| KIT #: | 4030 |
| PRICE: |
£6 |
| DECALS: | Six options |
| REVIEWER: | Carmel J. Attard |
| NOTES: |
| HISTORY |
The BI-M2 series of rocket
aircraft is good indication of interest in the technology shown by Russian
scientists for making rocket-powered flights. Soviet Defence Committee issued a
specification for an interceptor fighter and out of three designs the BI-1 was
selected with the BI-1 team receiving a go-ahead for five prototype aircraft in
July 1941. The first aircraft had been built in span of 40 days but rapid
progress was hindered due to advancing German army, which led to the evacuation
of the factory and which was moved further east.
The first ground running of a D-1A rocket engine installed inside a BI
prototype was made in April 1942. Test pilot Boris Kudrin had however been
injured due to an explosion of a D-1A. Further flight testing were primarily in
the hands
 of
former Soviet Air Force pilot Grigor Bakhchivandzhi enabling the first power
flight to take place on 15th of May 1942. This put the BI firmly into
contemporary status with the German Me-163 Komet rocket fighter which was also
under rapid development at the same time.
of
former Soviet Air Force pilot Grigor Bakhchivandzhi enabling the first power
flight to take place on 15th of May 1942. This put the BI firmly into
contemporary status with the German Me-163 Komet rocket fighter which was also
under rapid development at the same time.
 Using the
next four aircraft, more tests were undertaken to control the instability and
also increase the low endurance time of only 8 minutes. Aircraft No6 was fitted
initially with wing-tip fuel tanks and then with small jet engine at each wing
tip being designated BI-M2 but the Dushkin D-1a engine never achieved its
promised potential. With the jet engine increase in popularity the rocket power
BI-1 was abandoned with 20 airframes left uncompleted. In terms of construction
the BI was a very small, lightweight fighter. Some but not all of the prototypes
were armed with two 20mm ShVAK cannons being mounted in the forward fuselage
ahead of the cockpit. The fully loaded prototype weighed a mere 1683 Kg.
Using the
next four aircraft, more tests were undertaken to control the instability and
also increase the low endurance time of only 8 minutes. Aircraft No6 was fitted
initially with wing-tip fuel tanks and then with small jet engine at each wing
tip being designated BI-M2 but the Dushkin D-1a engine never achieved its
promised potential. With the jet engine increase in popularity the rocket power
BI-1 was abandoned with 20 airframes left uncompleted. In terms of construction
the BI was a very small, lightweight fighter. Some but not all of the prototypes
were armed with two 20mm ShVAK cannons being mounted in the forward fuselage
ahead of the cockpit. The fully loaded prototype weighed a mere 1683 Kg.
Had it been successful the BI
would have been used as a home defence fighter in role of protecting local
assets such as power stations, factories, dams etc. But was never to be used as
dogfight aircraft in view of its limited endurance.
| THE KIT |
The model comes as two complete
kit packs that come in separate Plastic bags with a header card strapped to
them. There are 36 parts injection moulded in mid grey plastic all stuck to a
thick sprue. A transparent canopy
of rather thick and poor quality is also included. The kit contains alternative
parts so that the rocket prototype fighter can be built with Skis or wheels
undercarriage. The first one to fly was ski equipped. There is a decal sheet to
cater for the two models.
The kit I bought from e-bay came
under the Pioneer 2 brand name but I noted that Eastern Express and Zlinek also
issued the very same kit except for different decals. The two models with their
tail numbers 3
 and 6
are depicted in a black and white sketch shown flying in wide formation. A clear
printed instruction sheet covers stages of construction to produce a prototype
powered by a single inboard rocket engine or an alternative version having wing
tip mounted engine pods. In fact three options are offered from these two kits,
one having side mounted rocket fairings at the aft side of fuselage. There are
colour detail drawings for two options. As mentioned earlier the kit has extra
parts and these enable to build the second, third and 6th prototype.
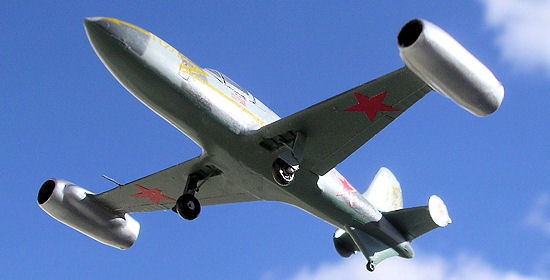
The wing tip mounted ramjets installed are intended for the 6th
prototype. Parts that you have to provide are tail support struts and retraction
arms for the main undercarriage leg. Different lengths for these in ‘mm’ are
given so that they are shaped from stretch sprue. 9mm long nose mounted guns are
also to be provided. Additional booster fairings mounted either side of the
fuselage if it is desired to make a kit which had these fittings added. The
decal sheet has a selection of numbers and stars.
and 6
are depicted in a black and white sketch shown flying in wide formation. A clear
printed instruction sheet covers stages of construction to produce a prototype
powered by a single inboard rocket engine or an alternative version having wing
tip mounted engine pods. In fact three options are offered from these two kits,
one having side mounted rocket fairings at the aft side of fuselage. There are
colour detail drawings for two options. As mentioned earlier the kit has extra
parts and these enable to build the second, third and 6th prototype.
The wing tip mounted ramjets installed are intended for the 6th
prototype. Parts that you have to provide are tail support struts and retraction
arms for the main undercarriage leg. Different lengths for these in ‘mm’ are
given so that they are shaped from stretch sprue. 9mm long nose mounted guns are
also to be provided. Additional booster fairings mounted either side of the
fuselage if it is desired to make a kit which had these fittings added. The
decal sheet has a selection of numbers and stars.
| CONSTRUCTION |
 The kits
can be built straight from the box to represent the prototypes early and late
production types. The kit offering of cockpit detail was a good start and
delicate paintwork of interior medium grey with light tan seat cushions, black
instrument panel with white dials and side console detail. All the cockpit
detail parts, which are all to be mounted on a floor frame, are attached to the
right hand side of the fuselage. These include the seat attached to the rear
bulkhead, rudder bars, instrument panel, and control stick. The kit has moulded
details on the cockpit side’s walls. Seat straps made from masking tape were
added after all interior parts were painted. The kit lacks locating pins and so
care was required when closing the fuselage parts together. A dry fit will show
that the rear bulkhead requires a little sanding at the edge to allow complete
closing of the fuselage halves that were then sealed with Humbrol liquid cement.
A little filler is required to the upper seam area and to the leading edge of
fin. Since I was building the 3rd prototype, which carried two nose
guns, I drilled two holes where these are located using a 1mm drill. Then fitted
two hollow needles to represent the nose mounted lethal weapons. A gun camera
fairing is also added to top of nose shaped from a piece of scrap plastic.
The kits
can be built straight from the box to represent the prototypes early and late
production types. The kit offering of cockpit detail was a good start and
delicate paintwork of interior medium grey with light tan seat cushions, black
instrument panel with white dials and side console detail. All the cockpit
detail parts, which are all to be mounted on a floor frame, are attached to the
right hand side of the fuselage. These include the seat attached to the rear
bulkhead, rudder bars, instrument panel, and control stick. The kit has moulded
details on the cockpit side’s walls. Seat straps made from masking tape were
added after all interior parts were painted. The kit lacks locating pins and so
care was required when closing the fuselage parts together. A dry fit will show
that the rear bulkhead requires a little sanding at the edge to allow complete
closing of the fuselage halves that were then sealed with Humbrol liquid cement.
A little filler is required to the upper seam area and to the leading edge of
fin. Since I was building the 3rd prototype, which carried two nose
guns, I drilled two holes where these are located using a 1mm drill. Then fitted
two hollow needles to represent the nose mounted lethal weapons. A gun camera
fairing is also added to top of nose shaped from a piece of scrap plastic.
Next was fitting the wings, these
were aligned and slotted in the fuselage checking for the correct slight
dihedral and ensuring it is retained while the glue set. The fuselage joint
still required some filler. The two bumps on the wing roots were removed on the
early prototype. The one-piece tail plane was inserted in the tail base slot and
again requiring a little filler and the tail plane round fins were inserted
later. One of the undercarriage legs was missing which I had to build from a
piece of stretch sprue pieces of different thickness and the retraction links
added after the legs were fixed in place. The rear undercarriage fairing, which
had a rounded edge, was then replaced with a triangular one also provided in two
parts glued together. Beneath the fuselage I added two ski simulator items made
from scrap plastic filed to same shape as the skis. The skis were finally added
to the wing legs and a smaller ski attached to the tail bracket. The clear
canopy was much improved in appearance once dipped and cured in Klear liquid’
which was finally fixed in place.
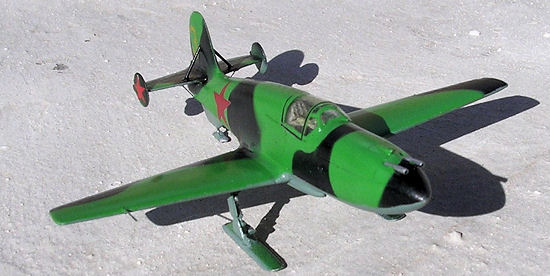
 The
second BI kit was fashioned to represent the 6th prototype. This
involved removing the root bulged fairings on the undersides. Some areas on the
fuselage and wings had sink marks, which were filled, with a little filler.
Bracing wire on tail unit was not added, the fuselage rocket orifice was blanked
and a pointed tail end was inserted. For this detail I had to refer to
The
second BI kit was fashioned to represent the 6th prototype. This
involved removing the root bulged fairings on the undersides. Some areas on the
fuselage and wings had sink marks, which were filled, with a little filler.
Bracing wire on tail unit was not added, the fuselage rocket orifice was blanked
and a pointed tail end was inserted. For this detail I had to refer to
| COLORS & MARKINGS |
 Colour
detail plan views are provided for reference. These were checked and found to be
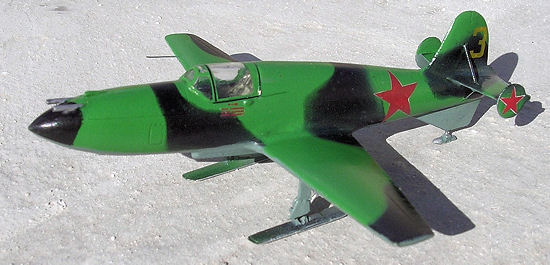
accurate. The 3rd prototype was finished in grass green with black
disruptive camouflage upper and Russian light blue grey underside. The 6th
prototype was light grey and medium grey disruptive camouflage to upper surface
and blue grey undersides. Decals were very thin and also fragile and while I
used stars from other kits for the first kit, I made an effort to handle the
decals for the second kit with lots of care. The 6th prototype had a
yellow flash running the length of fuselage and some legend in Russian, which I
could not discern what was written. I did not use the yellow outline stars but
resorted to the more standard white outline stars to conform to the reference
material I had. Had the Gwardija used the type the stars would carry a yellow
outlines.
Colour
detail plan views are provided for reference. These were checked and found to be
accurate. The 3rd prototype was finished in grass green with black
disruptive camouflage upper and Russian light blue grey underside. The 6th
prototype was light grey and medium grey disruptive camouflage to upper surface
and blue grey undersides. Decals were very thin and also fragile and while I
used stars from other kits for the first kit, I made an effort to handle the
decals for the second kit with lots of care. The 6th prototype had a
yellow flash running the length of fuselage and some legend in Russian, which I
could not discern what was written. I did not use the yellow outline stars but
resorted to the more standard white outline stars to conform to the reference
material I had. Had the Gwardija used the type the stars would carry a yellow
outlines.
| CONCLUSIONS |
 The
finished models appear to capture the lines and perfect nose shape of the BIs
prototypes. At a quick glance the finish also looked smooth after a coat of
Klear followed by another airbrush coat of transparent Alclad 2 Lacquers gave
the models a light sheen. At a glance the kits appeared to be a straightforward
job but looking hindsight these proved to involve a lot more work and in great
need for good reference material to build the two kits as accurate as possible.
I recommend these kits to any modeller seeking early rocket planes. In fact
these were the first
The
finished models appear to capture the lines and perfect nose shape of the BIs
prototypes. At a quick glance the finish also looked smooth after a coat of
Klear followed by another airbrush coat of transparent Alclad 2 Lacquers gave
the models a light sheen. At a glance the kits appeared to be a straightforward
job but looking hindsight these proved to involve a lot more work and in great
need for good reference material to build the two kits as accurate as possible.
I recommend these kits to any modeller seeking early rocket planes. In fact
these were the first
December 2012
If you would like your product reviewed fairly and fairly quickly, please contact the editor or see other details in the Note to Contributors.