| KIT #: | L48007 |
| PRICE: | $81.00 SRP |
| DECALS: | Two options |
| REVIEWER: | Scott Lyle |
| NOTES: |
| HISTORY |
The
Douglas TBD Devastator is probably best known for being something of a
sacrificial lamb during the Battle of Midway, but the tale of the TBD goes
deeper than that.
One of the most advanced aircraft in the world when it
entered service in 1937, the Devastator was the Navy’s first all-metal
monoplane, first aircraft with a totally enclosed cockpit, first aircraft with
hydraulically-powered folding wings, and even its first aircraft with brakes on
its main landing gear.
The Devastator began life in June
1934 when the Navy Bureau of Aeronautics issued a request for proposals for a
new aircraft to replace its aging Martin BM-2 and Great Lakes TG-2 biplane
torpedo bombers.
The new bomber was to be able to carry a torpedo or up to 1,500
pounds of bombs, and it was to be powered by the new Pratt & Whitney XR-1830-60
radial engine.
Proposals from Douglas and Great Lakes were soon submitted to the
Navy.
The Great Lakes aircraft was a traditional biplane design while the
 Douglas
design was extremely modern - an all-metal monoplane with a low wing,
fabric-covered control surfaces, and hydraulically-powered folding outer wings.
After testing both types, the Douglas XTBD-1 prototype
was chosen the winner of the competition.
Production ultimately began in February 1936.
Douglas
design was extremely modern - an all-metal monoplane with a low wing,
fabric-covered control surfaces, and hydraulically-powered folding outer wings.
After testing both types, the Douglas XTBD-1 prototype
was chosen the winner of the competition.
Production ultimately began in February 1936.
Entering service in 1937, the TBD
first filled out VT-3 aboard the USS Saratoga.
With its full complement of 18 aircraft (numbered 3-T-1
through 3-T-18), the squadron conducted the first in-service testing of the
aircraft.
Later VT-2 went aboard the USS Lexington, followed by VT-5 aboard
the USS Yorktown, VT-8 aboard the USS Hornet, VT-6 aboard the USS Enterprise,
and VT-4 with the USS Ranger in the Atlantic.
When war broke out in Europe VT-7 was formed aboard the
USS Wasp.
After Pearl Harbor the Navy went on
the offensive and the TBD’s first taste of combat was in raids against Japanese
bases on Kwajalein, Jaluit, Taroa, as well as bases in the Marshall and Gilbert
Island chains.
Problems were soon discovered with the Mk. XIII torpedoes – in
short their performance was awful.
To be successfully air-launched the torpedo had to be
dropped within 100 feet of the surface at a speed of less than 120 mph.
Even when these conditions were met the torpedo seldom
ran true; often it broke up on the surface or dove straight towards the bottom.
On top of that the overall performance of the TBD was
beginning to show its limitations.
Its short range and slow speed were proving to be
serious detriments, and it had yet to face determined enemy fighters.
The Battle of the Coral Sea in
early May 1942 was the most successful action of the TBDs of the war.
Used properly in concert with SBD Dauntlesses and F4F
Wildcats, TBDs from VT-2 and VT-5 scored several torpedo hits and helped sink
the Japanese light carrier Shoho and damage the fleet carrier Shokaku.
It was the Battle of Midway however that would be the
closing chapter in the TBD’s story.
 An overwhelming victory for the US
Navy, the Battle of Midway was a catastrophe for the Devastator and its crews.
Three US carriers participated in the battle, armed with
Devastator wings VT-6 from the USS Enterprise, VT-8 from the USS Hornet, and
VT-3 from the USS Yorktown.
Without sufficient fighter cover and attacking the enemy
carriers alone, the TBDs were so badly mauled that of the 41 TBDs launched from
the three carriers, only six made it back.
But by drawing the Japanese Zeros down to their level,
the TBDs freed up their colleagues in the SBDs to wreak havoc, which is
precisely what they did.
Four Japanese fleet carriers were sunk by those
aircrews, and in the process the tide in the Pacific was turned in favor of the
Americans.
An overwhelming victory for the US
Navy, the Battle of Midway was a catastrophe for the Devastator and its crews.
Three US carriers participated in the battle, armed with
Devastator wings VT-6 from the USS Enterprise, VT-8 from the USS Hornet, and
VT-3 from the USS Yorktown.
Without sufficient fighter cover and attacking the enemy
carriers alone, the TBDs were so badly mauled that of the 41 TBDs launched from
the three carriers, only six made it back.
But by drawing the Japanese Zeros down to their level,
the TBDs freed up their colleagues in the SBDs to wreak havoc, which is
precisely what they did.
Four Japanese fleet carriers were sunk by those
aircrews, and in the process the tide in the Pacific was turned in favor of the
Americans.
While Midway was a conclusive
American victory, the fighting days of the TBD were over.
The surviving aircraft were withdrawn from duty –
somewhat of a foregone conclusion given that the new Grumman TBF Avenger was
beginning to arrive in numbers.
In training and testing capacities the Devastator
remained in service until November 1944 when the last one was phased out of the
Navy.
Such was the pace of aeronautical development that in just six years the
TBD had gone from being the most advanced naval aircraft in the world to being
utterly obsolete.
One of the most well-known pilots
of the ill-fated action during Midway was Lt. Commander John Waldron, the
squadron commander of VT-8 aboard USS Hornet.
On the eve of the battle he met with his squadron-mates
and told them that if worst came to worst, he wanted every man to do his utmost
to attack his target.
“If there is only one plane left to make a final run-in,
I want that man to go in and get a hit.
May God be with us all.
Good luck, happy landings, and give’em hell.”
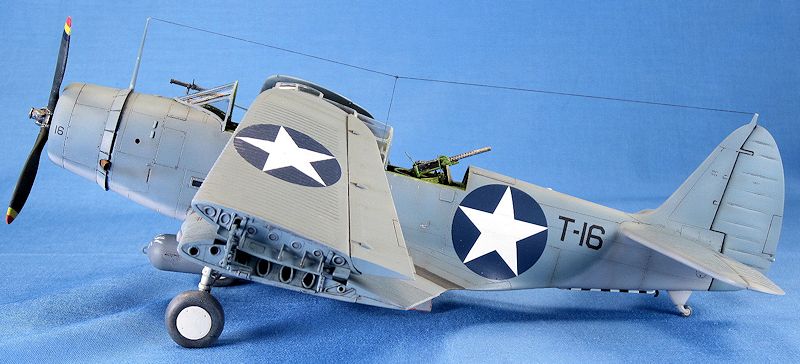
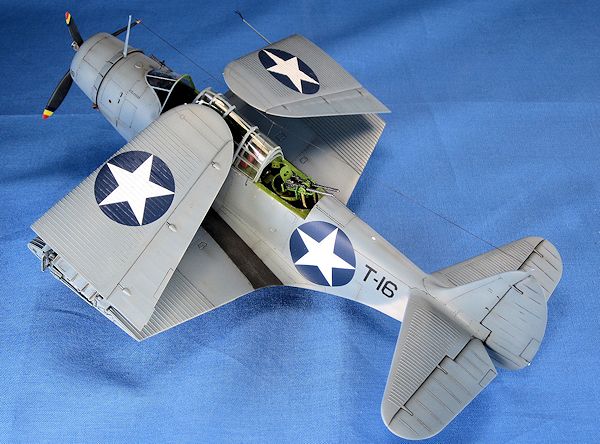
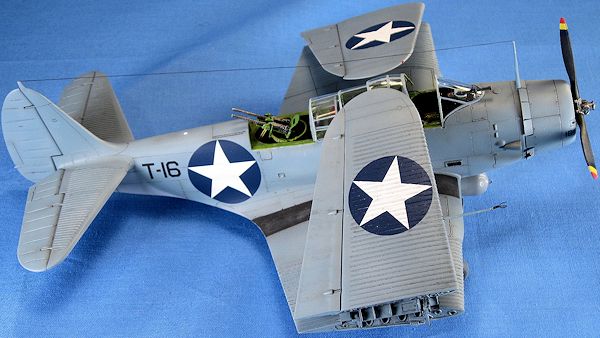
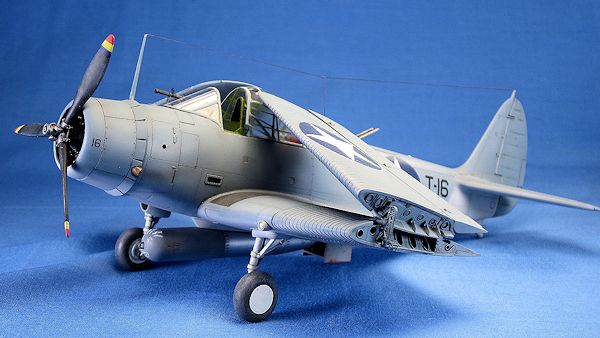
The kit provides decals for the TBD he flew on the day
of the battle, BuNo#1506, Black T-16, so I decided to model that aircraft.
| THE KIT |
The quality of the molding is
superb.
The recessed panel lines are very precise with rows of tiny rivet heads,
and the amount of detail provided for the interior is excellent.
The engine is a small kit in and
 of itself,
made up of ten parts including a photo etch wiring harness.
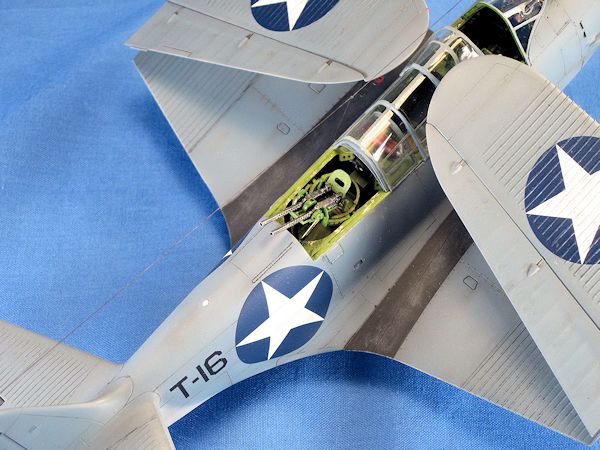
Options include modeling the cowling flaps open or
closed, posing the bombardier’s viewing hatch open or closed, posing the various
canopy sections open or closed, and mounting the wings in their open or folded
position.
Two torpedoes are provided, as is the option to mount it or bomb
racks on the bottom of the aircraft (though no bombs are provided).
The dual 0.30” caliber machine gun mount for Midway VT-8
aircraft is provided, though a single mount option is not.
The decals provide markings for the VT-8 TBDs of Ensign
George Gay, one of the few survivors of the battle, and Lt. Commander Waldron.
of itself,
made up of ten parts including a photo etch wiring harness.
Options include modeling the cowling flaps open or
closed, posing the bombardier’s viewing hatch open or closed, posing the various
canopy sections open or closed, and mounting the wings in their open or folded
position.
Two torpedoes are provided, as is the option to mount it or bomb
racks on the bottom of the aircraft (though no bombs are provided).
The dual 0.30” caliber machine gun mount for Midway VT-8
aircraft is provided, though a single mount option is not.
The decals provide markings for the VT-8 TBDs of Ensign
George Gay, one of the few survivors of the battle, and Lt. Commander Waldron.
The model has been well reviewed by
modelers on this website.
In particular I read and took to heart the build reviews
of Tom Cleaver and Ken Freundt, who both pointed out that there are some issues
with the kit to watch out for.
To summarize their findings, the clear plastic canopy
parts are too thick to be “stacked” in their open position and thus a Squadron
replacement canopy is good choice if you want to display the cockpit open.
The kit’s masks are too thick to conform to the curves
of the canopy sections and thus cannot be used.
Mounting the bombardier doors closed is easier if some
backing strips are glued in place – and if the torpedo is to be mounted
underneath the doors can’t open anyway so closed it will be.
The landing gear are molded in their “fully extended”
position, thus causing the model to sit a bit too high.
None of these
issues are insurmountable, but it is handy to know about them before proceeding.
To help with the build I purchased
the aforementioned Squadron Canopy set (#9615) and an Eduard Mask set (#EX354),
and eagerly got to work.
| CONSTRUCTION |
 bombardier’s
window doors in position, the fit of which was perfect.
When those were set I glued the fuselage halves
together.
I had to trim the engine firewall bulkhead a little, but the fit
of the halves was otherwise good and the seams only required a little filing and
filling.
bombardier’s
window doors in position, the fit of which was perfect.
When those were set I glued the fuselage halves
together.
I had to trim the engine firewall bulkhead a little, but the fit
of the halves was otherwise good and the seams only required a little filing and
filling.
With that done I turned my
attention to the wings.
I first glued the lower center section in place; it fit
perfectly.
Once it was set I glued the upper inner wing sections onto the
lower section.
The ribs that represent the TBD’s distinctive corrugated skin
wrap around to the underside, setting up an annoying seam between the upper and
lower wing halves.
Luckily the ribs line up perfectly, so I only had to
spend a little time scraping between the ribs on the leading edges to remove the
seam.
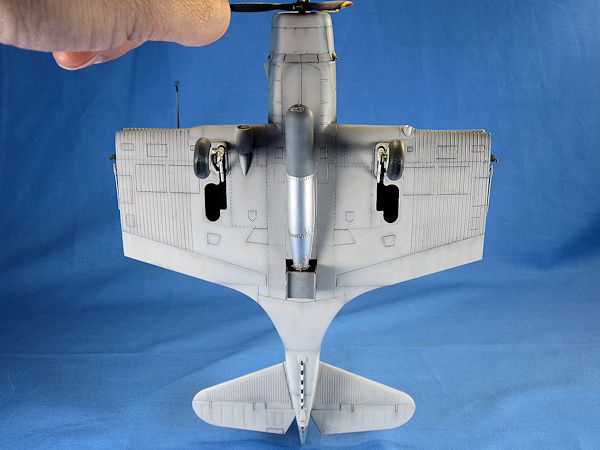
While working on the wings I came across one rather annoying shortfall
of the kit – a complete lack of wheel well detail.
There are no parts for sidewalls or other details at
all, just the smooth surfaces of the undersides of the upper wings.
I added some small ribs from plastic card to dress the
area up a bit.
My additions are probably not accurate in the least, but they
look better than nothing.
At this point you need to decide if
you’re going to build the TBD with its wings folded or extended.
I opted for the former, so I glued the “end caps” of the
wings in position next.
The end caps feature what looked to me like lightning
holes that I thought should be hollowed out, and a close-up in my Squadron
reference shows the large open holes with cables passing through them – or so I
thought!
Thinking I was being clever, I started using my Dremel to open the holes
up when it dawned on me I should look at my references more closely.
Sure enough, the close-up photo must have been of a
prototype because all of the other photos of various TBDs show no holes at all!
I patched up my damage with plastic card and moved on,
chastened but wiser as they say.
The outer wings were assembled next
without any issue, and then I glued on the horizontal tail planes.
The fit here required a little bit of Mr. Surfacer 500,
which I applied using a new method.
My old method was to dab it on to the seam with a small
brush, let it dry, and then sand it down.
My new method is to dab it on to the seam with a small
brush and then wipe the excess away with a Q-Tip soaked in lacquer thinner.
This
method leaves the putty only in the seam and requires no further sanding.
I wish I’d thought of this about 30 sets of wings roots
ago.
Next up was the engine assembly,
and Great Wall have provided a highly detailed replica of the Pratt & Whitney
engine.
I assembled the two banks of cylinders and gave them a base coat of
Vallejo Black Gray.
Once that was dry I dry-brushed them using Testors Steel
to make the detail stand out.
The photo etch wiring harness was added next and painted
Flat Black, followed by the front hub of the engine, which I painted Vallejo
Neutral Gray.
A dark wash was added next, and then I picked out some of the
details using Testors Aluminum.
I assembled the completed engine and exhaust piping to
the fuselage, and then added the engine cowling flaps (in the open position) and
the cowling itself, both of which fit solidly.
 At this point the major
subassemblies were complete and it was time to work on the canopy.
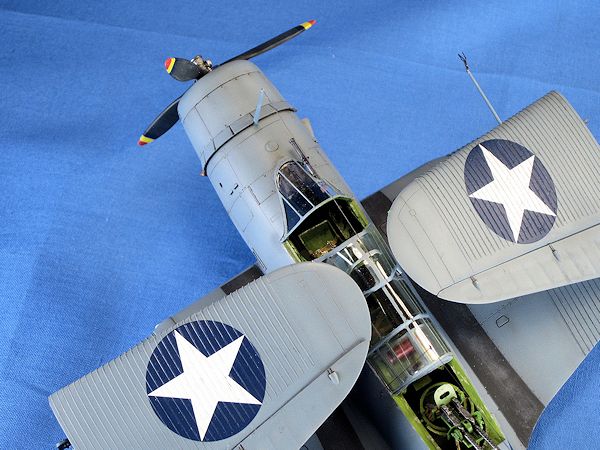
The TBD has six canopy sections that slide under and
over themselves in various positions, and as pointed out by other modelers, the
kit’s parts are too thick and thus cannot be used if you wish to pose some of
them in the open position.
I had purchased the Squadron replacement canopy, so my
first step was to trim the new canopy and separate it into the various sections
that I wanted to show open.
Next I applied the Eduard masks to the various sections.
They didn’t fit as well as I hoped, so I had to add some
Tamiya masking tape here and there, making this a painstaking process.
I then glued the front windscreen and middle canopy
sections in place using some Testors Clear Cement.
I masked off the engine and open canopy areas and with
that, it was time to head to the paint booth.
At this point the major
subassemblies were complete and it was time to work on the canopy.
The TBD has six canopy sections that slide under and
over themselves in various positions, and as pointed out by other modelers, the
kit’s parts are too thick and thus cannot be used if you wish to pose some of
them in the open position.
I had purchased the Squadron replacement canopy, so my
first step was to trim the new canopy and separate it into the various sections
that I wanted to show open.
Next I applied the Eduard masks to the various sections.
They didn’t fit as well as I hoped, so I had to add some
Tamiya masking tape here and there, making this a painstaking process.
I then glued the front windscreen and middle canopy
sections in place using some Testors Clear Cement.
I masked off the engine and open canopy areas and with
that, it was time to head to the paint booth.
| COLORS & MARKINGS |
My first painting step was to spray the canopy
sections Interior Green to replicate the inside of the canopy framing.
That was followed up with a coat of Tamiya Surface
Primer, which as usual revealed a few seam areas that needed a little more
attention.
I next preshaded all of the panel lines using Testors Enamel
Panzer Schwarzgrau, a suitably dark gray that I had on hand.
The first color to go on was the light gray on the
undersides, and for that I made a roughly 1:1 mix of Tamiya XF-19 Sky Grey and
XF-2 Flat White.
I sprayed it on in thin coats to let some of the pre-shading show
through.
I next sprayed some Tamiya XF-69 NATO Black on the upper wing roots to
replicate the walk ways.
Once they were dry I masked them and then made a roughly
2:1 mix of Tamiya XF-18 Medium Blue and XF-2 Flat White for the upper surfaces.
This was also sprayed on in light coats, leaving a bit
of a splotchy and weathered look that I liked.
I let that dry for a night and then airbrushed a coat of
Future over the whole model to create a glossy surface for the decals and the
panel line wash.
After letting the Future cure for
48 hours I applied the kit’s decals.
I had doubts that the large star insignia on both sides
of the wingtips would conform over all of the corrugations, even with liberal
applications of Walthers Solvaset decal solution.
As it turned out my doubts proved to be true.
Large
 bubbles
developed and had to lance them a couple of times and apply more Solvaset to get
them to lie flat.
bubbles
developed and had to lance them a couple of times and apply more Solvaset to get
them to lie flat.
I airbrushed another coat of Future
over the decals to seal them, and then after waiting 48 hours I applied MIG
Productions Dark Wash to all of the recessed panel lines, wiping any excess off
with a lint-free cloth.
Up next I airbrushed a few light coats of Testors Flat
Finish (Lacquer based) over the whole model to remove the gloss finish.
I then made a very dilute mix of 50/50 Tamiya XF-1
Black/XF-64 Red Brown and lightly sprayed it over panel lines and exhausts – any
place that needed some subtle weathering and streaking.
It’s an effect I really like but it has to be kept
subtle.
With the painting steps now
complete it was time to focus on the remaining items.
Up first I removed the masks from the canopy sections,
and was happy to see that no paint seeped under the masks.
I then glued them all in place.
The Squadron sections work very well – they’re so thin
that with a little bit of careful trimming they can be nicely slid under and
over each other, just like the real things.
The next addition to the interior
was the rear machine guns.
I painted them Vallejo Black Gray and then dry-brushed
them with Testors Steel before assembling them to their carriage and attaching
them to the gunner’s seat.
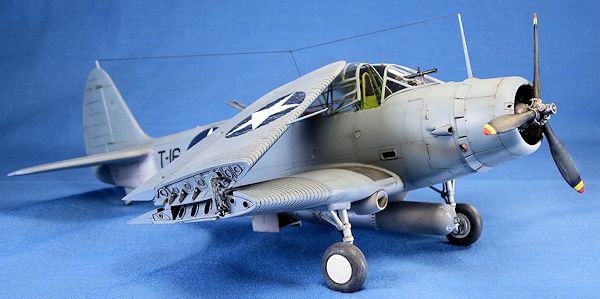
The landing gear have brake lines
already molded on to them – the first time I’ve seen that in a kit.
Having read that they are molded in their “fully
extended” position I performed some surgery on them.
The oleos are about 7mm long – I cut about 2mm out and
then reassembled them and then painted the struts Testors Light Gray and the
oleos Testors Chrome.
The wheel hubs were also painted Light Gray, with the
tires and brake lines Vallejo Black Grey.
 The prop was also painted Vallejo
Black Gray and the hub was dry-brushed Testors Steel.
The blade tips were sprayed navy blue, red, and yellow;
I masked each color off as I went.
The prop was also painted Vallejo
Black Gray and the hub was dry-brushed Testors Steel.
The blade tips were sprayed navy blue, red, and yellow;
I masked each color off as I went.
Great Wall provides two torpedoes
that are the same size but have different prop arrangements.
One has parts for a plywood box that was added sometime
before Midway to make the torpedoes run better.
I decided to build both, mount the one with the plywood
box to the model, and save the other for use later.
Both were sprayed with Tamiya Surface Primer and then
preshaded with Tamiya XF-69 NATO Black.
I sprayed the rear surfaces Testors Chrome Silver while
the forward surfaces were sprayed Tamiya XF-54 Dark Sea Gray.
I weathered them by washing their panel lines with MIG
Productions Dark Wash.
Color wartime photos show funny faces chalked onto the
front of these torpedoes, so I tried to replicate that with white crayon.
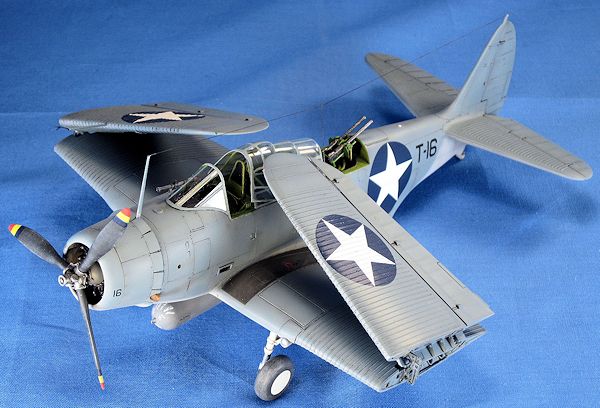
With that the model was down to the
final details.
The wingtip lights were painted and the wings were mounted in
their folded position.
The mast was added, and I used EZ Line for the antenna.
After a few touch ups of Vallejo Flat Finish to remove
the gloss of the CA glue I used on the EZ Line, the model was done.
| CONCLUSIONS |
 I really enjoyed building Great Wall’s TBD.
The surface detail is beautifully done, the overall
level of detail is excellent, and the fit of the parts is superb.
I particularly enjoyed building the interior as I am a
fan of bomber interiors in general and there was a lot more going on inside the
TBD then I had originally thought.
I really enjoyed building Great Wall’s TBD.
The surface detail is beautifully done, the overall
level of detail is excellent, and the fit of the parts is superb.
I particularly enjoyed building the interior as I am a
fan of bomber interiors in general and there was a lot more going on inside the
TBD then I had originally thought.
I agree with the issues with the
kit that have been identified by other builders, but those issues are minor and
given how many options Great Wall gives you, this is an excellent model.
I’ve never built the older Monogram kit so I don’t know
how the two compare, but I recommend this kit to all modelers, and I look
forward to what else Great Wall has in store for us.
| REFERENCES |
-
Squadron/Signal Publications, Aircraft in Action
#97, “TBD Devastator in Action”
- Wikipedia, the Online Encyclopedia
July 2013
If you would like your product reviewed fairly and fairly quickly, please contact the editor or see other details in the Note to Contributors.