| KIT #: | L4807 |
| PRICE: | £43.99 (approx. $70.99) |
| DECALS: | Two options |
| REVIEWER: | Ken Freundt |
| NOTES: |
Long awaited upgrade from the Monogram kit. |
| HISTORY |
 order
of 15 TBD-1s (BuNo 1505 through 1519) with final delivery in November 1937.
When entering service the TBD would be popular with pilots and the 1939
graduating class at Pensacola would overwhelmingly select it as their preferred
choice of types to fly. The Devastator would not be without its vices however.
The hydraulic wing fold mechanism was underpowered and on windy carrier decks
manual assistance from deckhands would be required to fold or unfold them before
going below to the hanger deck. Pilots on occasion neglected to engage the
locking pins, an instance that resulted in fatalities.
order
of 15 TBD-1s (BuNo 1505 through 1519) with final delivery in November 1937.
When entering service the TBD would be popular with pilots and the 1939
graduating class at Pensacola would overwhelmingly select it as their preferred
choice of types to fly. The Devastator would not be without its vices however.
The hydraulic wing fold mechanism was underpowered and on windy carrier decks
manual assistance from deckhands would be required to fold or unfold them before
going below to the hanger deck. Pilots on occasion neglected to engage the
locking pins, an instance that resulted in fatalities.
For its flying qualities it was not the most powerful aircraft. But perhaps the biggest factor against the TBD was its principal armament. The TBD was a multi task aircraft and had fittings to carry up to a 1500 lb. load of bombs but the Bliss-Leavitt Mk. XIII torpedo was prone to failure. The prototype TBD would become a workhorse for improvements of the Mk. XIII but it would never achieve satisfactory performance and Grumman’s TBF Avenger (the TBD’s replacement) would perform its missions with bombs more often that with torpedoes. And at the pace of aircraft development went in the years leading up to the Second World War, the Devastator would be outclassed by the opposition. Following the decimation of the TBD air fleet at Midway, some 35 surviving Devastators would soldier on as advanced trainers with the exception of eight which served anti-submarine patrol duties with Torpedo 4 on U.S.S. Ranger. They would be withdrawn from front line service in August 1942. But for its brief front line service the TBD served crews well in the early carrier raids in 1942 as well as at the Battle of Coral Sea. In the end, all would be scrapped by November 1944 and the only remaining examples are silently corroding away in the ocean around Florida and far flung islands in the south Pacific.
| THE KIT |
 Monogram released their 1/48 scale TBD-1
Devastator in 1974 and it was a pretty respectable model in the day. The
toy-like features were minimalized with just the operating folding wings and it
featured a relatively well detailed cockpit. But the kit has a few inaccuracies
and the molds did not hold up well over time. It also has wing fit issues and
one of the biggest factors in making the kit a perennial closet sitter is
dealing with the gaps as well as the leading edges. It was a subject that was
coming due for a rework by a kit manufacturer and I had hopes that it would be a
subject Accurate Miniatures would tackle in time. I don’t know if they ever
considered it but as we know it would have never come to fruition anyway. The
announcement by Great Wall Hobby that they were following up their P-61 kit with
a TBD came as a surprise to me and it
didn’t feel like it took them long to develop the kit before it went to market.
Monogram released their 1/48 scale TBD-1
Devastator in 1974 and it was a pretty respectable model in the day. The
toy-like features were minimalized with just the operating folding wings and it
featured a relatively well detailed cockpit. But the kit has a few inaccuracies
and the molds did not hold up well over time. It also has wing fit issues and
one of the biggest factors in making the kit a perennial closet sitter is
dealing with the gaps as well as the leading edges. It was a subject that was
coming due for a rework by a kit manufacturer and I had hopes that it would be a
subject Accurate Miniatures would tackle in time. I don’t know if they ever
considered it but as we know it would have never come to fruition anyway. The
announcement by Great Wall Hobby that they were following up their P-61 kit with
a TBD came as a surprise to me and it
didn’t feel like it took them long to develop the kit before it went to market.
The
difference between the kits is night & day. GWH not only took care of the fit
issues but cleaned up some of the inaccuracies with the Monogram kit as well.
And the level of detailing is comparable to the latest releases we modelers have
come to expect. Much of the detailing is provided by 2 photo etch frets and the
wing fold hinges (which I chose to do without), although oversized, are cast in
white metal which would resolve any strength issues. However, the kit is not
without its inaccuracies. Others have noted the raised ribs on the horizontal
tail surfaces are too long (which I did not address on this build). And on an
initial examination of the parts the foot steps on the fuselage are an easily
noted flaw. The TBD had spring
 loaded hinged covers here and they should not be
represented by holes. The canopy had a quite notable “pinch” at the top where
the peak should be rounder as noted in photos of the aircraft taken from astern.
The landing gear legs are also an issue. GWH molded them based on where they sit
when fully extended and if left uncorrected the plane would sit on the ground
way too high. It is nice if the modeler wants to build the kit in flight with
gear retracted (instructions provide for this) or on final approach but I
suspect that won’t happen too often. Another issue I came across is related to
this. The Midway plane used plywood “boxes” on the Mk. XIII to correct
directional instability and in dry fitting this with the gear legs corrected the
model sat on the fins instead of the 3 points of the landing gear.
loaded hinged covers here and they should not be
represented by holes. The canopy had a quite notable “pinch” at the top where
the peak should be rounder as noted in photos of the aircraft taken from astern.
The landing gear legs are also an issue. GWH molded them based on where they sit
when fully extended and if left uncorrected the plane would sit on the ground
way too high. It is nice if the modeler wants to build the kit in flight with
gear retracted (instructions provide for this) or on final approach but I
suspect that won’t happen too often. Another issue I came across is related to
this. The Midway plane used plywood “boxes” on the Mk. XIII to correct
directional instability and in dry fitting this with the gear legs corrected the
model sat on the fins instead of the 3 points of the landing gear.
| CONSTRUCTION |
Having built about a dozen of the
Monogram kits in recent years (and with more than 50 left in the stash) I looked
forward to tackling this. It came to me in the midst of my Build All the
Japanese Aircraft in the Stash theme build so it didn’t get the lion’s share of
the attention it deserved on the bench. It was my intent to build the kit
straight out of the box with all the issues intact, but as it went I couldn’t
help but make a few corrections along the way. This build began as unusual with
correcting the fuselage sides. I used strip styrene to fill the holes for the
footsteps and in doing this, it was not my intent to cover the holes instead of
filling them. The covers should still be there without sanding & filling to make
them go away altogether. THEN work started on the cockpit. I started as I
typically do with painting the parts on the sprue. Color photos of the interior
green used on the 1500 block TBDs show a rather oily looking dark green and I
mixed up a home brew of this with Model Master FS34095 and adding black until I
got the look I wanted. Much of the photo etch is used in the interior and this
includes brass seats and lap belts. Be aware that the shoulder harness didn’t
come into widespread use in the fleet until after Midway (the F4F-4 was fitted
with them and many were retrofitted) after overwhelming complaints from pilots
with blood streaming down their foreheads about catching a deck wire without
them. The Navy’s response was concern about the pilot being trapped after a
faulty launch and hence the delay in fitting them. There isn’t conclusive
evidence that the TBD was fitted with them. These will fit nicely in the spares
box for a future build. One of the anomalies
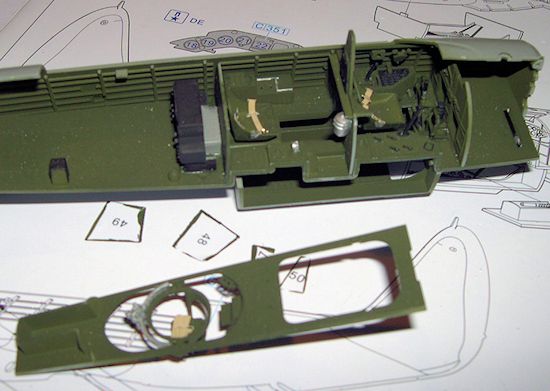 with the lit is the bombardier
doors. They were good enough to provide detailing for the inside in brass but
they only apply to the 1500 block TBDs. The earlier ones had lightening holes in
them. Also, the model is supposed to depict TBDs at Midway, when the torpedo was
used and the bombardier wasn’t assigned to the mission. Also note that the doors
do not clear the torpedo and would not be depicted open when armed. It wasn’t
long into this build when I found the sprue gates leading to the smaller parts
were too big and it was a simple thing to shatter the part when taking the part
off. The twin gun mount in particular caused some teeth gnashing as it shattered
into three parts. So to sum up, take care. Know it will be an issue going into
the build and if it looks like it might be an issue, act accordingly. One thing
of note is the mount on the gun ring. It goes on such a way that it doesn’t need
to be glued to the ring and when you get to final assembly you can move it into
a position that best fits the twin gun mount. And since these were not
retrofitted for long (likely for a week or less) there were no stowage doors and
the canopy was not closed over them. Another nice thing about the kit is the
instrument gauges are represented by individual decals, making for a very nice
finished panel. Another correction to the instructions would be the DF ring.
They were half black, half white with the break being vertical.
with the lit is the bombardier
doors. They were good enough to provide detailing for the inside in brass but
they only apply to the 1500 block TBDs. The earlier ones had lightening holes in
them. Also, the model is supposed to depict TBDs at Midway, when the torpedo was
used and the bombardier wasn’t assigned to the mission. Also note that the doors
do not clear the torpedo and would not be depicted open when armed. It wasn’t
long into this build when I found the sprue gates leading to the smaller parts
were too big and it was a simple thing to shatter the part when taking the part
off. The twin gun mount in particular caused some teeth gnashing as it shattered
into three parts. So to sum up, take care. Know it will be an issue going into
the build and if it looks like it might be an issue, act accordingly. One thing
of note is the mount on the gun ring. It goes on such a way that it doesn’t need
to be glued to the ring and when you get to final assembly you can move it into
a position that best fits the twin gun mount. And since these were not
retrofitted for long (likely for a week or less) there were no stowage doors and
the canopy was not closed over them. Another nice thing about the kit is the
instrument gauges are represented by individual decals, making for a very nice
finished panel. Another correction to the instructions would be the DF ring.
They were half black, half white with the break being vertical.
 proposition than directly on the peak of it. However, the
molding is crisp and the seam is a much tighter one than the Monogram kit and
after working with the older kit for so long, this one was a relative breeze to
sand. Having tried all the tricks I could imagine to do this, I found an answer
in using a sanding block with self adhesive sandpaper on it. Lynn Ritger
suggests a flat toothpick would do the job and I have no doubt it would. I have
been fortunate enough in having Gary Uhl send me aluminum sanding blocks he made
at work and one of them had a side on it that fits near perfectly between the
ribs on the leading edges. It takes time and is fiddly work as one slip rips
that raised rib off, so take care and be careful here as well. I have tried
cutting sandpaper to width and sanding the seam flat but the finished result
“dips” between the ribs and looks for all the world like tissue paper stretched
between the ribs on a stick & tissue balsa plane.
proposition than directly on the peak of it. However, the
molding is crisp and the seam is a much tighter one than the Monogram kit and
after working with the older kit for so long, this one was a relative breeze to
sand. Having tried all the tricks I could imagine to do this, I found an answer
in using a sanding block with self adhesive sandpaper on it. Lynn Ritger
suggests a flat toothpick would do the job and I have no doubt it would. I have
been fortunate enough in having Gary Uhl send me aluminum sanding blocks he made
at work and one of them had a side on it that fits near perfectly between the
ribs on the leading edges. It takes time and is fiddly work as one slip rips
that raised rib off, so take care and be careful here as well. I have tried
cutting sandpaper to width and sanding the seam flat but the finished result
“dips” between the ribs and looks for all the world like tissue paper stretched
between the ribs on a stick & tissue balsa plane.
Once the wings were done and fitted I
built the very nice representation of the engine. Be sure to ensure that all the
exhaust connections are good as any deviation here could result in the engine
sitting crooked in the cowl. The cowl and external details went on after this.
The oil cooler was one of the bright spots in the build as the Monogram kit
depicts this as too narrow and it’s a distinct feature of the TBD. I left off
the tail hook and propeller for after paint. I also dealt with the landing gear
issue at this time. As afore mentioned it’s molded too long and to resolve this
I took about ¾ of the inner compression shock off, reinforced it with a piece of
straight pin and glued it back together. It’s still a bit too long for a torpedo
load perhaps, but it looks a lot closer than without modification. While on the
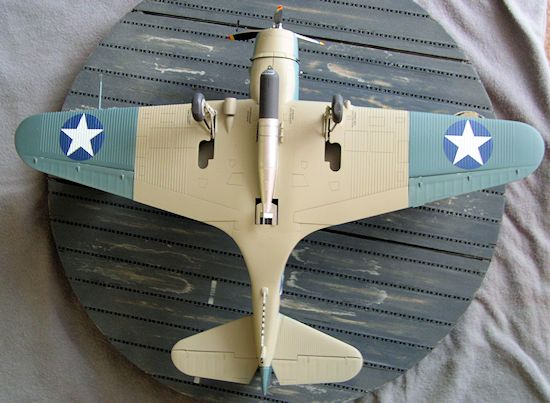
subject of landing gear, the “flattened” tires GWH provides are incorrect.
U.S.N. carrier aircraft tires are filled to high pressures to withstand the
shock of carrier landings and unless a tire got shot out, it wouldn’t be
flattened under load or otherwise. Flat spotted is more correct here than
bulged. I also made the canopy ready at this point. I resolved the problem with
the peaked top of the canopy as simply as I could-I used a Monogram canopy. The
three sections
 behind the sliding hood are GWH with the extra material cut off
with a razor saw but the hood, windscreen and gunner’s canopies are Monogram.
And happily enough, they fit without modification. Also be aware that the
“masks” provided in the kit will best serve you in the trash bin. Not a single
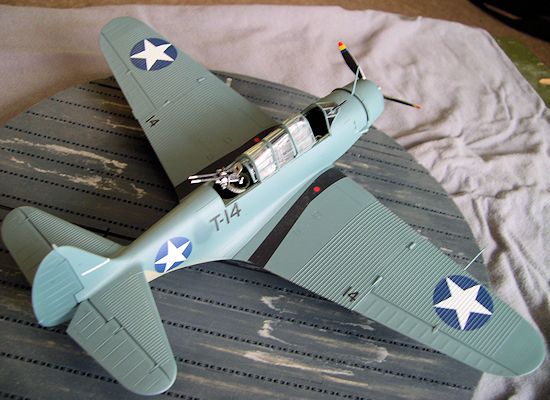
one fits and the odd layered paper-like material that they are cut from makes
the idea of using the star stencils on the corrugated wings inconceivable. They
will never conform. And the canopy masks themselves are too long and too narrow.
Even cutting them to fit doesn’t work. I used an old Black Magic mask set for
this build and was pleasantly surprised to find the vinyl didn’t shrink over
time.
behind the sliding hood are GWH with the extra material cut off
with a razor saw but the hood, windscreen and gunner’s canopies are Monogram.
And happily enough, they fit without modification. Also be aware that the
“masks” provided in the kit will best serve you in the trash bin. Not a single
one fits and the odd layered paper-like material that they are cut from makes
the idea of using the star stencils on the corrugated wings inconceivable. They
will never conform. And the canopy masks themselves are too long and too narrow.
Even cutting them to fit doesn’t work. I used an old Black Magic mask set for
this build and was pleasantly surprised to find the vinyl didn’t shrink over
time.
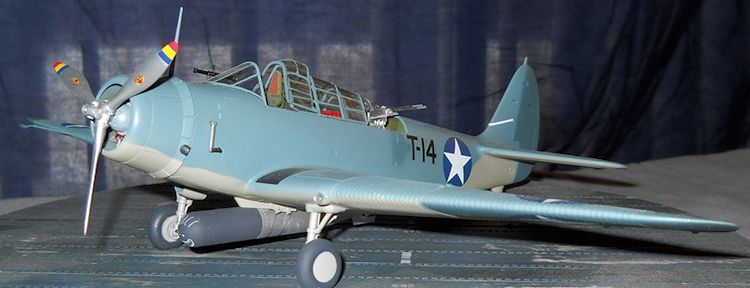
| COLORS & MARKINGS |
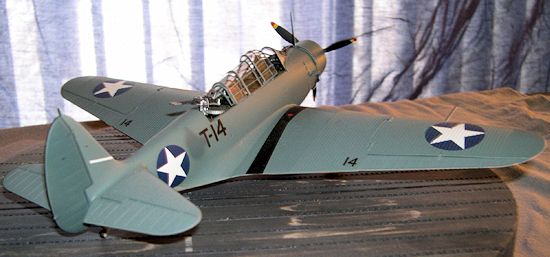
 white to the
Blue Gray to depict fade and age and sprayed the rest of the plane. The TBDs of
Torpedo 8 did not see the service other Devastators of the Pacific fleet did and
they didn’t show an excess of wear and tear. This is clear in photos taken just
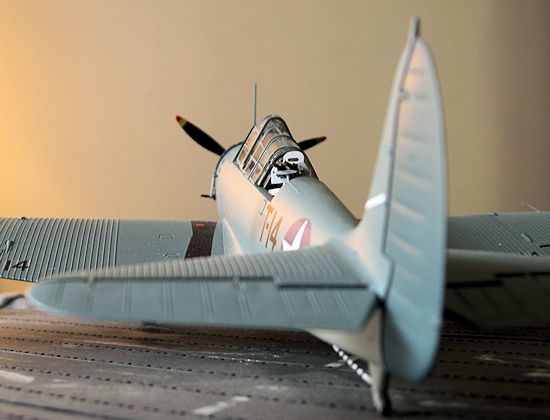
before Midway. The 13 red & white stripes on the rudder would have been recently
painted out, and since they spent their time below decks when not in immediate
use, I did not depict fading on the lower wings. A coat of Testors lacquer
glosscoat and it was on with the decals.
white to the
Blue Gray to depict fade and age and sprayed the rest of the plane. The TBDs of
Torpedo 8 did not see the service other Devastators of the Pacific fleet did and
they didn’t show an excess of wear and tear. This is clear in photos taken just
before Midway. The 13 red & white stripes on the rudder would have been recently
painted out, and since they spent their time below decks when not in immediate
use, I did not depict fading on the lower wings. A coat of Testors lacquer
glosscoat and it was on with the decals.
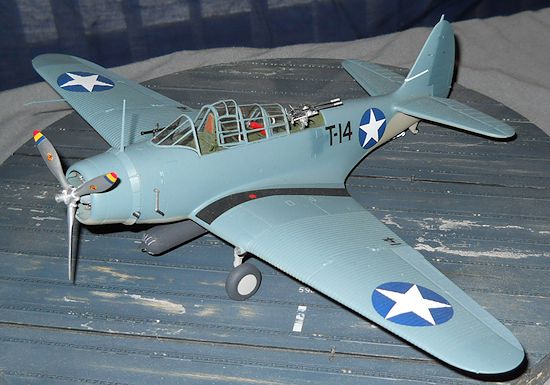
The decals provided were quite nice and
gave me no issues. GWH provides decals for both George Gay’s and John Waldron’s
aircraft and in all the time I’ve spent building Devastator models I’ve never
build George’s aircraft. So it became my topic of choice. Something to be aware
of with Waldron’s aircraft is that it was a spare. Waldron injured his back
wrecking his usual ride just days before Midway and BuNo 1506 was pulled down
from the ceiling in the hanger deck to serve him on 4 June 1942. Color photos of
the spares aircraft pressed into service before Midway show that the red center
in the insignia was still on the lower wings; they were hung with wings folded
and the painters simply could not get at them while they hung there. There’s a
real possibility that he flew T-16 into combat with the “meatball” still there.
Regardless, I modeled George Gay’s plane with the decals provided, which brings
up another anomaly. The front line aircraft serving on the fleet all had the
squadron codes painted out immediately after Coral Sea. Again, color photos of
Torpedo 8 Devastators show this to be the case and in spite of all the
representations by decal manufacturers, this certainly would have been the case
with T-14as well. I represented this by painting out the “8” with unaltered Blue
Gray paint after the decal was applied. It seems the codes are a bit too big,
but I’ll live with that. This time. Following this was a coat of Testors lacquer
Dullcoat and unmasking.
| FINAL CONSTRUCTION |
Final assembly went rather quickly,
beyond the issues with the twin gun mount mentioned earlier. It would be nice if
a resin aftermarket manufacturer out there would make up a set like this, as it
would give the scale modeler more (and likely more desirable options) for that
old Monogram kit. And while I’m at it, the
 bulge fitted to clear .50 forward
firing machine guns retrofitted to pre-war Devastators would be nice too. But to
the build, the canopies went on along with the detailing under the pilot’s
canopy. The photo etch for the torpedo sight (not the scope) was terribly fiddly
and I ended up using bits from the Eduard photo etch set to finish it. I was
hoping to add an aerial wire to it but the mast on the cowl is so delicate (it
broke off while I was painting the lane) and my decision was between having a
sagging wire, bowed mast or leaving it off entirely. The landing light is from
the Monogram kit as this is molded onto the housing on the GWH kit. I just
sanded it off flat and glued the Monogram piece on. The detail on the pitot tube
gave me trouble and it still shows. The torpedo is not the correct one for
Midway but as I fitted it with a tacky glue instead of styrene cement, it’s
something I can resolve later. And I’ve yet to find a satisfactory way to paint
tail hooks. This one broke while I was masking it and that made for some
frustration. I still want to do a bit of exhaust streaking on this, but as it is
I’m rather happy with it.
bulge fitted to clear .50 forward
firing machine guns retrofitted to pre-war Devastators would be nice too. But to
the build, the canopies went on along with the detailing under the pilot’s
canopy. The photo etch for the torpedo sight (not the scope) was terribly fiddly
and I ended up using bits from the Eduard photo etch set to finish it. I was
hoping to add an aerial wire to it but the mast on the cowl is so delicate (it
broke off while I was painting the lane) and my decision was between having a
sagging wire, bowed mast or leaving it off entirely. The landing light is from
the Monogram kit as this is molded onto the housing on the GWH kit. I just
sanded it off flat and glued the Monogram piece on. The detail on the pitot tube
gave me trouble and it still shows. The torpedo is not the correct one for
Midway but as I fitted it with a tacky glue instead of styrene cement, it’s
something I can resolve later. And I’ve yet to find a satisfactory way to paint
tail hooks. This one broke while I was masking it and that made for some
frustration. I still want to do a bit of exhaust streaking on this, but as it is
I’m rather happy with it.
| CONCLUSIONS |
It was my original intent to do a
simultaneous build for this review; this kit against the Monogram kit. But in
the process, the Monogram kit became the center of frustration and the holdup
with finishing this build. I still want to write up a “How To” regarding the old
Monogram kit to address some of the issues with getting one from your stash to
your display shelf. However, this kit makes it a moot point if you don’t have a
1/48 TBD in the stash yet. My main source of Monogram TBDs has been eBay and
it’s easily purchased for $20 shipped. Add to that $17 for the Eduard photo etch
set, $12 for a decal set (as the Monogram decals are
 invariably garbage) and any
other aftermarket bits like engine and torpedo to improve the kit parts and the
money invested comes out close to the price for this kit. And with the fit and
the detailing of this kit being light years ahead of the venerable Monogram kit,
this one wins hands down. The issues I have found with this build are far easier
to contend with and for the beginner/average/typical modeler I recommend this
one. Be aware that it is not a box shaker and some of the issues like the canopy
shape are not corrected with the
kit parts but in the end I did enjoy the build and when they come out with a
Yellow Wings boxing (if they do) I’ll certainly build another.
invariably garbage) and any
other aftermarket bits like engine and torpedo to improve the kit parts and the
money invested comes out close to the price for this kit. And with the fit and
the detailing of this kit being light years ahead of the venerable Monogram kit,
this one wins hands down. The issues I have found with this build are far easier
to contend with and for the beginner/average/typical modeler I recommend this
one. Be aware that it is not a box shaker and some of the issues like the canopy
shape are not corrected with the
kit parts but in the end I did enjoy the build and when they come out with a
Yellow Wings boxing (if they do) I’ll certainly build another.
Thanks go out to “Holmes”, the prolific
ARCer for sending me the kit out of his own goodness. He proves that there are
still good people in the world, around the world, and most of them are scale
modelers ;) Props out as well to the long lost Gary Uhl for inspiring me long
ago to write up a review dealing with corrugated leading edges and for sending
me the “surfboard” sanding block. And last but never least when it comes to
Douglas’ TBD-1 Devastator, Lynn Ritger, fellow TBD nut. His research has saved
us Devastator modelers a WORLD of work and has been invaluable for me in my
scale modeling subject matter of choice.
| REFERENCES |
Naval
Fighters #71 Douglas TBD-1 Devastator, Steve Ginter (probably the only reference
book you will need for the TBD)
Profile
Publications #71 The Douglas TBD Devastator, George Falkner & Sons Ltd. (no
author noted)
Lynn Ritger’s The Douglas TBD-1 Devastator http://tbd_devastator.tripod.com/
February 2013
If you would like your product reviewed fairly and fairly quickly, please contact the editor or see other details in the Note to Contributors.