
| KIT: | Moscow Based 1/72 F7F-3 Tigercat |
| KIT #: | ? |
| PRICE: | £9.99 (About $21.00) |
| DECALS: | 3 options |
| REVIEWER: | Carmel J. Attard |
| NOTES: | Vacuformed with injected bits. |
| HISTORY |
 During 1941 the Grumman Company began to
design a deck fighter for the US Navy. On the 11th of March 1943 the
type F7-1 was evolved and since the 29th April 1944 the F7F was being
produced in a variety of roles. The F7F was the first twin-engine deck fighter
built in the history of aviation. More commonly known as the Tigercat it
participated actively in the end of WWII during the Pacific Ocean operations.
The Tigercat got its fame during the Korean conflict when it was extensively
used as a night fighter and for carrying out rocket attacks and bombing
missions.
During 1941 the Grumman Company began to
design a deck fighter for the US Navy. On the 11th of March 1943 the
type F7-1 was evolved and since the 29th April 1944 the F7F was being
produced in a variety of roles. The F7F was the first twin-engine deck fighter
built in the history of aviation. More commonly known as the Tigercat it
participated actively in the end of WWII during the Pacific Ocean operations.
The Tigercat got its fame during the Korean conflict when it was extensively
used as a night fighter and for carrying out rocket attacks and bombing
missions.
The Tigercat was equipped with two Pratt& Whitney engines R-2800-34W Double-Wasp that permitted to reach a speed of 724 Km/h at the altitude of 6,553m. Its armament consisted of four 20mm cannons with 200 rounds per gun and four 50 calibre machine guns in the forward fuselage with 300 rounds per gun. External bomb racks could carry various combination of rockets, bombs and additional fuel tanks or a torpedo beneath the fuselage with a total weight of 1,814 Kg.
| THE KIT |
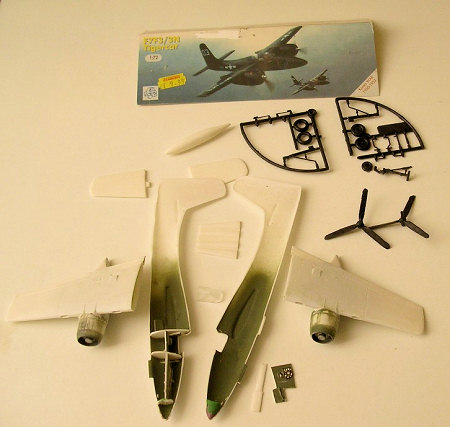 This is a vacform kit representing the
F7F-3 day fighter, moulded on a sheet of white plastic. This caters for the wing
halves, fuselage and cockpit parts, seats, instruments, central fuselage fuel
tank, undercarriage doors, etc. Other parts such as the wheels, undercarriage
legs, gun barrels, propellers and antennae are injection moulded in rather crude
black plastic containing lots of flash but with careful cleaning one makes
acceptable parts for use on the kit.
This is a vacform kit representing the
F7F-3 day fighter, moulded on a sheet of white plastic. This caters for the wing
halves, fuselage and cockpit parts, seats, instruments, central fuselage fuel
tank, undercarriage doors, etc. Other parts such as the wheels, undercarriage
legs, gun barrels, propellers and antennae are injection moulded in rather crude
black plastic containing lots of flash but with careful cleaning one makes
acceptable parts for use on the kit.
| CONSTRUCTION |
The vac form parts have accurate panel
lines and once the parts are cut and sanded to size these fitted together with
minimum fuss. Masking tape was used to protect the surface detail during sanding
 and blending after joining parts together. The large engine cowlings required
some careful fitting of the internal radial engine detail in order to produce as
round cowlings as possible. The vac form piece formed the roof of the nose wheel
bay and another one formed the crew office floor. These both fitted correctly
however the two bulkheads behind and in front of the pilot seat and another
forming the front and back of the wheel well required careful trimming to bring
to fitting size. The most peculiar issue about this kit is that the colour art
work that accompanies the kit shows the two seat night fighter version, F7F-3N,
having a second cockpit behind that of the pilot, when in fact this is the
single seat day fighter version not dissimilar from the type offered by Monogram
where it is issued in injection moulded form. This proved to be misleading when
the kit was bought from e-bay. There was also lack of wheel well detail in spite
of the empty space that this entails. The centre line fuel tank is correctly
shaped but on the other hand no rockets are provided to go on the under wing
pylons.
and blending after joining parts together. The large engine cowlings required
some careful fitting of the internal radial engine detail in order to produce as
round cowlings as possible. The vac form piece formed the roof of the nose wheel
bay and another one formed the crew office floor. These both fitted correctly
however the two bulkheads behind and in front of the pilot seat and another
forming the front and back of the wheel well required careful trimming to bring
to fitting size. The most peculiar issue about this kit is that the colour art
work that accompanies the kit shows the two seat night fighter version, F7F-3N,
having a second cockpit behind that of the pilot, when in fact this is the
single seat day fighter version not dissimilar from the type offered by Monogram
where it is issued in injection moulded form. This proved to be misleading when
the kit was bought from e-bay. There was also lack of wheel well detail in spite
of the empty space that this entails. The centre line fuel tank is correctly
shaped but on the other hand no rockets are provided to go on the under wing
pylons.
The assembly of the kit went together well with fixing the aligning tabs to fuselage halves and the usual method of vac form assembly. As this is a tricycle undercarriage aircraft I added weight to the forward nose empty space. Four nose machine gun ports were carefully opened with a hand drill and the antennae were replaced with ones made out of steel wire.
| COLORS & MARKINGS |
 The interior was painted cockpit green and
the wheel wells zinc chromate. The instrument panel was matt black with the
engraved instruments in white using a pointed match stick which was sharpened to
a point before slightly dipped in white paint. I used semi gloss Compucolour Sea
Blue for the overall exterior finish of the kit. The decal sheet offers three
options. One had large white letters AZ on tail unit, another LL and the third
one the serial 462 in large white numbers written on the engine cowling. The
decal sheet itself with all these offerings give the impression that it is type
most sought after to find in kits these days the quality falls from the desired
standard as it was very thin and brittle. So I played safe by adding another
coat of clear Revell varnish to strengthen the backing film and that saved the
day. Otherwise there were ample of minute white stencilling which decorated the
finished model quite effectively.
The interior was painted cockpit green and
the wheel wells zinc chromate. The instrument panel was matt black with the
engraved instruments in white using a pointed match stick which was sharpened to
a point before slightly dipped in white paint. I used semi gloss Compucolour Sea
Blue for the overall exterior finish of the kit. The decal sheet offers three
options. One had large white letters AZ on tail unit, another LL and the third
one the serial 462 in large white numbers written on the engine cowling. The
decal sheet itself with all these offerings give the impression that it is type
most sought after to find in kits these days the quality falls from the desired
standard as it was very thin and brittle. So I played safe by adding another
coat of clear Revell varnish to strengthen the backing film and that saved the
day. Otherwise there were ample of minute white stencilling which decorated the
finished model quite effectively.
| CONCLUSIONS |
 The Tigercat remains one of the most
beautiful designs much to my liking. I have seen the Tigercat doing loops, dives
and powerful turns at Duxford way back in 1991 and was truly impressed as much
as I was with the Bearcat also performing at the same air event. The completed
kit will be in company to a previous Tigercat that I built from the Monogram
offering but which I converted into a recce version.
The Tigercat remains one of the most
beautiful designs much to my liking. I have seen the Tigercat doing loops, dives
and powerful turns at Duxford way back in 1991 and was truly impressed as much
as I was with the Bearcat also performing at the same air event. The completed
kit will be in company to a previous Tigercat that I built from the Monogram
offering but which I converted into a recce version.
November 2007
If you would like your product reviewed fairly and quickly, please contact me or see other details in the Note to Contributors.