| KIT #: | E 17 |
| PRICE: | 3200 yen MSRP |
| DECALS: | Three 12th BG options |
| REVIEWER: | Chuck Wojtkiewicz |
| NOTES: | Big Ed set 7214 ($32.95 MSRP) utilized |
| HISTORY |
Much has been written of the long
and storied career of this able medium bomber, but I’ll concentrate on the H
version. It represents a big jump in the type’s development, making a great
plane even better. The dorsal turret was moved forward, staggered waist guns
with plexiglass covers became standard as did the dual-fifty rear turret with
it’s racy fighter-style greenhouse blister. The radio station was moved into
the deepened rear fuselage, and the co-pilot’s controls were deleted from
 the cockpit. The navigator/cannoneer
rode next to the pilot in a simple jump seat.
the cockpit. The navigator/cannoneer
rode next to the pilot in a simple jump seat.
Three versions of the H-model were produced. The H-1 sported 4 fifties in the snubby, all-metal nose for strafing, along with a whopping 75mm cannon. Two package guns in individual fairings were carried low on the starboard nose. 300 examples were produced. The H-5 had provisions for four package guns- two per side. It had electric bomb controls and a gunsight aim pointing camera- 300 of these babies were built as well. The H-10 featured some minor adaptations, including some rearrangement of the pilot’s IP, a larger life raft compartment and revisions to the brake system control panel. 400 were produced.
The plane could be modified to suit the mission it was to undertake- the cannon could be easily removed to allow a greater bomb load, and the package guns were often deleted to save weight as well.
| THE KIT |
Our intrepid editor, Scott Van Aken himself, did a snappy preview of the Hasegawa kit when it fell into his paint-stained paws- read it here: http://modelingmadness.com/scotts/allies/us/7225hpreview.htm
 The Eduard Big Ed set adds a
galaxy of detail, with sets for the interior, bomb bay and exterior, as well as
a set of canopy masks in that nice yellow masking tape. Highlights include full
replacements for the pilot and navigator seats, cockpit sidewalls, engine
controls, 75mm ammo storage bin, ammo belts- you name it, it’s in the interior
set! The bomb bay gets a real boost with ribbing and etched panels that cover
otherwise blank kit panels and hide the seams between the sub-assembly and the
fuselage. The exterior set gives you landing gear details, antennae, tiny
control horns, engine wiring harnesses and more.
The Eduard Big Ed set adds a
galaxy of detail, with sets for the interior, bomb bay and exterior, as well as
a set of canopy masks in that nice yellow masking tape. Highlights include full
replacements for the pilot and navigator seats, cockpit sidewalls, engine
controls, 75mm ammo storage bin, ammo belts- you name it, it’s in the interior
set! The bomb bay gets a real boost with ribbing and etched panels that cover
otherwise blank kit panels and hide the seams between the sub-assembly and the
fuselage. The exterior set gives you landing gear details, antennae, tiny
control horns, engine wiring harnesses and more.
| CONSTRUCTION |
My goal for this review is to build the model combined with the photo-etched sets. No other aftermarket parts were used, and no major scratchbuilding undertaken, either.
What sweet little kit! Hasegawa’s
grey styrene is nice and workable, the detail is copious and crisp. Surface
engraving is fine and as extensive as many 1/48 kits. Sitting down to begin the
build I was taken aback by the number of ejector-pin marks on the interior
pieces- yuck! I spent a lot of time filling, sanding and scraping these buggers
into oblivion. While most of the kit goes together effortlessly, be wary of
part F1- it’ll likely be the first piece you glue to fuselage half A1. I make
sure it
 sits
level with the outer skin or be prepared to do some tedious filling and sanding
(like me).
sits
level with the outer skin or be prepared to do some tedious filling and sanding
(like me).
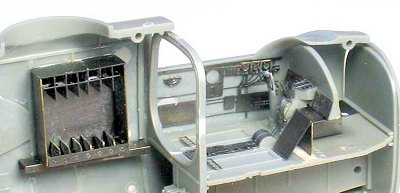
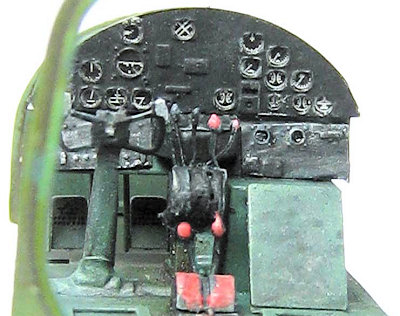
Now, where else to begin but with
the cockpit? Pitch the kit seats and fold up t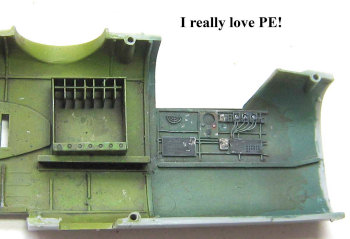 he
brass parts- what a difference! I annealed the seat belts to make them more
flexible, heating them red hot with a butane cigar lighter. While I was at it I
hit the machine gun cooling jackets, but more on those later. The finished
seats are highly visible, so it’s time well spent. The kit sidewalls are
decorated only by ejector pin marks, and the PE transforms them quite
dramatically. Move back through the fuselage, adding the gunner’s emplacements
and their details. Eduard instructs you to move the rear seats to the starboard
side
he
brass parts- what a difference! I annealed the seat belts to make them more
flexible, heating them red hot with a butane cigar lighter. While I was at it I
hit the machine gun cooling jackets, but more on those later. The finished
seats are highly visible, so it’s time well spent. The kit sidewalls are
decorated only by ejector pin marks, and the PE transforms them quite
dramatically. Move back through the fuselage, adding the gunner’s emplacements
and their details. Eduard instructs you to move the rear seats to the starboard
side
 of
the plane to give you room to mount the PE radio. It would’ve highly visible if
I hadn’t dropped the sealed-up fuse on the floor, effectively knocking the radio
assembly loose. There was no way to get it back in- curses! I did glue the
side windows in before joining the fuselage halves so I could rig the waist guns
with their ammo belts. The windows are not quite as tall as their openings-
pretty much the worst shortcoming with the kit, and easily rectified with a few
thin strip of styrene. Do yourself a favor and glue them to the fuse before
fitting the windows. The nose cap, part F2 doesn’t fit all that well. It needs
to be sanded down to match the fuselage contours, and necessitates some
rescribing of a few panel lines.
of
the plane to give you room to mount the PE radio. It would’ve highly visible if
I hadn’t dropped the sealed-up fuse on the floor, effectively knocking the radio
assembly loose. There was no way to get it back in- curses! I did glue the
side windows in before joining the fuselage halves so I could rig the waist guns
with their ammo belts. The windows are not quite as tall as their openings-
pretty much the worst shortcoming with the kit, and easily rectified with a few
thin strip of styrene. Do yourself a favor and glue them to the fuse before
fitting the windows. The nose cap, part F2 doesn’t fit all that well. It needs
to be sanded down to match the fuselage contours, and necessitates some
rescribing of a few panel lines.
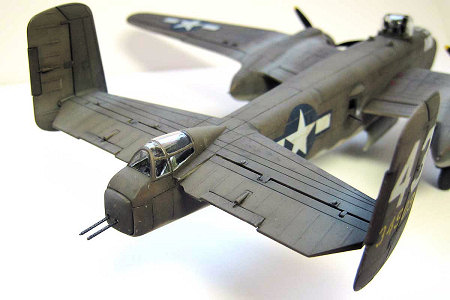
I cut off all the machine barrels
before adding any to their respective assemblies. Tint cooling jackets were
rolled from PE and added at final assembly. You’ll want to avoid my error of
not drilling holes for the new barrels- I was hedging my bets against the PE
being unusable and wanted the option to glue the kit barrels back on later. I
figured I’d have broken them off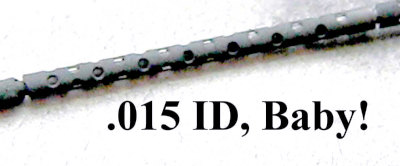 anyway! To roll the sleeves, put the part on a mouse pad and press a length of
.030 music wire along the length to get the roll started- easy! Move the part
and wire onto your cutting mat- a totally hard surface won’t work. I have a
triangular rubber sleeve on my Xacto knife that keeps it from rolling around- I
used that to further roll the sleeve. The rubber grips the part and wraps it
around the wire. Slip the barrel off and onto a piece of .017 wire. It’s the
perfect size for the final roll. Finally, glue a length of .015 music on for
the barrel. I ground the ends flat with my trusty Dremel tool.
anyway! To roll the sleeves, put the part on a mouse pad and press a length of
.030 music wire along the length to get the roll started- easy! Move the part
and wire onto your cutting mat- a totally hard surface won’t work. I have a
triangular rubber sleeve on my Xacto knife that keeps it from rolling around- I
used that to further roll the sleeve. The rubber grips the part and wraps it
around the wire. Slip the barrel off and onto a piece of .017 wire. It’s the
perfect size for the final roll. Finally, glue a length of .015 music on for
the barrel. I ground the ends flat with my trusty Dremel tool.
The bomb bay is quite an enjoyable building exercise, with ribbing added to the sides and panels to the end plates. I glued the plastic parts of the bay to the port fuse half and built those ribs. Then I worked up the right side, carefully test-fitting as I went. Add the end caps after the fuse is all sealed up and the seams dealt with. The uber-tiny door actuators went on at final assembly. There are usually spare parts on Eduard’s frets- this time you’ll use every little bit. The full-length door hinges are particularly nice. I chose to paint my bay in interior green, which I found reference to on some later-model B-25s. I just can’t stand to paint things silver, I don’t know why!
I tend to build my sub-assemblies as the mood strikes me, so I sat down one Saturday morning and attacked the gear struts. I was in the mood to clean the seams, I guess. The struts are nice and round- there’s nothing worse than scraping bad LG down to an oval cross-section! I added wire brake lines as advised by Eduard, the new oleo scissors (sweet!), the tiny tie-down rings and the nosewheel’s miniscule bellcrank. I then cranked up my resolve and painted them, yes, silver.
The wings and nacelles went together all but perfectly. I sanded the rather enthusiastic ribbing on the flying surfaces. Toss the kit gear doors, Big Ed gives you perfect brass replacements. The landing lights have separate lenses- I punched tiny discs from aluminum furnace tape and stuck them in the recesses, then glued the lenses in with Testor’s canopy glue. Next went the covers, which are too big, but that’s no biggie! I sanded ‘em to mate perfectly with the wing, polishing them to clarity with micro-mesh sanding cloths. They’re indispensable for working with clear parts!
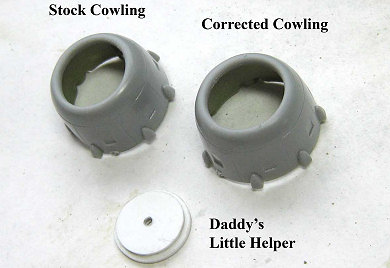 Now,
not to start a furor, but the openings to the cowls are shy by 1/8 of inch-
perfectly misproportioned to Accurate Miniatures’ 1/48 offerings. Oh, noes!
What shall we do? It’s easy- I scaled down a solution posted by Bruce Radebaugh
here:
http://detailsite.tripod.com/b25b/b25bpage.htm In short, I cut a styrene
disc to fit the kit cowl, then centered a disc 1/8 inch larger over it. Stick
this template into the cowl and scribe yourself a new, larger opening. Cut the
hole to this line and clean it up with some sandpaper wrapped around a dowel.
Much better, and now you can see more of the beautiful little engines. They
come without pushrods, so I added them with bits of wire. Next cane the etched
ignition harness and the crankshaft cover. Don’t forget the polycaps that hold
the props on- I did and will have glue mine in. D’oh!
Now,
not to start a furor, but the openings to the cowls are shy by 1/8 of inch-
perfectly misproportioned to Accurate Miniatures’ 1/48 offerings. Oh, noes!
What shall we do? It’s easy- I scaled down a solution posted by Bruce Radebaugh
here:
http://detailsite.tripod.com/b25b/b25bpage.htm In short, I cut a styrene
disc to fit the kit cowl, then centered a disc 1/8 inch larger over it. Stick
this template into the cowl and scribe yourself a new, larger opening. Cut the
hole to this line and clean it up with some sandpaper wrapped around a dowel.
Much better, and now you can see more of the beautiful little engines. They
come without pushrods, so I added them with bits of wire. Next cane the etched
ignition harness and the crankshaft cover. Don’t forget the polycaps that hold
the props on- I did and will have glue mine in. D’oh!
 By
now you might have caught on to the fact that I’m the kind of guy that just
can’t leave well enough alone. That’s why I had to drop the elevators and
reposition all the trim tabs. It’s easy, it’s fun, and it breathes a little
life into the finished model. I try to find photographic references to this
kind of thing- it was generally SOP to lock all control surfaces to avoid damage
from wind, etc., but you’ll usually find a pic of aircraft, perhaps undergoing
maintenance, that’s standing “at ease”.
By
now you might have caught on to the fact that I’m the kind of guy that just
can’t leave well enough alone. That’s why I had to drop the elevators and
reposition all the trim tabs. It’s easy, it’s fun, and it breathes a little
life into the finished model. I try to find photographic references to this
kind of thing- it was generally SOP to lock all control surfaces to avoid damage
from wind, etc., but you’ll usually find a pic of aircraft, perhaps undergoing
maintenance, that’s standing “at ease”.
Assembly of the major components was mercifully uneventful. The wing-to-fuselage joins need a swipe of Squadron putty, which was cleaned up before it set with a Q-tip wet with acetone-base fingernail polish remover. It’s gentle, but the plastic is soft and got a tiny bit of distress that showed up after painting in greatly enlarged digital close-ups. Give this area a swipe with the Micro-Mesh and it’ll be fine. The clear parts were masked with the excellent pre-cut Eduard items. They went on easily and a job that could have taken a year off my nervous system went by in less than an hour. The only mask missing was for the gun turret panel directly over the gunner’s head - consult the box art. I plugged all the open holes with bits of sponge foam- time to paint it!
| COLORS & MARKINGS |
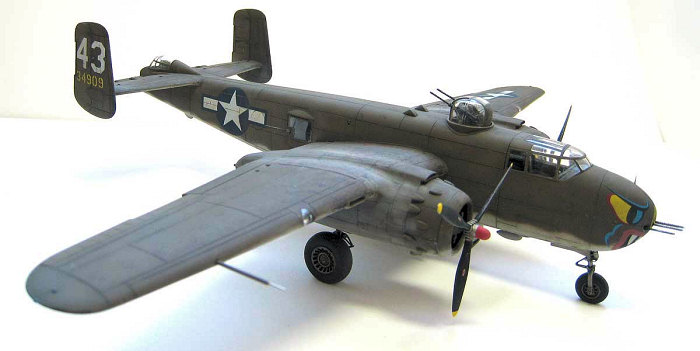
 I primed the beast with Mr.
Surfacer, grumbled as I fixed all the little flaws I’d missed, and got down to
the dirty work. The undersurfaces were painted with Tamiya XF-19 Sky Grey. The
uppers got sprayed with a mixture of Tamiya XF-58 Olive Green, XF-51 Khaki Drab,
some light tan, white and a touch of yellow. My bird was going to show the
effects of the harsh conditions in the China/Burma/India theater. That OD faded
quickly, and more so on the fabric-covered flying surfaces. They were masked
off and sprayed a lighter shade of olive. I sprayed my little strafer with
Future and put it aside to cure. The decals went on nicely in general, but
needed some help in a couple of places. The port flank US insignia goes on over
a couple of small scoops- either cut them off and glue back later or punch a
hole in the decal and touch up with paint after the fact. The dog- face
markings have to wrap around some serious compound curves on that pug nose.
Multiple (like 10) applications of Solvaset tamed them, pretty much. The only
thing that bothered me was the halftone dot pattern
I primed the beast with Mr.
Surfacer, grumbled as I fixed all the little flaws I’d missed, and got down to
the dirty work. The undersurfaces were painted with Tamiya XF-19 Sky Grey. The
uppers got sprayed with a mixture of Tamiya XF-58 Olive Green, XF-51 Khaki Drab,
some light tan, white and a touch of yellow. My bird was going to show the
effects of the harsh conditions in the China/Burma/India theater. That OD faded
quickly, and more so on the fabric-covered flying surfaces. They were masked
off and sprayed a lighter shade of olive. I sprayed my little strafer with
Future and put it aside to cure. The decals went on nicely in general, but
needed some help in a couple of places. The port flank US insignia goes on over
a couple of small scoops- either cut them off and glue back later or punch a
hole in the decal and touch up with paint after the fact. The dog- face
markings have to wrap around some serious compound curves on that pug nose.
Multiple (like 10) applications of Solvaset tamed them, pretty much. The only
thing that bothered me was the halftone dot pattern
 on some of the nose art. This is
evident in close-up photography and renders things toy-like. I should have
hiked up my britches and repainted these areas, but wussied out. Oil paints
would be the way to go here, if you want to show me up.
on some of the nose art. This is
evident in close-up photography and renders things toy-like. I should have
hiked up my britches and repainted these areas, but wussied out. Oil paints
would be the way to go here, if you want to show me up.
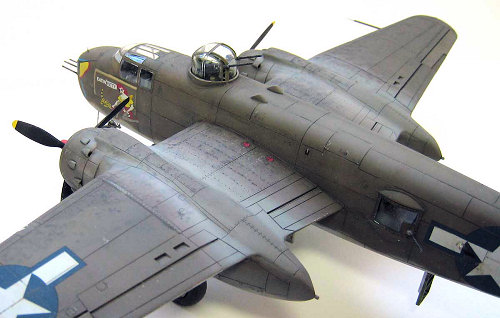
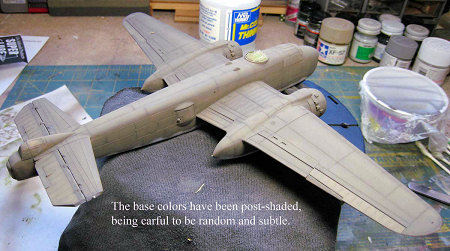
I’m a firm believer in a good, weathered finish to a hard-working, war-weary aircraft. It’s easy to overdo, so go lightly. Black is not a good choice unless you’re working on a black plane, so use browns, greys and darkened versions of your base colors for your washed and airbrush shading. I post-shaded the panel lines and wear areas, then laid down a coat of Future to protect this delicate work- and the decals. Next, thinned oil paints were lightly washed over the panel lines, and wiped with a Q-tip dampened with Humbrol thinner, stroking along the direction of the slipstream. The paint job is coming to life! Some irregular patches of darker base color were sketched in here and there to break up the neatness of the color. It’s now time for another coat of Future.
The B-25 was a big plane, and I used
some color tricks to give my tiny, plastic
 sculpture a sense of scale.
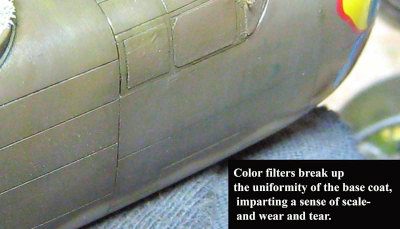
Tiny dabs of oil paint- yellow ochre, raw sienna, burnt umber, blue, green and
black- were randomly spotted on the top and sides of the fuselage and rudders.
They were then blended over the surface with a brush moistened-not soaked- with
Humbrol thinner. The idea is to make a thin filter of color over the
base coat that blend randomly and break up its vast, dull expanse. Use vertical
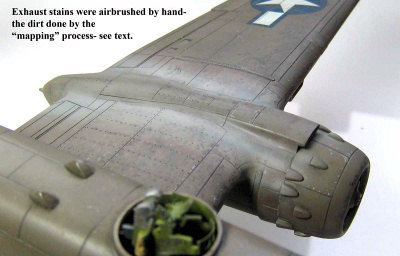
strokes here to simulate rain-streaked dust. A similar trick was used on the
wings to simulate the dirty boot-prints of the maintenance crew. Spread a thin
film of water over the traffic areas and, using a tapping motion, add tiny blips
of thinned brownish-black acrylic paint. This technique is called, for reasons
not entirely obvious to me, as mapping.
sculpture a sense of scale.
Tiny dabs of oil paint- yellow ochre, raw sienna, burnt umber, blue, green and
black- were randomly spotted on the top and sides of the fuselage and rudders.
They were then blended over the surface with a brush moistened-not soaked- with
Humbrol thinner. The idea is to make a thin filter of color over the
base coat that blend randomly and break up its vast, dull expanse. Use vertical
strokes here to simulate rain-streaked dust. A similar trick was used on the
wings to simulate the dirty boot-prints of the maintenance crew. Spread a thin
film of water over the traffic areas and, using a tapping motion, add tiny blips
of thinned brownish-black acrylic paint. This technique is called, for reasons
not entirely obvious to me, as mapping.
The heavy exhaust stains on the
wings and tail surfaces were sprayed by hand, using mixtures of pale, warm grey,
touches at the edges with dilute black. Consult your references to get it
right. The fuel burned in those big
 radials really burned and
bleached the paint. Finally, it’s time for a flat coat- I use Humbrol’s. I
added paint chipping in the appropriate areas with a dark lead pencil and a
bright artist’s silver pencil. Thinned brownish-black was spattered over the
lower areas of the airframe- keep the droplets fine! Tan pastel was brushed
over the wheels and rubbed off with a finger to leave the color in the treads.
Virtually every little part gets some paint variation- whew! Once painting and
weathering were complete all the little easily-broken-off bits were finally
glued into place
radials really burned and
bleached the paint. Finally, it’s time for a flat coat- I use Humbrol’s. I
added paint chipping in the appropriate areas with a dark lead pencil and a
bright artist’s silver pencil. Thinned brownish-black was spattered over the
lower areas of the airframe- keep the droplets fine! Tan pastel was brushed
over the wheels and rubbed off with a finger to leave the color in the treads.
Virtually every little part gets some paint variation- whew! Once painting and
weathering were complete all the little easily-broken-off bits were finally
glued into place
These last bits are always the hairiest- and I not just kiddin’! The nose antennae were just too bendable in etched brass- I replaced them with .015 music wire. The aerials? Well, there’s a little bit of my wife in this model- they’re tied from a few precious strands of her beautiful silver hair.
| CONCLUSIONS |
 I’m ashamed to say that I had
long ago given up on 1/72 scale for aircraft- too tiny, too toy-like. How wrong
I was! Today’s kits have fabulous levels of detail- this Hasegawa honey is a
perfect example. Good fit and an accurate outline make it a real treat to build
and a joy to behold. Its few shortcomings are easily overcome and make it
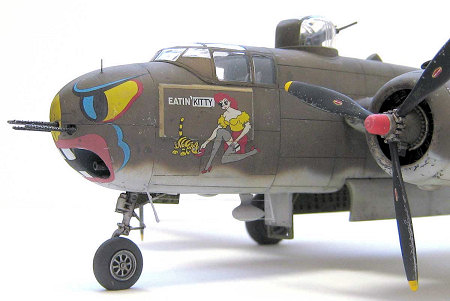
available to any modeler. The color schemes are great- I couldn’t resist
building “Eatin’ Kitty”. Hubba, hubba!
I’m ashamed to say that I had
long ago given up on 1/72 scale for aircraft- too tiny, too toy-like. How wrong
I was! Today’s kits have fabulous levels of detail- this Hasegawa honey is a
perfect example. Good fit and an accurate outline make it a real treat to build
and a joy to behold. Its few shortcomings are easily overcome and make it
available to any modeler. The color schemes are great- I couldn’t resist
building “Eatin’ Kitty”. Hubba, hubba!
The Eduard sets add a whole new dimension to the modeling experience and I recommend them highly to anyone with a steady hand, patience and the desire to make the model of your dreams. In this small scale even the essentially two-dimensional items such as the control yoke are better bits than the super-chunky kit item. A bit or two need a little extra filing to fit, but that could have been my error. On the whole, I give them a big thumb’s up.
| REFERENCES |
B-25 Mitchell in detail by Bert Kinsey
Warbird tech Vol. 12 North American B-25 Mitchell by Frederick A Johnsen
B-25 Mitchell, Crowood Aviation Series by Jerry Scutts
North American B-25 Mitchell cz 2 by Krzystof Janowicz and Waldemar Pajdosz
B-25 Mitchell in Action by Ernest R. McDowell
Walkaround B-25 Mitchell by Lou Drendel
Kit provided by your editor via the late, great GreatModels.
July 2007
Copyright ModelingMadness.com. If you would like your product reviewed fairly and fairly quickly, please
contact
the editor or see other details in the
Note to
Contributors.