Hasegawa 1/32
P-47D Thunderbolt
|
KIT #: |
08077 |
|
PRICE: |
$65.00 MSRP |
|
DECALS: |
Three options |
|
REVIEWER: |
|
|
NOTES: |
|
|
HISTORY |
The P-47, AKA “the jug,” was the
brainchild of Alexander Kartveli, Republic Aviation’s chief engineer. In 1940,
Republic was building the P-43 Lancer and was planning on building a lightweight
fighter. But given the prevailing air combat experiences in Europe, the
A major engineering problem with the
new engine was designing a supercharger duct system that would provide the
proper airflow. Kartveli purportedly designed the duct system first and then
designed the aircraft’s fuselage to fit around it. This resulted in a large
supercharger (turbo) in the rear fuselage, with the large air intake duct being
mounted un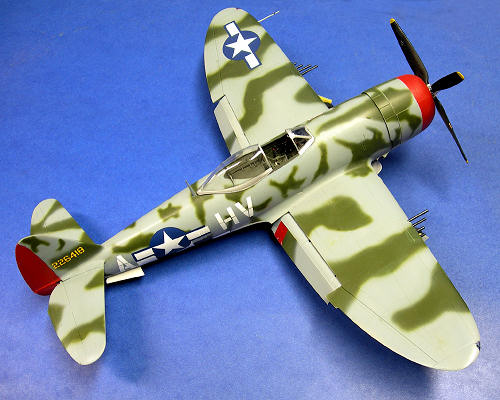 derneath the engine. The system piped exhaust gases back to the turbo
and expelled them through an opening in the bottom of the fuselage.
derneath the engine. The system piped exhaust gases back to the turbo
and expelled them through an opening in the bottom of the fuselage.
After addressing the myriad of
performance and production issues inherent in a new aircraft design, Republic
delivered the first P-47B to the USAAC in May, 1942. After delivering 171 B
models, Republic started delivering a refined C model in September, 1942, and in
late 1942, the P-47C arrived in
The next variation, and the subject of
this review, was the P-47D, of which Republic eventually built 12,602 aircraft.
The D model was actually an evolving series of models, as Republic continued to
refine the P-47 design. For example, the P-47D-15 was the result of combat units
asking for longer range. In response to this combat requirement, Republic
increased the internal fuel capacity to 375 gallons and installed “wet” fuel
plumbing in the under-wing bomb racks to allow the carriage of a jettisonable
drop tank under each wing (these were in addition to the belly tank).
At this time, Republic had three plants
turning out P-47s: its original
To this point, all P-47s had been the
“razorback” canopy configuration with the tall fuselage spine behind the pilot.
This created poor visibility, and Republic looked for a way to provide better
pilot visibility. The British, also facing this combat problem, had come up with
a “bubble” canopy for the Hawker Typhoon that significantly improved pilot
vision. The USAAF looked at this
canopy and decided it was a solution to the problem (not only for the P-47, but
also for the P-51). The new bubble
canopy was incorporated into the
 P47D-25 and Republic started shipping them to
combat units in May, 1944.
P47D-25 and Republic started shipping them to
combat units in May, 1944.
The most famous P-47 pilot of World War
II was Francis S. “Gabby” Gabreski. Assigned to the 56th Fighter
Group in February, 1943, Gabreski became a flight leader and later assumed
command of the 61st Fighter Squadron.
By late November, he had become an ace. His kill totals climbed through
the winter of 1944, and by March, he had 18 kills to his credit. With his three
Fw-190 kills on July 20, 1944, he tied Robert S. Johnson as the leading ace in
the European Theater of Operations (ETO). On July 5, 1944, he got his 28th
and final kill of the war, making him the unsurpassed ETO kill leader.
Ironically, Gabreski’s aerial kill
total was cut short by a strafing run while returning from an escort mission to
Not only did Gabreski end the war as
the leading American fighter ace in
|
THE KIT |
For a detailed look at what’s in the box,
see Tom
Cleaver's in-box review. I must
confess that, other than my build of Lindberg’s
Laird-Turner
Meteor Air Racer several years ago, I have not assembled a 1/32 aircraft kit
since the mid seventies. After building just about all of the 1/32 kits that
came out in that decade, I finally decided they occupied way too much shelf
space when 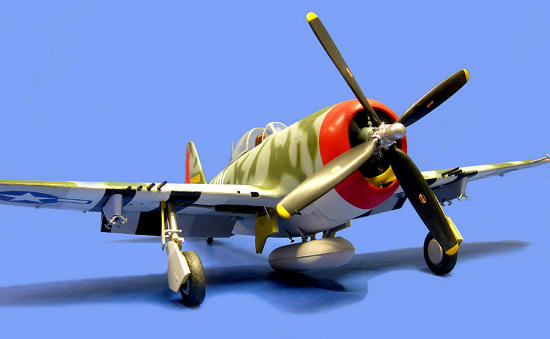 completed, so I quit purchasing/building them and shifted to the
growing 1/48 scale class of kits. I
successfully resisted 1/32 kits for nearly 30 years, but with the renewed
emphasis by kit manufacturers on 1/32 scale, I finally caved, and I purchased
several of them (hey, I didn’t have them in my stash, so I needed them!). The
Hasegawa P-47 is my re-entry into this scale, and it’s a winner. A total
pleasure to build, I found the detail incredible when I recalled the Revell and
Hasegawa 1/32 kits of yore. As Tom
says in his review, this kit is right up there with the Tamiya 1/48 kit as THE
definitive P-47 model kit (I have not seen the Trumpeter kits, so those who have
seen them and/or built one might have a different opinion about this).
completed, so I quit purchasing/building them and shifted to the
growing 1/48 scale class of kits. I
successfully resisted 1/32 kits for nearly 30 years, but with the renewed
emphasis by kit manufacturers on 1/32 scale, I finally caved, and I purchased
several of them (hey, I didn’t have them in my stash, so I needed them!). The
Hasegawa P-47 is my re-entry into this scale, and it’s a winner. A total
pleasure to build, I found the detail incredible when I recalled the Revell and
Hasegawa 1/32 kits of yore. As Tom
says in his review, this kit is right up there with the Tamiya 1/48 kit as THE
definitive P-47 model kit (I have not seen the Trumpeter kits, so those who have
seen them and/or built one might have a different opinion about this).
Believe it or not, I didn’t have a model of Gabreski’s jug in my collection, so I decided to build the post D-Day version of his mount as depicted in the kit. I went through the instructions to get a feel for which optional parts I should use to model this aircraft, and then jumped into the construction process. For Gabreski’s P47D-25, I opted for the hydraulic Hamilton-Standard prop vice the also included Curtiss-Electric symmetrical paddle prop used by later P-47 variants. Even though the kit’s cockpit floor does not represent the earlier variant corrugated floor, I opted not to recreate this via extra detailing (e.g., plastic strips).
|
CONSTRUCTION |
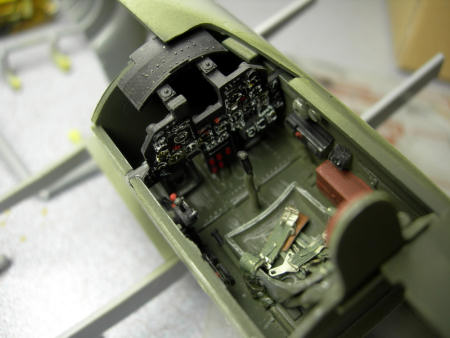
As usual, I started construction with
the cockpit. While others might want to add detail, I found the Hasegawa cockpit
to be full of detail. The only thing I added was a set of Eduard’s painted,
photo etch seat belts and shoulder harness. I painted the cockpit a
 dark green
and gave it a wash of black acrylic Liquitex. I then picked out details with a
silver artist’s pencil, and set the completed cockpit tub aside to move on to
other assembly steps.
dark green
and gave it a wash of black acrylic Liquitex. I then picked out details with a
silver artist’s pencil, and set the completed cockpit tub aside to move on to
other assembly steps.
Next, I tackled the radial engine. I
had a little trouble lining up some of the cylinder pushrods, but after a little
adjusting, I got them to line up. I painted the engine Testors Steel and then
gave it a wash of Liquitex black acrylic. The engine is a perfect candidate for
super-detailing, for those that are so inclined.
Once dry, I installed the engine in the cowling, which is in several
sections. I thought these would be difficult to line up, but they aligne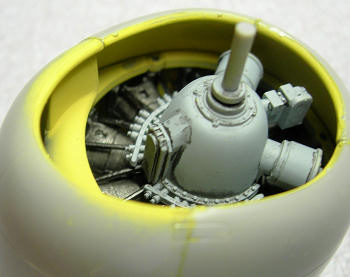 d just
fine, negating the need for any filling, sanding, etc.
d just
fine, negating the need for any filling, sanding, etc.
I then glued the cockpit to one half of
the fuselage and then glued the two fuselage halves together. With a little
work, the fuselage halves lined up pretty well. I did not need to use any putty
for the seams: only light sanding to completely smooth it.
The next assembly was the wings. Here,
one needs to decide on flaps down or fully retracted. I opted to build my kit
with the flaps down, even though I understand that the normal procedure was to
retract the flaps once the aircraft was on the ground. Once assembled, the wings
glue onto a set of spars, which really helps align and mate them to the
fuselage. If done correctly, this also negates the need for any putty to create
a smooth wing to fuselage seam.
I assembled the landing gear and the
gear doors, and painted both assemblies for later attachment to the model. After
I glued on the horizontal stabilizers, the turbo exhaust, and the tail wheel
housing the kit was ready for the paint shop. I planned to do an open canopy
version (the kit provides both open and closed canopies), so I masked the canopy
sections with Scotch tape and then used white glue to attach the canopy in the
closed position to the fuselage for painting (note: since the canopy braces on
Gabreski’s P-47 were natural metal, I could have just masked the cockpit instead
of covering it with the canopy, but this is a method I have always used when I
paint aircraft models. Old habits die hard!).
|
COLORS & MARKINGS |
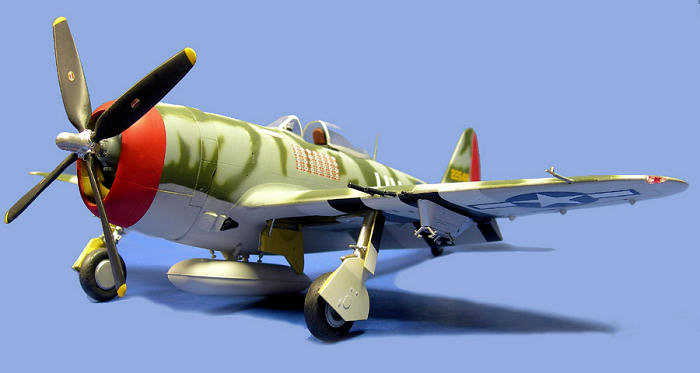
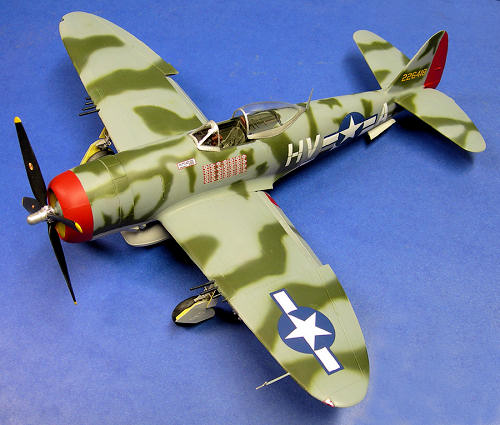
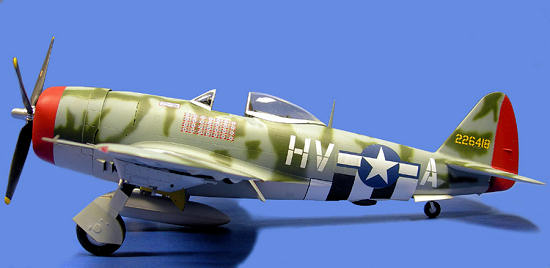 According to references, the underside
of Gabreski’s P-47D was light gray, and the topside was a darker, bluish gray
with dark green mottling. I opted for Testors Model Master paints to represent
these colors. I painted the underside, and then applied pin striping tape to
define the demarcation between the lower and upper surfaces. I then applied the
topside gray, and when dried, I tackled the dark green mottling. I decided to
free-hand this, as I didn’t think I had the patience to create masks for the
various dark green sections. This takes a steady hand, and mistakes ARE
inevitable (e.g., overspray, small paint runs, etc.), so some correctional
painting was in order.
According to references, the underside
of Gabreski’s P-47D was light gray, and the topside was a darker, bluish gray
with dark green mottling. I opted for Testors Model Master paints to represent
these colors. I painted the underside, and then applied pin striping tape to
define the demarcation between the lower and upper surfaces. I then applied the
topside gray, and when dried, I tackled the dark green mottling. I decided to
free-hand this, as I didn’t think I had the patience to create masks for the
various dark green sections. This takes a steady hand, and mistakes ARE
inevitable (e.g., overspray, small paint runs, etc.), so some correctional
painting was in order.
Once the overall camo scheme was
complete, it was time to mask and paint the red tail rudder and red nose
cowling. I masked these with pin striping tape, and then painted the masked off
areas with Testors flat red.
The next major decision was with
regards to the invasion stripes (on this post D-Day variant of Gabreski’s
aircraft, the top wing stripes had been painted over). Having had bad
experiences with large stripe decals before, I was nervous about using the kit
decals, so I decided to mask and paint the lower wing stripes. By the time I got
to the fuselage stripes, I revisited the decal sheet and decided that the
contours, if they worked, would save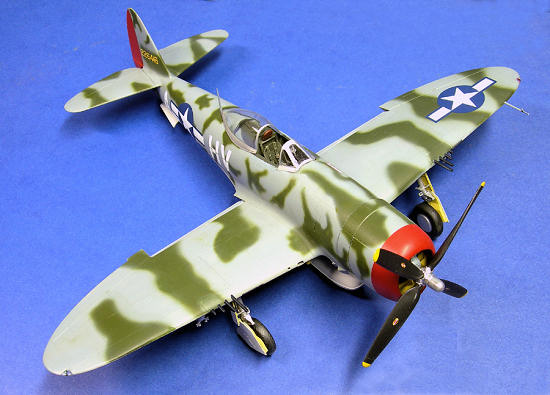 me a bunch of time, so I decided to try
them once I had clear-coated the entire aircraft in preparation for applying the
decals.
me a bunch of time, so I decided to try
them once I had clear-coated the entire aircraft in preparation for applying the
decals.
For the fuselage invasion stripes (and
all decals) I used a generous amount of Solvaset, and I must say that these
Hasegawa decals were a pleasant surprise. They laid down perfectly, and at this
point, I was kicking myself for not having used the kit decals on the wings.
Once the decals were dry, I shot
several coats of Testors Dulcote over the entire model to reduce the glossy
finish. I then popped off the two canopy sections, and painted the canopy braces
with Humbrol Silver. The final touch was to brush paint the prop hub with
Humbrol Silver (if you haven’t used this stuff, it is the best brush metal paint
I have ever used, and I highly recommend it. In fact, I am now using it for
spraying large natural metal areas on my kits rather than the various metalizer
paints that are available – it looks acceptable as natural metal, it can be
masked, and you can handle the kit once the paint is dry).
|
CONCLUSIONS |
And there you have it: I’m back in the 1/32 aircraft business and I must admit I am hooked! This is a great kit: the detail is more than ample; the fit is superb, and the decals are a pleasure. What more could one ask for in a modeling project? I highly recommend this kit to one and all!
|
REFERENCES |
1.
“P-47 Thunderbolt,”
Wikipedia, 2009.
2.
“Gabby Gabreski,”
Wikipedia, 2009.
3.
“Walter C. Beckham,”
P-47 Thunderbolt Pilots Association, 2009.
February 2009
If you would like your product reviewed fairly and quickly, please contact me or see other details in the Note to Contributors.