Monogram 1/48 P-47DD Twinbolt
| KIT #: | 6838 |
| PRICE: | $30 total |
| DECALS: | |
| REVIEWER: | Dale Rannals |
| NOTES: | Kitbashed |
| ALTERNATE HISTORY |
Sorry
…... didn't really exist.
Just a product of my imagination.
But if it was made …........
The
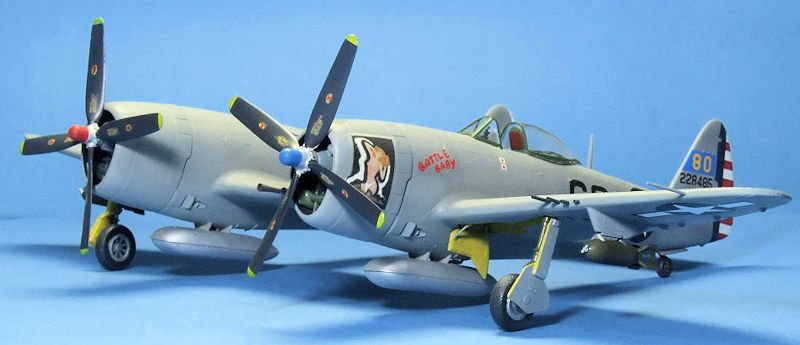
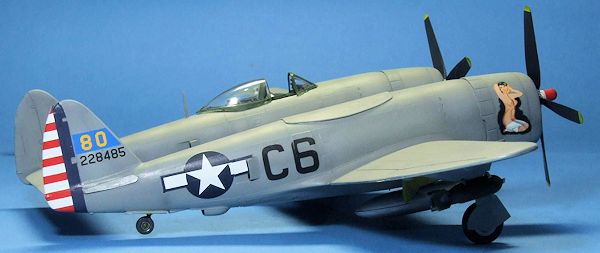
P-47DD Extreme Range Fighter.
That was the official designation of Republics’ massive
creation.
To the pilots they were the Twinbolts, or, with much more
affection, the “Big Jugs” or “Double-Dee’s”.
It was a simple solution to an urgent need.
The need was that of a fighter with a much longer range
than the current generation escorting bombers over Germany and the Pacific.
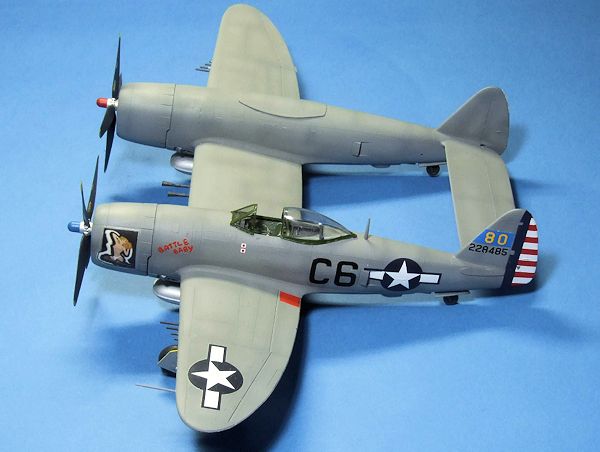
Two standard D models were mated together with a simple
center wing section.
The right cockpit was not needed and that space filled
with fuel tanks, and for the Pacific theatre one of the cockpit tanks could be
replaced with a Sperry Autopilot.
The center section wing housed two Oldsmobile 37mm
cannon, while the outer wings st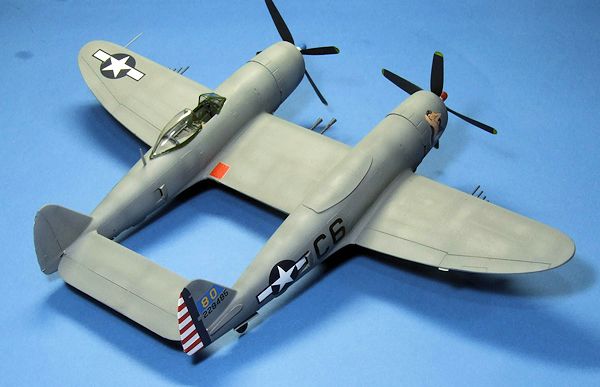 ill
retained the normal four .50's each.
Development was straightforward and quick.
Handling was tricky with the fuselage tanks filled, but
the simple solution was to select and use these up first.
The biggest problem was the landing gear; they were just
not robust enough for the task.
Adding the P-47N’s stronger legs helped, but accidents
still occurred, mostly when landing.
Standard procedures were written to jettison all under
wing stores and dump all remaining fuel except that needed to land with.
Trained with these steps in mind, almost all landing
events were eliminated within a few months of deployment.
ill
retained the normal four .50's each.
Development was straightforward and quick.
Handling was tricky with the fuselage tanks filled, but
the simple solution was to select and use these up first.
The biggest problem was the landing gear; they were just
not robust enough for the task.
Adding the P-47N’s stronger legs helped, but accidents
still occurred, mostly when landing.
Standard procedures were written to jettison all under
wing stores and dump all remaining fuel except that needed to land with.
Trained with these steps in mind, almost all landing
events were eliminated within a few months of deployment.
The massive aircraft were first received with disdain ….. certainly this behemoth would not be able to mix it up with the nimble German and Japanese fighters. But events proved otherwise, and soon pilots began to appreciate the big Jugs. There wasn't an airman around that wasn't comforted by the mere sight of a pair of Double-Dee's close by, and soon you couldn't find a group of pilots talking and not hear tales of their favorite Double-Dee's. So impressive were the big twins that they soon attracted the attention of servicemen everywhere ..... The normal C's, or even D's were hardly noticed when Double Dee's were near.............
| THE KIT |
Monogram's venerable 1/48 P-47 Thunderbolt kit is the basis for this whiffer.
I have constructed a number of Koster vacuform P-47
conversions over the last few years and this left me with a few leftover
fuselages and other odds and ends.
I thought for over a year about making a "Twinbolt" and
even went so far as to buy a section of bass wood to form the wing center
section.
But the project languished in the closet, just
 never had
the inspiration to start it.
But then, on the sites forum, there began a group build
featuring "WW2 twins."
A good friend and forum regular suggested to me that I
do a twin Thunderbolt, knowing my fondness for the type.
And nobody mentioned if the twin actually had to exist,
so back on the bench it all came.
So...........
never had
the inspiration to start it.
But then, on the sites forum, there began a group build
featuring "WW2 twins."
A good friend and forum regular suggested to me that I
do a twin Thunderbolt, knowing my fondness for the type.
And nobody mentioned if the twin actually had to exist,
so back on the bench it all came.
So...........
Monograms Bubbletop Thunderbolt consists of 39 parts of either olive or
silver colored plastic, depending on the year it was molded. (I had one
bubbletop kit molded in silver, and a spare fuselage in olive drab.)
The kit itself dates from 1967 and features raised
detail and panel lines.
Detail is quite crisp for its age and though there are
some shape issues, notably with the cowl, Monogram got the soul of the airplane
correct.
Somehow it just "looks" right.
Instructions have changed over the years, but always consist of easy to
understand drawings of the assembly steps.
The complete kit I had was dated 1983 and had markings
for "The Turtle.”
| CONSTRUCTION |
Construction began with taping the fuselage halves together, taping the
propellers on, and eyeballing the size of the center wing section.
I cut a piece of basswood to this length and slowly
began sanding this to an airfoil shape. I started here for I figured if I
couldn't get the center section done right, or even mostly right, then I may as
well not waste any more time on this project.
I compared the airfoil frequently to the shape of the
mating area of the fuselage.
Once I arrived at the shape I wanted, I wrapped/glued a
sheet of very thin styrene around the wood.
This way I could easily add rivet or panel line detail
later on.
 Well
then, on to the cockpit.
A pretty simple affair.
This consists of a tub, a stick, instrument panel, and
rudders.
I added some Eduard PE seat belts as it should be easily seen under the
bubbletop ..... I even believe they were American belts, but they may have been
British.
They look better than nothing, either way.
Well
then, on to the cockpit.
A pretty simple affair.
This consists of a tub, a stick, instrument panel, and
rudders.
I added some Eduard PE seat belts as it should be easily seen under the
bubbletop ..... I even believe they were American belts, but they may have been
British.
They look better than nothing, either way.
The fuselages were assembled and the "inner" wing mating areas were
sanded flat to accommodate the center section.
I added some metal rod to the basswood and drilled holes
in the fuselage so I would hopefully end up with something stronger than a butt
joint there.
I taped the fuselages to the basswood and then measured the
distance between the rudders.
Using that info I fabbed a center tailplane section out
of evergreen sheet; here I used the stock tailplane as a template to get the
familiar curve of the elevators at each end.
I
made no attempt to sand this into airfoil shape, I merely rounded the
leading edge with a sanding stick.
I figured it is thin enough anyway that nobody would
notice one way or the other.
Now it was time to assemble the two fuselages with the center section
and the center tailplane and attempt to get it all squared and straight.
I used 5 minute epoxy on the center wing, giving it a
couple minutes to thicken and trying to hold it all correctly until it finally
set up.
I managed to hold it all together; much to my surprise it did indeed
come okay.
Not perfect by any means …. the back right tail wheel hovers off
the ground a bit.
But I was a happy camper and moved on.
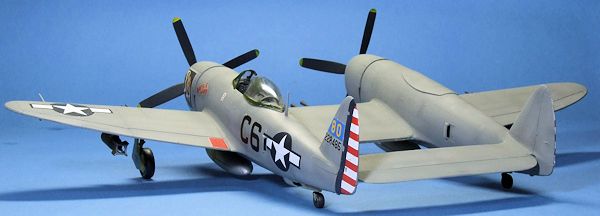 The
outer wings attached with no issues, I just needed to make sure the wing
dihedral was correct, or at least looked good. :-)
I cut the wing guns off both wings.
Monogram molds the guns along the seam, whereas the guns
should be level with the ground.
Not a deal-breaker by any means, but since I usually add
steel tubing for the guns anyway, it is something I try to correct.
The
outer wings attached with no issues, I just needed to make sure the wing
dihedral was correct, or at least looked good. :-)
I cut the wing guns off both wings.
Monogram molds the guns along the seam, whereas the guns
should be level with the ground.
Not a deal-breaker by any means, but since I usually add
steel tubing for the guns anyway, it is something I try to correct.
I then turned my attention to covering up the unused right cockpit area.
Since this was going to be a simple,
off-the-assembly-line conversion, I made some covers out of thin evergreen
plastic sheet to simulate riveted-on aluminum.
I did the same to the unneeded outboard tailplane slots.
I added some rivets around the perimeter of each with a
rivet tool.
I did things this way to give it that unrefined look of something
quickly put into production.
The tubes of putty came out next, and some quality time was spent over the few days (weeks) getting things smoothed out. Things weren't too bad in this respect; I've had some short-run kits that required more putty. Things got smooth eventually, or at least smooth enough.
| COLORS & MARKINGS |
At this point in a build I usually throw on an overall coat of some gray
paint I have mixed up, just to let me see the areas that still need attention.
This time, the aircraft was going to be gray anyway, so
it wasn't 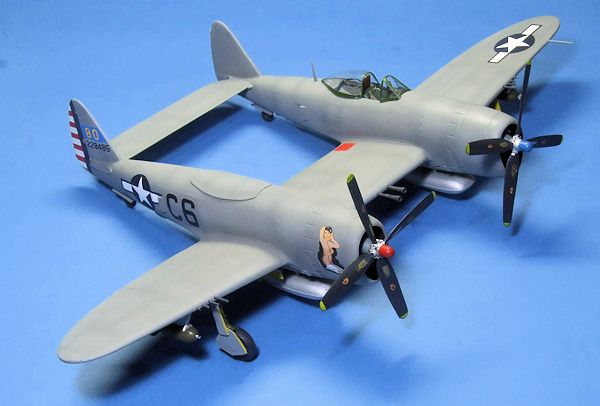 an
extra step at all.
I had spied a two-tone gray Warhawk stationed in the
Indian theatre from Squadron's P-40 In Action book.
I liked this as it was different from the norm.
So I sprayed the bottom Light Sea Gray and the topside
Neutral Gray.
Some lighter mixtures got sprayed in various panel centers, then
some darker mix along the panel lines.
I puttied, sanded, and touched up areas in need of
attention, and then threw a coat of Future on it all to gloss things up for
decals.
an
extra step at all.
I had spied a two-tone gray Warhawk stationed in the
Indian theatre from Squadron's P-40 In Action book.
I liked this as it was different from the norm.
So I sprayed the bottom Light Sea Gray and the topside
Neutral Gray.
Some lighter mixtures got sprayed in various panel centers, then
some darker mix along the panel lines.
I puttied, sanded, and touched up areas in need of
attention, and then threw a coat of Future on it all to gloss things up for
decals.
Decals came from a variety of slightly used Thunderbolt sheets I had in
the stash.
Most, including the pin-ups, came from a Zotz sheet.
These are very nice sheets that contain several
different schemes each.
After a matte coat (I use Tamiya flat base mixed with Future), I
attached the landing gear, canopy, props, and hanging bits.
And she was done.
| CONCLUSIONS |
 I
will always recommend Monogram Thunderbolts to any modeler, any age.
They build up nice and can still be had cheap.
They are also a great way to use up those extra decal
sheets.
As for the Twinbolt itself, what can I say?
A fun way to use up some spare parts, very little money
invested, and something unique on the shelf.
Do I care that it didn't really exist?
Not at all.
Have fun my friends!
I
will always recommend Monogram Thunderbolts to any modeler, any age.
They build up nice and can still be had cheap.
They are also a great way to use up those extra decal
sheets.
As for the Twinbolt itself, what can I say?
A fun way to use up some spare parts, very little money
invested, and something unique on the shelf.
Do I care that it didn't really exist?
Not at all.
Have fun my friends!
| REFERENCES |
My Imagination
February 2013
If you would like your product reviewed fairly and fairly quickly, please contact the editor or see other details in the Note to Contributors.