Meng 1/48 P-51D Mustang
| KIT #: | LS-006 |
| PRICE: | $45.00 |
| DECALS: | Two options |
| REVIEWER: | Dan Lee |
| NOTES: | Aeromaster 48-226 decals. |
| HISTORY |
The history of the P-51D has been done better in other Modeling Madness articles so I will avoid rehashing that, but instead focus on the subject of the build.
The 2nd Fighter Squadron was activated in 1940 at Selfridge Airfield as the 2nd Pursuit Squadron. It was later renamed the 2nd Fighter Squadron and assigned to the 52nd Fighter Group which was then sent to England as part of the 8th Air Force assigned to bomber escort flying Spitfires. Thanks to the desperate need for fighter groups in the Med Theater of Operations, the 52nd Fight Group with the 2nd Fighter Squadron was sent to the Med. In April of 1944, their Spitfires were replaced with P-51 Mustangs.
Among their ranks was one Fred Ohr. Fred had an unusual path to become a pilot as he was born in Idaho to immigrant Koreans in 1919. He fell in love with aviation and wanted to be a military pilot from the age of 6. Fred tried to join various branches of the US military to attempt to get a college education which he felt was necessary for him to become a pilot. Instead he had to deal with outright racism from recruiters.
 After high school, he went to college and
joined the Idaho National Guard. Fred was assigned to the 116th
Cavalry Brigade and later transferred to artillery. The 116th
was Federalized in 1940 along with Fred. In 1942, a friend of his told him that
the Air Corps was coming to the base to recruit pilots and aircrew. Then
communications Sgt Ohr decided to provide moral support for his friend, but by
odd circumstances and luck he ended up taking the exam and passed the physical.
Fred was inducted into flight training in 1941 then in 1942 was sent to England
initially assigned to the 52nd
Fighter Group. He was posted as an engineering officer/test pilot to the 68th
Maintenance Squadron and assigned to a depot near Kasserine Pass.
After high school, he went to college and
joined the Idaho National Guard. Fred was assigned to the 116th
Cavalry Brigade and later transferred to artillery. The 116th
was Federalized in 1940 along with Fred. In 1942, a friend of his told him that
the Air Corps was coming to the base to recruit pilots and aircrew. Then
communications Sgt Ohr decided to provide moral support for his friend, but by
odd circumstances and luck he ended up taking the exam and passed the physical.
Fred was inducted into flight training in 1941 then in 1942 was sent to England
initially assigned to the 52nd
Fighter Group. He was posted as an engineering officer/test pilot to the 68th
Maintenance Squadron and assigned to a depot near Kasserine Pass.
In Feb 1943, Rommel's humiliation of the II Corps at Kasserine Pass forced the USAAC officers and men assigned to the depot to flee ahead of the Afrika Korps in whatever vehicles they could find. His CO (a rear echelon glory hound who wanted a DFC) took off in one P-40 and Ohr flew in the other which had just arrived due to maintenance issues. Ohr's P-40's engine exploded in flames soon after takeoff and somehow Fred managed to land the burning plane back at the depot airfield. He then tried to set all the abandoned fuel and aircraft on fire with no means of escape. Fortunately for him, a truck carrying the crew chief and maintenance men came back for him and helped him destroy what equipment within reach. When Fred got back to American lines, he discovered that his CO claimed that he and Fred were bounced by Bf-109s and Fred was shot down and killed. Not very happy with this turn of events, Fred demanded to the senior commanding officer that something be done or a transfer. The senior commander wrote out orders for him to join a fighter unit. Soon he found himself back with his old unit, the 52nd Fighter Group.
Fred Ohr didn't spend much time training
as a fighter pilot before going overseas and found himself having take a crash
course in fighter pilot tactics and training. He was fortunate that he learned
many of the hard lessons of being a fighter pilot without paying the ultimate
price and soon became an effective fi ghter pilot. Thanks to rumors of German
aces like Hans-Joachim Marseille, Fred never took any Axis fighter pilot for
granted which served well him in the air.
ghter pilot. Thanks to rumors of German
aces like Hans-Joachim Marseille, Fred never took any Axis fighter pilot for
granted which served well him in the air.
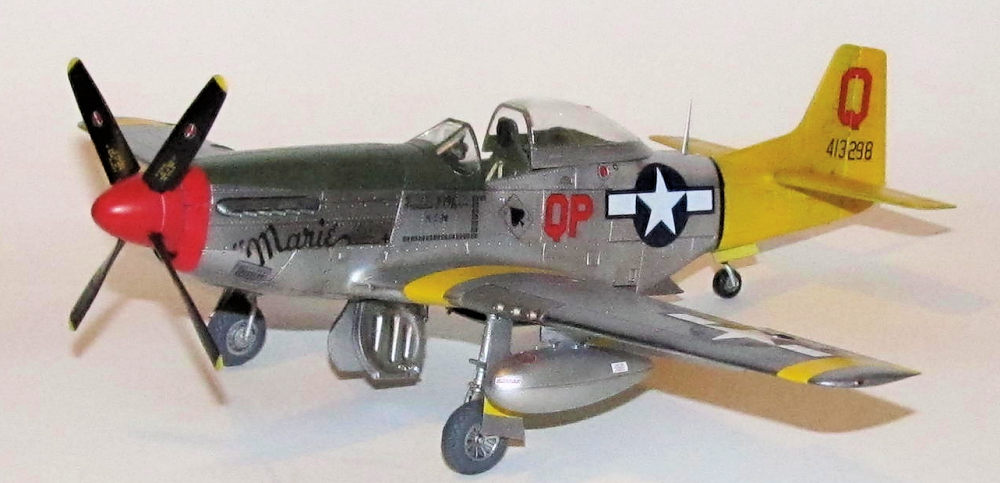
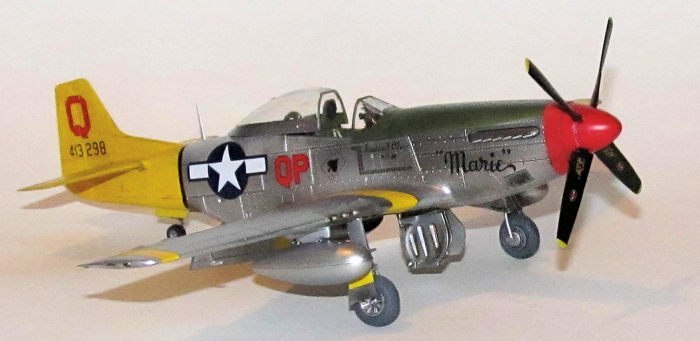
The 52nd Fighter Group was unique in that they flew Spitfires for an extended period of time from 1943 to April of 1944 where they were re-equipped with P-51s for long range bomber escort missions. At the time of the change, Fred had already shot down a Ju-88 while flying a Spitfire. He would shoot down five more Axis planes as well as destroy 17 planes on the ground in his P-51s. When Fred's tour ended in Nov 1944, he was a Major and the commander of the 2nd Fighter Squadron. Fred Ohr earned the DFC with an oak leaf cluster, Bronze Star and Air Medal with 18 oak leaf clusters. His P-51D “Marie” did not survive the war as it was shot down over Austria on December 8, 1944.
After the war Fred decided that a military fighter pilot's life wasn't good for a family life and gave up military aviation. Instead he studied dentistry and became a dental surgeon in Chicago. He died in 2015 at the age of 96.
A couple of years ago I fell down a wiki hole (searching for one thing on Wikipedia and then following links) and ended up on the page of Fred Ohr, the only Korean American Fighter ace who flew with and commanded the 2nd Fighter Squadron till November 1944.
| THE KIT |
The Meng P-51D kit came out with a lot of fanfare in late 2016 as Meng claimed it could be built cement free. It is a really nice snap kit, but I would still use glue. The detail of the kit is much better than the older generation Tamiya and Hasegawa P-51D kits.
It seems to me similar to the wonderful Tamiya 1/32 P-51D kit especially in terms of parts layout and breakdown minus the engine and other interior details. The kit comes with six different sprues, five sprues of dark grey plastic and one clear sprue that contains the canopy/windscreen.
Part A-main fuselage
Part B-exterior parts
Part C-wings
 Part D-most of the interior components
Part E-interior parts, wheels, prop and exhausts
Part F-two different types of canopies, windscreen, gunsight and armored plate glass
The P-51D interior is well defined with enough detail for most folks unless you really really want extreme fidelity. In my opinion, the only thing lacking in the cockpit is the seatbelts/restraints.
The Meng P-51D comes with three different types of external stores (250lb bombs, 75 gallon metal drop tanks and 108 gallon paper drop tanks) and two different types of canopies (late style Inglewood and Dallas.) The landing gear wheels are two piece affairs with the tire and rim as separate parts to make painting easier. It also comes with two different types of props, the cuffed Hamilton Standard prop and what I believe to be the rounded Aeroproducts prop. It also has two different types of exhausts and radiators. Meng used a slide mold for the exhausts so they are actually hollow which is a nice touch.
The surface detail is well done. A lot of divots/rivets and crisply done panel lines. One complaint that came out is the wings aren't puttied as they were during WW2 so there are a lot of excess “rivets” and panel lines on the wings. Much sharper detail than the 1/48 Tamiya and Hasegawa kits and closer to the 1/32 Tamiya kit in terms of surface detail. There is no flash on the parts just the inevitable mold markings.
The decal sheet comes with two different markings. Meng chose two prominent markings (but not from the 8th AF.) One is American Beauty from the 31st Fighter Group and Short Fuse Sallee from the 354th Fighter Group. Both require NMF. Of course, one can choose the many other markings available from aftermarket decal sheets (like I did.)
| CONSTRUCTION |
It all began with the cockpit sidewalls
being painted Xtracrylix interior green with certain areas being hand painted
with various shades of brown and black and various details picked out in with a
toothpick  dipped in white, yellow or red paint. When the paint was dry, I used
some of the interior placard decals from the kit sheet. The instrument panel,
radio and floor was sprayed with Tamiya flat black while the gunsight was brush
painted Tamiya flat black. Meanwhile the seat parts were sprayed Tamiya flat
green. When the seat was dry and glued together I then attached the Eduard Steel
PE restraints to the seat using small drops of CA glue. The steel PE was very
flexible compared to the old style brass PE (I do recommend them if you get a
chance to get a set.)
dipped in white, yellow or red paint. When the paint was dry, I used
some of the interior placard decals from the kit sheet. The instrument panel,
radio and floor was sprayed with Tamiya flat black while the gunsight was brush
painted Tamiya flat black. Meanwhile the seat parts were sprayed Tamiya flat
green. When the seat was dry and glued together I then attached the Eduard Steel
PE restraints to the seat using small drops of CA glue. The steel PE was very
flexible compared to the old style brass PE (I do recommend them if you get a
chance to get a set.)
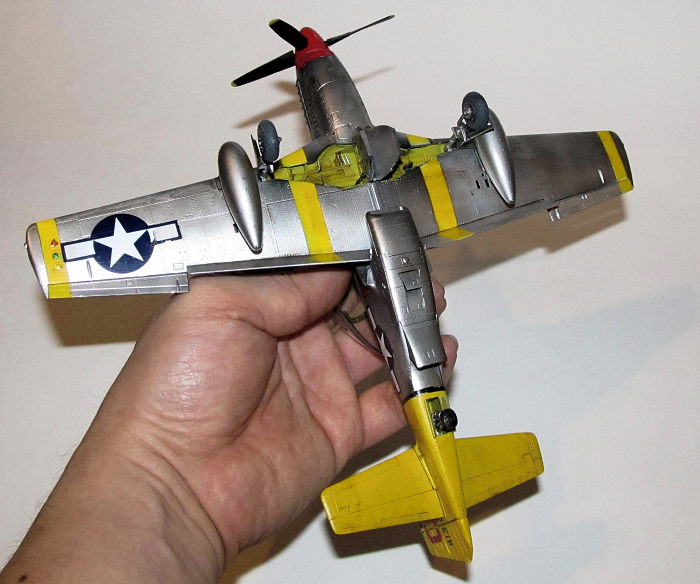
I painted the interior grills and radiators with Tamiya metallic grey and then sprayed the interior of the intake and exhaust Vallejo dark aluminum. The prop and blades are separate. I sprayed the prop tips and prop hub flat white and then sprayed the prop tips Gunze chrome yellow and the prop hub Tamiya gloss red. I masked off the tips and then sprayed the blades Tamiya flat black. The propellor blades were added to the hub pieces and glued together. The wheel wells were painted with a 50/50 mix of Tamiya flat yellow and flat yellow green. The fine details were painted using Vallejo Metal Color Silver and a fine tipped brush.
I didn't follow the instructions entirely when I assembled the wing. First, I used CA glue to glue the leading edges and used Tamiya Extra Thin glue for the internal joins mostly to eliminate the phantom seam. When the CA glue was cured, I sanded it smooth and polished the seams with 3200 and 3600 grit polishing cloths. Second, I left off the ailerons and flaps because I know that I would somehow break them. I cut off most of the mounting tabs on those parts to ensure that I would be able to add them later. Unfortunately, I added the landing gear as per instructions which was something I would regret later.
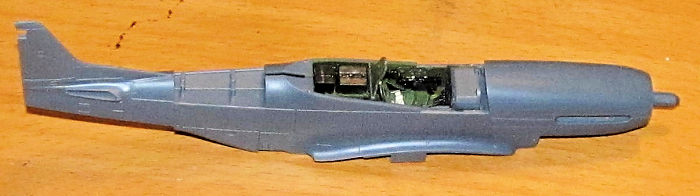 The interior parts were added to the main
fuselage parts as per instructions and then were press fit together except the
bottom portion of the tail containing the tail wheel (part B29.) The reason I
left it off is because I know that area of the Mustang is a pain in the rear to
mask and paint so I thought I would be smart to add it later when it was
painted. I glued the interior joins with a dab of Tamiya extra fine cement. I
used CA glue for the leading edge of the rudder seam which was sanded and
polished when dry.
The interior parts were added to the main
fuselage parts as per instructions and then were press fit together except the
bottom portion of the tail containing the tail wheel (part B29.) The reason I
left it off is because I know that area of the Mustang is a pain in the rear to
mask and paint so I thought I would be smart to add it later when it was
painted. I glued the interior joins with a dab of Tamiya extra fine cement. I
used CA glue for the leading edge of the rudder seam which was sanded and
polished when dry.
I then attached the wings to the fuselage. I glued the forward bottom piece to the plane using Tamiya extra thin glue in the fuselage portion and CA glue (again to eliminate the phantom seam) for the leading edges that form the forward portion of the wheel well. I sanded and polished the leading edges when the glue was dry.
I painted part B29 flat white then chrome yellow. I ended up trimming most of the tabs to make it fit into the fuselage prior to painting. I wasn't as smart as I thought as I had to fill the seam between part B29 and the rest of the fuselage (using Vallejo plastic putty.) So now the Meng P-51D was ready as it was going to be for painting.
| COLORS & MARKINGS |
I masked off the interior and landing gear with tape and wheel wells with slightly oversized cut sponges (to keep them from falling out.) I started spraying the wing areas, stabilizers and tail designated by the instructions for the chrome yellow wing stripes flat white and then painted them chrome yellow. I also sprayed a portion of the nose flat white then Tamiya Gloss red. When dry I masked those areas off with correct width strips of craft tape for the stripes, nose and the entire tail. The canopy and windscreen were masked off and painted Xtracrylix interior green.
 I sprayed Vallejo Black acrylic primer on
the plane and canopy in light coats and it sat for a couple of days to cure.
When I was ready, I sprayed on several very light coats of Vallejo white
aluminum. In my experience, I have found that I have to do this to prevent the
metal paint from running or blotching. I don't think Vallejo Metal Colors are as
good as lacquer metallic paint and it has similar quirks to other metallic
paints, but it has a lot of pluses as it is a lot more forgiving, more durable
in handling and much less toxic (before I could only paint NMF aircraft outside
in the summer due to the fumes.)
I sprayed Vallejo Black acrylic primer on
the plane and canopy in light coats and it sat for a couple of days to cure.
When I was ready, I sprayed on several very light coats of Vallejo white
aluminum. In my experience, I have found that I have to do this to prevent the
metal paint from running or blotching. I don't think Vallejo Metal Colors are as
good as lacquer metallic paint and it has similar quirks to other metallic
paints, but it has a lot of pluses as it is a lot more forgiving, more durable
in handling and much less toxic (before I could only paint NMF aircraft outside
in the summer due to the fumes.)
When the main paint coat was dry I masked off part of the nose and painted the area around the exhausts with a light coat of Vallejo Steel. The underside intake and gun port parts were painted dark aluminum. Next, I masked off the lower areas of the nose and sprayed on lightened Tamiya Olive Drab XF-62 paint for the anti-glare panel and the windscreen. The various parts like the fuel tanks, wheels, stabilizers, ailerons, flaps, landing gear doors, top portion of the rear fuselage and wheels were painted, masked and/or painted as per the decal sheet markings. When the paint was dry, I sprayed on a couple of light coats of Gunze Clear on the plane, parts and propeller in preparation for the decals.
I wanted to build Fred Ohr's plane so I used Aeromaster Sheet 48-226 which I bought via a well known auction site. The 20 year old decals held up for the most part. Some of the edges frayed and needed to be repaired with paint and a fine brush, but overall the decals held together and stuck to the model. I used some Microsol and Microset to get them to snuggle down into the details. I used some of the stencils from the kit decals, but generally avoided them (not because they're terrible, but because I didn't need them.)
I lightly weathered the panel lines with a light burnt umber watercolor wash while the wheel wells were made a bit more grimy with a heavier version of the wash. Once dry I wiped away the excess with damp Q-Tips then sprayed on Xtracrylix Satin finish for the final coat. The Vallejo metallic coat worked as advertised as it didn't change color or tone unlike other metallic paints.
| FINAL BITS |
It was at about this time the model fell out of the box as I was moving it and broke the tail wheel and the portside landing gear. &$**%*#((#*$(((!!!!! I glued the broken pieces back on and let it sit for a day or two before continuing.
The canopy, exhausts, top portion of the rear fuselage, gun ports and underside
intake were added to the model after painting but before the decals. The fit is
okay, but not great. I am sure that it would have
 gone better if I had added
them before painting, but I was getting really sick of masking at this point
which explains why I left these parts off till later. I really didn't like
adding the sliding canopy on before the final coat because of the increased
chance of breaking it off.
gone better if I had added
them before painting, but I was getting really sick of masking at this point
which explains why I left these parts off till later. I really didn't like
adding the sliding canopy on before the final coat because of the increased
chance of breaking it off.
I added the wheels to the landing gear. It was a press fit and I was careful not to snap off the portside landing gear. The 75 gallon metal fuel tanks with sway braces were glued in (the 108 gallon paper tanks were only used in the ETO.)
I snapped the windscreen into place, but the fit isn't as good as advertised so it popped out a couple of times before I glued it in place with Tamiya extra fine cement. I glued in the stabilizers and tail to the rudder and I was finally finished my Meng P-51D Mustang. Lastly I brush painted all the landing and ID lights with various colors of Tamiya clear paints.
| CONCLUSIONS |
I was glad I finished the kit, but more for the markings though. It was an honor to build Fred's P-51D. I was surprised to find out after I finished this that it was a P-51D-5NA which initially didn't have the tail fillet of the later versions although a lot of them were retrofitted with the tail fillet. I “decided” that Fred's Marie had a tail fillet kit retrofitted to his Mustang and left it at that.
Here is what I thought of the Meng P-51D based on my experience:
The Pros
The cockpit is detailed enough for most modellers including a resin/PEholic like myself. It really only needs aftermarket seat belts. I do recommend the Eduard PE steel seatbelts.
It was designed to limit the number of seams to be filled/sanded. I only had to fill/sand the leading edge of the wings and the rudder. That was it.
The separate gun sections. One of the worst parts of the Tamiya kit and a headache to fix by aftermarket or scratch build.
I like how the Meng kit keeps the dihedral of the wings and the correct angle of the landing gear, both notoriously tricky to keep in the Tamiya kit.
The Cons
Who thought it was a good idea to add most of the fiddly parts before painting? There is a reason why most modellers leave them off as I broke the portside landing gear and the tail wheel during painting.
The fit wasn't as snug as they hoped it would be. I did a lot of shaving and test fitting and it still didn't fit as good as advertised. I did use some filler (Vallejo plastic putty) to fill in the more obvious gaps.
I did not like the way the canopy and windscreen was added. The windscreen has a tendency to pop out. I would have preferred to add the canopy and windscreen after the fact and that the windscreen be less snug.
The prop was too snug. I prefer the Tamiya method of polycaps mostly because I like to spin the prop of my prop models.
I disliked adding the separate flaps before painting. I had to cut off the tabs to make them fit in after assembling the wing. If I followed the instructions it would have been a nightmare to mask/paint and I know I would have broken at least one of them off.
As an engineer, I know that design compromises are a fact of life and I also know process. I really did not like the build order in the instructions. If you are building the schemes supplied in the kit then the build order is fine, but if you are building one that has a painted tail and wing stripes (which is a lot of masking) then you will probably not like the build order of the Meng kit.
So there it is. Is the Meng kit a good kit? Yes, it is. It is definitely a generational step up from the earlier Tamiya and Hasegawa P-51Ds. It is not the perfect kit and will require some forethought to build.
| REFERENCES |
http://ilvets.ltc.k12.il.us/ilvets/VideoGallery/VideoPlayer/TabId/136/VideoId/70/Fred-Ohr.aspx
29 January 2018
Copyright ModelingMadness.com
If you would like your product reviewed fairly and fairly quickly, please contact the editor or see other details in the Note to Contributors.
Back to the Main Page Back to the Previews Index Page Back to the Review Index Page