Weijun Models (Bronco) 1/35 Piper L-4H Cub
| KIT #: | 35014 |
| PRICE: | $44.95 at www.greatmodels.com |
| DECALS: | One option |
| REVIEWER: | Dan Lee |
| NOTES: |
| HISTORY |
Borrowed from
Scott’s preview:
The Piper Cub's
military use was really quite extensive, though little has been written about
it. It quickly became a familiar sight wherever US forces were in action or
based. First Lady Eleanor Roosevelt took a flight in a J-3 Cub, posing for a
series of publicity photos to help promote the CPTP. Newsreels and newspapers of
the era often featured images of wartime leaders, such as Generals Dwight
Eisenhower, George Patton and George Marshall, flying around European
battlefields in Piper Cubs. Civilian-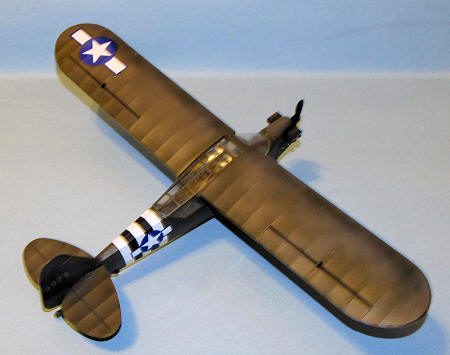 owned
Cubs joined the war effort as part of the newly formed Civil Air Patrol (
owned
Cubs joined the war effort as part of the newly formed Civil Air Patrol (
Piper developed a
military variant ("All we had to do," Bill Jr. is quoted as saying, "was paint
the Cub olive drab to produce a military airplane"), variously designated as the
L-4, O-59 and NE-1. The variety of models were collectively nicknamed
“Grasshoppers” and were used extensively in World War II for reconnaissance,
transporting supplies and medical evacuation. L-4s were also sometimes equipped
with lashed-on infantry bazookas for ground attack. Mechanically identical to
the J-3, the military versions were equipped with large Plexiglas windows
extending over the top of the wing and behind the rear-seat passenger, and the
side windows were enlarged. The Grasshopper was so influential to ground battles
and the war that the Luftwaffe awarded twice as many "points" towards combat
medals for Cub kills as they did for Allied fighter aircraft.
In
After the war, most
L-4s were destroyed or sold as surplus, but a few saw service in the Korean War.
The Grasshoppers sold as surplus in the
| THE KIT |
See Scott’s Preview of the kit.
| CONSTRUCTION |
I received the
review kit in Sept which had already been started (only the prop and wooden deck
were painted black.)
I sprayed the
interior cockpit areas with a mixture of Tamiya OD and Khaki Drab based on the
photos I’ve seen of restored aircraft and Wiki (!!?!).
I used some of the brass PE buckles to make seatbelts and harnesses, but
I opted not to add all of them because I have had some difficulty with making
them before (and the fact that the cockpit would be enclosed.)
The instrument console instruments were hand painted gloss black and dry
brushed white to make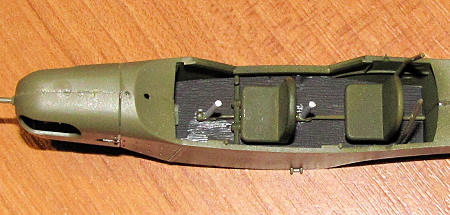 the instrument detail pop out.
The assembly of the
cockpit proved to be the most difficult part of the build due to the internal
bracing with did not fit as well as the instructions would have you believe.
Nothing lined up the way it was supposed to, but I managed to align the internal
bracing so that like it was assembled by competent workmen instead of by Picasso
(I was very wrong about that.)
Fuselage assemble occurred simultaneously with the cockpit and it went much
better than the cockpit. I left off
the landing gear as there were some sink marks and the seams needed to be dealt
with.
The engine was also
not an easy assembly particularly the engine cylinders which were two piece
assemblies that had difficult gaps to deal with due to the surface corrugation.
I tried to fill the gaps with
Next up were the
wings and glasshouse canopy. The
way the plane is assembled is that one has to assemble the canopy before the
wings. I used Tamiya extra thin
glue to attach the clear bits on which worked out okay except for one area where
the glue squeezed out of a seam and left a mark.
I then masked off the clear bits using Tamiya tape cut with an Exacto
knife with a new blade (and the interior was masked off with painters tape)
because I figured this made sense before adding the wings to the fuselage.
The wings were straight forward to assemble.
I left off the PE parts for the flaps because the instructions were
rather vague.
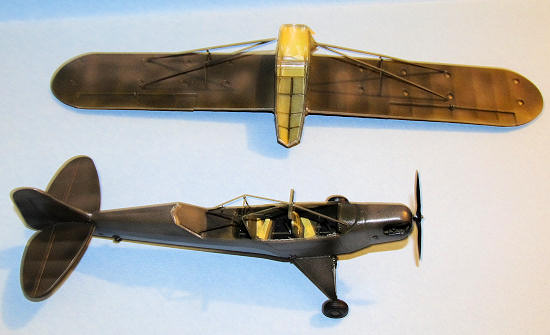 I glued on
the wing bracing/struts and fitted the entire wing assembly to the fuselage.
I thought I had the internal cockpit frame aligned, but I did not notice
it was off till I removed the masks and there was nothing I could do about it.
The wing bracing/struts were actually a couple of millimeters too short
and I had to glue cut plastic rod to compensate for it,
I glued on
the wing bracing/struts and fitted the entire wing assembly to the fuselage.
I thought I had the internal cockpit frame aligned, but I did not notice
it was off till I removed the masks and there was nothing I could do about it.
The wing bracing/struts were actually a couple of millimeters too short
and I had to glue cut plastic rod to compensate for it,
There were some
gaps between the fuselage and clear bits so I added some Vallejo plastic putty
into the gaps and removed the excess with damp Q-Tips.
At this point I added the forward windscreen.
One thing I did not do was put nuts on glass, I mean, add the plastic
nuts that are supposed to be added to the windscreen frame.
It is not like anyone is going to notice.
Lastly, I glued the
landing gear to the underside of the fuselage, but did not add the wheels till
later.
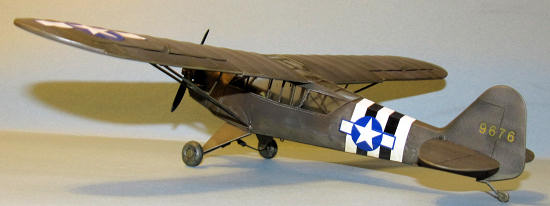
Colors and Markings
Painting
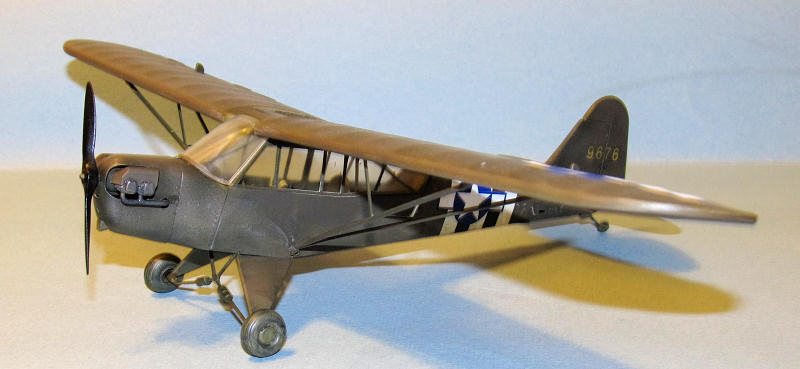
The L-4s were
painted the browner OD that was common in WW2.
Unfortunately, I don’t have many Gunze OD left so I opted to use a mix of
XF-62 OD (which is closer to a dark green) and XF-51 Khaki Drab which I think is
closer to the browner WW2 OD.
The wheels were painted OD first and then the small hubs were masked using Tamiya tape and then painted NATO black.
| COLORS & MARKINGS |
 I was warned
by Scott that the Bronco Decals weren’t all that great.
He wasn’t kidding. The
decals weren’t too bad on paper except the color of the insignia blue which had
a purple tinge and the black numbers which were supposed to be white.
Nothing bad occurred when I dropped them in warm water.
It was a whole other story when I got them on the model.
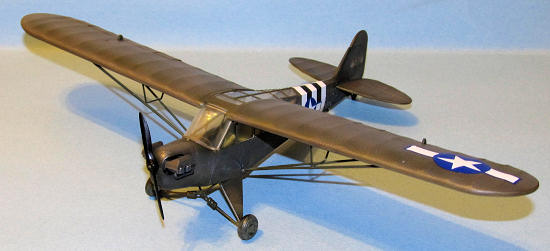
I ended up shredding the wing invasion stripes because of my clumsiness
and grabbing them while I had Solvaset on them but no issues with the wing
insignia. Next I added the fuselage
stripes and insignia (one decal per side) and although I lined everything up,
the decals did not wrap around the fuselage properly.
Last I added the yellow bureau numbers on the tail.
I was not happy that the yellow was not opaque enough to prevent the
darker OD from showing through. It
might be best to build this as a civy plane or get (if possible) aftermarket
decals.
I was warned
by Scott that the Bronco Decals weren’t all that great.
He wasn’t kidding. The
decals weren’t too bad on paper except the color of the insignia blue which had
a purple tinge and the black numbers which were supposed to be white.
Nothing bad occurred when I dropped them in warm water.
It was a whole other story when I got them on the model.
I ended up shredding the wing invasion stripes because of my clumsiness
and grabbing them while I had Solvaset on them but no issues with the wing
insignia. Next I added the fuselage
stripes and insignia (one decal per side) and although I lined everything up,
the decals did not wrap around the fuselage properly.
Last I added the yellow bureau numbers on the tail.
I was not happy that the yellow was not opaque enough to prevent the
darker OD from showing through. It
might be best to build this as a civy plane or get (if possible) aftermarket
decals.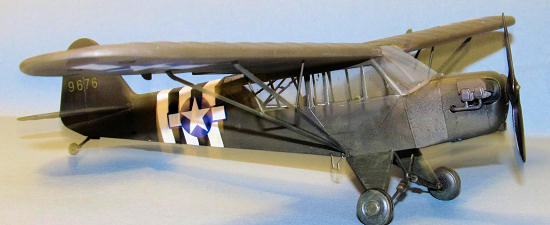
Weathering and
Final Coat
Due to the faded
and blotchy paint, I left weathering to the underside of the plane.
I used a dark red water color wash and when that was dry I dry brushed on
several coats of Vallejo ochre yellow to add contrast and dust effects.
Some of the excess was wiped off with wetted Q-tips.
Lastly, I used Tamiya’s weathering set to add exhaust stains.
Once all the weathering agents were dry, I sprayed on Xtracrylix Flat
varnish for the final coat and removed the canopy masks.
| FINAL CONSTRUCTION |
I glued the wheels on the landing struts and added the boarding step. Next the engine pieces were added. The last piece to be added was the prop which popped into place and I had a finished L-4 Grasshopper.
| CONCLUSIONS |
 The Bronco
L-4 isn’t a complex kit nor is it a really tough build.
The kit is fairly straight forward to construct with the only area to
really watch out for is getting the internal bracing correct and to lengthen the
wing struts.
The Bronco
L-4 isn’t a complex kit nor is it a really tough build.
The kit is fairly straight forward to construct with the only area to
really watch out for is getting the internal bracing correct and to lengthen the
wing struts.
I would recommend
that if they are available that if you can get aftermarket decals to replace the
kit ones because the kit decals are lousy or build it as a civilian aircraft.
Overall not a bad kit.
December 2010
Thanks
If you would like your product reviewed fairly and quickly, please contact me or see other details in the Note to Contributors.