CMR 1/72 P-63D Kingcobra
| KIT #: | 5029 |
| PRICE: | $32.99 SRP |
| DECALS: | One option |
| REVIEWER: | Dan Lee |
| NOTES: | Resin kit with vac canopy |
| HISTORY |
 The Bell
P-63 KingCobra was primarily used by the Soviet Union against both the Germans
and the Japanese despite the fact that they agreed to only fly the P-63 against
the Japanese based on the Lend Lease agreements.
It was an upgraded more powerful version of the P-39
Aircobra which proved to be an excellent fighter bomber and low level
dogfighter.
The Bell
P-63 KingCobra was primarily used by the Soviet Union against both the Germans
and the Japanese despite the fact that they agreed to only fly the P-63 against
the Japanese based on the Lend Lease agreements.
It was an upgraded more powerful version of the P-39
Aircobra which proved to be an excellent fighter bomber and low level
dogfighter.
There were
several versions of the P-63, the D model was unique in that it had a larger
wing and a bubble canopy.
There was only one D built which is the subject of this
kit.
| THE KIT |
This
particular Czech Master Resin kit comes with approximately 20 pieces including a
one piece wing and fuselage.
It also comes with a couple of vacuformed canopies,
decals and a set of instructions.
FYI, this is my first ever resin kit. I bought this on sale when there was an attempt at a Resin Group build in the MM forum.
| CONSTRUCTION |
 My first task was to wash the parts with dish soap and warm water to
remove the mold release agent.
My first task was to wash the parts with dish soap and warm water to
remove the mold release agent.
The model
went together very easily.
I glued the wings and intake on the one piece fuselage.
Filled in the gaps and pinholes with Vallejo Plastic
Filler, did a little bit of sanding around the intake piece and lightly wet
polished the surface with various grades of polishing cloths in preparation for
the paint job.
I ran into
trouble with the ailerons.
These were glued on and broken off and then glued on and
broken off several times mostly due to clumsy handling.
To say that was I was unhappy about it was an
understatement.
It involved a lot of gluing then sanding.
The various small parts were removed from the casting blocks and cleaned
up in preparation for painting.
| COLORS & MARKINGS |
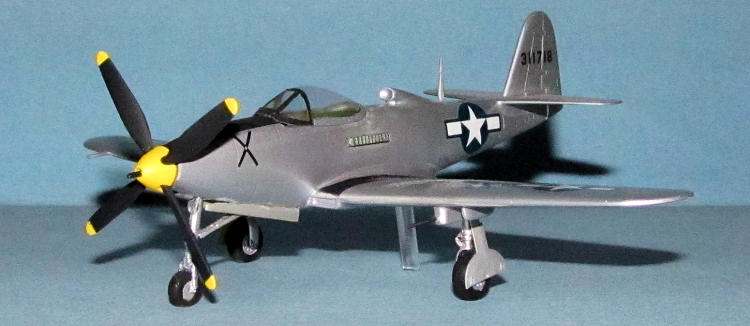
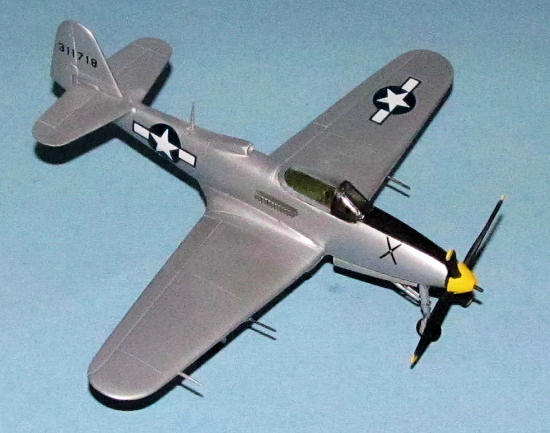
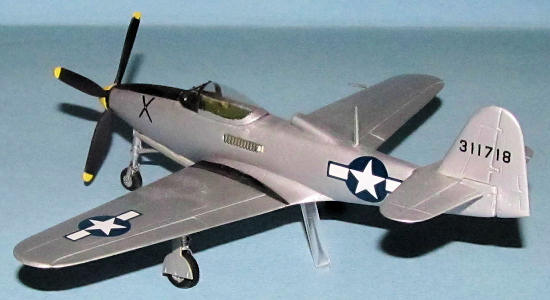
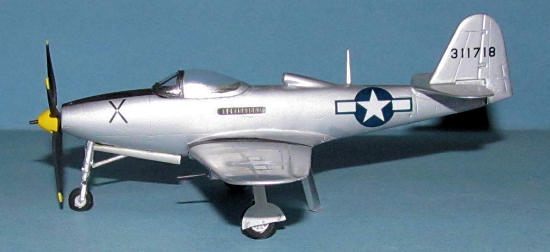
The P-63D-1
is a NMF plane.
I sprayed the entire plane and the various parts with Tamiya Fine
Surface Primer.
I didn’t have too many problems with it and polished the surface
several times with varying grades of polishing cloths till it got very shiny.
I sprayed on the Tamiya TS-30 Old Leaf Silver in two
thin coats.
The paint was polished but I did not use any polishing powder
with it.
I thought about varying the colors of the metal, but decided against it.
FYI, I
also painted the tiny parts like landing gear well doors at the time.
 When
everything was dry, the exterior was masked off and the cockpit was sprayed Dark
Dull Green (Tamiya XF-5) while the rest of the interior bits were hand painted
black.
I made tiny seatbelts from Tamiya masking tape for the seat.
When
everything was dry, the exterior was masked off and the cockpit was sprayed Dark
Dull Green (Tamiya XF-5) while the rest of the interior bits were hand painted
black.
I made tiny seatbelts from Tamiya masking tape for the seat.
The landing
gear itself was painted with AS-12 Polished Aluminum.
I masked off the wheel rims and the forward part of the
fuselage (glare panel) and they were sprayed flat black via airbrush.
The wheel wells were masked off and the interiors
(including the gear doors) were sprayed with Tamiya XF-4.
However I
ran into a problem with the prop which was broken in so many pieces that I
didn’t want to rebuild it.
At that time, I was also working on the Trumpeter F-100C
which sapped all my enthusiasm for modeling and I stopped building everything.
Several
months later, I was at the LHS and found a 1/72 P-63 kit (Toko) for cheap so I
bought it and used the prop (and gun barrels) from the kit instead.
The rest of the P-63 kit went to the spares box.
I had to drill out the hole for the prop because the
mounting lug for the Toko P-63 was bigger than the kit one.
I used a 1/8” drill bit for that task.
The prop
hub and prop blade tips were painted flat white then flat yellow.
When the tips were dry, they were masked off and the
prop was painted flat black.
Decals
The decals
went on without any issue (as the surface was so smooth) using some MicroSet.
No weathering was done with the model.
| FINAL CONSTRUCTION |
 I trimmed
the vacuform canopy carefully to get it to fit, masked and then sprayed it
black.
When it was dry, the windscreen was masked then sprayed on Tamiya Old
Leaf Silver from the can.
I had a little bit of overspray to fix but it was easy
to clean off.
I trimmed
the vacuform canopy carefully to get it to fit, masked and then sprayed it
black.
When it was dry, the windscreen was masked then sprayed on Tamiya Old
Leaf Silver from the can.
I had a little bit of overspray to fix but it was easy
to clean off.
The various
landing gear parts were attached using CA glue.
Also added the painted exhausts.
The gun
barrels were cut from the Toko kit, painted Gunmetal and super glued on while I
used a thin piece of plastic rod for the pitot tube.
These were attached using CA glue.
Thanks to
the one piece fuselage, the plane is a tail sitter and there is really no way to
fix it.
I had to glue (with CA glue) a piece of clear plastic to the fuselage to
act as a support.
It was trimmed so that all the wheels touch the ground.
| CONCLUSIONS |
If you have never built a resin kit and want to build one then I recommend this one as it makes for an easy build despite the NMF paint job. It is a good introduction to the techniques and pitfalls of resin kit.
Dan Lee
September 2012
If you would like your product reviewed fairly and fairly quickly, please contact the editor or see other details in the Note to Contributors.