Trumpeter 1/32 P-47D Thunderbolt
|
KIT #: |
02262 |
|
PRICE: |
$139.95 SRP |
|
DECALS: |
Two options |
|
REVIEWER: |
Lee Kolosna |
|
NOTES: |
Hasegawa Hamilton Standard propeller used, Large Scale Planes decals |
 Even
though it was designed from the beginning as a high-altitude
interceptor, Republic’s P-47 Thunderbolt really came into its element as
a ground attack weapon in the European, Mediterranean, and Pacific
theaters of operation during World War II.
Armed with eight .50 caliber machine guns
and the ability to deliver bombs and rockets, the P-47 became a fearsome
instrument in the close air support role.
Attacks on the transportation network
conducted by the 9th Air Force were instrumental in the successful
invasion of the European continent and continued as forces moved
eastward into Germany.
Even
though it was designed from the beginning as a high-altitude
interceptor, Republic’s P-47 Thunderbolt really came into its element as
a ground attack weapon in the European, Mediterranean, and Pacific
theaters of operation during World War II.
Armed with eight .50 caliber machine guns
and the ability to deliver bombs and rockets, the P-47 became a fearsome
instrument in the close air support role.
Attacks on the transportation network
conducted by the 9th Air Force were instrumental in the successful
invasion of the European continent and continued as forces moved
eastward into Germany.
The long production run of the D model Thunderbolt
can be divided into the initial “razorback” versions and then the later
“bubbletop” versions beginning with the -25 production block.
The bubbletop P-47 was originally going to
be referred to as the P-47K, but the War Production Board elected to
introduce the cut-down rear spine and blown canopy in the middle of the
D manufacturing run instead in order to minimize any disruption to the
delivery schedule.
Modelers therefore have to differentiate
the two types of D models based on their canopy configuration.
For over thirty five years, Revell’s kit was the only option in 1/32 scale
before Trumpeter finally provided the world with a injection molded
alternative.
The classic Revell P-47 has a significant number of shape and detail issues
and few will miss it.
It appears that Trumpeter’s A team worked on this project,
bringing to market a very nice and accurate kit that faithfully captures the
chunkiness of Republic’s workhorse.
 A
complete engine and internal plumbing all the way back to the
turbo-supercharger in the rear fuselage is provided.
You can inspect some of it by leaving the clear cowling unpainted,
but the center and rear portions of the power train is buried forever inside
the fuselage once the halves are glued together.
The cockpit is good enough with sufficient detail to satisfy most,
although an aftermarket replacement would be an improvement in depicting the
overall busyness of the P-47D’s cockpit.
Three different propellers, two from Curtiss Electric and one
Hamilton Standard are included, and a very nice set of bombs, bazooka
launchers, and several drop tanks come with the kit as well.
The traditional bugaboo of Trumpeter’s kit designers has been the
canopy pieces, and fortunately for us they nailed the subtle shape of the
razorback Thunderbolt’s greenhouse and windscreen.
The gun bays are detailed with individual machine guns and soft
plastic ammo belts.
Synthetic rubber tires are provided with no styrene alternative.
Photo-etch parts are incorporated for the seat harness, air intake
screens, and under-wing strakes.
A
complete engine and internal plumbing all the way back to the
turbo-supercharger in the rear fuselage is provided.
You can inspect some of it by leaving the clear cowling unpainted,
but the center and rear portions of the power train is buried forever inside
the fuselage once the halves are glued together.
The cockpit is good enough with sufficient detail to satisfy most,
although an aftermarket replacement would be an improvement in depicting the
overall busyness of the P-47D’s cockpit.
Three different propellers, two from Curtiss Electric and one
Hamilton Standard are included, and a very nice set of bombs, bazooka
launchers, and several drop tanks come with the kit as well.
The traditional bugaboo of Trumpeter’s kit designers has been the
canopy pieces, and fortunately for us they nailed the subtle shape of the
razorback Thunderbolt’s greenhouse and windscreen.
The gun bays are detailed with individual machine guns and soft
plastic ammo belts.
Synthetic rubber tires are provided with no styrene alternative.
Photo-etch parts are incorporated for the seat harness, air intake
screens, and under-wing strakes.
Still, there are a few minor points to make regarding accuracy:
-
Propellers.
Trumpeter copied Tamiya’s goof found on their 1/48 scale P-47s in which the
Hamilton Standard prob hub boss is much too large.
The two Curtiss Electric props are just fine. D-23 and D-25 P-47s
came from the factory with the Hamilton Standard propeller, but there was a
bunch of swapping done in operational units so the modeler needs to check
reference photos to determine which was used on the model that they are
building.
Hasegawa provides an excellent Hamilton Standard prop in their bubbletop kit
so one can utilize that to complete their project.
-
 Cockpit.
As stated previously the cockpit has a reasonable level of detail,
although it certainly could use more in this scale.
I found the control stick to be a bit too skinny, and the canvas
boot at the floor isn’t depicted.
The reflecting portion of the early gun sight (a later sight for
the P-47N is included) is molded as an inelegant blob of clear plastic. The
oval double-glazed sight is best reproduced with a sandwich of two thin
sheets of clear plastic or acetate.
The kit does not provide a ring and bead fixed sight.
Cockpit.
As stated previously the cockpit has a reasonable level of detail,
although it certainly could use more in this scale.
I found the control stick to be a bit too skinny, and the canvas
boot at the floor isn’t depicted.
The reflecting portion of the early gun sight (a later sight for
the P-47N is included) is molded as an inelegant blob of clear plastic. The
oval double-glazed sight is best reproduced with a sandwich of two thin
sheets of clear plastic or acetate.
The kit does not provide a ring and bead fixed sight.
-
Ordnance.
The bazookas and drop tanks are nicely done.
The big P-38 drop tanks will need some rear anti-sway bars.
The bombs are not too bad, although Trumpeter molds each with a
couple of circumferential raised bands that are not present on the real
thing. This is
easy enough to sand off.
The kit is engineered such that if you don’t use the flat belly
tank, you will have to fill a large trench between the front and rear
stanchions.
-
Tail wheel well.
Normally, the tail wheel mechanism is covered with a canvas
shroud, which is not reproduced in the kit.
I don’t know where the design of the block-like retraction piece
came from, but it doesn’t match any drawings or photographs of any P-47D
mechanism that I have seen.
Trumpeter seems to have used the tail wheel part on the Tamiya
1/48 scale P-47 as their guide, which has a similar questionable design.
-
Rivets.
The Trumpeter Mad Riveter is in fine form on this model, with
hundreds of small recessed divots representing the flush rivets used on the
actual aircraft.
Filling them would be an ugly task, so I left mine alone and did not
highlight them in any way.
-
 R-2800
Engine.
The engine pieces include two different types of magnetos and two
different crankcases in order to cover the D, M, and N variants of the P-47.
There are no ignition wires, so the modeler will have to furnish
those, two for each cylinder.
There were several series of R-2800s used across the P-47 range,
so an exact match in configuration will require some research and possible
modification of the kit’s parts, particularly with the magnetos.
R-2800
Engine.
The engine pieces include two different types of magnetos and two
different crankcases in order to cover the D, M, and N variants of the P-47.
There are no ignition wires, so the modeler will have to furnish
those, two for each cylinder.
There were several series of R-2800s used across the P-47 range,
so an exact match in configuration will require some research and possible
modification of the kit’s parts, particularly with the magnetos.
-
Wheels.
Trumpeter provides both solid and spoked wheels.
A minor issue is that the rear face of the wheel should be solid
no matter if the front face is solid or spoked.
Instead, Trumpeter erroneously gives you a wheel whose rear face
has spokes.
-
Decals.
The quality of the decals is excellent, as I used a few markings
on my model and they performed beautifully.
The problem, as ever with Trumpeter, is the artwork.
They continue to make US national insignia that have blue outlines
that are too thin.
The markings for the two aircraft options also have some errors so
it is best to find an aftermarket solution.
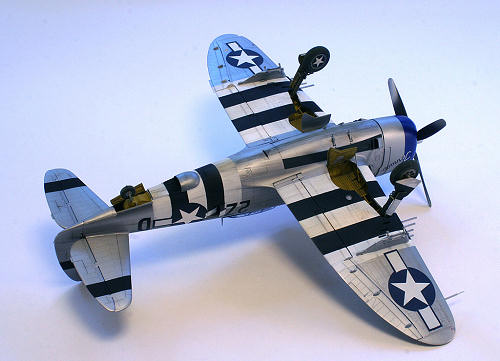
Most of the above issues are admittedly slight and need to be addressed
only if you are so inclined.
The model’s overall shape is spot-on and the kit builds up to a
very impressive and sufficiently accurate model right out of the box.
The first
order of business was to close the gun bay doors, as I prefer my models to
be built in a clean configuration.
The doors didn’t fit too well, being smaller
than the surrounding openings, so I had to fill those gaps with CA glue and
Mr. Surfacer and then restore the lost rivet detail with a new pounce wheel
tool I purchased just for this purpose.
The guns themselves were
 glued
inside the wings and the barrels were left off until the final assembly
process.
Trumpeter provides both smooth blast tubes (correct)
and bare ventilated barrels (incorrect) for each gun for reasons that escape
me.
I drilled out the opening of the blast tubes with a
twist drill.
glued
inside the wings and the barrels were left off until the final assembly
process.
Trumpeter provides both smooth blast tubes (correct)
and bare ventilated barrels (incorrect) for each gun for reasons that escape
me.
I drilled out the opening of the blast tubes with a
twist drill.
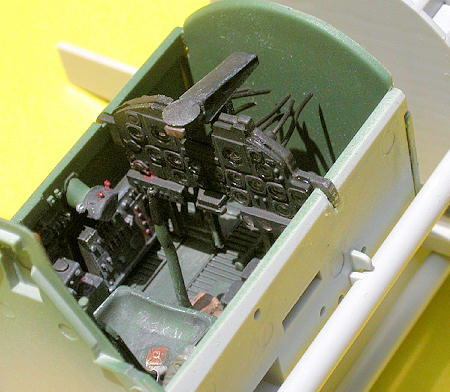
I assembled
the cockpit without much drama.
The kit photo-etch harness was attached to the
seat after annealing it over a candle flame for a few seconds to make it
more pliable.
I added a canvas boot at the bottom of the control
stick using tissue paper and thinned white glue.
The kit provides a film for the instruments, so
that was glued to the back of the panel and painted white on the rear to
make the dials stand out. I added some thin wire out of the back of the
instruments as this is visible on the completed model.
The overall cockpit color on P-47s is Dull Dark
Green, for which I use Polly Scale RAAF Foliage Green as a reasonable match.
A dark wash was applied, the raised portions
were dry-brushed with a light gray, and paint chipping was added with a
silver pencil.
The engine
was next.
There are a lot of tiny parts to add to the cylinders
which makes this a bit more fussy than it really needs to be.
I added ignition wires using copper telephone
wire.
The engine was painted in Testor’s Metalizer Steel and
a black wash was applied to bring out the detail.
The engine crankcase was painted dark gray and
the magnetos were painted flat black.
The kit instructions have you glue the cowling
brackets to the cylinder heads but I found this impossible to achieve, so I
snipped off the attachment points and instead glued the front bracket inside
the cowling itself.
I left out the rear bracket figuring it would
never be seen, particularly since I chosen the closed cowl flap option.
Slipping the cowling over the engine, I had to sand about an eighth of an
inch (2 mm) from the air intake trunk to get a good fit.
 I
assembled all the internal plumbing from the rear of the engine back to the
turbosupercharger, as it is required in order to mount the cockpit tub and
the engine in the fuselage.
It went together reasonably well, although some
of the piping is a little tricky to get aligned properly.
I left out the big oil tank as that will never
be seen.
The fuselage halves were glued together, trapping
inside the engine, cockpit, and turbosupercharger plumbing.
I used CA glue for this instead of plastic
cement as I wanted to eliminate any possibility of ghost seams appearing
under the natural metal finish.
I
assembled all the internal plumbing from the rear of the engine back to the
turbosupercharger, as it is required in order to mount the cockpit tub and
the engine in the fuselage.
It went together reasonably well, although some
of the piping is a little tricky to get aligned properly.
I left out the big oil tank as that will never
be seen.
The fuselage halves were glued together, trapping
inside the engine, cockpit, and turbosupercharger plumbing.
I used CA glue for this instead of plastic
cement as I wanted to eliminate any possibility of ghost seams appearing
under the natural metal finish.
The wings and
horizontal stabilizers were glued to the fuselage with routine seam filling
required. I assembled the control surfaces and attached them to the model.
Based on study of period photos, I put the
elevators on with a slight downward deflection.
The flaps were posed up and the ailerons and
rudder were attached in a neutral position.
All fit well except for the ailerons, which
only nestled snugly into the wing after I snipped off the attachment pegs.
I added brake
lines to the landing struts using copper wire.
I sanded down a faint mold seam on the rubber
tires, otherwise they look quite good.
I filled the huge trench between the belly tank
stanchions with scrap plastic.
All of the
seams were filled with CA glue and an additional coat of Mr. Surfacer 1000.
The rivets lost in the seam filling process
were replaced with a pounce wheel and the panel lines were re-scribed.
The plastic surface was polished to a smooth
shine using progressively finer grits of sanding sticks followed Novus
Plastic polish #2.
I primed the
model with Floquil Old Silver, followed by a coat Alclad Aluminum a few days
later.
P-47s didn’t have much individual panel variation,
particularly after they weathered for a few months out in the elements.
The housing over the turbosupercharger was
painted Testors Metalizer Stainless Steel.
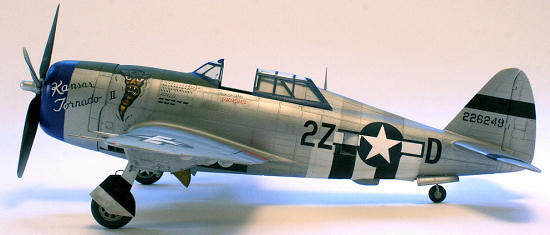
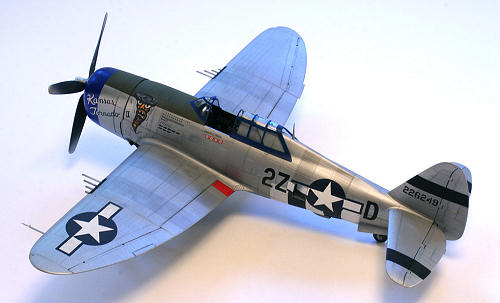
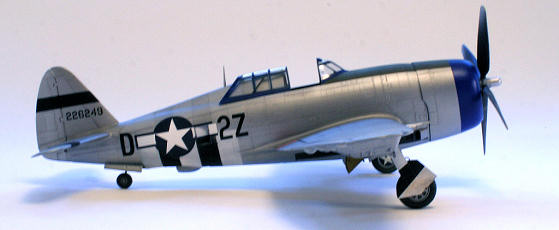
 The
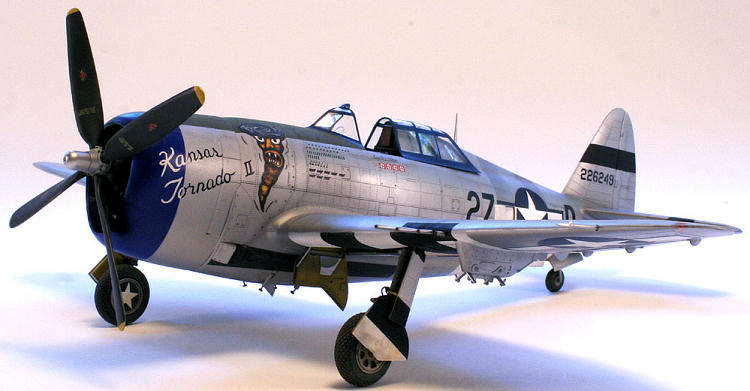
aircraft I wanted to do, “Kansas Tornado II” from the 510th
Fighter Squadron, 405th Fighter Group, had a complete set of
D-Day stripes for the invasion.
As photographed in France in September 1944,
the topside stripes had been removed from the fuselage and wings, leaving a
faint trace.
To replicate this, I masked off the stripes and
painted them using full strength paint on the undersides, but used only an
exceptionally thin mixture for the top that was misted on as delicately as
possible.
The anti-glare panel was painted with Polly Scale
Olive Drab.
The
aircraft I wanted to do, “Kansas Tornado II” from the 510th
Fighter Squadron, 405th Fighter Group, had a complete set of
D-Day stripes for the invasion.
As photographed in France in September 1944,
the topside stripes had been removed from the fuselage and wings, leaving a
faint trace.
To replicate this, I masked off the stripes and
painted them using full strength paint on the undersides, but used only an
exceptionally thin mixture for the top that was misted on as delicately as
possible.
The anti-glare panel was painted with Polly Scale
Olive Drab.
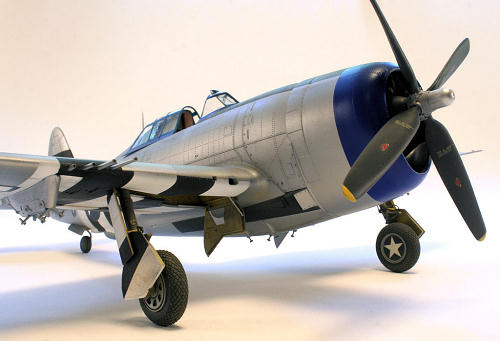
There is a
debate among decal artists regarding the cowling color of this aircraft.
The Large Scale Planes sheet and profile
recommends black, whereas BaracudaCal’s Roy Sutherland advises that it
should be blue like the distinctive canopy framing.
After looking at the black and white (only)
photos and consulting Dana Bell’s research in
Air Force Colors, volume 2, I
went with blue.
I freely admit that I could be wrong, but it
certainly is a prettier color than black.
Testors Acryl gloss Dark Blue was used.
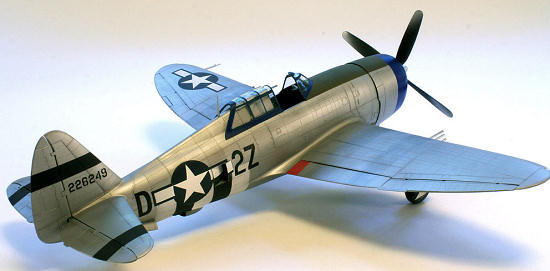
The wheel
wells were painted Testors Acryl Yellow Zinc Chromate.
The main landing gear struts were painted Olive
Drab – a color seen on a large number of P-47s in the middle period of the
war.
The tires were sprayed with Polly Scale clear flat to
take off the shine aloing with a thin coat of Polly Scale Mud for
weathering.
The Large
Scale Planes 2007 IPMS Special for P-47s decal sheet is very nice, providing
research notes and two sheets of markings: one a traditional sheet of
waterslide decals and another sheet of dry transfers supplied by Hobby Decal
including stencils and some of the nose art.
There is a very small ALPs-printed decal for
the Tornado artwork as well.
There are no national insignia, so I had to
source them from other decal sheets.
 The dry
transfers were used for the aircraft serial number, mission markings, pilot
name, data plate, and airplane name.
These transferred to the model fairly well, but
the very smallest stencils simply would not come off the backing.
I tried burnishing them as hard as I dared
without success.
Therefore there are no stencils on my model,
which is a minor disappointment, because I really wanted to avoid having to
apply a clear coat over the natural metal finish, which would diminish the
metallic effect very noticeably in this scale.
Using decal stencils from the kit sheet would
have required that a clear coat to blend them into the surrounding finish,
so I chose to leave them off.
I did spray clear flat over the national
insignia and the squadron codes using masks I cut out from a 3x5 index card.
The dry
transfers were used for the aircraft serial number, mission markings, pilot
name, data plate, and airplane name.
These transferred to the model fairly well, but
the very smallest stencils simply would not come off the backing.
I tried burnishing them as hard as I dared
without success.
Therefore there are no stencils on my model,
which is a minor disappointment, because I really wanted to avoid having to
apply a clear coat over the natural metal finish, which would diminish the
metallic effect very noticeably in this scale.
Using decal stencils from the kit sheet would
have required that a clear coat to blend them into the surrounding finish,
so I chose to leave them off.
I did spray clear flat over the national
insignia and the squadron codes using masks I cut out from a 3x5 index card.
All panel
lines (but not the rivets) got treated with dark gray pastels.
Oil stains underneath the belly were added with
a thin brownish-black wash.
I sprayed a filter of Polly Scale Mud all
around the underside of the undercarriage and areas of the aircraft that
would have seen the effects of the dust and dirt of forward base operations.
Paint chipping along the leading edge of the wings, cowling, and prop blades
was done with a silver pencil.
Dust abrasion on the back of the blades was
added with a feathered spray of Old Silver.
The landing
gear and doors all snapped smartly into place.
The wheels were much more temperamental and I
spent a lot of time getting them aligned properly.
Because of the weight of the model, you have to
slightly overcompensate with the camber angle of
 the
wheels because they will settle when you place the model down.
The tail wheel strut simply is not robust
enough to withstand the model’s weight and bends under the load.
Other than replacing it with a metal piece,
there is not much that can be done about it.
the
wheels because they will settle when you place the model down.
The tail wheel strut simply is not robust
enough to withstand the model’s weight and bends under the load.
Other than replacing it with a metal piece,
there is not much that can be done about it.
I stole a
Hamilton Standard propeller from a Hasegawa kit and used it on this model.
It took a little drilling out of the mounting
hole to get it to fit properly, but I think the replacement is worth it.
The remaining fiddly bits were added:
recognition lights, antenna post (no aerial wire on 8th and 9th
Air Force fighters), landing light, pylon anti-sway braces, machine gun
blast tubes, and canopy.
I painted two 500 pound bombs but didn’t add
them as I wasn’t happy with the yellow stripes (always a troublesome task
for me) so they might get added sometime later.
This is a very good kit – I dare say one of Trumpeter’s best.
Like many of their other offerings, it is unnecessarily
complicated but the end result is a razorback Thunderbolt in 1/32 that is so
superior to the ancient Revell kit that it isn’t even worth mentioning.
Until Hasegawa gets it act together and releases a razorback
variant of their excellent bubbletop kit, the Trumpeter kit does very well
on its on. The
street price is right around $110, so it is expensive.
But I still think you get a reasonable value for your money in
this scale with the photo-etch parts, a good-enough cockpit, three different
propellers, and lots of stuff to hang under the wings.
I would have liked to have seen more accurate decal artwork and
plastic alternatives to the rubber wheels, but what’s in the box will
satisfy most modelers.
Bell, Dana: Air Force Colors,
volume 2
Kinzey, Bert: P-47D Thunderbolt in
Detail & Scale, volume 54
Lee Kolosna
November 2011
If you would like your product reviewed fairly and fairly quickly, please contact the editor or see other details in the
Note to
Contributors.
Back to the Main Page
Back to the Review
Index Page