Heller 1/72 P-39Q Airacobra
| KIT #: | ? |
| PRICE: | $3.00 at a show |
| DECALS: | Two options |
| REVIEWER: | Joel Hamm |
| NOTES: | Nothing really notable |
| HISTORY |
Beauty is in the eye of the beholder; and the eye of
this beholder sees the Bell P-39 Airacobra
as one of
the most
beautiful
airplanes ever to be pulled, pushed, or prodded by a prop. More beautiful than
the Mustang. More beautiful than - can I be Superglued
and feathered for saying this? – yes, more beautiful
than even the
Spitfire. That opinion makes this
model is one of the few exceptions to the foolish consistency of my small mind
which allows but one kit build of any particular plane. It is an opinion not
only my own, judging from the kitting by every manufacturer major or minor
(excepting perhaps Matchbox) of some version in some scale of the P-39,
or its similarly
shaped P-63 successor; and judging from the plethora of previews and reviews on
modeling web sites (this one makes 6 for MM).
Everybody already knows how the P-39 was the first
tricycle-geared fighter; how it was the first airframe designed around a weapon
system; how it’s centrally mounted Allison V-12
supposedly gave the plane superior maneuverability, but
also
gave
 its pilot a case of
the willies with
a
3000RPM drive shaft churning just
below his gonads. Everybody already knows how
the Army’s decision to remove that engine’s
turbo-supercharger severely limited the Airacobra’s performance above 10K and
therefore its utility as a fighter.
Everybody already knows how it nevertheless soldiered
bravely in every theater and became a favorite tank-buster for the Russians. If
everybody didn’t already know that nutshell history, they do now. If anybody
would like more details, several of the other 5 reviews and previews on Modeling
Madness go into greater depth.
its pilot a case of
the willies with
a
3000RPM drive shaft churning just
below his gonads. Everybody already knows how
the Army’s decision to remove that engine’s
turbo-supercharger severely limited the Airacobra’s performance above 10K and
therefore its utility as a fighter.
Everybody already knows how it nevertheless soldiered
bravely in every theater and became a favorite tank-buster for the Russians. If
everybody didn’t already know that nutshell history, they do now. If anybody
would like more details, several of the other 5 reviews and previews on Modeling
Madness go into greater depth.
By my reconing
and research,
neither of which is touted as
accurate to JMN standards; but which nevertheless
herein are offered in fulfillment of the duties and
responsibilities
of a duly-appointed model-kit reviewer,
the first
operational Airacobra was the C model, progressing down to the Q/N.
Differences consisted mainly of changes to engine and
armament. Several external characteristics, however,
present but
small challenge to modelers wishing to update, backdate, accurize, or anally-retentivate
any particular boxing. Props could be 3 or 4-bladed, with
spinners
sporting either
a short-fat or
long-thin barrel, depending on the caliber of cannon. Some
nose-wheels had flat hubs, others spoked, or rather vaned centers. Some
references show early Airacobras
sans outer main gear doors. These may have been removed
in the field, and at least with this Heller kit, most modelers should
refrain from doing likewise, unless they can find in
their spare
parts department a pair of wheels more convincing than the
shirt-collar
buttons provided on the sprues.
Wing armament on pre-Q’s was internal, poking through a
pair of vertically staggered holes approximately mid-span. The last variants
carried a set of 50-cals slung in fairings. Heller provides these as separate
parts; but their deletion requires a slight sanding of the “etched” locator
engravings on the wing underside.
sprues.
Wing armament on pre-Q’s was internal, poking through a
pair of vertically staggered holes approximately mid-span. The last variants
carried a set of 50-cals slung in fairings. Heller provides these as separate
parts; but their deletion requires a slight sanding of the “etched” locator
engravings on the wing underside.
The only difficult modification centers on the exhaust stack banks. Most planes had a six-pack of stubs on either flank, but some had an even dozen. How or why 12 cylinders exhaled through 24 stacks is unclear; but this variation is visually prominent; and displaying, either electronically or in person, a model will erroneous exhausts could result in psychological, if not physical, harm to the builder, should said subject be espied by representatives of the Rivet Counters, a species known to habitate, habituate, congregate, pontificate, and bloviate at modeling shows and web sites.
| THE KIT |
Speaking strictly of 1:72 renditions, and lumping
together the Airacobra and Kingcobra,
the first issuance came
from Revell, and
typified
its 50’s-60’s era. So-so accuracy. Flash. Sink holes. A removable panel to
display an engine (really only the half engine that you could see.
Rotating wheels
and prop. Gawdawful decals. Oh yes – and rivets. Lots and lots of big fat 1:72
scale basketball-sized rivets. More rivets than you could shake a sheet of 400
grit wet/dry sandpaper at. Bits and pieces of that kit
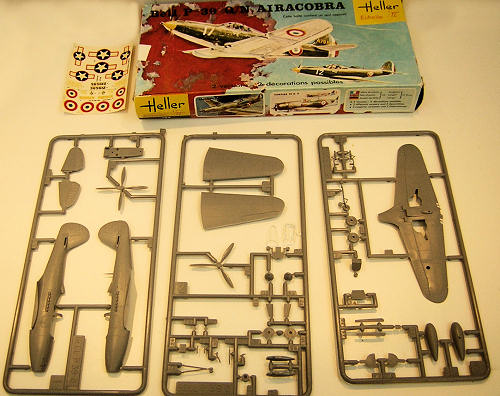 inhabit my spares bins.
Revell, or Revel of Germany, supposedly re-released
either a new or tweaked-tool version.
Airfix featured an Airacobra in its original batch of
moldings, about the same time as the first Revell, and bested its American
competitor only in having more and bigger rivets. That kit still sits on my
shelf.
inhabit my spares bins.
Revell, or Revel of Germany, supposedly re-released
either a new or tweaked-tool version.
Airfix featured an Airacobra in its original batch of
moldings, about the same time as the first Revell, and bested its American
competitor only in having more and bigger rivets. That kit still sits on my
shelf.
There
were toy-like versions from Arii, or Otaki, or both, or maybe they’re the same
company.
MPM or one of its Czech mates put out a passable P-63 that
benefited from a few dives into the alternate parts
department.
A-Model, or someone like that, issued another short runner of the
“Pinball” Kingcobra, the heavily-armored, manned gunnery target with the
apocryphal Rudolph-the-Red-Nosed-Reindeer spinner that according to popular
legend lit up and blinked in time to hits by special practice bullets. Most
references insist that such an indicator
light was actually located on the fuselage flanks.
Academy eventually issued what is generally hailed as
the definitive
Other than that failing, the Heller P-39 is, in general quality, on par with the median state of the art. Flash and sink-hole free. No ejector pin parks anywhere that a forgetful or lazy builder would later regret. Acceptable interior. Optically superior transparency. Alternate parts for a choice of variants; though the instructions fail to clearly show which part for which variant; even for someone who does speak French.
| CONSTRUCTION |
This kit was dredged out of the stash to fulfill a need
for a quick’n’easy one-afternooner OOB (Out Of the Box). It occupied over two
weeks. Not because of build
difficulty, but on account of the implacable urge to enhance and embellish.
Since the 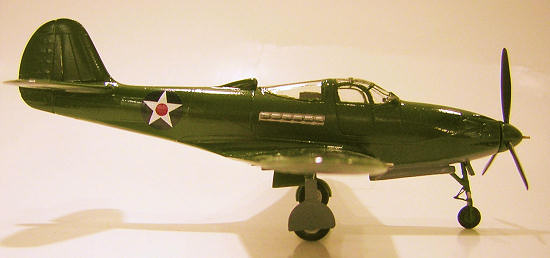 decals were obviously unusable, the first requirement was finding a
version that could be built with whatever transfers
could be scrounged. GOOGLE
Image Search yielded up several
photos of non-descript
early production
machines that
were dressed only in pre-war insignia (dot-in-star-in-circle) without additional
identifying numbers, letters,
or nose art.
Backdating the kit would involve minimal surgical
changes.
decals were obviously unusable, the first requirement was finding a
version that could be built with whatever transfers
could be scrounged. GOOGLE
Image Search yielded up several
photos of non-descript
early production
machines that
were dressed only in pre-war insignia (dot-in-star-in-circle) without additional
identifying numbers, letters,
or nose art.
Backdating the kit would involve minimal surgical
changes.
The fuselage has molded in the nose section 4
rear-facing scoops, exhaust ports for the cannon mechanism, or something like
that.
I didn’t notice until the final construction phases that most photos
(and other models) posed these in the closed position. Sanding them off would
have been a minor change with a major improvement
in the plane’s aesthetics. Construction, as usual,
starts with the cockpit, consisting of a floor, aft bulkhead, and rear deck. The
instrument panel is realistic, with raised detail, but takes a swipe or two of a
file to get the correct inverted T shape. It properly sits aft of the windshield
with no glare-shield,
allowing close inspection to reveal the emptiness
behind.
I filled this with bits and pieces to represent the clutter that makes
miserable the lives of radio and instrument technicians.
I also busied up the
cockpit sides with pieces hinting at the control lever
quadrants and map cases suggested by photos of the interior. The seat is
simplistic, but sufficient. It, and the accurately molded control stick, were
deferred to facilitate masking and painting.
The interior was shpritzed with flat interior green;
close enough to Bell’s proprietary shade.
 After the nose was stuffed with all the lead that could
fit, the fuselage halves went together without any seam or misalignment
difficulties. The wings similarly fit together well, with a sharp trailing edge,
despite the molding in split halves of flaps and ailerons.
The wing
underside has a molded bulge to carry the belly tank.
Since the subject plane lacked external stores, this had
to be severed, and the opening filled and smoothed over.
After the nose was stuffed with all the lead that could
fit, the fuselage halves went together without any seam or misalignment
difficulties. The wings similarly fit together well, with a sharp trailing edge,
despite the molding in split halves of flaps and ailerons.
The wing
underside has a molded bulge to carry the belly tank.
Since the subject plane lacked external stores, this had
to be severed, and the opening filled and smoothed over.
Joining the wings to the fuselage revealed a narrow gap at the wing roots, but filler was avoided by flowing liquid cement into the space, eventually welding it shut. The only other place filler was required was to correct a small step and gaps where the “beavertail” of the wing assembly mates with the belly. Tail-planes have good, old fashioned tabs and slots to keep them at right angles to the fin. Nose gear doors and inner main gear doors were attached pre-painting, though masking would have been easier had they been deferred.
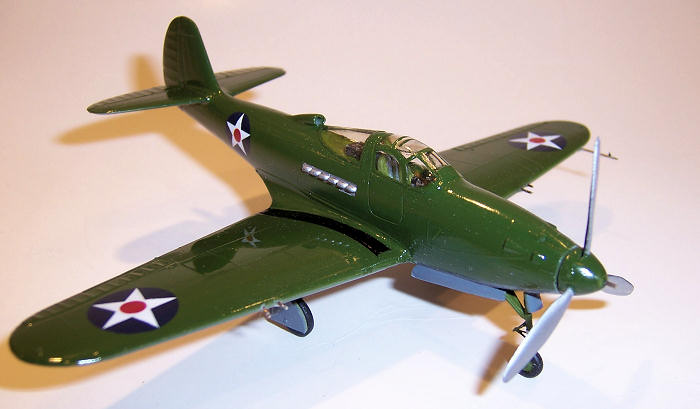
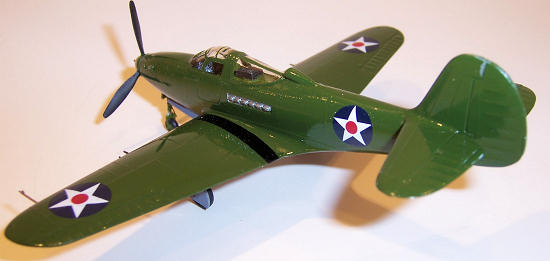
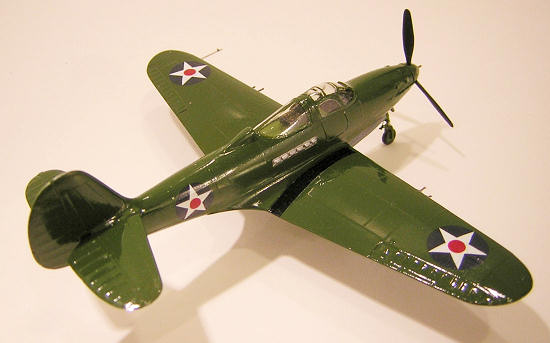
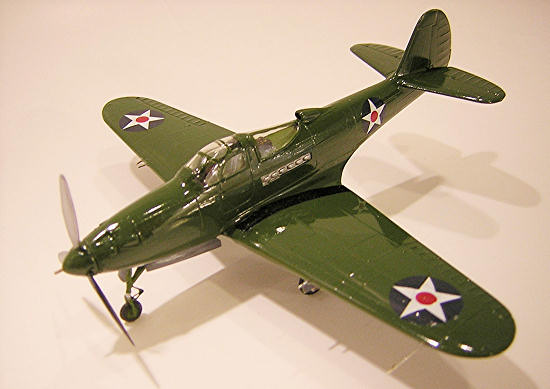
| COLORS & MARKINGS |
Simplicity, as I said, was the main consideration; so
topside was doused in a mix of Testors generic
green and orange, though perhaps a bit too much green.
Underside was straight from the little square bottle gray. The pre-war cocardes
I had
dredged from the spares box turned out to be as unusable as the kit
transfers. I decided to re-stock the spares box with sheets of various
 old under the brand name “Experts
Choice”; and while their quality is indeed
excellent, a
more fitting brand name might be “Skin-Flint’s Choice”. At $6.50 a sheet they
are half the price of other brands.
old under the brand name “Experts
Choice”; and while their quality is indeed
excellent, a
more fitting brand name might be “Skin-Flint’s Choice”. At $6.50 a sheet they
are half the price of other brands.
They are considerably thicker than transfers from
Propagteam or Superescale; but that makes them more easily handled. Printing is
precise and carrier surround is just about non-existent. The package
instructions claim they
will conform to a painted-on appearance. They will, but not of their own
volition. Flooding with Micro-Sol will snug them into the tightest crevasses;
but they then dry with a slight graininess. Experimentation revealed that the
best finish results from a double dousing. First with acetic based solution (I
used Polly-Scale); followed by Micro-Sol. I couldn’t summon the courage to try
Solvaset, generally regarded as the aqua-regia of setting solutions.
The wing underside sports a “U.S.ARMY” logo. Lacking the
correct size, I assembled one from individual letters cut from an ancient
Microscale sheet.
Multiple coats of Future sealed everything against the elements. I am cognizant that in reality these aircraft were painted matte, and usually looked beat-up before leaving the factory hangar. I like my models shiny and new. Anyone in whom that insistence arouses angst is invited to pretend that this is a model of a warbird reconstruction all done-up purdy in Imron Poly-U. If that relieves insufficient inner tension, pop a Paxil and segue over to a modeling site which brooks no divigation from absolute accuracy.
| FINAL CONSTRUCTION |
The instrument panel was dolled-up with a True-Details
decal; and the seat was embellished with belts water-slid from the same sheet.
These details hardly look true. Even in 1:72 scale, decals don’t work for these
parts. A simple dry brushing of the panel and a set of spare photo-etched seat
belts, or even straps made of tape strips, would have given a better appearance.
A
 featureless cube is provided for the radio box that sits on the rear deck. I
added PEB radio faces, painted black, then “dry brushed” with a finger tip to
reveal the dials and switches.
featureless cube is provided for the radio box that sits on the rear deck. I
added PEB radio faces, painted black, then “dry brushed” with a finger tip to
reveal the dials and switches.
Heller’s canopy may be the best of any kit. In addition
to clarity, and no-fidget fit, it has sharply molded framing that facilitates
hand painting – about the only way those complex curves
can be done. I penciled the lines
with a 10-ought
brush, scraped away any boogers with a sharpened toothpick, sealed with Future,
and performed a final touch-up in Paint Shop.
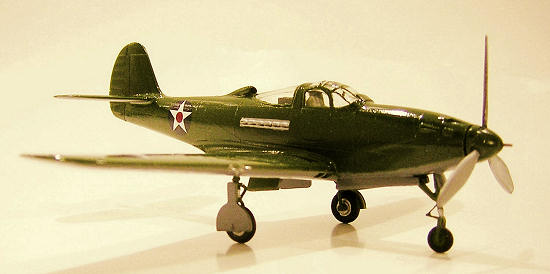
The nose gear has an oddly shaped torque link, which was
replaced with a brass etching. Small improvements like that result in a big
improvement. Landing gear color is a matter of conjecture. Most photos of early
variants show them painted interior green. Some have them matching the
underside.
The instruction sheet calls for aluminum, but it also calls for
black on the rear deck, which in all photos is shown in green. So what do they
know?
Most available pictures are B&W, which makes indistinguishable gray from
silver. I went with green, simply because metallic landing gear struts on al my
models gets boring. It wasn’t until touching up the photos for this review that
I noticed the slightly oversize diameter of the main wheels, and that the plane
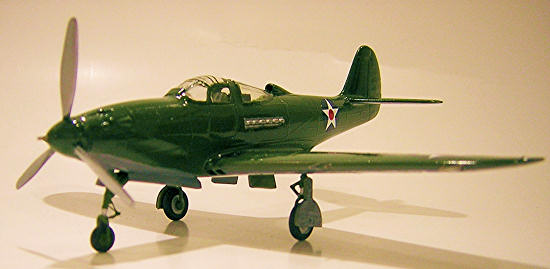
sits nose-down; as opposed to its properly jaunty snoot-skyward pose.
Since it sits on a lower shelf, the poor posture doesn’t
bother me.
To be truthful, it wouldn’t bother me even
if the plane perched on the end of my schnoz; but other
builders might check the length of the struts and adjust accordingly.
The props (plural because you get a choice of 3 or
4-bladed) are designed to get sandwiched between the halves of a laterally
sliced spinner; an arrangement that leaves a difficult to smooth seam in an easy
to see location. I rummaged through the spare props box and resurfaced with the
part from the wrecked Revell. Those blades looked shriveled by time or
malnutrition. Other spinner-blade combos didn’t look right either. In the end I
filled the crack with CA gel, unsheathed
my riffler files and
 finished with my
electric-toothbrush-detai- sander. A heavy brush coat of OD paint disguised the
last suggestion of poor engineering.
finished with my
electric-toothbrush-detai- sander. A heavy brush coat of OD paint disguised the
last suggestion of poor engineering.
I drilled the prop-hub and wings to accept gun barrels
made from hypodermic needles. No, I’m not a junkie. I mentioned on several
occasions that I have a brother in the surgical
business. (If anyone in the vicinity of
I omitted any radio masts or antenna wire, because the
reference photo showed that
this plane was not so equipped; likely because, as it
also
showed, the plane was not fitted with the prominent radio box on the rear shelf.
The absolute last step before getting this millstone off my bench was a drop of
quick-set clear epoxy to simulate the landing light on the wing underside.
| CONCLUSIONS |
February 2009
If you would like your product reviewed fairly and quickly, please contact me or see other details in the Note to Contributors.