| KIT #: | 72023 |
| PRICE: | $ |
| DECALS: | Four options |
| REVIEWER: | Joel Hamm |
| NOTES: | Short run with vac canopy and resin parts |
| HISTORY |
Honey, I shrunk Amelia Erheart’s Model 10 Lockheed. Well, it was bigger than most folks needed. Now the US, Brits, and other air forces are buying the Electra Junior. Details are all here at www.rccaraction.com/fj/articles/electra.
| THE KIT |
“Short Run” carries the connotation of poor quality and limited technology molding; but applied to the Czech companies it means only that they make just a few of each kit. Fit and finish is top notch. No flash, sink holes, ejector marks, or other boo-boo’s. Fine line engraving. Resin for the eensy-beensy bits. No PEB (Photo Etched Brass). Yes, the hood is a vacanopy (vacuformed canopy), but it’s an easy cutout and perfect fit. Side windows – well, we’ll get to that in just a minute. If I had my druthers, I’d ask for a few locating pins to help line up the fuselage halves; and a different arrangement on some of the parts. But that’s not to be construed as complaining.
| CONSTRUCTION |
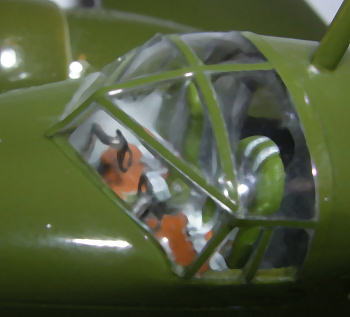
Started with assembly of the flight deck – but it shouldn’t have. When the cockpit is wide open from above, as this one was, the preferred sequence is to add seats and protuberances from above after painting. That facilitates masking, and fitting the transparency, which can be trimmed while still attached to a stiffening block of plaster or wood putty (for details, q.v. my article on the Care and Coddling of Vacanopies).
 Control yokes and columns are
done in resin; a bit of a bother on bits that small. Substituted PEB wheels
mounted on bent wire were not much easier. The passenger compartment floor and
bulkheads are provided, with bases for seats; though none are included. I
scrounged some from the spares box, thinking they would be visible. You have to
get awfully close with a magnifier to catch a glimpse through the canopy; and
nothing at all can be seen through the side windows.
Control yokes and columns are
done in resin; a bit of a bother on bits that small. Substituted PEB wheels
mounted on bent wire were not much easier. The passenger compartment floor and
bulkheads are provided, with bases for seats; though none are included. I
scrounged some from the spares box, thinking they would be visible. You have to
get awfully close with a magnifier to catch a glimpse through the canopy; and
nothing at all can be seen through the side windows.
Oh yes, about those side windows. This is a persistent sore point with the Czech parts engineering. They are provided as injected individual panes with no flanges or other means of affixing them to the sidewalls. Several plans of action suggest themselves. One is the presumable intended method of press fitting into the openings, carefully letting capillarity draw a fine bead of liquid cement into the joint, living a clean life, and fervently praying that none gets on or fogs the clear part; followed by meticulous paint masking with liquid medium. That much difficulty (particularly the “living the clean life” part) is worthwhile only if the windows are especially flat and clear. These are not.
Another
solution is to cast a male mold of the windows, then vacuform them in strips.
The process is explained in the UC-61 forwarder review. Also archived somewhere
on this site are plans for a kitchen table vacu-former, accompanied by DIY notes
for melt-sucking parts. 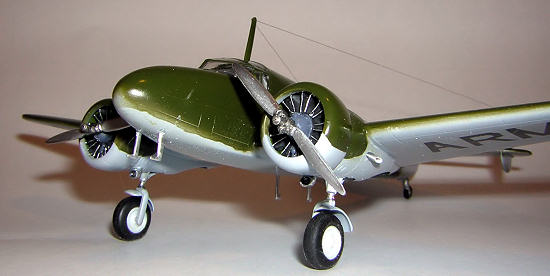
The quicker and dirtier technique, here opted for, with less than outstanding outcome, was to cover the windows inside with strips of clear plastic; take advantage of the resultant deep cavities to mask with bits of “Blue Tack” type rubber stuff (Silly Putty, etc); then, post painting, fill flush to the fuselage with clear epoxy. Getting a perfectly clear, flat window takes patience; a commodity in short supply due to the heat / humidity index (“Humiditure”) in No VA in July pulsating persistently around one hundred and eleventy ‘leven degrees. The air conditioning duct rigged to the Secret Model Airplane Building Room was barely making a dent in the swelter, due to the impossibility of also rigging a corresponding warm air return duct. But that’s another sort of building problem. Traditional Down South Solution to Summer is Mint Julep; a suspension of ice in pure ethanol. Effects are inconsistent with model airplane building – certainly in 1/72 scale. But back on transparency track. A twist to the epoxy route is pouring the stuff prior to painting, slightly overfilling, then filing and polishing perfectly flat and flush. Panel lines get sanded away, and the problem remains of paint masking. Both variations of the epoxy technique are covered in reviews of the PM Beechcraft Be-18 and Kansan kits.
Closing the
clamshell halves brings up another bitch with short run engineering. Lack of
locating pins invariably leads to a mili-micron of slippage; meaning a tough and
very visible seam to fill and sand. In subsequent builds, I’ve cured the glitch
with i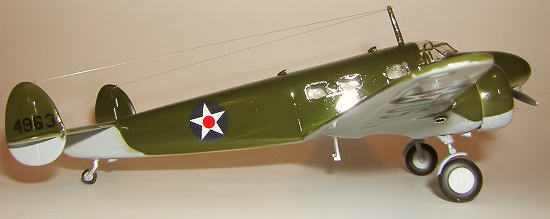 nterlocking tabs made of
strip stock.
nterlocking tabs made of
strip stock.
The manner in which the wing is attached – separate upper panels glued to a single lower span and then stuck to the open fuselage belly – also keeps happy the makers of Squadron Putty and Mr. Surfacer.
At the risk of sounding curmudgeonly, mention must be made of the empennage assembly. Vertical fins come as upper and lower panels mating around the horizontal stabilizer. That leaves a nasty little gap where they meet at the leading and trailing edges that’s only partially disguised by gel cyanoacrylate and riffler filing. Upper nacelle halves are integral with the wing panels; but the lowers come in quarter panels that must be joined then mated to the underside. Best way to do this is clamp the part in place, then flow liquid cement into the joint.
| COLORS & MARKINGS |
Markings
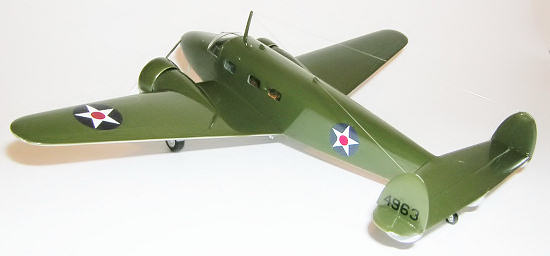
are provided for two NMF (Natural Metal Finish) a/c in British civilian livery;
one actually a cover for a spy plane; and two in RAF camo over yellow. One of
the latter wears the US “meatball” insignia of a Navy liaison plane operating in
England. That would have been an interesting addition to a mostly solid-color
collection of transports; but the humiditure had not abated. I
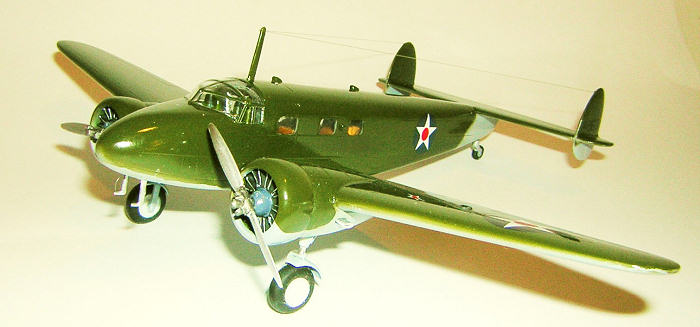
 chose a quicker OD over Neutral
Gray scheme seen in a web photo.
chose a quicker OD over Neutral
Gray scheme seen in a web photo.
Incidentally, is anyone privy to the RAF rationale for camouflaging a plane’s upper surfaces but painting its underside bright insignia yellow? Seems that if you were trying to confuse fighters above, you’d want to do the same to flak below. Maybe it was to help Search and Rescue; with British pilots trained to always crash inverted.
To soften the separation line, masking was done with tacky rubber stuff from the Everything’s a Dollar Store. It’s a darn sight cheaper than, works just as well as, and is very likely the same substance as dedicated Modeler’s Masking Putty. Paints are Model Master gloss enamels, which saves a pre-decal gloss coat. OD isn’t available shiny, by a bit of orange and brown added to green yields a Russian shade of US Olive Drab. Russian as in Gudinov.
Kit decals were not up to the usual excellent Czech standard, being thicker than usual and somewhat dull in color. The fuselage insignia were much smaller than called for in the web photo, so a brighter, more tractable pair were pulled out of the spares envelope. Future sealed everything in a gloss coat; glossier than intended, but the stuff wouldn’t settle down except in a heavy, wet layer. The heat/humidity index again.
| FINAL CONSTRUCTION |
The canopy, to repeat, was a perfect
fit with minimal tweaking. Framing was done with painted strips of Pactra
Trim-Tape. All sorts of addenda complicated the underside. Resin exhaust stacks
were discarded in favor or snippets of squashed aluminum tube.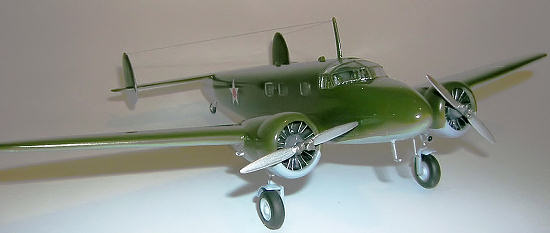
Engines are semi-generic injected buttons. Only alternative was a single Wasp Junior from Engines’n’Things. Its quality was hardly better; certainly not good enough to cast a dupe (see casting article). The originals were spruced up by cutting away the webbing between the cylinders, which allows daylight to be seen when viewed from directly ahead or astern, as in reality.
Next to last step (last was antenna wire) was mating of injected prop blades to resin hub. This looked to be a bear but molding was so good that the blade bosses, once cleaned up, slipped snuggly into the hub sockets, also just as in the actual article. Those hubs were the best parts of the kit. Sharply defined fly-weights, actuating arms, and pressure dome. Pity they didn’t do the same with the engines.
| CONCLUSIONS |
 Somewhere out there in Injected
Kit Land floats a big brother Model 10 Electra cranked out a few years back by
one of the short-runners. Only Military scheme I’ve seen so far is a grainy B&W
thumbnail shot of the 1936 USCG Commander’s personal limo. Other than a
presumably NMF fuselage, it gives no clue to other color or markings. If some
references come forward, that kit will have to be hunted down and added to the
collection.
Somewhere out there in Injected
Kit Land floats a big brother Model 10 Electra cranked out a few years back by
one of the short-runners. Only Military scheme I’ve seen so far is a grainy B&W
thumbnail shot of the 1936 USCG Commander’s personal limo. Other than a
presumably NMF fuselage, it gives no clue to other color or markings. If some
references come forward, that kit will have to be hunted down and added to the
collection.
August 2006
Copyright ModelingMadness.com. All rights reserved. No reproduction in part or in whole without express permission from the editor.
If you would like your product reviewed fairly and fairly quickly, please contact the editor or see other details in the Note to Contributors.