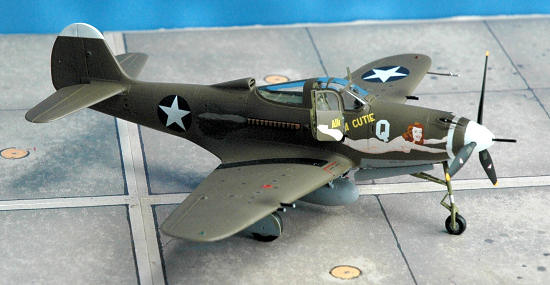
Hasegawa 1/48 P-39 Airacobra 'Pin up Girl'
|
KIT #: |
09738 |
|
PRICE: |
$41.99 |
|
DECALS: |
Two options |
|
REVIEWER: |
Andrew Garcia |
|
NOTES: |
Eduard FE374 P-39 Color Zoom & FE195
P-39 Color Placards |
The P-39 was an all-metal,
low-wing, single-engine fighter, with a tricycle undercarriage and an Allison
V-1710 liquid-cooled Vee-12 engine mounted in the central fuselage, directly
behind the cockpit.
The Airacobra was one of the
first production fighters to be conceived as a "weapons system"; in this case
the aircraft (known originally as the
Bell
Model 4) was designed around the 37mm T9 cannon. This weapon, which was designed
in 1934 by the American Armament Corporation, a division of Oldsmobile, fired a
1.3 lb (610 g) projectile capable of piercing .8 in (2 cm) of armor at 500 yd
(450 m) with armor piercing rounds. The 200 lb, 90 inch long weapon had to be
rigidly mounted and fire parallel to and close to the centerline of the new
fighter; however, it would be impossible to mount the weapon in the fuselage,
firing through the propeller shaft as could be done with smaller 20mm cannon.
Weight, balance and visibility problems meant that the cockpit could not be
placed further back in the fuselage, behind the engine and cannon.
The
solution adopted was to mount the cannon in the forward fuselage and the engine
in the center fuselage, directly behind the pilot's seat. The tractor propeller
was driven via a 10 foot long drive shaft which was made in two sections,
incorporating a self-aligning bearing to accommodate fuselage deflection during
violent maneuvers. This shaft ran through a tunnel in the cockpit floor and was
connected to a gearbox in the nose of the fuselage which, in turn, drove the
three or (later) four bladed propeller via a short central shaft. The gearbox
was provided with its own lubrication system, separate from the engine; in later
versions of the Airacobra the gearbox was provided with some armor protection.
The glycol cooled radiator was fitted in the wing center-section, immediately
beneath the engine; this was flanked on either side by a single drum shaped oil
cooler. Air for the radiator and oil coolers was drawn in through intakes formed
in both wing-root leading edges and was directed via four ducts to the radiator
faces. The air was then
 exhausted through three controllable hinged flaps near
the trailing edge of the center section. Air for the carburetor was drawn in via
a raised oval intake immediately aft of the rear canopy.
exhausted through three controllable hinged flaps near
the trailing edge of the center section. Air for the carburetor was drawn in via
a raised oval intake immediately aft of the rear canopy.
Because the pilot was riding
above the extension shaft he was placed higher in the fuselage than most
contemporary fighters, which, in turn, allowed
Bell
to use a raised cockpit enclosure, giving the pilot a good field of view. Access
to the cockpit was via sideways opening "car doors", one on either side. Both
had wind-down windows; because only the right hand door had a handle both inside
and outside this was used as the normal means of access. The left hand door
could only be opened from the outside and was only for emergency use, although
both doors could be jettisoned. In operational service, however the cockpit was
difficult to escape from in an emergency because the roof was fixed.
The complete armament fit
consisted of the T9 with a pair of Browning M2 .50 in (12.7 mm) machineguns
mounted in the nose. This would change to two .50 in (12.7 mm) and two .30 in
(7.62 mm) guns in the XP-39B (P-39C, Model 13, the first 20 delivered) and two
0.50 in/12.7 mm and four 0.30 in/7.62 mm (all four in the wings) in the P-39D
(Model 15), which also introduced self-sealing tanks and shackles (and piping)
for a 500 lb (227 kg) bomb or drop tank.
Because of the
unconventional layout, there was no space in the fuselage to place a fuel tank.
Although drop tanks were implemented to extend its range, the standard fuel load
was carried in the wings, with the result that the P-39 was limited to short
range tactical strikes.
In September 1940,
Britain
ordered 386 P-39Ds (Model 14), with a 20 mm (.79 in) Hispano-Suiza HS.404 and
six .303 in (7.7 mm), instead of a 37 mm (1.46 in) cannon and six 0.30 in (7.62
in) guns. The RAF eventually ordered a total of 675 P-39s. However, after the
first Airacobras arrived at 601 Squadron RAF in September 1941, they were
promptly recognized as having an inadequate rate of climb and performance at
altitude for Western European conditions. Only 80 were adopted, all of them with
601 Squadron.
Britain
transferred about 200 P-39s to the
Soviet Union.
Another 200 examples
intended for the RAF were taken up by the USAAF after the attack on Pearl Harbor
as the P-400, and were sent to the Fifth Air Force in Australia, for service in
the South West Pacific Theatre.
A heavy structure, and
around 265 lb (120 kg) of armor were characteristic of this aircraft as well.
The production P-39's heavier weight combined with the Allison engine having
only a single-stage, single-speed supercharger, limited the high-altitude
capabilities of the fighter. The P-39's altitude performance was markedly
inferior to the contemporary European fighters and, as a result, the first USAAF
fighter units in the European Theater were equipped with the Spitfire V.
However, the P-39D's roll rate was 75°/s at 235 mph (378 km/h)– better than the
A6M2, F4F, F6F, or P-38 up to 265 mph (426 km/h).
Above the supercharger's
critical altitude of about 12,000 ft (3,658 m), an early P-39's performance
dropped off rapidly. This limited its usefulness in traditional fighter missions
in
Europe
as well as in the Pacific, where it was not uncommon for Japanese bombers to
attack at altitudes above the P-39's operational ceiling (which in the tropical
hot air inevitably was lower than in moderate climates). However the late
production N and Q models making up 75% of all Aircobras could maintain a top
speed of approximately 375 mph (604 km/h) up to 20,000 ft (6,100 m).
The weight distribution of
the P-39 was supposedly the reason for its tendency to enter a dangerous flat
spin - a characteristic Soviet test pilots were able to demonstrate to the
skeptical manufacturer who had been unable to reproduce the effect. After
extensive tests, it was determined the spin could only be induced if the
aircraft was improperly loaded, with no ammunition in the front compartment. The
flight manual specifically noted a need to ballast the front ammunition
compartment with the appropriate weight of shell casings to achieve a reasonable
center of gravity. High speed controls were light thus high speed turns and
pull-outs were possible although the P-39 had to be held in a dive since it
tended to level out, reminiscent of the Spitfire. Recommended dive speed limit
was 475 mph (764 km/h) for the P-39.
 The rear-mounted engine made
the aircraft ideal for ground attack since fire would be coming from the
front-bottom quarter and was less likely to hit the engine and its cooling
systems. However, the arrangement proved to be very vulnerable to attacks from
above and behind and nearly any hit on the fuselage from an attacking enemy
fighter was virtually guaranteed to disable the cooling system and lead to the
prompt demise of the engine and thus the airplane. Coupled with lack of
high-altitude performance, the Airacobra was extremely vulnerable to any enemy
fighter with decent high altitude performance.
The rear-mounted engine made
the aircraft ideal for ground attack since fire would be coming from the
front-bottom quarter and was less likely to hit the engine and its cooling
systems. However, the arrangement proved to be very vulnerable to attacks from
above and behind and nearly any hit on the fuselage from an attacking enemy
fighter was virtually guaranteed to disable the cooling system and lead to the
prompt demise of the engine and thus the airplane. Coupled with lack of
high-altitude performance, the Airacobra was extremely vulnerable to any enemy
fighter with decent high altitude performance.
By the time of the
Pearl Harbor
attack, nearly 600 had been built.
When P-39 production ended
in August 1944,
Bell
had built 9,558 Airacobras, of which 4,773 (mostly -39N and -39Q) were sent to
the
Soviet Union
through the Lend-Lease program. There were numerous minor variations in engine,
propeller, and armament, but no major structural changes in production types,
excepting a few two-seat TP-39F and RP-39Q trainers. In addition, seven went to
the
U.S.
Navy as radio-controlled drones.
The Airacobra saw combat
throughout the world, particularly in the Southwest Pacific,
Mediterranean
and Russian theaters. Because its engine was not equipped with a supercharger,
the P-39 performed best below 17,000 feet (5,200 m) altitude. It often was used
at lower altitudes for such missions as ground strafing. Russian pilots
appreciated the cannon-armed P-39 for its ground attack capability.
The P-39 was one of the
first aircraft I built as a youngster. I built the Revell P-39 1946 Thompson
Trophy race version and always liked the shape and innovative design of the
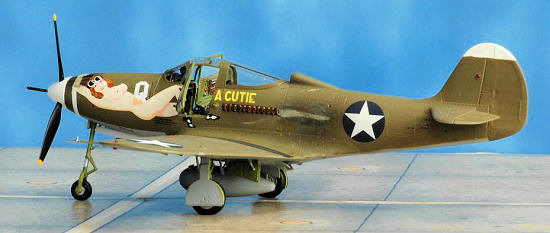
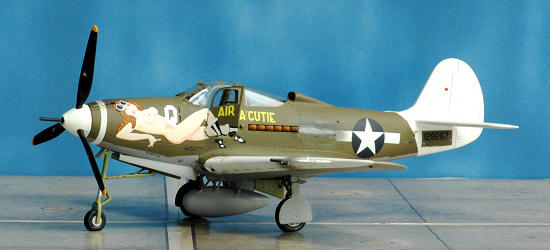
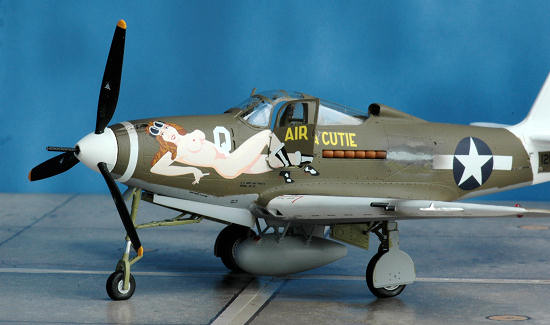
P-39. My tale of history and kit build focuses on one of the largest nose art
profiles used to decorate an American aircraft. The P-39/P-400 with the
“Air-A-Cutie” nose art has been often painted in color profiles but very few
pictures have survived the war mainly due to the harsh conditions this aircraft
experienced in the SWP combat area in the early stages of the Pacific war.
I wish I had more insight
into the history of this kits nose art. The most I have seen are the various
interpretations of the nose art by a variety of decal manufacturers or as
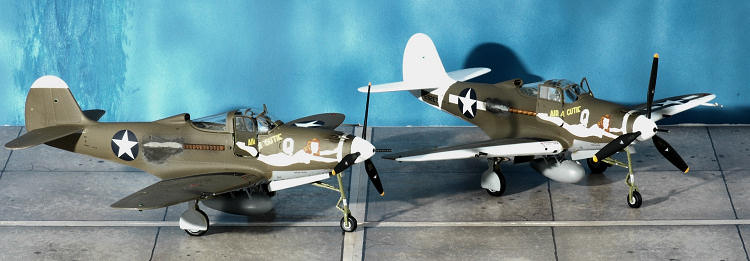
profiles in aircraft books. Hasegawa released a special edition of this nose art
aptly called “Pinup Girl”. In this boxing, as kit # 09738, I was impressed they
caught the two main variations of the nose art. Again, I do not have any
worthwhile details other than to confirm there are two versions, maybe on the
same airframe, of this nose art. If you look closely you will notice the port
side artwork positioning of the arm and hands change. Also, it is easy to spot
the changed style from the SWP white tail with a star and bar national insignia
to the small white tail tip and white star in the round circle version.
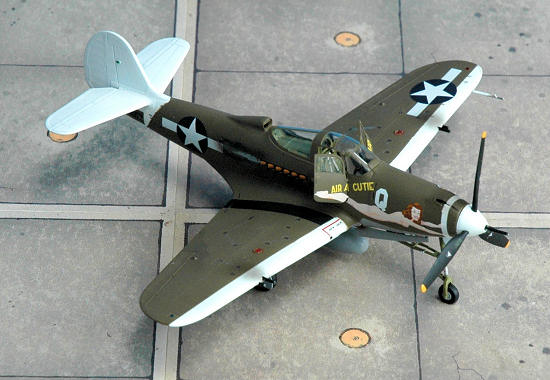
Hasegawa’s kit is excellent.
It features finely engraved panel lines, excellent overall shape and detail, a
highly detailed cockpit, nice wheel wells and landing gear, a canopy with
separate ‘car doors’ and optional centerline bomb or drop tank. There are decals
for 2 aircraft – the two versions of Air-A-Cutie I described above. The decals
are as good as or better than aftermarket decals. For the Air-A-Cutie version I
compared it to the aftermarket alternatives including Superscale and Cutting
Edge and Pyn-Up decals which are by the way excellent. I prefer the Hasegawa kit
decals which are printed by Cartograph. Once applied using Future clear gloss as
a setting solution and Testors dullcote as a finishing coat they look painted
on. The artwork has superb
 details, somewhat more accurate than the aftermarket
versions.
details, somewhat more accurate than the aftermarket
versions.
There are no photo-etch
parts with the kit but you can build a nice OOB build without them. The kit
comes with an excellent stencil decal sheet. For an OOB build you will be
delighted. When compared to the Monogram kit you can see the enhanced details
which the forty years age difference have brought to injection moulding – such
as the cockpit and landing gear. I am sure Monogram would do better if it
produced the P-39 with today’s tools. Monogram is a fine P-39 rendition and
worthy of building if you have some.
At the Hasegawa MSRP retail
price or even when purchased for less from discounters’,
it is a bit higher in price than I prefer. This is where the Eduard kit
offers a very competitive alternative and a much better price.
I did not see any need for
an aftermarket resin cockpit and just some color etched filled the need for
extra detailing with the Hasegawa kit. There is a new resin main wheel well
detail set available that has excellent details but it was released too late for
inclusion in this build.
I would
recommend it for those who like to look at that area of their aircraft and want
it to look perfect.
If cost or budget is your
concern then I would suggest getting the Eduard Dual Combo P-39 kits. The Eduard
kit has all you need. It provides finely moulded plastic, color etched metal
parts, nice masking, and good decals. The only disadvantage with the Eduard kit
is a somewhat thick rear wing edge. Perhaps it might be this way to accommodate
the Eduard etched flaps set?
This model although much
more detailed than Monogram is very easy to construct. I really want to
emphasize please do not deviate from the kit instructions, especially the
initial build steps because there are some parts you cannot retrofit if they are
not properly installed at the step indicated by Hasegawa.
None of the detail is beyond
the reach of an average modeler if you take your time, sand, dry fit and follow
the instructions. The instruction booklet is what every modeler has come to
expect from Hasegawa. Printed on non-gloss paper the details are reasonably
clear and well illustrated. I did not find any problems with the assembly
sequence. It looked so simple when I started that I deviated from it when
building the cockpit and nose gear. That was a mistake that was hard to correct
and now I see it was a needless chore if I would have followed Hasegawa’s steps
– so be forewarned!
One step that I deviated
from was in the attachment of the clear canopy and doors where it appears in the
instructions. It was an experiment to see which worked better. You have
advantages to attaching the canopy when the kit instructions indicates it in
step 9 and also get some benefits from attaching it after all the painting is
completed.
 I had some trouble mounting
the internal post and bead etched gunsight and rear mirror from the Eduard
etched zoom set when the canopy was added in step 9. Adding the canopy per the
instructions has the benefit of an improved placement and appearance because it
is done prior to painting the kit. The disadvantage is with the open doors you
have some unexpected issues not found with other aircraft.
I had some trouble mounting
the internal post and bead etched gunsight and rear mirror from the Eduard
etched zoom set when the canopy was added in step 9. Adding the canopy per the
instructions has the benefit of an improved placement and appearance because it
is done prior to painting the kit. The disadvantage is with the open doors you
have some unexpected issues not found with other aircraft.
If you attached the canopy
per the kit instructions it requires the attaching the doors for painting (which
sort of seals the open area) or leaving them off for ease in painting. Masking
the open aircraft door area of the canopy leads to the potential of small
over-spray getting into the inside of the canopy. Also, I experienced some
damage to some very small etched parts like the post and bead etched gunsight,
mirror, seatbelts and red gun charging handles by adding them before the final
painting step.
I was so pleased to get
these tiny color etched bits attached during the build.
When I carefully removed the Tamiya masking tape after painting the
exterior I also took out these parts and one seat belt too! Ouch – some of the
parts needless to say were very difficult to attach once the canopy is glued in
place per step 9.
 My preference is to attach the canopy
and doors – after all the painting and decaling are complete.
The next Hasegawa P-39/P-400 I build will not have the canopy attached
and polished before I paint the model. I recommend adding the canopy at the very
end, after all painting is finished if you use etched metal bits in your build.
My preference is to attach the canopy
and doors – after all the painting and decaling are complete.
The next Hasegawa P-39/P-400 I build will not have the canopy attached
and polished before I paint the model. I recommend adding the canopy at the very
end, after all painting is finished if you use etched metal bits in your build.
I also used the clear
plastic parts for the wing tip and rudder, green and red formation lights. They
were painted with clear Tamiya colors. The underside of the light was painted
Testors chrome silver. Note – you need to sand or file down the raised plastic
lights on the fuselage to use the kit provided clear parts.
An alternative is to use the
moulded on parts and through careful painting and an application of clear epoxy
or your favorite gloss paint add the lights by painting the moulded on lights.
After the overall kit dull coat is dry I attached the clear lights and pitot.
I used the clear parts since
they do look perfect if you buff them with a tri-stick sanding stick before
painting them with the clear Tamiya colors. I also used the tri-stick sanding
stick on the kit plastic area where the clear lights are attached to remove any
filing or sanding marks left from the removal of the moulded on kit lights.
I tried two different
approaches with the cockpit interior. I like the Hasegawa kit plastic in the
cockpit area. There is no dry fitting or other problems to deal with unlike that
posed by some resin cockpits. Hasegawa’s plastic kit cockpit detailing is very
nice.
By adding the Eduard color
etched bits to the Hasegawa plastic cockpit parts a very nice build can be had
without getting into an
AMS
build.
Although you can paint the
kit plastic instrument dials and dry brush the details because it would look
“OK”, I prefer to use the kit supplied instrument dial decal instead. I did this
with one version and used the Eduard zoom etched instrument panel on the second
build of Air-A-Cutie for comparison purposes. Eduard wins by an etched hair!
With careful placement the
decal conformed perfectly to the excellent kit plastic instrument moulding using
microsol and microset. The benefit of this is you can drill into the decal and
place small rods made from thin guitar wire that allow for the attachment of the
ve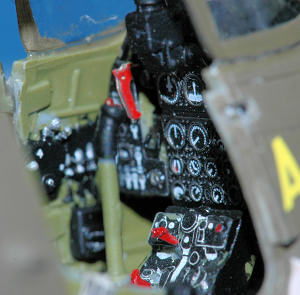 ry small Eduard etched “T” handles o your instrument panel. Once attached and
dry a dab of thin red paint on the “T” handles makes them look great.
ry small Eduard etched “T” handles o your instrument panel. Once attached and
dry a dab of thin red paint on the “T” handles makes them look great.
I find attaching the “T”
handles and small levers directly to Eduard’s etched metal to be too difficult
or prone to installation accidents. If your skills are better than mine or you
have mastered this step and can get the potential results from a direct
attachment also adding all the levers to the Eduard painted parts without
affecting them – go for it!
I did have a small fit
problem with the Eduard etched instrument panel. When I installed it the lower
edge of the gap for the plastic gunsight was above the kit plastic panel by a
very small amount. This slightly raised the kit plastic reflector gunsight which
caused a problem with the canopy attachment. The canopy would not properly seal
on the first attempt with the kit that used the Eduard etched instrument panel.
It could have been my fault with the wrong placement of the etched instrument
panel. If you do this step correctly and carefully it should all work out.
The solution I found was to
allow the plastic gunsight to be placed on the lower plastic lip and it will
work just fine – just watch this step in your assembly sequence. The tolerances
are so tight that a small deviation will cause the gunsight to push up on the
clear area of the front canopy glass and not allow the front canopy glass to
correctly mount. Since the entire canopy is a large one piece unit you will find
this problem to cause a difficult installation task and affect other areas to
the rear of the canopy.
In any
event the finished cockpit looks terrific with either approach.
Don’t forget to add nose
weight. There is a small call out in the instructions that should not be
overlooked before you attach the fuselage halves. Although you can do this at a
later step because there is a small nose hatch, part D3, to allow the different
nose guns to be added, it is easier to add weight and glue it in place with
epoxy before closing up the fuselage.
I think I found the “fatal
flaw” of this kit – and it is with the bottom of the main landing gear tires.
The main landing gear have a keyed to the axel installation step. This good
engineering feature, along with the flat tire bottom provides an excellent
looking tire and landing gear combination except – it appears Hasegawa moulded
the tire contact angle the same for both sides. They forgot to create a left and
right version of the main landing gear tires with the incline reversed on one of
the tires so they have the same front to back contact angle when attached.
Due to the tires angle of
contact to the ground this is only accurate for one side. The opposing tire is
slightly lifted off the ground because both have the same angle moulded. Since
they are the same once attached you can see the tire contact causes one tire to
be ever so slightly raised due to the incorrect angle of the moulding at the
bottom of the tire. I don’t think resin tires are a must. But, if you want to
fix this they could improve the situation.
I don’t think it is a fatal flaw by the way. My statement here was
intended to attract the eyes of those who delight in seeking the fatal flaw in
kits. I prefer to purchase and praise plastic kit manufacturers for their
investment and constant improvement I their products rather than berate them for
an oversight such as this one.
The front nose wheel was a
problem to attach. I really enjoyed and appreciate Hasegawa’s use of a separate
front nose wheel. The Monogram version for instance with its one piece nose
wheel and tire combination is 1960’s technology. This does not look as good as
Hasegawa’s version. The kit is a tail sitter and heavy nose weight is
required to keep the P-39 from being a tail sitter.
 Attaching the nose wheel
requires some work because the plastic nubs where the wheel attaches is a tight
fit. I tried two approaches. In order to get the wheel installed I tried to file
down the front landing gear attachments by a small amount to permit the tire to
mount between the raised plastic attachment points. I first tried to brute force
push the tires onto the nubs. When it did not snap into place and I feared
breaking the thin plastic at the base of the front landing gear I went to “plan
B”
I did this out of a fear of
breaking the lower part of the front landing gear while trying to separate the
arms to attach the tire.
Attaching the nose wheel
requires some work because the plastic nubs where the wheel attaches is a tight
fit. I tried two approaches. In order to get the wheel installed I tried to file
down the front landing gear attachments by a small amount to permit the tire to
mount between the raised plastic attachment points. I first tried to brute force
push the tires onto the nubs. When it did not snap into place and I feared
breaking the thin plastic at the base of the front landing gear I went to “plan
B”
I did this out of a fear of
breaking the lower part of the front landing gear while trying to separate the
arms to attach the tire.
Filing the nubs has a
detraction of weakening an area that is in need of help so on the second P-39 I
drilled through the contact area and ran a small piece of guitar wire though the
landing gear tire contact point – that is, I created an axel and mounted the
tire by running the axel through the kit plastic landing gear and tire. I used
cyano glue to attach it. It worked very well and the drilling was not too
difficult if you have small twist drill and drill bits.
Hasegawa has a two piece
front tire. Once glued together there is a noticeable gap. I was surprised to
find this in such an overall excellent kit but it is an easily fixable problem.
I used some Tamiya putty since it is easy to sand and dries quickly. I
anticipated this problem and fixed it before the front tire was mounted.
I did not do this for the
two main landing gear tires. Once I noticed the off angle on one of the tires
contact with the ground it was too late. They had already been glued to the
landing gear. I tried fixing the problem by using putty and sanding, that is
doing this after it was glued on and it, the entire landing gear snapped off
inside the wheel well. This problem required a metal pin and some different
adhesive to reattach the gear into the wing but it was fixed. A resin tire set
may be to your liking and preference.
I used Gunze acrylic paint
for the upper surfaces and for undersurfaces. Testors dullcoat was used to
create the final finish. I added some weathering and Tamiya smoke around the
exhaust area. I also used Testors chrome silver for chipped paint and wear on
the starboard entry-side wing area and wing walk.
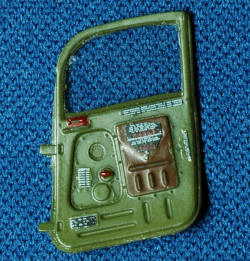
Hasegawa moulded on a door
handle on the inside of the port door. This is incorrect and the purist can or
should remove this. The P-39 had a door handle inside the cabin – but only on
the starboard door which was the preferred side for entry per
Bell
engineers. You could however open the door from both sides since there is a
flush exterior door handle on both sides. A nice exterior stencil “open” is
provided for both door handles.
Decal national markings came
from the kit decals. The kit decals are so well printed and thin I was really
pleased with them.
It was a very enjoyable
project. I have been intending to build some P-39’s
for many years. I will build a few more
of the Hasegawa P-39 since I also purchased the U.K and Russian markings
releases from Hasegawa. If the price comes down, or the kit goes on sale, I will
buy and build several more beyond my immediate stash. The “Pinup” special
version was really appreciated because it had some value added content that an
aftermarket decal release may not have provided. It sold out very quickly when
released.
P-39 Airacobra, Volume 63 In
Detail and Scale, Squadron Signal Publications # 8263 by Bert Kinzey 1999
Andrew Garcia
June 2009
Copyright ModelingMadness.com
If you would like your product reviewed fairly and quickly please
contact
me or see other details in the
Note to
Contributors.
Back to the Main Page
Back to the Review
Index Page 2016