
Special Hobby 1:32 P-400 Airacobra
| KIT #: | SH 32062 |
| PRICE: | £30-00 |
| DECALS: | Four options |
| REVIEWER: | Frank Reynolds |
| NOTES: | Also used HGW seat belts 132154; Eduard canopy masks JX073 |
| HISTORY |
Some aircraft have a poor
reputation because they were caught in the wrong place at the wrong time. Such
was the P-400; the export version of the Bell P-39 Airacobra that was intended
for Britain’s Royal Air Force and ordered at a time when the RAF was expected to
be short of home produced types. Issued to just one squadron, No 601 at Duxford,
England, the P-400 was found to have poor altitude performance and with the RAF
essentially in a defensive posture it did not require a low level fighter. 675
aircraft had been ordered by the British in April 1940, with the first few
delivered from August 1941, yet by October they were being withdrawn from
service as unsuitable. 212 were to be diverted to the USSR, while 179 were
effectively repossessed by the USA in December 1941 in urgent response to the
need for fighters in the Pacific theatre. What is recorded as a disappointment
for the original customer turned out to be a blessing in disguise for the USSR
who relished the type’s low level performance. The US Army Air Corps newly and
unexpectedly acquired inventory was rushed into the campaign against Japan in
New Guinea alongside P-39Ds and filled the breach until better types became
available. Relatively inexperienced pilots of t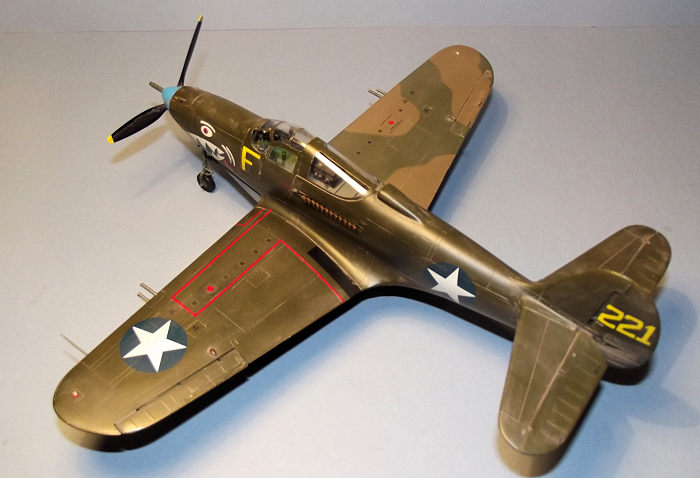 he
US Army engaged in combat with battle tested Japanese Naval pilots equipped with
the nimble and deadly Zero. It is to the credit of the Army pilots that they did
not flinch from their duty and did the best that they could with what they had
been given.
he
US Army engaged in combat with battle tested Japanese Naval pilots equipped with
the nimble and deadly Zero. It is to the credit of the Army pilots that they did
not flinch from their duty and did the best that they could with what they had
been given.
The P-400s armament consisted of a nose mounted 20mm Hispano Suiza cannon, two 7.7mm machine guns above the nose and four 7.7mm machine guns in the wings.
The P400/P-39s were ahead of their time, complicated and innovative at a time when standard and state of the art might have been better. Mid engine with a nose mounted cannon and a tricycle landing gear, access through side doors for the pilot to sit astride the propeller shaft , combined factors that were maybe a leap too far for the period. Had it been a valid concept other manufacturers would surely have adopted it. None did. However as a low level attack aircraft it excelled and many Soviet aces were glad of its rugged structure and powerful armament in their war against massed tanks..
| THE KIT |
This comes in a stout top opening tray – type box.
Special Hobby has come a long way in not too many years, having established its reputation with short run kits, yet this offering is scarcely distinguishable from a mainstream product. There are six bagged parts frames in well -defined medium grey softish plastic and one in clear. There was a slight trace of flash on some of the parts but nothing that could not be corrected with a light swipe from a scalpel blade.
There is little in the way of resin other than the twelve-pipe British style exhaust stacks and a gunsight. Two etched frets are included, a coloured one for cockpit details including seat belts and a further unpainted one for door liners and associated details.
 The
instructions are contained in a glossy 16 page A4 size booklet that adds to the
overall feel of quality with this kit. There is a parts chart and 30 stages of
construction in large drawings that are of great assistance to those of us with
older eyesight specifications. Some of the drawings are colour tinted to
highlight internal paint colours. Four full pages are devoted to four-view
colour schemes with painting notes keyed to Gunze Sangyo paints only, but all of
the colours are named. One page is devoted to stencil placement.
The
instructions are contained in a glossy 16 page A4 size booklet that adds to the
overall feel of quality with this kit. There is a parts chart and 30 stages of
construction in large drawings that are of great assistance to those of us with
older eyesight specifications. Some of the drawings are colour tinted to
highlight internal paint colours. Four full pages are devoted to four-view
colour schemes with painting notes keyed to Gunze Sangyo paints only, but all of
the colours are named. One page is devoted to stencil placement.
There is no engine or gun bay detail in the kit but it is none the worse for that.
This is a special boxing from Special Hobby that highlights aircraft from the British contract that ended up with other users so the options offer camouflage colours that are to a greater or lesser degree influenced by the order for the RAF. The nicely printed decal sheet, by Aviprint, has four options.
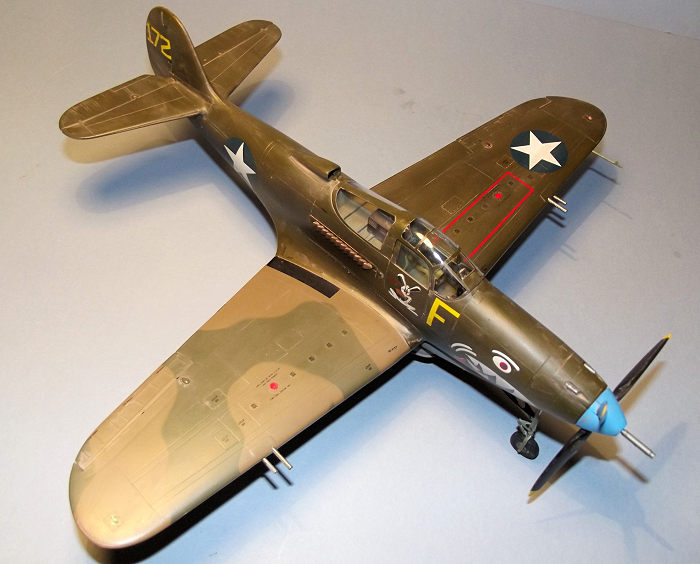
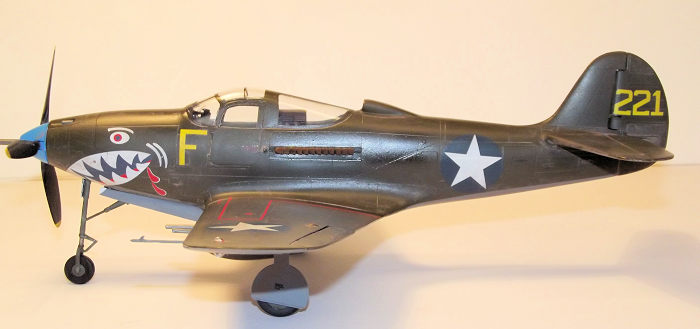
The first and the subject of this build, depicts an aircraft of the 80th Fighter Squadron 8th Fighter Group of the US Army in New Guinea in the autumn of 1942. The same aircraft had been operated by the 39th FS/35 FG in the defence of Port Moresby in the summer of that year. The colour scheme reflects all of the intended and actual users. It appears that the 39th FS applied the Fighting Rabbit insignia to the cockpit door, while the 80th added the Shark Mouth and large identification letter under the windscreen. The aircraft was painted in standard US colours of the period with Olive Drab upper surfaces and Neutral Grey undersides but at some point it had acquired a replacement right wing from the inventory of the cancelled British order, resulting in that wing being Dark Green/Dark Earth on the upper surfaces and Sky beneath. To further mix things up a replacement rudder from a P-39 was fitted, displaying parts of that donor aircraft’s serial number on each side of the fin. The kit’s colour notes use words such as “could have”, “we assume ” and “just as possible”, so a little caution needs to be exercised as to the total authenticity of this scheme. Not all of the features may have been present on the airframe at any given time.
The second option is a US
Army aircraft of the 35th FG in the British-style scheme of Dark Green/Dark
Earth/Sky with standard US markings of the period. It carries a large duck
insignia on one cockpit door and a
 shark mouth
overpainted in Black.
shark mouth
overpainted in Black.
The third option is a US Army aircraft in Tunisia in early 1932, a fairly anonymous subject in British-type camouflage. There are no code letters or serial numbers and the only personalisation is a bird cartoon on the cockpit door.
The fourth option is a P-400 of the USSR used in the defence of the port of Murmansk. It is painted in the revised British tactical camouflage of Dark Green and Ocean Grey upper surfaces over Medium Grey lower surfaces. This suggests that the aircraft was diverted from the RAF after being repainted in the UK. The decals have Russian Stars printed onto a green roundel background to simulate the British insignia being painted over.
If every picture tells a story there are a number to be told from this kit’s options and I settled for the shark mouth and odd wing presentation.
| CONSTRUCTION |
This began with the cockpit interior but in a slightly unusual way since the side doors need to be built up. They are moulded completely in clear plastic so the outside and inside of the windows were masked off using the Eduard set for the exterior and Tamiya tape for the interior. The door liners and small equipment boxes are provided on the etch fret. Since I prefer plastic to plastic where I can get it, the liners and boxes were copied onto 5thou plastic card and glued in place with liquid cement. An additional reason for copying the etch parts in plastic is that I find it tricky to paint metal with my favoured acrylic paints without fiddling around to find an appropriate primer. Without it paint chips easily from metal.
The instructions highlight
all of the parts that should be painted interior green from the cockpit to the
wheels bays and the landing gear doors. I decided to pre-paint many of the
relevant components while still on the parts frames. The inner faces of the
doors and fuselage halves were painted at the same time. I le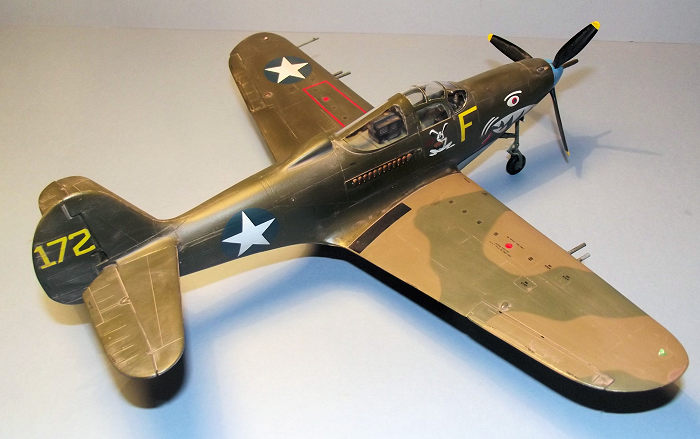 arned
from a trawl of the web that the Bell Aircraft Corp. used a distinctive shade of
Green for interiors and based upon a web consensus I used Tamiya XF-73 JGSDF
Dark Green. The same colour was used for the gear legs, wheel wells and inner
faces of the gear doors
arned
from a trawl of the web that the Bell Aircraft Corp. used a distinctive shade of
Green for interiors and based upon a web consensus I used Tamiya XF-73 JGSDF
Dark Green. The same colour was used for the gear legs, wheel wells and inner
faces of the gear doors
The core of the interior is built up from a flat floor plate which is first inverted to build the nose wheel bay that consists of side walls, front and rear bulkheads and a small internal bulkhead. The box structure was glued up and allowed to set. Turned the right way up the firewall was glued into place together with two small side boxes and the rudder bar. The instrument cluster was painted Black and built up neatly from a centre pedestal surmounted by two instrument panels. No instrument decals were provided so the instrument faces were detailed with suitable decals from Airscale’s generic sheet AS48USA “WW2 USAF”. The breaches for the nose guns were installed on the front bulkhead and the control stick atop the central tunnel. Two small riblets were glued in place forward of the door openings then the cockpit floor and nose wheel box fixed into the right hand fuselage half. At the same time the rear bulkhead and rear cockpit shelf were glued in place. The fuselage halves were joined and left to set. There is no need to worry about nose weight at this stage since the upper forward nose is moulded separately to allow for the gun troughs and the open hatch is a handy way of inserting nose weight later in the build.
The instructions showed that it was time to deal with seat belts and I could have played around with the 31 pieces of etch that represent the belts and buckles. Instead I turned to one of HGW models excellent laser cut fabric seat belt sets made specifically for a P39-D. I find that they are easier to handle if the buckles are left on the etch frame for as long as possible while the fabric is threaded into place, only cutting them away when the end fastenings need to be fixed to each belt. Tiny dabs of superglue are sufficient to deal with overlaps in the fabric. An unexpected bonus with the HGW set is an etched brass seat pan to replace the somewhat undersized version that is provided by Special Hobby. This was used as a pattern to copy the shape onto thin plastic card. The cockpit build was completed with the installation of the new seat onto its vertical support struts against the rear bulkhead while the clear armour glass to the bulkhead was fixed with Humbrol ClearFix. Finally the black painted radio box was installed on the rear shelf. With the dome-like cockpit glazing and doors still to be fitted the cockpit had a strange open plan look to it. The seat belts were fixed into place with dabs of superglue.
The tail group components were dealt with next. The fixed horizontal tail surfaces and the elevators are moulded from simple upper and lower pieces and the rudder in halves. Similarly the two piece ailerons were assembled. They were cleaned up and set aside for installation later.
The lo wer
wing is moulded in one piece which helps with alignment of the dihedral. Before
the top wing panels are added some care is needed in installing the wing root
leading edge intakes and belly air exit ducts together with the landing gear
wheel wells. Some minor fettling of the parts and a few dry runs ensured a
reasonable fit. The lower wing assembly was offered up to the fuselage and fixed
with tube cement allowing time for minor adjustments while the upper wing panels
were fixed in place. After a period of overnight drying, the basic airframe was
completed by the installation of the horizontal tail surfaces, rudder and
ailerons.
wer
wing is moulded in one piece which helps with alignment of the dihedral. Before
the top wing panels are added some care is needed in installing the wing root
leading edge intakes and belly air exit ducts together with the landing gear
wheel wells. Some minor fettling of the parts and a few dry runs ensured a
reasonable fit. The lower wing assembly was offered up to the fuselage and fixed
with tube cement allowing time for minor adjustments while the upper wing panels
were fixed in place. After a period of overnight drying, the basic airframe was
completed by the installation of the horizontal tail surfaces, rudder and
ailerons.
The landing gear main legs were dry fitted and secured with some low tack reusable putty to provide a see-saw pivot. I obtained some spent BB pellets from a friendly local gun shop and dropped them through the open nose hatch a few at a time until l was satisfied that there was a sufficient number to balance the model when the build was complete. The lead pellets were then tipped out again and fed back in a few at a time after having dipped each one in five minute epoxy resin. I learned the hard way some years ago not to install too many at a time since the resin gives off heat as it sets. An overdose of resin chemically cooking away is a sure recipe for distorted plastic.
Once satisfied that the nose weight was safe and secure the nose panel was glued in place. The large cockpit transparency was covered with Eduard’s pre-cut masks, while the internal masking was removed from the doors. The gunsight was fitted on a half hoop across the front of the cockpit. I test fitted the cockpit transparencies and the doors a number of times, having established that the doors were not a precise fit but eventually they were coaxed into place and the large upper transparency fixed with Tamiya Ultra Thin cement flowed along the fuselage joint.
The main airframe was checked over and a few small areas sanded to provide clean joints but no significant areas of filler were necessary.
| COLORS & MARKINGS |
The paintwork was an interesting mix of camouflage from two air forces. I accept that RAF camouflage on US-built aircraft of the era is actually based on DuPont paints as near equivalents but rather than try to duplicate these, nor any attempt at jungle-faded US colours, I settled for standard RAF and US colours from my home stock of paints.
The airframe was first primed in Grey from a rattle can of auto primer, then the undersides airbrushed in Neutral Grey using Tamiya XF-53. With the grey masked out using Tamiya tape, the left wing was painted in Xtracrylix XA1007 Sky.
With the undersides masked
off the main upper surfaces were airbrushed in Tamiya XF-62 Olive drab. With
further masking, the upper surfaces of the right wing were finished in
Xtracrylix X1001 Dark Green and X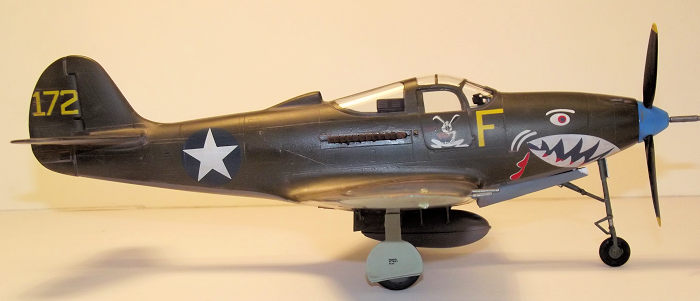 A1002
Dark Earth with the demarcation between the colours defined by thin rolled
snakes of low tack putty to give a soft demarcation. By carefully checking the
instructions I ensured that the parts to be added later in the build were
painted alongside the colours applied to the main airframe.
A1002
Dark Earth with the demarcation between the colours defined by thin rolled
snakes of low tack putty to give a soft demarcation. By carefully checking the
instructions I ensured that the parts to be added later in the build were
painted alongside the colours applied to the main airframe.
With the masking stripped away the airframe was treated to two hand brushed coats of Future/Klear floor polish to provide a base for the decals. Special Hobby provides a comprehensive set of stencils although the wing walk lines were omitted from the “RAF” side of the airframe. The decals were straightforward to apply and even the multipart decals for the shark mouth around the nose presented no real problems. The decals were sealed in with a misted airbrushed coat of Xtracrylix matt varnish
The nose gear doors required a little more attention since they carry parts of the nose shark mouth decal and would be installed during the final round up of parts. They are intended to have some tiny etch hinges which have a double fold. I took the opportunity to once again duck out on the use of etched parts by fashioning some small plates out of sheet plastic to link the inner face of the doors with the inner edge of the nose wheel well.
The landing gear parts were a bit of a fiddle to put together and the only real indication that this kit came from a manufacturer that had built up its product line from short run mouldings. I found it easier to assemble the legs with liquid cement and then repaint them where the cement had burned away the pre-painting. The main legs are provided with oleo callipers in two pieces and an additional bracket to support the main gear door. The two piece wheels have separate hubs which thankfully make painting the tyres and hubs easier.
The nose gear is a complex
example of the mould makers’ art with ten parts forming the leg and its complex
retraction mechanism but with persistence it all seemed to fall into place. A
long engine shaft extension passes through the nose wheel bay to the back of the
spinner. The legs and wheels were glued into place and left overnight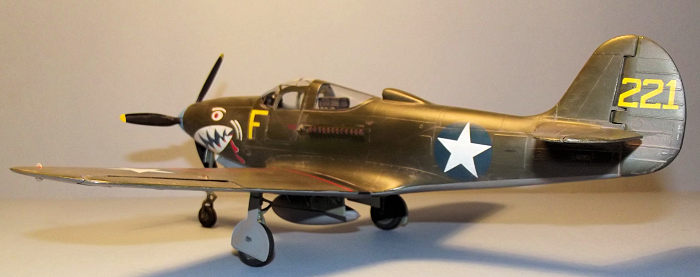 to set hard. The main gear doors were joined to the legs and the secondary
centre section doors with their closing struts were installed.
to set hard. The main gear doors were joined to the legs and the secondary
centre section doors with their closing struts were installed.
The propeller spinner and back plate were painted Tamiya Sky Blue X-14 and the blades matt Black with Yellow tips.
It was time for the finishing touches. The resin exhaust manifolds were tidied up and painted Red Brown . They were tacked into slots in the fuselage sides with superglue. Special Hobby intends that small etched strips should be fitted above and below the exhausts – once again they were copied in plastic card. The belly tank and support struts had been previously painted while still one the parts frames. The three radiator exit doors were fixed under the rear centre section. Six machine guns and the nose cannon were glued in place and the job was done. A quick wash over with a water based weathering wash gave the aircraft a grubby look.
| CONCLUSIONS |
It is a mark of Special Hobby’s later standards that the plastic from this kit has appeared in a Revell boxing as the basis of a P-39.
The kit is close to mainstream in its presentation, with minimal resin and as boxed requires some limited work with etch, so it might prove a useful introduction to this medium.
This was a fascinating build, the option that I chose offers the colours of two different air forces, the markings of two different squadrons and the components of two, maybe three, different airframes. It tells a story. The shark mouth adorning the ship somehow speaks about the defiance of the Army pilots in the New Guinea campaign. The bulky, sturdy P-400 looks fine upon the shelf and is a welcome addition to my collection.
| REFERENCES |
Special Hobby’s Instructions.
British Warplanes of World War 2. Aerospace Publishing 1998.
The internet.
7 September 2017
Copyright ModelingMadness.com. If you would like your product reviewed fairly and fairly quickly, please
contact
the editor or see other details in the
Note to
Contributors. Back to the Main Page
Back to the Review
Index Page
Back to the Previews Index Page