Monogram 1/48 P-38M Lightning
| KIT #: | 5479 |
| PRICE: | $15.99 MSRP |
| DECALS: | three options |
| REVIEWER: | Greg Ewald |
| NOTES: | An old kit that still holds up well |
| HISTORY |
Those of you who have listened to me babble on and on about the 38 already know that I feel it was the greatest airplane used in World War Two: versatility, speed, firepower…all these came into a wonderful combination in the Lightning. The initial design may have had its drawbacks, but refinements during the war produced a sleek and deadly airframe that stood out from the competition in every way.
The night fighter variant, the P-38M, came into being out of sheer necessity (the mother of invention, correct?) as the allies fought to maintain a semblance of air superiority in the Pacific Theatre. The Japanese had the very capable “Betty” bombers that flew high altitude night missions, destroying American airfields and supply depots at will. The night fighter of the time, a modified Havoc twin-engine light bomber( P-70A), could not catch up with the high flying Betty’s, and the U.S. needed a solution.
The airfields could light up the sky with powerful searchlights and find the Japanese bombers, and then a squadron could pummel the enemy aircraft with cannon fire and machine guns…but this was only a stop-gap measure.
 The ultra secret “Manhattan
Project” was kept from most of the military brass, and not knowing that the war
would soon be over, several groups of pilots and radio-intercept-officers were
trained in the use of the P-38M and the newer and larger P-61 Black Widow. From
most accounts, it does appear that the pilot’s liked the modified 38 much better
than they did the bulky 61, which had a shorter range and a weak turning
radius…but to be fair, the RIO’s liked the leg room in the Widow much better!
The radio station in the 39M was cobbled together, some of the longer legged
aviators had to put their feet past the pilot’s head due to the cramped space:
To quote Lt. D. Hopwood;
The ultra secret “Manhattan
Project” was kept from most of the military brass, and not knowing that the war
would soon be over, several groups of pilots and radio-intercept-officers were
trained in the use of the P-38M and the newer and larger P-61 Black Widow. From
most accounts, it does appear that the pilot’s liked the modified 38 much better
than they did the bulky 61, which had a shorter range and a weak turning
radius…but to be fair, the RIO’s liked the leg room in the Widow much better!
The radio station in the 39M was cobbled together, some of the longer legged
aviators had to put their feet past the pilot’s head due to the cramped space:
To quote Lt. D. Hopwood;
“We didn't have much room in the aircraft (front or back). We had a full seat about as wide as a chair. Everything like the instrument panel, throttles and rudder pedals were up close. The canopy came right up over your head without much clearance. Compared to the R/0's compartment, the pilots had quite a bit of room. He sat hunched over his scope without any room to move around, certainly nothing like the rear cockpit of the Black Widow! He - put his legs down on either side of the pilot's seat. Believe me, it took a dedicated individual to stick it out on the longer practice missions. I remember that most of them complained about the excessive g’s or all the horsing around, and I don't blame them."
The P-38M probably never saw combat, records of encounters with Japanese aircraft are vague, at best, and the fog of war has obscured the reality of the air combat in the latter days of the Pacific confrontation. If it had been put to the test, however, I do believe it would have really rocked the world of many a Japanese bomber pilot, feeling himself safe in the darkness…
| THE KIT |
 This is the old boxing, stamped 1964,
that has been around the block a time or ten, so the amount of flash is to be
expected. The Revell-o-Gram offering lets you build one of three variants, and
the instructions veer off from time to time during the construction process with
individual diagrams, I would heavily recommend reading them thoroughly prior to
removing styrene from the sprues! The cockpit isn’t as poor as you might
think, with a little bit of added detail and some careful brushing, it actually
looks the part, though you are going to want to either make some belts, or use
some aftermarket bits.
This is the old boxing, stamped 1964,
that has been around the block a time or ten, so the amount of flash is to be
expected. The Revell-o-Gram offering lets you build one of three variants, and
the instructions veer off from time to time during the construction process with
individual diagrams, I would heavily recommend reading them thoroughly prior to
removing styrene from the sprues! The cockpit isn’t as poor as you might
think, with a little bit of added detail and some careful brushing, it actually
looks the part, though you are going to want to either make some belts, or use
some aftermarket bits.
The plastic itself is nice enough, gray styrene for the main kit, and black for the additional items, along with a really horribly molded (this in all three of my example kits) clear pieces. You will require Future to make these even look passable, it took three separate dunks for mine.
Decals are printed well, but on that typical super-thick carrier film, and on a black aircraft, silvering is going to be a real issue, more on that later.
| CONSTRUCTION |
 Same as is normal, start with
the ‘pit. I didn’t spring for any aftermarket doodads on this one, trying to go
for OOB as much as was possible with the kit…but was hit by the scratchbuild
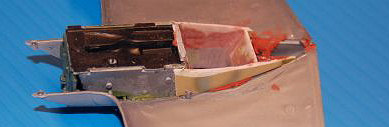
monster almost immediately. You will see when you cut away the rear fuselage to
accept the RIO station, that if you don’t fill in the back part, it will look
absolutely ridiculous, why they didn’t include a rear cockpit, I will never
know. Using 3x5 notecards, I made some stencils in order to create some plastic
cardstock bulkheads, and boxed in the radio station before mating the upper and
lower fuselage
Same as is normal, start with
the ‘pit. I didn’t spring for any aftermarket doodads on this one, trying to go
for OOB as much as was possible with the kit…but was hit by the scratchbuild
monster almost immediately. You will see when you cut away the rear fuselage to
accept the RIO station, that if you don’t fill in the back part, it will look
absolutely ridiculous, why they didn’t include a rear cockpit, I will never
know. Using 3x5 notecards, I made some stencils in order to create some plastic
cardstock bulkheads, and boxed in the radio station before mating the upper and
lower fuselage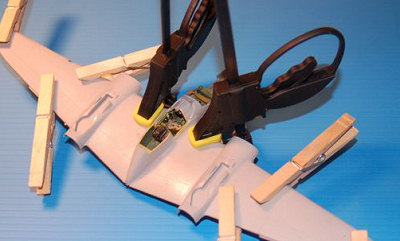 halves. With the upper new half puttied and sanded down (take
out some stock in Bondo), it was time to insert the cockpit(s) and clamp the
whole thing together, I really like these little hobby bar clamps I picked up at
Harbor Freight Tools, they work fantastically on jobs like this, and boy oh boy,
did this warped plastic need to be clamped!
halves. With the upper new half puttied and sanded down (take
out some stock in Bondo), it was time to insert the cockpit(s) and clamp the
whole thing together, I really like these little hobby bar clamps I picked up at
Harbor Freight Tools, they work fantastically on jobs like this, and boy oh boy,
did this warped plastic need to be clamped!
While you set this assembly off to
the side to dry, you can get hopping on the booms, which go together fairly
easily, but with a lot of seam repair necessary. How many tubes of body putty
did you buy? If you don’t want to install the gear right now, and I did not,
you can simply cut the receiving rings into a “C” shape, this will allow you to
glue the landing gear whenever 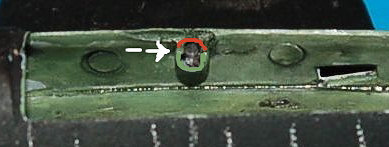 you want to (remove red area). I also left off
the gear doors and other bits that would just break off during construction.
you want to (remove red area). I also left off
the gear doors and other bits that would just break off during construction.
Joining the booms to the fuselage/wing is somewhat tricky, and despite all of my dry fitting, and I do mean hours of dry fitting, it still took quite a bit of filler. Unfortunately for me, my Milliput was dried out, the hobby store was out of stock, and I had to resort to thickened white glue, which is just white glue and talcum powder mixed up…it works well in a pinch, as it can be applied and then smoothed over with a damp finger or Q-tip.
Slide the tail section stabilizer into the starboard side until it lines up with the correct markings and then glue this in place, and wait until it is completely dry and set well. Now, maneuver the port boom into place, and clamp to hold it there…now you can glue it in where it should be without resorting to odd Rube Goldberg contraptions to make it come together. Simple, right?
I put the nose on prior to installing the gun bay, as I knew it was going to need the PSR treatment (putty sand repeat) to look decent, and it did. The radar nose piece actually goes on quite easily, with little filler needed. With all of the major construction done, and the seams nice and non-apparent, it was time to move onto the base paint job.
| COLORS AND MARKINGS |
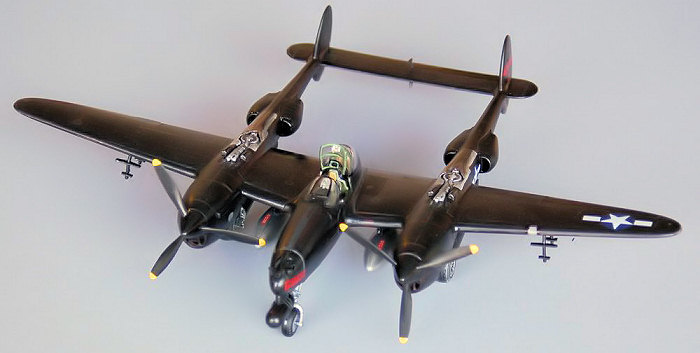
According to the field notes,
these craft were painted a high gloss black, all the better to be invisible in
the night sky, and even faster.( Yes, it is true, flat paint actually does
create a drag effect) The big problem with the kits I see painted gloss black
is that, well, they look rather “toyish” to me, and I wanted something a little
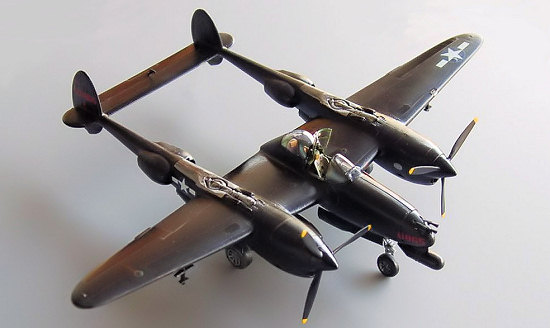
more menacing . Poring over old photographs led me to the conclusion that
operational aircraft would have probably shown some signs of wear on the black
finish, and that a mixed bag of finishes was called for, so, much like you would
mix up flat panel finishes for a bmf job, I mixed up a few different blacks and
grays to give the 38M some distinction betwe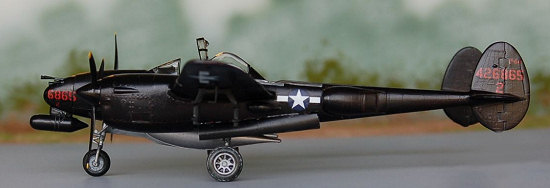 en
control surfaces, walk on surfaces, and airframe. The inner workings were
masked off with damp tissue paper ,which, once dried, makes a perfect fitting
paint block. The bright chrome areas of the fuselage were taped off, and a
light spray of grey primer was applied, any faults or seams that I had missed
were repaired, then it was time to apply a coat of flat black overall. Small
areas were masked off, then coats of progressively grayer and glossier layers
were applied, this method of painting does turn out well, but it is very time
intensive, and make sure you wait until each coat has cured thoroughly before
putting on a second. I wait at least 24 hours between sprays.
en
control surfaces, walk on surfaces, and airframe. The inner workings were
masked off with damp tissue paper ,which, once dried, makes a perfect fitting
paint block. The bright chrome areas of the fuselage were taped off, and a
light spray of grey primer was applied, any faults or seams that I had missed
were repaired, then it was time to apply a coat of flat black overall. Small
areas were masked off, then coats of progressively grayer and glossier layers
were applied, this method of painting does turn out well, but it is very time
intensive, and make sure you wait until each coat has cured thoroughly before
putting on a second. I wait at least 24 hours between sprays.
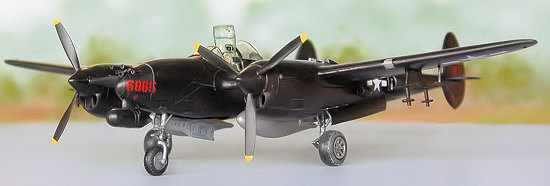
Once the lines were drawn in with red and silver coloured pencils, a thin coat of clear acrylic satin was applied to the entire bird, then Future where the decals were going to go on.
I used a mixture of aftermarket and kit decals this time around, the Microscale 38 decals went on with no issue, but the kit decals (the red numbers) silvered like crazy. Several applications of Microset were needed to get them to even lay down over the riveted detail, and even then they looked bulky. After the whole affair was dry, I went back with flat black and basically painted around all of the red numbers, then sealed it over again with Future, and later on, another spray of clear acrylic satin.
| FINAL BITS |
After removing the masks, it
was time to put in the gun tub, the superchargers, the drop tanks, and the
cockpit glass. I had left the cockpit glass off during painting because black is
easy to touch up, and I really wanted to have the canopy displayed
open…sometimes it is easier to do it this way. The flimsy landing gear were
attached on with C/A glue, be careful about the alignment here! The rocket
launchers were fitted to the P-38M, but the rockets from this kit are ghastly,
so they were removed and 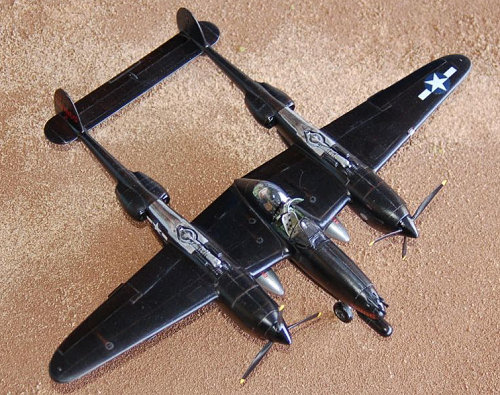 the launching rack assembled without them. Believe it
or not, this was probably the hardest part of the entire kit to get together, as
each little piece had to be custom fit to make them look halfway decent! Two
and a half hours later, they were attached to the underside of the wings, as
were the counter-weights on the stabilizer, and the pitot tube.
the launching rack assembled without them. Believe it
or not, this was probably the hardest part of the entire kit to get together, as
each little piece had to be custom fit to make them look halfway decent! Two
and a half hours later, they were attached to the underside of the wings, as
were the counter-weights on the stabilizer, and the pitot tube.
Now it was time for all of the touch up work, which was mostly done by brush…hitting problem areas, and outlining the gloss areas and flat areas from the satin. I also like to use a monolith pencil, which is basically just a solid chunk of graphite, to demarcate parts of the airframe, a 2B requires no sealer, yet leaves enough of a silvery line to be subtly distinctive when viewed.
I had painted the wheel wells and interior doors chromium yellow/green as I had supposed them to be, but it was kindly pointed out by TC that in fact, it seems that the inner workings were done in a light gray. No sweat, pull out some Tamiya grey and fix it all up!
Like most nose-sitters, the P-38 needs a LOT of weight in the nose or the engine nacelles to maintain a normal stance, and I became tired of having to put in custom lead bits to get the things to sit correctly. (Editor's note: TD Productions makes ready to go weights for most Monogram nose wheel aircraft and they are surprisingly inexpensive. See the Accessories section )A simple solution is to heat up a pin or a bit of wire, and push it into the nose wheel at an angle…then you just have to drill a hole in your display base, slide it in, and viola’! The angle of the nose varies from laden to empty craft too, something to take into account if you are being ultra-realistic.
| CONCLUSIONS |
This is certainly not the easiest conversion to make with this kit as a basis, but the end result is worth the pain, in my opinion. These older kits (hey, this one came out the same year that I was born) can really bring back some fond memories of Saturday afternoon’s spent watching the old Admiral black and white, Rat Patrol or McHale’s Navy on , with the smell of tube glue and enamel paint wafting around the room…and, if you put in some time, they can also result in a very nice looking model.
| REFERENCES |
http://www.aeronautics.ru/news/news001/combair015.htm
January 2007
Copyright ModelingMadness.com. All rights reserved. No reproduction in part or in whole without express permission from the editor.
If you would like your product reviewed fairly and fairly quickly, please contact the editor or see other details in the Note to Contributors.