SMER 1/48 Piper L-4 Cub
| KIT #: | ? |
| PRICE: | $4-5 USD in Czech Republic |
| DECALS: | Two Options |
| REVIEWER: | Martin Dolejsi |
| NOTES: | Your editor thinks this is probably the Heller 1/50 kit. |
| HISTORY |
The first Piper Cub J.2 was built in 1936 followed by J.3 version in
1938 equipped with 48kW / 65 hp Continental engine. This was the most
successful version with 3000 aircraft built a year in early forties.
Military version, designed L.4 “Grasshopper” had modified canopy and
instruments according to the military needs. This version saw the first
action during the invasion to
| THE KIT |
 The Smer
kit was first released in early eighties, I believe. The box contains some
40 gray plastic parts, injected 4-parts canopy and decal sheet for two
aircraft. There used to be PE set produced by Eduard, but I did not have it.
The plastic frames are, in spite of the age of the forms, free of flash and
no disturbing pins on the exposed areas. The instruction sheet with quite
clear drawings and with some extra references for the details, there is no
problem to follow it.
The Smer
kit was first released in early eighties, I believe. The box contains some
40 gray plastic parts, injected 4-parts canopy and decal sheet for two
aircraft. There used to be PE set produced by Eduard, but I did not have it.
The plastic frames are, in spite of the age of the forms, free of flash and
no disturbing pins on the exposed areas. The instruction sheet with quite
clear drawings and with some extra references for the details, there is no
problem to follow it.
I don’t check against the plans the correctness of the size and shape but there are few problematic things you notice straightaway. Some details are too rough and the fabric pattern, otherwise quite nice, is missing on the top and bottom sides of the fuselage.
| CONSTRUCTION |
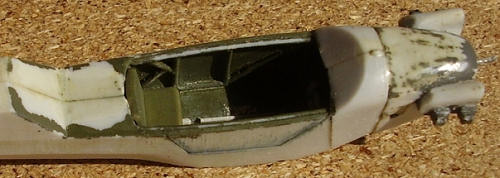
I make
the kits in Out-of-Box style with few added details or corrections. This
time I started with the cockpit adding the fuselage metal structure made of
plastic frame bits (just to find later it was mostly covered with fabric,
but left it there).
Then glued the fuselage together to be able to
install the seats, sticks and the front pedals I scratched made (that you
cannot see really through the glassing anyway).
Next step
was to complete the engine part. There is need to thin the cylinder covers
and both bottom exhaust pipes. After that I assemble the engine parts except
the screw and glue it to the fuselage. I sprayed the interior and the
sticking places with the green enamel to check the errors. I found out that
the engine needs some correction of the top lid, that looked smaller, I used
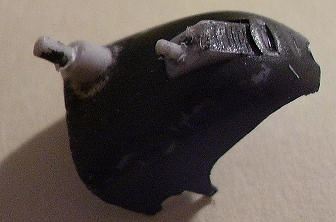 some
thick glue that was sanded to the correct shape.
Then I sprayed the cockpit with the Gunze H80 Khaki
green and glued the instrument panel to the place. This I painted Humbrol
Flat Black and scraped the instrument edges with scalpel so you get the
faces light gray. Next the elevators were glued to the fuselage. I masked
the interior and sprayed the fuselage with the Surfacer 1000. I drilled
little hole at the bottom of the fuselage just above of the tail wheel for
the only rigging that the model needs. The last step was to assemble and
glue to the place panted cockpit structure of the ceiling .
some
thick glue that was sanded to the correct shape.
Then I sprayed the cockpit with the Gunze H80 Khaki
green and glued the instrument panel to the place. This I painted Humbrol
Flat Black and scraped the instrument edges with scalpel so you get the
faces light gray. Next the elevators were glued to the fuselage. I masked
the interior and sprayed the fuselage with the Surfacer 1000. I drilled
little hole at the bottom of the fuselage just above of the tail wheel for
the only rigging that the model needs. The last step was to assemble and
glue to the place panted cockpit structure of the ceiling .
The
wings, have classic top/bottom parts, were glued together, sprayed with
Surfacer and left aside.
Later I glued the supports to it, as I thought it
would help me to hold the correct angles.
 the
assembly for later (I am not sure if this is the best way to do it, as I ran
into some problems later with the clearness of the glassing). I painted the
internal frames (yes, there are internal frames interpreting some inner
structure), masked the outside frames of the canopy and glue it to the
fuselage. The main leg parts were glued to the fuselage (it needs to look
after the correct angle).
the
assembly for later (I am not sure if this is the best way to do it, as I ran
into some problems later with the clearness of the glassing). I painted the
internal frames (yes, there are internal frames interpreting some inner
structure), masked the outside frames of the canopy and glue it to the
fuselage. The main leg parts were glued to the fuselage (it needs to look
after the correct angle).
The horror started when I took off the masking tape of the canopy. Part of it was sprayed inside, as I left the gap between the canopy and fuselage in the place of the door and the sprayed colour went inside… To correct that, I had to take off the canopy, clean the windows (fortunately the Mr Colour Thinner worked well) and glued everything together again, to end up with mist on the windows… again the cleaning took place. Finally I painted the canopy with the Gunze gloss varnish and glued it to the place with moreless satisfying result.
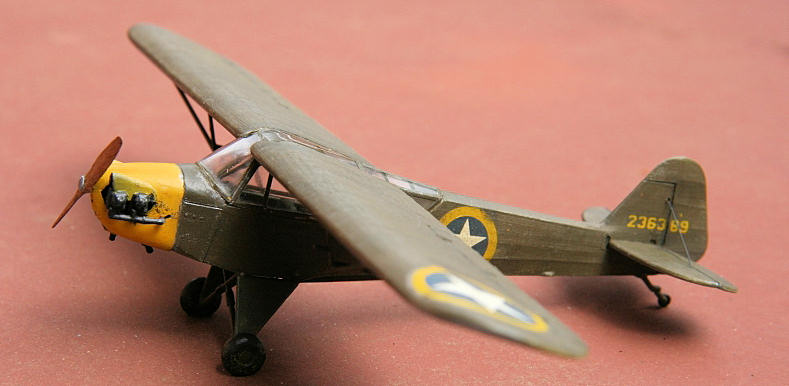
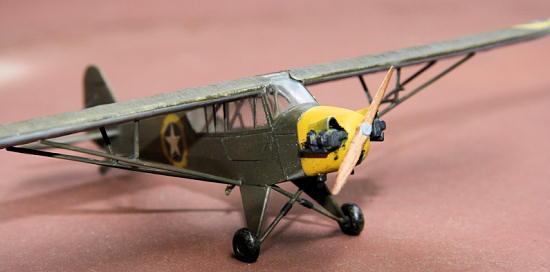
| COLORS & MARKINGS |
I choose
the "Torch" aircraft that seemed to me a bit more attractive with the yellow
front and yellow edges of insignia.

| CONCLUSIONS |
As I
mentioned, the kit is quite old and therefore doesn’t seem to meet nowadays
standards.
I don't check the 100% correctness of every detail so I found
this kit entertaining enough to buy another one. And as there is only one
other possibility for this scale, if you are interested in this kind of
aircraft, it is a good choice, because it is very cheap and provides good
base for nice model.
| REFERENCES |
September 2010
Copyright ModelingMadness.com. All rights reserved. No reproduction in part or in whole without express permission from the editor. If you would like your product reviewed fairly and quickly, please
contact
the editor or see other details in the
Note to
Contributors.
Back to the Review
Index Page 2023