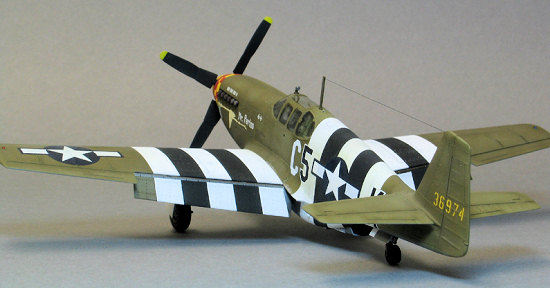
Tamiya 1/48 P-51B Mustang
| KIT: | Tamiya 1/48 P-51B Mustang |
| KIT #: | 61042 |
| PRICE: | £12.99 on discount |
| DECALS: | Several Options |
| REVIEWER: | Steve Budd |
| NOTES: | Cutting Edge decals CED 48280 used |
| HISTORY |
Please see any one of the many P-51 development histories already listed. Rather than re-hash one of those, let’s take a wander down the combat activities of the 357th Fighter Group during WWII, the unit of “Mister Period”, the subject of this build, flown by Captain Richard C. Smith, until he was lost in combat on D+23 – 29 June 1944, following his third and final victory.
The 8th Air Force will always be synonymous with air combat over Europe during the mid 40’s. Toting some fifteen fighter groups ‘in theatre’, it counted amongst its operational strength the 357th; a unit that would cut a cyclone swathe through the Luftwaffe until hostilities ended in the European Theatre of Operations (ETO) in May 1945.
 Following orders issued on 16 December 1942; barely a year
after the Pearl Harbour attacks, the 357th was assembled at Hamilton
Field, California – a hot, sandy desert base north of San Francisco. On 3 March
1943 the unit migrated to Tonopah, Nevada where its pilots were allocated a
fairly mixed bag of P-39s, readily throwing themselves into their training, in
what were certainly spartan conditions. Following several further base moves the
357th was declared combat ready in 24 October 1943; their training
having accounted for fourteen fatalities from aircraft accidents by the time
they set down in England at the end of 1943.
Following orders issued on 16 December 1942; barely a year
after the Pearl Harbour attacks, the 357th was assembled at Hamilton
Field, California – a hot, sandy desert base north of San Francisco. On 3 March
1943 the unit migrated to Tonopah, Nevada where its pilots were allocated a
fairly mixed bag of P-39s, readily throwing themselves into their training, in
what were certainly spartan conditions. Following several further base moves the
357th was declared combat ready in 24 October 1943; their training
having accounted for fourteen fatalities from aircraft accidents by the time
they set down in England at the end of 1943.
The five and a half day unescorted trip over to the ETO was made on the Queen Elizabeth – some 17,000 personnel were crammed on board, necessitating a considerable number to bunk down on the promenade deck the whole way from New York to the Firth of Clyde in Scotland. Adding to their discomfort was a natural apprehension over the presence of U Boats – a threat countered by the ship changing course every four minutes, as it was felt a sub took about five minutes to track a target and register a torpedo hit. The regular slewing back and forth only added to the irony of travelling on a luxury liner in a fair degree of individual discomfort.
Building on the excellent progress made in the US, pilots underwent Mustang transition training at the new airfield built at Raydon, until senior group pilots were cleared to fly initial ‘live’ combat missions with the 354th – who had been the first fighter group to operate the type in the ETO, from their base at Boxted. Initial supplies of Mustangs were small, all comprising ex-British issue machines that were in a tired state of repair, requiring plenty of spanner work from the resident ground crews.
Home for the 357th was subsequently established at Leiston (after the P-47s of the 358th had moved out in a straight base swop to Raydon) and the unit’s arrival was later greeted by ‘Lord Haw-Haw’, the notorious British traitor William Joyce, in his radio broadcast on 30 January 1944. Joyce dubbed the group, in his uniquely oily tones, “The Yoxford Boys”, after the small village situated nearby and cheerfully promised them violent ends at the hands of Luftwaffe pilots during the coming weeks. Joyce was certainly correct in predicting large scale aerial destruction – as the German air force would soon discover to its cost, as soon as the boys with their red and yellow chequered P-51s started flying their ponies over hostile territory from 11 February 1944.
 First blood went to 1st
Lieutenant Calvert L. Williams of the 362nd Fighter Squadron. Flying
P-51B coded 43-6448 (G4-U Wee Willie) Williams downed an Me109 on 20
February 1944 to open the group’s scoring.
First blood went to 1st
Lieutenant Calvert L. Williams of the 362nd Fighter Squadron. Flying
P-51B coded 43-6448 (G4-U Wee Willie) Williams downed an Me109 on 20
February 1944 to open the group’s scoring.
Ultimately participants in a total of 313 combat actions, the 357th also flew in support of the Arnhem landings in September 1944 and employed their aggression and team professionalism to rack up the destruction of fifty enemy aircraft in only forty-eight hours during that operation.
By war’s end the 357th had created forty-two aces from purely air kills – Bud Anderson, “Kit” Carson, Chuck Yeager among them. Their kill total was second only to Hub Zemke’s 56th FG, although the latter had been in combat for a significantly longer period, thus making the 357th the fastest scoring group in the 8th Air Force.
Flying alongside one squadron of the 4th FG, the 357th was the first to put allied fighters in Berlin airspace – Goering is said to have finally accepted the inevitability of defeat when he first saw Mustangs appear over the capitol. Lord Haw-Haw’s prediction was truly turned on its head when the 357th engaged in a single, wide ranging air battle over Berlin on 14 January 1945, eventually returning to base with claims for fifty seven and a half Luftwaffe aircraft wrecked in their wake. The score was an all comer’s record for a single day of air fighting, which had previously stood at thirty-eight. “Kit” Carson was one of the twenty-three 357th aces that made up the fifty-eight ship group that tore into the 100 + 109s and 190s attempting to drive through to the B-17s under the care of their “Little Friends”. For a fascinating insight into this red letter day for the 357th read Carson’s own account at:
http://www.cebudanderson.com/carson02.htm
Final tally for the group (according to official 8th Air Force figures) was 595.5 machines destroyed in the air, plus 106.5 on the ground – for the loss of 128 Mustangs. Beyond those that were listed MIA or KIA, 54 pilots became POWs (two died in captivity) and 13 successfully evaded capture and returned to fight again. More Me 262 jockeys found themselves in the 357th’s terminal ‘Browning Embrace’ than by any other unit (the last unit kill was a 262 on 19 April 1945 by 2nd Lieutenant James P. McMullen of the 364th Fighter Squadron).
For a Wikipedia summary of the hard charging 357th go to:
http://en.wikipedia.org/wiki/357th_Fighter_Group#Casualties
 And what of Captain Smith? Try as I might, I couldn’t
uncover any biographical details of him on the web; something I sincerely
regret. What I do know is he accrued three kills before being shot down over
Leipzig on a bomber escort mission led by Colonel Hayes on 29 June 1944. He was
certainly alive at the point he bailed out, as he announced his exit from Mr
Period over the radio. They proved to be the last words that would ever be heard
from him again.
And what of Captain Smith? Try as I might, I couldn’t
uncover any biographical details of him on the web; something I sincerely
regret. What I do know is he accrued three kills before being shot down over
Leipzig on a bomber escort mission led by Colonel Hayes on 29 June 1944. He was
certainly alive at the point he bailed out, as he announced his exit from Mr
Period over the radio. They proved to be the last words that would ever be heard
from him again.
Initially posted Missing In Action, it was eventually conceded that he had met his end by some means, although no-one to this day can be certain exactly how. Whether his chute failed to deploy or he was shot up on the descent or died on the ground in some manner is something that would surely have been so very hard for his surviving family to bear back in the US.
The Luftwaffe paid for the loss of Captain Smith that day with 21 of their own aircraft, as clashes with the 357th unfolded.
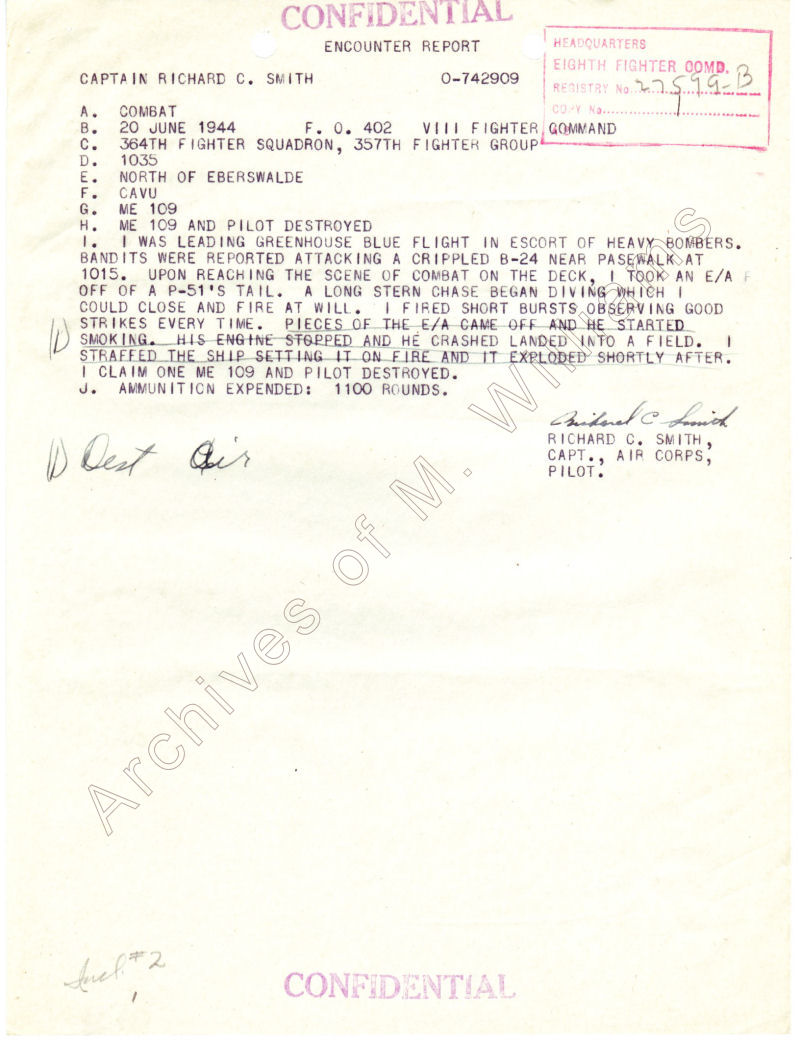
The one item I was particularly happy to uncover was a combat report from 20 June 1944 recording what was possibly Captain Smith’s second but more likely third and last kill. You can view it here: http://www.spitfireperformance.com/mustang/combat-reports/357-smith-20june44.jpg There is something about this kind of record I find very compelling. To read the contents is to hear the pilot himself talking to you across the decades.
| THE KIT |
Tamiya’s pony follows the company’s signature approach to single engined WWII fighters – main parts spread over a couple of sprues, everything sharply moulded and presented in grey styrene, clear parts separately bagged and so on.
Mostly accurate on the outside, Tamiya tripped up in the cockpit and missed the B’s wooden floor by supplying the curved wing top of earlier variants instead. By the time this particular penny had clattered to the bottom of the space still awaiting a brain I’d already hosed the interior with paint.
| CONSTRUCTION |
 The simplicity of the presentation makes for a rapid build.
As for me, I bought mine around the time it was first released, after I’d peeked
in the box and thought “Looks simple enough – should be a quick build”. No
sooner was 2007 tipping over the halfway point and it was finished. Just the
nine years then.
The simplicity of the presentation makes for a rapid build.
As for me, I bought mine around the time it was first released, after I’d peeked
in the box and thought “Looks simple enough – should be a quick build”. No
sooner was 2007 tipping over the halfway point and it was finished. Just the
nine years then.
Re-winding through the last twenty odd percent of my life I recall starting this Tamiyathon by removing the moulded oxygen hose from the right sidewall. A heavy gauge of fuse wire was tightly bound with lighter fuse wire (superglued together each end) to provide a replacement hose that was gently bent to suit the route from the oxygen distributor to a point close to the pilot. Hand painted with Humbrol Matt Black it’s much improved over the plain relief moulding.
The seat grew Eduard belts and as pre-painted ones were still some years away I sprayed and brush painted mine pale tan and steel. Continuing the wire fest I ran mock cables from the radio to where the antenna would later attach, as these would be visible through the rear windows once everything was closed up.
The pilot’s signal flare port on the left side of the fuselage was drilled out and a corresponding tube and cap scratched up for the inside – dizzy stuff. The trim wheel on the port interior was also scratched and sundry levers added from etched left overs before finishing the pre-painting of the cockpit, radio area and radiator.
The pony grew wings and with the basic airframe now in a
single lump I test fitted the rear stabs. A nice tight fit; so I pulled out the
first and then the second – to a sharply audible ‘crack’. The rear fuselage had
come apart. I blessed my good fortune with a high
 pitched and rather girly
scream. As Tenax 7R had been used throughout I was at a loss to account for such
an easy separation. Resorting to the iron fist in the iron glove, Tenax was
re-applied in quantities that could only be exceeded by immersing the back end
of the kit in a small bucket of the stuff.
pitched and rather girly
scream. As Tenax 7R had been used throughout I was at a loss to account for such
an easy separation. Resorting to the iron fist in the iron glove, Tenax was
re-applied in quantities that could only be exceeded by immersing the back end
of the kit in a small bucket of the stuff.
The cover over the engine is a separate part and while this is a very good fit it does join along several panel lines. Call me Mr Obsessive Compulsive Disorder but the result left fine gaps in places that would, if left unmolested, be apparent under paint and scream ‘plastic kit’ rather than look the ‘all of a piece’ pony I’d been assembling at three parts per year. This would never do.
Some folks resolve this by super glue and then re-scribe. Others brush Mr Surfacer on and wipe off the surplus with alcohol. I trod a different route, using a material not conventionally associated with this particular job.
The substance in question can effectively camouflage surprising gaps in construction where a panel line or natural junction of components occur, requires no sanding, does not harm or obscure either fine detail (raised or recessed), bare plastic or existing paint work and is dry in a day – you’ll be more familiar with it as artist’s oil paint. Used in conjunction with equal quantities of Liquin (Japan Dryer in the States – it reduces the drying time of oils from weeks to only a day or less) and mixed to the consistency of thick cream it is simply worked into the gap quickly and easily with a conventional paintbrush. The excess is cleanly removed with any combination of Royal Sovereign rubber ‘brushes’ (used by artists to smudge and manipulate charcoal in drawing), a finger or tissue.
To be totally clear, when I mention the use of this material as a filler I don’t intend it to be used to attempt to cover faults and blemishes in construction like those in a seam between fuselage halves for instance that otherwise need to be eliminated. This is well catered for already by the likes of said superglue, Mr Surfacer or epoxy putty. The technique I am advocating however can be applied to smoothly blend components that former a natural junction – like wings to a fuselage that form a joint that represents a panel line.
In these
instances, no matter how careful you are, thin separation lines can still
result. As a working example, the main canopy section was an iffy fit along its
rear edge where it ran next to the semi-circular rear windows. The gap was
slender at the top, running into a slightly
 wider one at the base of
the port side, effectively rendering it a tall but very narrow triangular shape.
A potentially tricky problem, this one was a perfect test bed for the oil paint
solution.
wider one at the base of
the port side, effectively rendering it a tall but very narrow triangular shape.
A potentially tricky problem, this one was a perfect test bed for the oil paint
solution.
Clearly I needed a pre-coloured filler as it would show through the opposite glazing, so I mixed up a combination of Sap Green, and White, adjusted with tiny amounts of Black, until I had a very close match to the Interior Green I’d been using. An equal amount of Liquin was added, until lump free and reduced to the consistency of thick cream (I use an old paintbrush for mixing). This was then worked into the gaps via an ‘OO’ brush until the joint was noticeably overfilled. It was then a simple matter of running a narrow bladed chisel tip rubber brush along the exterior line of the joint to scoop up and remove the excess. The chisel tip was cleaned on some paper towel and the process repeated as necessary until the joint was flat.
This larger quantity of material shrank slightly on drying but I simply mixed up a colour to match the Olive Drab I’d be using and re-applied the oil paint filler as before (as now the interior application was already showing the correct colour). Like I’ve indicated, this second quantity also shrank – but this time to a point where I was left with a recessed junction line with no hint of the fit error my lack of care had induced. Remember this was a gap at the limits of this technique – but it resolved it perfectly, with no sanding or risk of damage and you’d never know what had been done if you hadn’t been told.
On occasion, when you apply the oil paint, you’ll find the cleanup of the joint results in the occasional air bubble. The remedy is obvious – simply reapply a little more paint over the bubble, gently worked in again with a brush and remove as before.
A similar approach can be taken
when dealing with the wing to fuselage joints. However,
the technique can also be accentuated to more
deliberately reproduce the effect of a scribed panel line
being present. Refine the joint as necessary until
it’s as close as it’s going to go and overfill it with the paint. This
time the excess is removed by drawing the tip of a finger along the line (one
 attached to your hand is the preferred choice, rather than one owned by
another member of the household). By applying a little pressure
on the draw stroke your skin will ‘indent’ the line and some of the
material will be removed from the joint.
attached to your hand is the preferred choice, rather than one owned by
another member of the household). By applying a little pressure
on the draw stroke your skin will ‘indent’ the line and some of the
material will be removed from the joint.
The mixture ‘self-levels’ during drying to leave a smooth, recessed panel line that blends in with those created by the manufacturer when the finishing paint goes on later. If excess paint gets in to an adjacent moulded panel line or into or around detail just remove it with a fine brush or tissue – it’s that easy. If the joint isn’t accessible to a finger just substitute with a pointed tip rubber brush or some tissue to achieve the same result.
This method is now a fixed part of my armory for ending up with a model that’s ‘all of a piece’. I’ve mentioned the technique to other modelers on my travels but so far it seems to have fallen on universally deaf ears. Shame really, as it’s such a honey of a solution in the appropriate circumstances.
| COLORS & MARKINGS |
This was where the project stalled for a year or two, when it would then make cameo appearances on the bench from time to time to receive different concoctions of Olive Drab. Xtracolour was first, later Aeromaster and most recently Gunze Sanyo. All now combine to give a gently weathered look that’s more evolutionary than orchestrated but I’m happy just the same.
Don Gentile’s “Shangri-La” had me hooked the moment I first saw the box art. Recently however, I read elsewhere that “…everyone does Shangri-La”. This kind of statement (akin to the ‘not another 109’ observation) infers that if anyone’s nailing a P-51 together they’re somehow obliged to produce different markings because S-L’s been covered before. All very irrelevant when you fancy an S-L in your own line up but don’t have one. Now who’s in a herd – those stampeding away from S-L or those following their own choices?
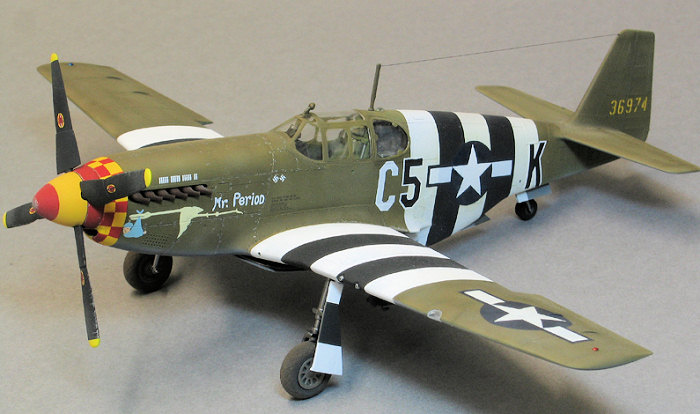
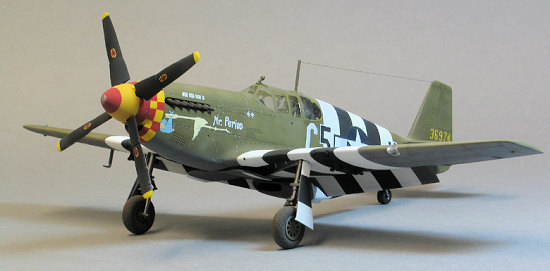
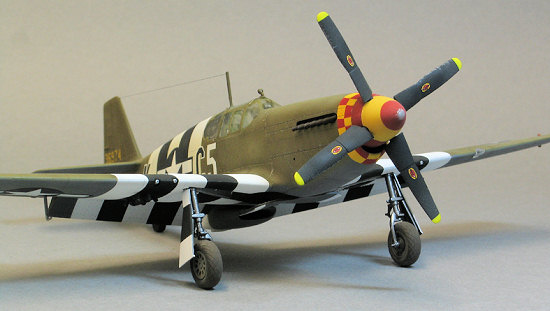
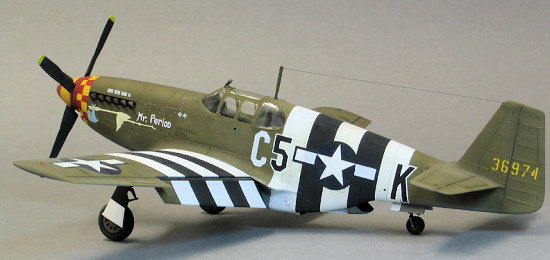
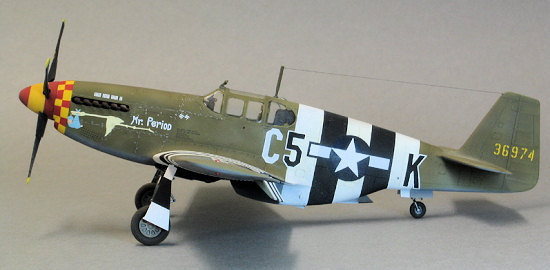
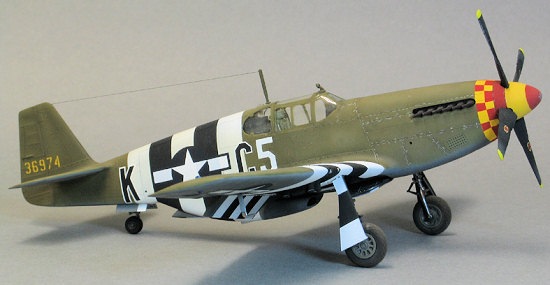
For nine years therefore it’s been a racing certainty that I’d add another to the ocean of models in DG’s honour – until I flicked through the Cutting Edge decals in Hannants and turned up their new “Yoxford Boys” sheet. With red and yellow stripes and cheques at the pointy end and full invasion bands around the pony’s waist and wings my sworn allegiance to the boxing bird ceased. The intended meaning of the nose art “Mr Period”, beside a stork carrying a baby, didn’t register for three days. Sometimes I worry about me.
 The intervening years had seen Eduard introduce kabuki tape
canopy and wheel masks so thought I’d give their P-51B set a day out. The
patches for the front windscreen were nigh on perfect and even the top one,
which has compound curves to follow, settled down with the requisite burnishing.
The hinged canopy section side windows were a very tight fit and needed to be
tightly flush with the lower frame or they overlapped slightly at the top. I
needed to re-fit these several times each and was impressed to find no loss of
adhesion or stretching after roundly abusing them with my serial clumsiness.
The intervening years had seen Eduard introduce kabuki tape
canopy and wheel masks so thought I’d give their P-51B set a day out. The
patches for the front windscreen were nigh on perfect and even the top one,
which has compound curves to follow, settled down with the requisite burnishing.
The hinged canopy section side windows were a very tight fit and needed to be
tightly flush with the lower frame or they overlapped slightly at the top. I
needed to re-fit these several times each and was impressed to find no loss of
adhesion or stretching after roundly abusing them with my serial clumsiness.
If you’re still not convinced then appreciate that I left the masks on for several weeks while I worked on this and various other kits. When they finally came off there was no discernible residue on the clear bits and all edges were sharp with no bleed under. Well worth the couple of quid the set cost.
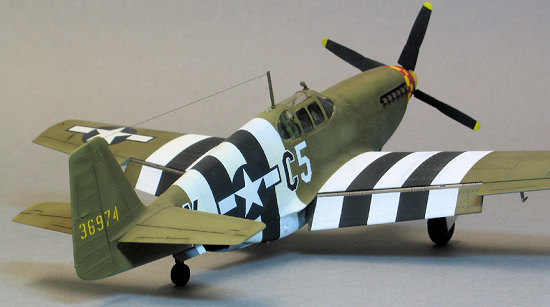
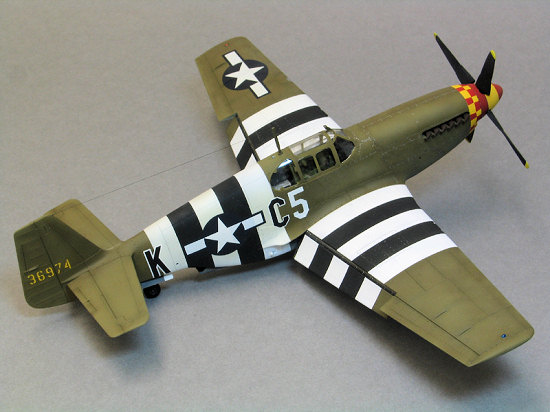
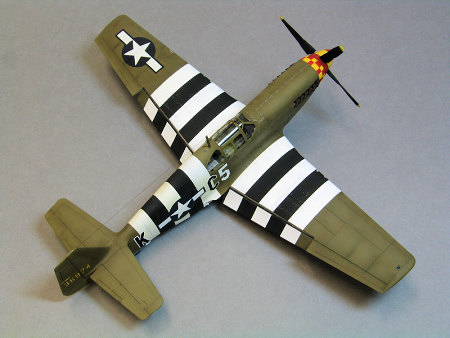
The sections where the invasion bands would go were masked off with Tamiya tape. At this point, despite having burnished down the tape I resorted to a little extra insurance against ‘bleed under’ by first spraying along the edges of the tape with gloss varnish. The varnish helps to seal the edges and any ‘bleed under’ is clear after you’ve applied the necessary colour. A light overspray with matt varnish and the clear ‘bleed under’ disappears.
So, with my varnish insurance on and dry the Tamiya matt white followed. Once cured the white was measured with dividers and re-masked. Tamiya Nato Black finished the stripe fest – again, the new tape was varnished as before (the Cutting Edge colour profile is 1-1 scale so stripe widths and other measurements can be lifted from it and transferred direct to the model). Keeping to the Tamiya theme, their Neutral Grey was wheeled out for the undersides before being streaked and marked by very thin lighter greys from the same range.
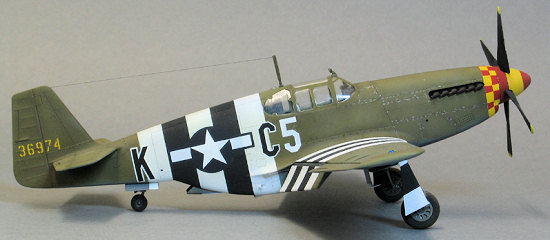
A very, very thin mix of Tamiya Red Brown and NATO Black (10% paint – 90% thinners) was sprayed at 10psi over the panel lines above and below and in random places before glossing the thing for the decals to follow. It helps if your brown-black mix is translucent enough so that it doesn’t shade the lines properly at the first pass – I aim for a potion that gives the required density at the third or fourth pass.
 The Cutting
Edge decals were, for the most part, fine in all respects and a generally happy
and relaxing time was had adding them one by one – until I reached the nose
cheques. The “Mr Period” cheques are fitted to the Accurate Miniatures ‘B’ and
seemed, when viewed on the sheet, too narrow in front of the Tamiya chin scoop.
This little problem plunged down the rankings as soon as I tried to fit the
marking (which comes in two halves) to the nose. It was a country mile off the
pace and clearly wasn’t going to conform to any of the curves below it. In the
bin went the first piece. I tried the decal matched to “Gash Hound” (nice to be
a gash hound – or so my local vicar tells me). Same result so that went in the
bin too.
The Cutting
Edge decals were, for the most part, fine in all respects and a generally happy
and relaxing time was had adding them one by one – until I reached the nose
cheques. The “Mr Period” cheques are fitted to the Accurate Miniatures ‘B’ and
seemed, when viewed on the sheet, too narrow in front of the Tamiya chin scoop.
This little problem plunged down the rankings as soon as I tried to fit the
marking (which comes in two halves) to the nose. It was a country mile off the
pace and clearly wasn’t going to conform to any of the curves below it. In the
bin went the first piece. I tried the decal matched to “Gash Hound” (nice to be
a gash hound – or so my local vicar tells me). Same result so that went in the
bin too.
My observations here are in no way a critical reflection on the Cutting Edge sheet – it is after all fitted to a different kit and so (as I wrote in my Ki-84 review elsewhere) I was once again engineering avoidable hassle into the end of another build. Maybe I’m getting used to this happening but I really didn’t feel fazed by having the whole thing next door to being done, only to find I’d snagged it too far down the line to go back and swop to different markings. What I did find surprising about the decals was the fuselage ones had a weird propensity towards blistering all over the place.
Simply opting for ‘apply and dry’ won’t do – the delinquent decals didn’t settle into the panel lines and needed decal solvent. Gunze ‘Mr Softer’ was wheeled out and once the blisters were dry were carefully cut with a new scalpel blade and re-treated with solvent. Thinking the Gunze potion might be a bit fierce I traded down to Micro Sol – with the same result. Dealing with the blisters was easy with the 3.5 magnification Optivisor – a superb bit of kit that makes plastic manipulation and painting up close a genuine pleasure.
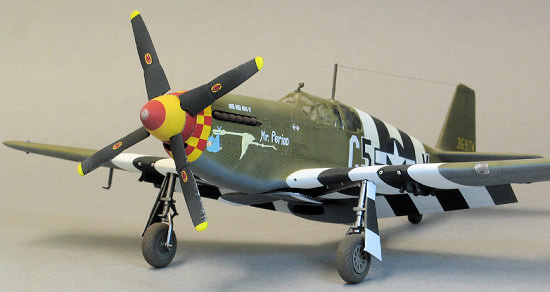
Switching back to the checks, I took out the Tamiya tape, cut a strip 2mm wide with a steel rule and scalpel and masked off the nose immediately behind the portion to be sprayed yellow. Additional masking was run in after the spacing all round had been checked with dividers until it was as even as I could make it-ish. A mix of Tamiya flat yellow and flat red was knocked up with lacquer thinners to give it a richer hue and on it went – way better than any decal. Perversely, I was actually glad my lack of forward thinking had forced me to spray the checks. I’d seen it done in mags and modelling ‘how to’ books but never had the nerve to try it.
I removed the masking to check the edges of the yellow were sharp and happy with this, ran another length of 2mm Tamiya tape back in line with the aft edge of the yellow. This was carefully burnished down with the smooth, rounded tip of a paintbrush handle ready for the individual checks. Squinting at the Cutting Edge profile and comparing the checks with ‘land marks’ like panel lines meant the rear row of red cheques were some 3mm square. As the yellow portion of the nose extended 6mm back from the rear edge of the spinner this was clearly going to be a useful working dimension. The rear row of yellow checks were overtly longer than the red and these required sections of tape 3mm wide by 4mm long.
 I’d already decided to work from the back to the front so
the rear row (nearest the pilot) were butted up against the existing band of
tape covering the OD and Neutral Grey. A continuous row of 3mm and 4mm cheques
were run alternately right round the nose to ensure as much evenness of spacing
as I could apply. I started from the top of the fuselage to the point where the
Neutral Grey starts, then did the other side from the top down to the same
position. Checks were then applied alternately left and right until the last
space underneath was left and filled. This required a slightly longer yellow
‘spacer’ to leave a red square directly under the nose on the rear row. Having
perused many photos of the cheques adorning 357th aircraft I noted
obvious variety in the cheques and their geometry (especially the front rows)
and so just gave it my best shot.
I’d already decided to work from the back to the front so
the rear row (nearest the pilot) were butted up against the existing band of
tape covering the OD and Neutral Grey. A continuous row of 3mm and 4mm cheques
were run alternately right round the nose to ensure as much evenness of spacing
as I could apply. I started from the top of the fuselage to the point where the
Neutral Grey starts, then did the other side from the top down to the same
position. Checks were then applied alternately left and right until the last
space underneath was left and filled. This required a slightly longer yellow
‘spacer’ to leave a red square directly under the nose on the rear row. Having
perused many photos of the cheques adorning 357th aircraft I noted
obvious variety in the cheques and their geometry (especially the front rows)
and so just gave it my best shot.
The next stage was to carefully remove the square tape patches with sharply pointed tweezers to expose the areas where red would remain. The final stage was to tape over the squares that would remain yellow in the front row, easier in some respects as these didn’t need to be applied in a continuous row as before – just matched up with the Mk1 eyeball with the corners of the rear squares. The front row did require individual squares to be measured one by one with the dividers as the geometry of the squares ‘cants in’ because of the curvature of the nose. Burnished down carefully I opted to run light coats of gloss varnish over the exposed squares to help ensure sharp edges – the real make or break in this little exercise.
Colour on, it was let dry until I could begin to remove the tape. All told, I was happy enough to live with the result – after some tweaking here and there – and I was glad to have nudged the envelope a bit in giving it a go. I’m going to try it on one of my Sweet 1:144 Mustangs…
The spinner’s rear section was sprayed Tamiya gloss red while the front section was hosed with the same Tamiya flat yellow and red I’d applied earlier. Fine micro tape .5mm wide was used to edge the section that would remain yellow and then Tamiya taped before more flat red was run over the spinner tip.
| FINAL CONSTRUCTION |
 And now, the time had come – and so I faced, the final
assembly. Flaps, undercarriage, prop, wheel well doors, aerial mast and wire. I
did it my way. At least I did after I’d sorted the fact that the prop shaft
moulded to the end of the fuselage was too tight a fit to allow the spinner back
plate over it. Sanding reduced it and cured it. I re-discovered why I’ve never
liked polycaps – the spinner wouldn’t sit exactly square until I snapped off the
spinner cap and forced the polycap to sit closer to the fuselage with tweezers.
A similar fit problem occurred with the wheel axles – way too large to allow the
wheels to slot over and only sorted after I’d drilled out the wheels some more.
A final overall coat of flat varnish and I breathed a nine year sigh of
satisfaction.
And now, the time had come – and so I faced, the final
assembly. Flaps, undercarriage, prop, wheel well doors, aerial mast and wire. I
did it my way. At least I did after I’d sorted the fact that the prop shaft
moulded to the end of the fuselage was too tight a fit to allow the spinner back
plate over it. Sanding reduced it and cured it. I re-discovered why I’ve never
liked polycaps – the spinner wouldn’t sit exactly square until I snapped off the
spinner cap and forced the polycap to sit closer to the fuselage with tweezers.
A similar fit problem occurred with the wheel axles – way too large to allow the
wheels to slot over and only sorted after I’d drilled out the wheels some more.
A final overall coat of flat varnish and I breathed a nine year sigh of
satisfaction.
I’ve only recently become aware that most of the wing panels on Mustangs were apparently filled with putty and sanded flush to squeeze a bit more speed out of the thing. As my paint was already past the point of no return it doesn’t feature this particular war measure. Next time.
| CONCLUSIONS |
The legendary Tamiya ‘it fell together’ didn’t show up
entirely on my edition of what is still a lovely kit. Prop shaft, axles,
rear canopy windows, radiator bath front intake section, rear radiator exit
door, landing light cover – all needed the kind of tweaking
 that I don’t recall
reading about in other reviews. I think Scott’s commented on this kind of thing
before – when others have said a kit was a slammer and his own experience has
been just a little different.
that I don’t recall
reading about in other reviews. I think Scott’s commented on this kind of thing
before – when others have said a kit was a slammer and his own experience has
been just a little different.
It was very pleasant to finish this one (eventually) out of the box with just a few home spun improvements and some etched belts in the pilot’s office. Now they’re discounted at Hannants from circa £16.00 to only £12.99 they’re great value for money.
I observe that TC observed that Hemingway observed that “…one cat leads to another” and so it is with Tamiya Mustangs, notwithstanding the necessary tweaks. There’s three more ‘cats’ waiting in my loft – at nine years a piece I’ll have them done by the time I’m blowing out the 75 candles on my cake. See you then…
| REFERENCES |
Detail and Scale P-51 Mustang, Part 1 by Bert Kinzey (SDN8250).
November 2007
If you would like your product reviewed fairly and quickly, please contact me or see other details in the Note to Contributors.