|
KIT: |
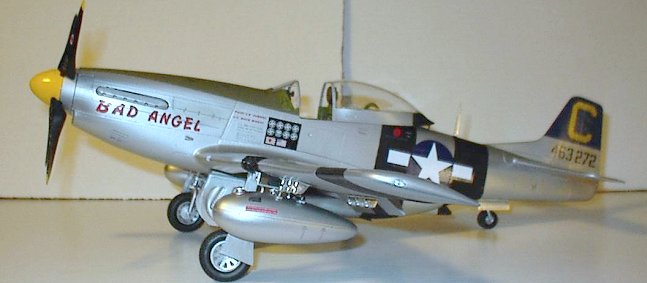
Trumpeter 1/24 P-51D Mustang |
|
KIT # |
? |
|
PRICE: |
$110.00 MSRP |
|
DECALS: |
See review |
|
REVIEWER: |
Len Roberto |
|
NOTES: |
CAM Decals 24-004 used |
|
HISTORY |
I am no expert on P-51 history- there is plenty of info out there from more knowledgeable folks than myself. Ever since I was a kid however, this was THE PLANE that made my heart race. The decals used cover a very interesting pilot and aircraft…here is the story:
Lt. Louis Curdes was circling low over one of his P-51 pilots who was bobbing in his dinghy just off a Japanese field on Batan Island. Another pilot whose plane had the lowest gas in his tanks headed for home. A fourth plane was circling at 20,000 feet sending out a distress signal. It had been a fairly good day, as fighter Mission days over Formosa go. Curdes' flight had knocked down two planes over the target, Curdes getting his first since he came to the Pacific from Italy last December. They had blasted three more on the ground at Bataan before flak caught one of his flight. Curdes looked down to the tossing dinghy and figured the chances of a Catalina coming in for a rescue before dark. It was getting along towards mid-afternoon, and the nights come fairly early off northern Luzon in the middle of February.
 Suddenly,
Curdes noticed a black speck coming from the southwest toward the enemy-held
landing strip at Bataan. Then the speck became a dead ringer for a C-47. And,
as the wheels came down on the transport, Curdes saw the American markings.
"Those damned Japs have patched up one of our buggies and didn't even have the
grace to take the markings off" --Curdes figured as he wheeled about to give
the visitor a closer look. Then he read a familiar number on the tail. It was
the number of one of the "Jungle Skippers." At this point, AAA opened up - at
Curdes’ P-51 but not at the transport. A quick run of thinking convinced
Curdes there was only one thing to do since the plane would be Jap property as
soon as it landed, if it was not already. The P-51 banked steeply, head on
into the flak, and opened up with its fifties on the C-47’s right engine. As
the transport headed out to sea, with one engine gone, Curdes made a
180-degree turn and cut loose on the other engine. The C-47 settled into the
water within yards of the downed fighter pilot's dinghy.
Suddenly,
Curdes noticed a black speck coming from the southwest toward the enemy-held
landing strip at Bataan. Then the speck became a dead ringer for a C-47. And,
as the wheels came down on the transport, Curdes saw the American markings.
"Those damned Japs have patched up one of our buggies and didn't even have the
grace to take the markings off" --Curdes figured as he wheeled about to give
the visitor a closer look. Then he read a familiar number on the tail. It was
the number of one of the "Jungle Skippers." At this point, AAA opened up - at
Curdes’ P-51 but not at the transport. A quick run of thinking convinced
Curdes there was only one thing to do since the plane would be Jap property as
soon as it landed, if it was not already. The P-51 banked steeply, head on
into the flak, and opened up with its fifties on the C-47’s right engine. As
the transport headed out to sea, with one engine gone, Curdes made a
180-degree turn and cut loose on the other engine. The C-47 settled into the
water within yards of the downed fighter pilot's dinghy.
Curdes dived in to do a little strafing after all occupants of the transport climbed aboard life rafts, but he observed in time that the survivors were Caucasian. So he went back to his low level circling. His water bound charges had grown from one to thirteen. When darkness fell and still no help had arrived, Curdes figured all would be safe until dawn and returned to his base. The next morning before daylight, he and his wingman took off. And they were circling over the survivors when a rescue Catalina arrived to pick them up. Back at base, Curdes learned that the C-47 had been American manned with 12 occupants including two Army nurses. The pilot had become lost during a flight from Art island in the southern Philippines and had been forced to head for the nearest visible strip because of a fuel shortage. Curdes gave a start and a shout when he glanced at the names of the survivors. One of the nurses was the "date" he had been with the night before at Lingayen.
"Jeepers," he exclaimed, "seven 109's and one Macchi in North Africa, one Jap, and one Yank in the Pacific -- and to top it, I have to go out and shoot down the girl friend."
A few weeks' later, Captain Louis E. Curdes of the 4th Fighter Squadron Third Air Commando Group was awarded the Distinguished Flying Cross for shooting down a C-47.
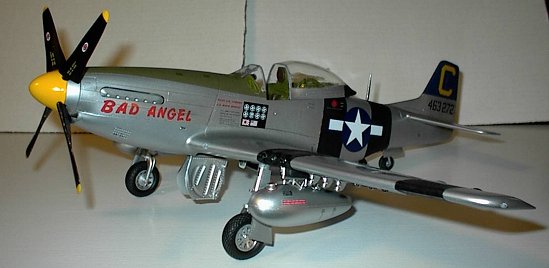
Captain Louis E. Curdes was assigned to the 95th Fighter Squadron, 82nd Fighter Group. He was reassigned to the 4th Fighter Squadron, 3rd Air Commando Group (1945) where he flew the P-51 "BAD ANGEL". A Jap flag and U.S. flag were added to the seven German and one Italian marking on the fuselage of his Mustang. Curdes made a wheels up forced landing on a beach South of Naples, Italy in August 1943 when he ran low on fuel trying to return to N. Africa. He was interned as a Prisoner of War until October 1943. He escaped twice and evaded capture for about eight months before returning through enemy lines on May 27, 1944. He received the DFC for shooting down a C-47, becoming the only flyer ever to be decorated for shooting down another American plane in combat.
|
THE KIT |
Most modelers know that Trumpeter kits are hit or miss. Some are quite good, some are horrible. This big Mustang kit has received its share of criticism- most of it justified. There are problems not easily fixed by even the best scratch builders: canopy is misshaped, cowling has shape problems, cockpit is sparse, rear fuselage dimensions look a bit off. There are probably more but like I said I am no expert. And I agree with the folks who say that this subject is the most accessible WWII fighter in the world and Trumpeter should have no excuses in producing an exacting replica with all the info and examples at its fingertips. At the price they are asking- these things should have been dealt with better. I won’t be buying any other 1/24 scale releases. Without getting further into the kit’s good or bad points, I just want to focus on what it was like building the kit…
|
CONSTRUCTION |
Assembly steps are arranged in an order I did not find sensible so I will explain the order I took.
 First
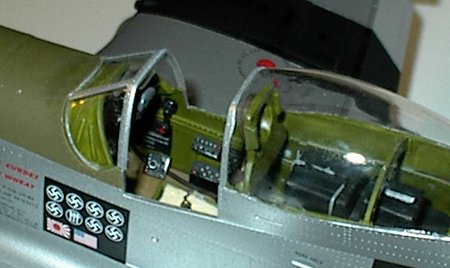
up was the cockpit. Everything fit well- I’ll say that much. Using numerous
books with close up photos of a pristine Mustang cockpit, I used my very
meager scratchbuilding skills to add missing levers, handles and knobs. The
landing gear lever and canopy release lever were added by searching the spare
parts box and cutting/ sanding the parts to shape. Tamiya Deck Tan used for
floor with drybrushing and pastel chalk used to simulate a dirty wood floor.
Carbon Fiber/ Steel decals from an old Tamiya Motorcycle kit were used for the
plates under rudder pedals. Rubber bands were cut and attached for seat belt
and harness. Photo-etched parts were scavenged from the stash and cut to
simulate buckles. Testors Interior Green used for seat etc. Instrument Panel
and template look pretty good- flat black with dry brushing for detail.
Future on dials for glass look.
First
up was the cockpit. Everything fit well- I’ll say that much. Using numerous
books with close up photos of a pristine Mustang cockpit, I used my very
meager scratchbuilding skills to add missing levers, handles and knobs. The
landing gear lever and canopy release lever were added by searching the spare
parts box and cutting/ sanding the parts to shape. Tamiya Deck Tan used for
floor with drybrushing and pastel chalk used to simulate a dirty wood floor.
Carbon Fiber/ Steel decals from an old Tamiya Motorcycle kit were used for the
plates under rudder pedals. Rubber bands were cut and attached for seat belt
and harness. Photo-etched parts were scavenged from the stash and cut to
simulate buckles. Testors Interior Green used for seat etc. Instrument Panel
and template look pretty good- flat black with dry brushing for detail.
Future on dials for glass look.
Engine: I was building the kit closed up but realized the engine had to be inserted for stability and for the prop. Engine parts fit well with some clamping required to keep assembly tight.
Engine firewall and cradle assembled easily but again were not painted.
Fuselage halves assembled with Interior Green and black for sidewall panels. Again no fit problems here as you would expect. Tailwheel assembled and painted silver. Rubber tail tire fit nicely- used a cost of grey paint inside the tire hub to help prevent the rubber eating the plastic over time. Read this tip on a modeling message board!
Rudder: assembled as per instructions with photoetch latches and metal rod superglued to allow rudder to move.
Joining the fuselage halves:
With cockpit, engine assembly, radiator grill piece, and tailwheel glued in right fuselage half—the moment of truth arrived. As I expected, this was a battle. I started from the rear and clamped the vertical stabilizer. The movable rudder was not seating so well so I had to glue it solidly and clamp it to get a good fit. Moving my way to the cockpit, it was a struggle to line things up and seat everything properly. With elastic bands, clamps and clothespin- I managed to close it up fairly well up to the firewall. Getting the nose to come together was the worst of it- there were no sufficient points to provide a firm join. Elastic bands were bending the framework and causing other areas to not bond. Certain areas required a substantial amount of pressure to keep the parts together.
 Wings:
Fit here was quite good. I did not fuss with the machine guns, as I wanted
the ship buttoned up. I used about 40 clothespins to secure the wings during
drying. Dihedral looked to be right on. Flaps and ailerons were assembled-
sanding needed on all edges to hide seams. These were glued straight in-
after the rudder incident; I did not want to even try to assemble the wings
with movable flaps, etc.
Wings:
Fit here was quite good. I did not fuss with the machine guns, as I wanted
the ship buttoned up. I used about 40 clothespins to secure the wings during
drying. Dihedral looked to be right on. Flaps and ailerons were assembled-
sanding needed on all edges to hide seams. These were glued straight in-
after the rudder incident; I did not want to even try to assemble the wings
with movable flaps, etc.
Wing assembly to fuselage was better than I expected. Filler was needed along the join line and I used the nail polish remover method to smooth over the putty before it dried. This saved a lot of detail from sanding. A large elastic band across the length of the wing helped preserve dihedral and bonding.
Cowlings: Trumpeter provides clear and solid cowling pieces. Since I was enclosing the engine- I attached the solid parts next. Here I experienced the biggest problems. Despite my efforts to clamp during the fuselage joining- there was a 1/8-inch gap most of way around. I wrapped this up with numerous powerful elastic bands and resolved myself to do my best to clean it up with putty and sanding when dry. After a week of attending only to the nose- it came out all right. I sat through the entire Super Bowl sanding away!
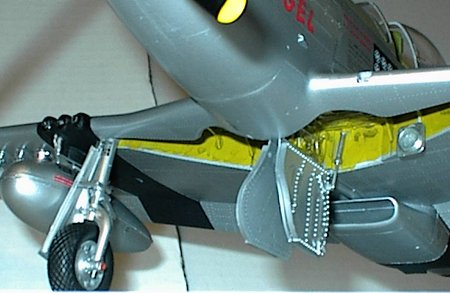
Landing Gear: Another step I was dreading turned out to be painless. The kit provides springs to sit in the gear legs- perhaps it just me but mine do not move very well. I think the springs were a little too stiff to allow the model’s weight to compress the gear as they should. I ended up gluing each gear leg in a position I thought would account for the plane’s weight.
All other assemblies went smoothly: drop tanks, horizontal stabilizers, canopy and rail, gear doors and actuators, prop blades, etc.
|
CAMOUFLAGE & MARKINGS |
Another part of the kit sorely lacking was the decals. Eagleston’s scheme did not thrill me and the decals themselves looked off especially the national insignia. Most of the kits placards and stenciling was used however. On Hyperscale, I read about three new sets from CAM Decals and I was intrigued by Lt. Curdes’ plane – set number 24-004.
 PAINTING:
After a grey primer coat, I used the following:
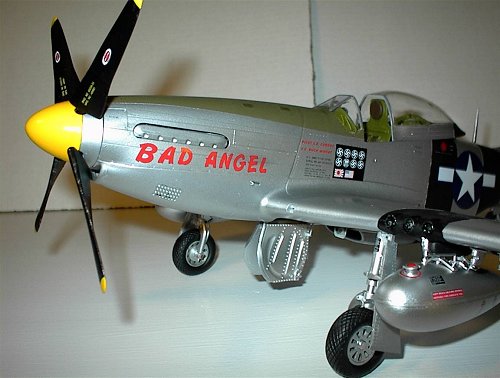
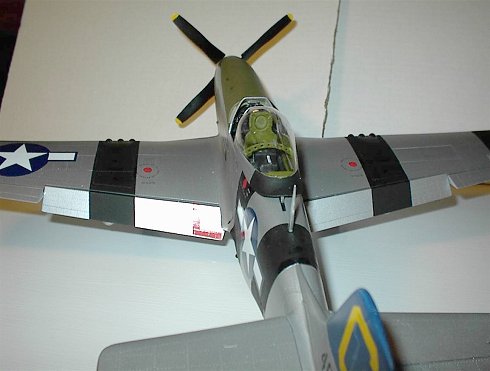
Anti-glare panel: Testor’s spray can Olive Drab FS34087
Top of rudder and vertical tail: Testors Acrylic Dark Blue- brushed on.
Prop Spinner: Testor’s spray can Gloss Yellow
Stripes: Flat Black from a trusty Rust-Oleum can
Gear Whells: Testors small bottle Zinc Chromate- black wash added and silver drybrushing added.
All of these were masked off with Tamiya Masking Tape in preparation for the NMF. I used Tamiya Spray Gloss Aluminum overall. A coat of Testors Dullcote over this turns the Gloss Aluminum into a convincing NMF for me.
When dry, I set the ship upside down in a homemade cradle and proceeded to apply the CAM decals and kit stencils. With Microset and warm water, the decals went on flawlessly.
Weathering: drybrushed prop blades for wear with silver, used a silver colored pencil on the cowling access screws which always lose their Olive Drab paint in most pics I see.
|
FINAL CONSTRUCTION |
Final bits: used brass tubing for the inboard gun sheathing and attached all subassemblies without incident. I tried to drill through the exhaust shrouds and planned to use brass tubing to replicate the exhaust stacks but that turned into another disaster- I mangled them so am starting from scratch to build proper shrouds. Unless an aftermarket company comes to my rescue and produces a replacement set! Or maybe someone has an old set of Airfix shrouds they want to trade me? Email me if you do.
|
CONCLUSIONS |
 To
me, any kit of this size by its nature will have fit problems. The way the
large pieces of plastic react to temperature and shipping and handling by the
builder, etc. all lead to some degree of a problem. This kit was a bit better
than expected in that respect. Better builders may experience less
frustration.
To
me, any kit of this size by its nature will have fit problems. The way the
large pieces of plastic react to temperature and shipping and handling by the
builder, etc. all lead to some degree of a problem. This kit was a bit better
than expected in that respect. Better builders may experience less
frustration.
Despite the kit’s problems as stated above and the high price, I wanted to build this kit and can live with the pitfalls. When I researched the decals to learn more about the plane and pilot, it provided a very satisfying connection for me. This is the plane that has always held the top spot in my aviation mind. Learning about this pilot’s experiences made the building enjoyable throughout the process.
If you have the kit and want to build it- I hope I have given you a few bits to help you build a better one than mine. Regardless of the criticism, when I look in my custom made display case- I see a big Mustang of a unique pilot and I think I did justice to his memory…
If you would like your product reviewed fairly and quickly by a site that has well over 175,000 visitors a month, please contact me or see other details in the Note to Contributors.
Back to the Reviews Index Page