Hobbycraft 1/48 "WW2 P-35A"
Reviewer and Photographer: John
Lester
Price: $11-14 US
Decals: 2 Versions, USAAC and Swedish machines
 The Seversky
(later Republic) P-35 was a direct ancestor of the P-47 Thunderbolt. Developed
as a private venture, the aircraft beat out the Curtiss P-36 (a better fighter
and the direct ancestor of the P-40) to win a US Army Air Corps contract
for 77 aircraft in 1937. Shortly thereafter, Sweden invited several aircraft
manufacturers to show off their latest designs. War clouds were gathering,
and the Royal Swedish Air Force, with it's Gloster Gladiators in front line
service, was desperately seeking to modernize.
The Seversky
(later Republic) P-35 was a direct ancestor of the P-47 Thunderbolt. Developed
as a private venture, the aircraft beat out the Curtiss P-36 (a better fighter
and the direct ancestor of the P-40) to win a US Army Air Corps contract
for 77 aircraft in 1937. Shortly thereafter, Sweden invited several aircraft
manufacturers to show off their latest designs. War clouds were gathering,
and the Royal Swedish Air Force, with it's Gloster Gladiators in front line
service, was desperately seeking to modernize.
Major Seversky himself pitched the company's newest design, which combined
the P-35 with lessons learned from the company's extensive racing experience
and RSAF requirements. The Swedes were sufficiently impressed that they ordered
a total of 120 EP-106 single seat fighters in four batches. However, the
last sixty were impressed into US service in mid-1940 as the P-35A and rushed
to the Philippines. As the J9 (Jakt or fighter), the Seversky aircraft soldiered
on throughout the war, mainly with Flygflottilj (Fighter Wing) 8, becoming
a familiar sight to Allied aircrew diverting to Sweden in damaged aircraft.
In US service they were less fortunate. Aside from being slaughtered mercilessly,
the fighter will be remembered only as the mount of the Army Air Force's
first WWII ace, Boyd "Buzz" Wagner, who claimed 5 Japanese aircraft in desperate
opening days of the war. Of 48 P-35A's sent to the Philippines (in such a
hurry that they still bore Swedish insignia when they arrived), only 8 remained
airworthy after the first 2 days of combat with the Japanese. The remaining
12 aircraft in US hands were given to Ecuador.
Hobbycraft sells at least three versions of this kit - stock P-35, the civilian
racer version, and the J9/P-35A. Though I haven't seen the other two versions,
I am willing to bet they share the same molds .... which leads to several
accuracy problems. The P-35A had a lengthened fuselage (compared to the P-35),
and this is not reflected in the kit. There's not much you can do about that,
aside from major surgery. Also missing is the landing light Swedish machines
(at least) had on the starboard wing, outboard of the landing gear (I didn't
discover that until it was too late to correct, alas). The P-35A also had
a larger engine; radios, instruments and placards were all Swedish; and most
noticeably, the standard armament of 1 each .30 and .50 cal MGs was changed
to two .30 cals in the cowl and 2 .50 cals in the wings. The P-35A's wings
were so thin that fairings were needed underneath the guns to accommodate
them.
 The kit comes
with two sprues of HC's standard Grey styrene, a clear parts tree, a large
decal sheet and instructions. Parts are reasonably well molded and flash
free. Panel lines are (as usual) a bit heavily engraved, but look ok after
painting. Clear parts are pretty clear, and look very nice after a bath of
Future. Decals are provided for one example of a USAAF machine from the 34th
Pursuit Sqdn. There are enough numbers and squadron badges to do just about
any Swedish machine serving with F8 (before they changed aircraft codes to
letters from numbers), but the painting guide is of little help in accurately
marking them (more on that later). Instructions are the usual hand-drawn
one page tri-fold - adequate to get the job done.
The kit comes
with two sprues of HC's standard Grey styrene, a clear parts tree, a large
decal sheet and instructions. Parts are reasonably well molded and flash
free. Panel lines are (as usual) a bit heavily engraved, but look ok after
painting. Clear parts are pretty clear, and look very nice after a bath of
Future. Decals are provided for one example of a USAAF machine from the 34th
Pursuit Sqdn. There are enough numbers and squadron badges to do just about
any Swedish machine serving with F8 (before they changed aircraft codes to
letters from numbers), but the painting guide is of little help in accurately
marking them (more on that later). Instructions are the usual hand-drawn
one page tri-fold - adequate to get the job done.
Assembly is straight forward and starts with the cockpit. Interior detail
is ... well, it's spartan. The real aircraft was a jumble of cables and knobs
and levers - see
Seversky
P-35 in Detail or
USAF Museum
for some very good photos. Both Reheat and Eduard make photoetched sets for
this kit. I bought the Reheat set - it doesn't have the bewildering array
of parts the Eduard set does, but it's half the price and more than sufficient
to spruce the kit up nicely. I placed the PE instrument panel over the kit
part to give the MG receivers something to affix to. Despite what the
instructions indicate, the P-35A and J9 only carried .30 cal MGs in the cowl,
so I followed the directions for that version. The interior was painted overall
Aluminum (all paints I used are Testor's Model Master, btw). Instrument panels,
gunsight, "dashboard", knobs and cables (the last I made myself from fishing
line) were painted Aircraft Interior Black. The seat cushion was painted
Field drab (a more faded, "canvas-y" color than straight Olive Drab) and
seat belts were painted off-white with Aluminum hardware.
The engine is next. The kit engine comes in 5 pieces and is actually quite
nicely done - I had a spare R- 1830-45 from Engines & Things, but I'll
save that for a kit that needs it more. The only thing needed was the wiring
harness, which Reheat supplied. Hobbycraft provides paint instructions of
a sort, but I'll be darned if I could figure out what they were supposed
to indicate. I painted the cylinders Gunmetal, with Aluminum tops, Flat Black
pushrods (part C20), Insignia Red wiring harness, and the rest (parts C18,
C19, and the center portions of C14 and C15) Neutral Grey. The wiring harness
didn't fit exactly, so I had to cut each "wire" apart and glue individually
to the cylinders. The fuselage, wings and stabilizers go together with a
minimum of fuss. I needed only a touch of putty on the bottom of the wings.
Note that Swedish fighters underwent several modifications during their lifespan
- carefully check your references for the correct cooling intakes (part C31
started off short but was extended over the years) and armament (.50 cal
wing guns were removed later on as well, and some aircraft carried cameras
in the bay behind the pilot).
Remember to drill out the locating holes for the underwing MG fairings -
I didn't, which caused me a few problems. Note also that the kit's 50 cal
wing gun assembly is incorrect - parts A4/A5 should not have the little "step".
Instead, the barrel of the gun sticks out of a hole you'll have to drill
just above the midpoint of the leading edge. I used barrels from a Verlinden
resin "WW2 USN Machineguns" set instead of the kit parts since they look
better. Landing gear was trickier - mostly because I built the kit "in flight".
The main gear covers (parts C11/C12) do not fit right. I had to cut a T-shaped
notch and round the edges to get them to look and fit correctly. The tail
wheel doors are very thick - if you don't use PE replacements you'll want
to sand them down. The Reheat PE set has nice tailwheel doors as well as
a much better looking tailwheel strut and main gear disc brakes. Wheel wells,
the inside of the gear doors, and landing gear struts all were painted Aluminum.
The wheel hubs were painted the underside color.
After masking off the clear parts, primering, and sanding any imperfections
that revealed, I was ready for painting. I left the prop, pitot tube and
wing guns off until after painting and decals were finished. Here's where
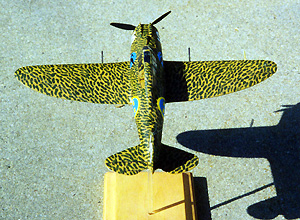
you'll need those references, as the instructions are vague at best. I wanted
to do a Swedish aircraft - and there are at least three variations in paint
schemes to chose from. Aircraft were delivered unpainted, and reverted to
that state in late 1944. From late 1940 through 1944 many aircraft wore a
dappled finish much like that of Italian aircraft, the exact style of which
varied from plane to plane. In late 1944 a standardized solid forest green
upper style was adopted for all RSAF machines. Undersides remained a light
blue-grey similar to the German "Hellblau" throughout the period, until natural
metal finishes were again adopted. For a brief period, many J9's had the
undersides of their wings painted white (port) and black (starboard) as well.
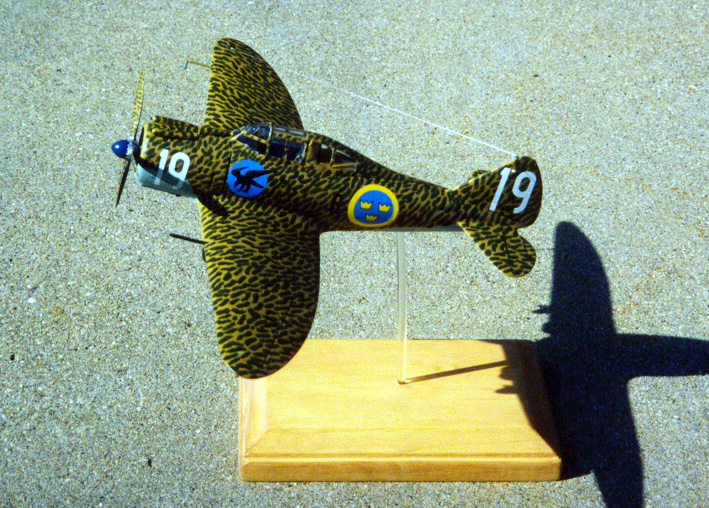
Nose art of any kind is rare on Swedish military aircraft, but not unheard
of. Many F8 fighters wore the wing's stooping falcon symbol over a colored
circle (Red for 1st Sqdn, blue for 2nd Sqdn and Yellow for 3rd Sqdn). Hobbycraft
gives you those colored circles, but doesn't tell you what squadrons used
what colors, unfortunately. They also give you a full set of white numbers
for the cowl and tail markings, which allows you to do any of the machines
between 1940 and 1944, when F8 (at least) switched to letter codes. Roundels
for the fuselage and huge ones for under the wing (slightly oversized, actually)
are provided - enough for most of the camouflaged machines, but not for bare
metal versions, which had roundels on top of the wing as well. You'll need
black numbers for the unpainted versions also. Extra decals are provided
as well - there are bumble bee and ram RSAF squadron insignia (the bumble
bee probably belonged to F6, which never used the J9) as well as the black
triangle/white owl badge of the USAAF 17th Pursuit squadron (which could
be used for Lt. Wagner's aircraft).
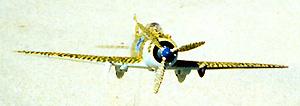
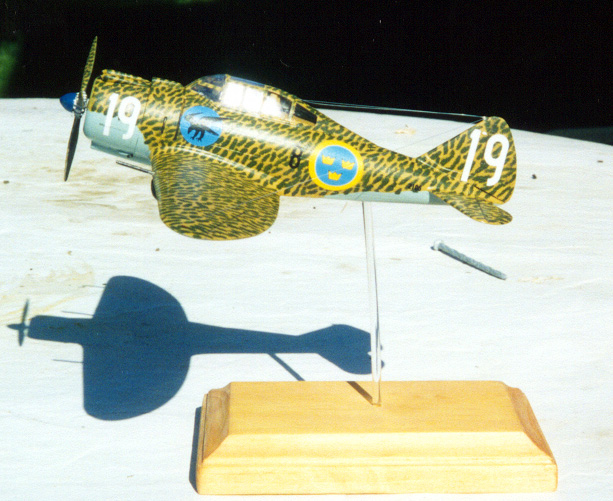
 I was able to
track down photos and drawings of a RSAF fighter with dappled camouflage,
white numbers, squadron badge and white/black wings (from an IPMS/Sweden
article "Republic EP-106, J9 Flyghistorisk Notis Nr 75:4") so I was all set.
I painted the underside RLM 65 Hellblau (close enough to correct), then sprayed
the uppers RAF Middlestone (again, close enough to correct but not an exact
match). The tricky part was painting the green blotches ... and for a while,
that had me stumped. Then a friend suggested I use a beat-up, flat brush
of the appropriate width to dab the paint on. That worked much better than
I expected. I used Medium Green - another case of "close enough" to the correct
color. My references show the front of the propellers camouflaged this way
- the backs were painted flat black. The wings were masked underneath and
sprayed Flat White (port) and Aircraft Interior Black (starboard) from the
panel line just outboard of the gear coverings. Finally, the spinner was
painted Chrysler Engine Blue and the whole model covered in several light
coats of Future acrylic floor polish.
I was able to
track down photos and drawings of a RSAF fighter with dappled camouflage,
white numbers, squadron badge and white/black wings (from an IPMS/Sweden
article "Republic EP-106, J9 Flyghistorisk Notis Nr 75:4") so I was all set.
I painted the underside RLM 65 Hellblau (close enough to correct), then sprayed
the uppers RAF Middlestone (again, close enough to correct but not an exact
match). The tricky part was painting the green blotches ... and for a while,
that had me stumped. Then a friend suggested I use a beat-up, flat brush
of the appropriate width to dab the paint on. That worked much better than
I expected. I used Medium Green - another case of "close enough" to the correct
color. My references show the front of the propellers camouflaged this way
- the backs were painted flat black. The wings were masked underneath and
sprayed Flat White (port) and Aircraft Interior Black (starboard) from the
panel line just outboard of the gear coverings. Finally, the spinner was
painted Chrysler Engine Blue and the whole model covered in several light
coats of Future acrylic floor polish.
Decals went on easily and responded well to MicroSol. The white numbers were
reasonably opaque - note that the "sixes" and "nines" are incorrect, needing
to have their "tail" chopped off a bit. The blue in the roundels and squadron
badge is a bit too light - oh, well, no way to fix that without making new
ones. Missing is the small red cross symbol that was painted to the upper
left of the starboard side fuselage window. The wing walk stripe shown in
the instructions should only appear on unpainted aircraft, as far as I can
tell. After the decals set, I gently washed the model to get rid of any residues
and sealed it under some more future. A light coat of Dullcote flattened
the shine and completed the painting.
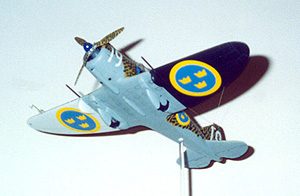
I held the weathering to a minimum, as RSAF machines were not ridden as hard
as those of the combatants. Some aluminum paint was drybrushed to the cowl,
wings, access panels and leading edges to simulate chips, scratches and wear.
Exhaust stains were airbrushed underneath. Note that the main fuel cells
were located in the center of the wing, under the fuselage - where the rows
of little ovals are - and were notorious for leaking. The ovals got a good,
dirty wash to simulate that oil. Finally, antenna wires made from 2lb test
fishing line were run from the top of the tail to the port side of the fuselage,
top of the canopy and wings (just inboard of the landing lights - which I
also had to make, since they are not molded in). wingtip lights were made
by stretching a drop of white glue to a teardrop shape using a toothpick.
They were then tinted red and blue with Tamiya Clear paints. I impaled the
finished model on a clear rod and fitted that to a simple base.
All-in-all, I wasn't disappointed with this kit. It built up rather easily,
and despite some accuracy problems, turned into a nice display model. For
sure it's one of the few kits available in 1:48 of vintage Swedish warbirds
- and I'll probably build another one day in a natural metal finish. Now
if we could just get Hobbycraft to do some more RSAF aircraft ... like a
J21 perhaps, or a Saab 17 ..... Many thanks to Sten Sundelin, David Fielding
and especially Tom Young for all their help with references.
Copyright ModelingMadness.com. All rights reserved. No reproduction in part
or in whole without express permission from the editor. Back to Main Page
Back to Reviews Page 2016