AMT 1/48 A-20B/C Havoc
|
KIT # |
8644 |
|
PRICE: |
$20.00 |
|
DECALS: |
Two aircraft |
|
REVIEWER: |
Michael Leduc |
|
NOTES: |
Kit is Out of Production (OOP) |
|
HISTORY |
I have always been a big fan of the Douglas A-20, not only because of how it looks—it is a very attractive aircraft, almost art-deco like in its 1930’s shapeliness. The main reason I like it is because of the huge variety of types and color schemes the modeler can apply to it. In that sense I find it practically rivals planes like the Spitfire and the Mustang in terms of variety of schemes one can do.
My aesthetic feelings about the
plane aside, the Douglas A-20 was a very important aircraft. It was only one of
the many successful aircraft produced by the U.S. aviation industry that not
only found wide use with U.S. forces, but with the air forces of other nations
as well. Surprisingly, the greatest user of the type was in fact Russia.
Although over half of the total production was diverted to the VVS, very little
is known is their operational history. What is known is that many
 were used not only in the
standard medium-bomber role, but successfully as torpedo bombers. Still others
were used as night fighters (as they were by the RAF and USAAF). Many of the
A-20’s were modified with Russian made ball-turrets in the dorsal position. All
in all, when dealing with the A-20 in Soviet use it is a difficult proposition.
For all the widespread usage all there is left is almost nothing but conjecture
and a few scattered photos. The aircraft I chose to model I first saw in
“American Aircraft of WWII”. It turned up again on the back of the Hall/Park
Warpaint book on the Havoc, but as with most WWII Soviet aviation, alas, no
photos.
were used not only in the
standard medium-bomber role, but successfully as torpedo bombers. Still others
were used as night fighters (as they were by the RAF and USAAF). Many of the
A-20’s were modified with Russian made ball-turrets in the dorsal position. All
in all, when dealing with the A-20 in Soviet use it is a difficult proposition.
For all the widespread usage all there is left is almost nothing but conjecture
and a few scattered photos. The aircraft I chose to model I first saw in
“American Aircraft of WWII”. It turned up again on the back of the Hall/Park
Warpaint book on the Havoc, but as with most WWII Soviet aviation, alas, no
photos.
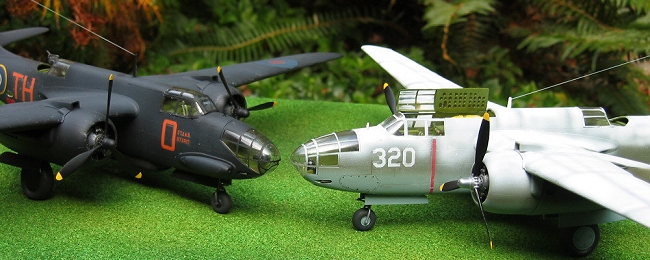
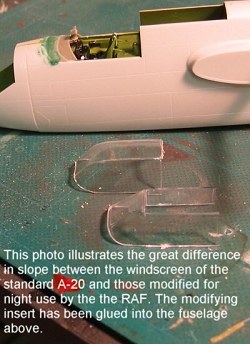
The British also used the A-20 extensively, although in RAF service the aircraft was named the Boston rather than the Havoc. While many found service in the medium bomber role, the most interesting usage was probably in the field of night operations. The most notorious was the “Turbinlight”, where a large spotlight was mounted on the nose of the aircraft. The plan (if one could call it such) was to illuminate the stream of bombers so that the accompanying Hurricane fighters could dart into the stream of light and attack. Needless to say this plan did not work out so well. The two slightly more successful attempts both revolved around using the A-20 as a more conventional type of night fighter. The first variant had a twelve-gun battery mounted in the nose. (BTW, This is another conversion offered by MDC as well as the Turbinlight) The one that ultimately saw the most usage was the “Night Intruder” variant, which had impressive firepower with four .50 caliber guns in the nose and a belly pack which housed an additional four 20mm Hispano cannon. This was reasonably successful, with the main letdown being that the A-20 had a less than spectacular rate of climb and could rarely catch the intended target. This deficiency did not however prevent the USAAF from repeating the same experiment with the nearly identical P-70 variant of the A-20 which filled the gap until the Northrop P-61 Black Widow came along.
|
THE KIT |
AMT made what I thought were some very nice kits in the 1990’s. I always found it unfortunate that they folded (Actually, they just stopped doing aircraft models, Ed), because they were on a bit of a winning streak with the A-20’s, Tigercats, and the P-40’s. They had nice recessed panel lines, decent enough detail, good thin decals printed by Scalemaster, and were reasonably priced to boot.
 Something bad seemed to happen at the end of AMT’s run however. As was the rage
in the 90’s, to save money they switched their production from Dyersville to
Mexico and there seemed to be a corresponding slight slippage in quality due.
For this project it so happened that I built up one of each of these kits. At
first glance the differences between the U.S. popped one and the Mexican are
slight, but certainly there. On the kit popped in Mexico there is more flash on
the parts and the plastic itself seems to be a little more “rubbery” in texture.
The end result is that it doesn’t seem to take to the cement as well. I had
other fit problems, but I’ll get to that in the construction section.
Something bad seemed to happen at the end of AMT’s run however. As was the rage
in the 90’s, to save money they switched their production from Dyersville to
Mexico and there seemed to be a corresponding slight slippage in quality due.
For this project it so happened that I built up one of each of these kits. At
first glance the differences between the U.S. popped one and the Mexican are
slight, but certainly there. On the kit popped in Mexico there is more flash on
the parts and the plastic itself seems to be a little more “rubbery” in texture.
The end result is that it doesn’t seem to take to the cement as well. I had
other fit problems, but I’ll get to that in the construction section.
The decals in both kits were unusable in my opinion, (though I did make the mistake of using the propeller warning stripes—which I later paid for) they are a far cry from the ones I used on my first A-20G w-a-a-y back in 1995. Keep in mind I am really not warning anyone away from the Mexican versions of the kit as they are still good--the same nice detail is there and basically its likely that that is what is out there right now. It is just that they will require a bit more effort on the part of the modeler in the construction.
One annoyance that I have with the kit is the exhaust manifold setup on the cowlings. I understand that AMT wanted to do all of the major variants of the A-20 (which was commendable) but in doing so they saddled the “B/C” kit with the multi-stack exhausts on the lower cowling. Sure, this arrangement was on some A-20’s, but it was only the Boeing built aircraft. Most planes had a single stack exiting from out of the side of the nacelle—certainly the most documented ones. This is not an insurmountable problem, just a bit of a pain.
…speaking of pains. The main wheels also need some work. For some reason AMT decided that the A-20 had tires with an aggressive tread similar to what you would find on an All Terrain Vehicle when in reality they were smooth. No big deal. A couple minutes with a Dremel tool and all can be nicely smoothed out.
 I also used some after-market
products with this project. The Lonestar Models cockpit set, KMC resin control
surfaces, and the MDC “Night Invader” conversion which comprised of new vacuform
canopy, fuselage insert, Hedgehog exhausts, resin cannon belly pack, and decal
sheet of codes. In all cases it was my first time at using a lot of these
things so I should have been prepared for some problems. On the surface the
quality of all looked good, but right off the start I was especially worried
about working with the vacuform canopy supplied in the MDC conversion.
I also used some after-market
products with this project. The Lonestar Models cockpit set, KMC resin control
surfaces, and the MDC “Night Invader” conversion which comprised of new vacuform
canopy, fuselage insert, Hedgehog exhausts, resin cannon belly pack, and decal
sheet of codes. In all cases it was my first time at using a lot of these
things so I should have been prepared for some problems. On the surface the
quality of all looked good, but right off the start I was especially worried
about working with the vacuform canopy supplied in the MDC conversion.
|
CONSTRUCTION |
Well, ordinarily I would start with the
cockpit, but seeing as I was doing two models simultaneously and using all of
these extra bits I decided to modify my approach. I started by hacking away the
control surfaces from the wings and tail pieces from what was going to be the
VVS A-20B. (And yes, in my case it was “hacking”) I found that getting the
ailerons to fit into the recess in the wing was a biggest challenge at the tip
as was a bit thick. In between shaving down the inside of the wing and sanding
down the aileron tip it was finally kind of OK.
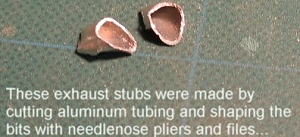
The next step was to fashion some exhausts
for the VVS A-20B. This was actually easier than I expected. I found some
appropriately sized K&S Aluminum tubing at the hobby shop, cut them off at a 45
degree angle with a razor saw, and then played with them a bit with my clippers
and needle-nose pliers. The aluminum is a nice soft material so all this was
executed inside about ten minutes. I then took out my trusty hobby knife and
carved out a nice space for these new pieces in the
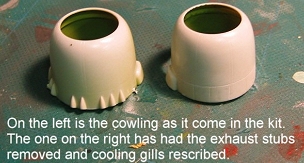
 engine nacelle. The cowlings
also have to be modified and this was done by shaving off the extraneous exhaust
stubs with my hobby knife and sanding it smooth. I then re-scribed all of the
lost cooling flap detail. For those who are adverse to doing all of this
process, I understand that Red Roo out of Australia are releasing a conversion
set with the proper exhausts and cowlings. Despite the ease of fixing this area
with my own handiwork I am sure I will be picking up a couple.
engine nacelle. The cowlings
also have to be modified and this was done by shaving off the extraneous exhaust
stubs with my hobby knife and sanding it smooth. I then re-scribed all of the
lost cooling flap detail. For those who are adverse to doing all of this
process, I understand that Red Roo out of Australia are releasing a conversion
set with the proper exhausts and cowlings. Despite the ease of fixing this area
with my own handiwork I am sure I will be picking up a couple.
 My third step was to glue the nose pieces to the fuselage halves. The kits
instructions state that the two nose halves should be glued together and then
fit over the bulkhead. My experience in the past is that doing it this way
results in a step and much better results can be gotten if you do it in this
different order.
My third step was to glue the nose pieces to the fuselage halves. The kits
instructions state that the two nose halves should be glued together and then
fit over the bulkhead. My experience in the past is that doing it this way
results in a step and much better results can be gotten if you do it in this
different order.
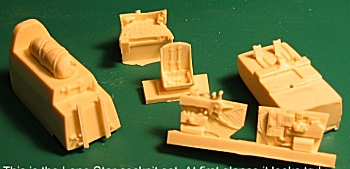
So now I can get to the cockpits. I will say that I was very excited to be using this Lone Star set. To be honest I had never been all that disappointed with what comes in the kit; it goes together well and all it needs are some after market seatbelts, rudder pedals, and a life raft—maybe made from some rolled-up lead wine bottle foil. These little additions make it look pretty decent. But, at first glance the resin replacement looked great!
There are some nice little levers for the pilots seat molded in, an emergency axe and relief tube (for those who enjoy such details). The new seat had nice details and molded in seat belts and the sidewalls were terrific. A nice feature *appeared to be* the fact that the nose gear well was integral with the cockpit floor rather than a separate piece.
I was game.
The problem, as you might expect, proved to be the fit of it all.
I had invested in a Dremel expressly for
this project but I had no inkling how much I would be forced to use it. I had to
remove the original dashboard to fit in the new one which was integral with the
instrument panel. No real problem there, I just snipped it away with my
side-cutters. The glitch came when I first tried to slide the panel in, for it
proved to be far too wide and the wrong shape to boot. I wound up grinding away
the sidewalls to the point where I could actually see light through, and even
then taking down the contour of the instrument panel itself before it would
finally fit in. I thought I had this
 little problem solved and so
moved on to my nicely painted and dry-brushed sidewalls. I super-glued them into
the fuselage halves so that they lined up perfectly with the rear bulkhead and
then tried to fit in the carefully shaped instrument panel again. I was dismayed
to find that the fuselage halves would not fit together again. The side panels
were about 3/16ths of an inch too long in front, so as much as it
pained me, I had to pull out the Dremel and grind into all of that nice
side-wall detail.
little problem solved and so
moved on to my nicely painted and dry-brushed sidewalls. I super-glued them into
the fuselage halves so that they lined up perfectly with the rear bulkhead and
then tried to fit in the carefully shaped instrument panel again. I was dismayed
to find that the fuselage halves would not fit together again. The side panels
were about 3/16ths of an inch too long in front, so as much as it
pained me, I had to pull out the Dremel and grind into all of that nice
side-wall detail.
I suppose that here I should mention the other Night Intruder project. Here I was using the kit part augmented by rudder pedals and seat belts from a True Details set, (which are unfortunately unavailable now). This kit also needed to have the dashboard removed and replaced with an insert from the MDC conversion set. This proved to be no problem at all as the kit parts fit great and the MDC insert pretty much fit like a glove. A little swipe of filler and I was done…
…but what about the rear gunners compartment? What can I say? They fit great. You know, other than that damned cockpit set everything in the kit fit great until…
…the tailplanes. These were just the tiniest of problems. I think I can safely say that there is just not quite enough plastic here. I shifted the pieces about over and over again and still found a sliver of sunlight shining through. No big deal. A little dab of putty fixes it. I say this now because it is easier to deal with it before you get the vertical tail parts on. This needs a bit of contouring as well.
Another problem to look out for, and here I will say there was a big difference between the Mexican version and the U.S. popped one, is in the areas above the carburetors. Again, this is molded separately to accommodate the “G” and “J” versions of the kit. Here a fair bit of patience and putty is in order as you have to bring carburetor part up to wing level. I found that The U.S. kit definitely has the edge in this small area.
|
PAINT & DECALS |
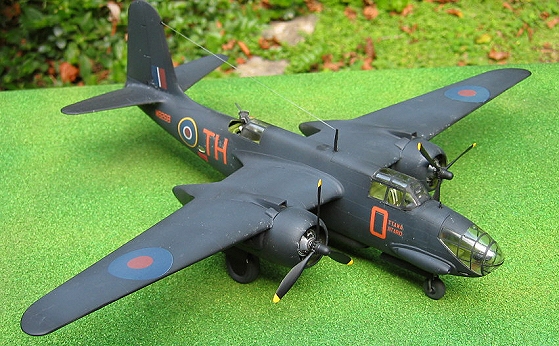
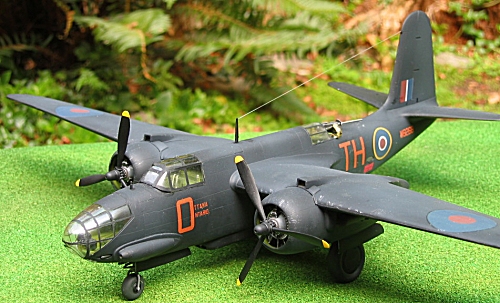
Boston Night Intruder: This was actually a pretty easy scheme: Black. Well I guess it couldn’t really be just any ole’ Black, so I used Polly Scale Night/RLM22 overall. I also wanted to give the black a bit of a faded look so I sprayed the centers of the panels with…now, I don’t want get any nasty emails about this,…Modelmaster Acryl “Gunmetal”. I rationalized that this was the sort of dark, bluey grey that “Night” might fade into. When I got the decals and the final dullcoat on, I patted myself on the back, because it had the nice subtle effect I was looking for.
As for said decals, the MDC conversion did come with the codes, and luckily, for the aircraft I was interested in, the RCAF 418 Sqdn, “O” for Ottawa, Ontario. However, when I looked at the sheet I said to myself, “Y’know, these really look kind of orange…” I convinced myself that they would fade and look a lot redder once they got onto the model. You know what? They really didn’t…
The rest of the decals, roundels basically, were found in the spares box.
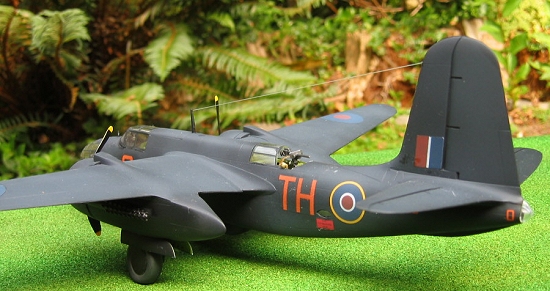 Some may notice that this
aircraft does not have the yellow wing and tail leading edges that is associated
with the A-20 in this British night operations arena. This yellow was actually
more of a mustard color as it was a lanolin paste which was temporarily applied
in order to prevent ice from forming. On all of my pictures of “O” for Ottawa,
Ontario there is no yellow to be seen, perhaps because the photos were taken in
the summer. For this reason I decided not to put any on mine.
Some may notice that this
aircraft does not have the yellow wing and tail leading edges that is associated
with the A-20 in this British night operations arena. This yellow was actually
more of a mustard color as it was a lanolin paste which was temporarily applied
in order to prevent ice from forming. On all of my pictures of “O” for Ottawa,
Ontario there is no yellow to be seen, perhaps because the photos were taken in
the summer. For this reason I decided not to put any on mine.
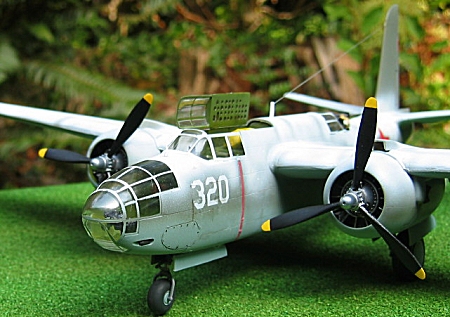
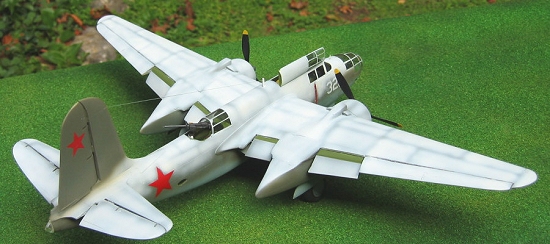
VVS A-20B: I had a few problems with this one. First of all I had what seemed to be conflicting information from my two profiles. The profile in “American Aircraft of WWII” had me leaning towards Winter distemper over the Olive Drab/Neutral Grey-- which would imply that other than having red stars put on, the aircraft had pretty much been put into service as received from the U.S. Lend-Lease program. The Warpaint book on the other hand called for a winter distemper over a Russian Green/Light Blue scheme which would have suggested that once the aircraft were received they were repainted. Ultimately I decided on the Warpaint version and used Polly Scale “Russian Topside Green”, (which actually ended up looking a lot like U.S. Olive Drab) over Tamiya “Light Blue”. For the distemper I used Modelmaster Acryl “Flat White” and did my best to airbrush away from the panel lines so I would get a worn look.
I had the most impossible time tracking down plain old white numerals. What’s the story here? After weeks of hunting around various sources I finally found a sheet of numbers that sounded promising a Fantasy Printshop set from Aeroclub in the UK and when I finally got them they were still wrong. So if the number “320” appears about 30% too large, your eyes are not fooling you. The red stars were cribbed from an Aeromaster I-153 sheet and the propeller warning stripe…well…
These are a pretty good example of what the kit decals have to offer. Try as you might, they just won’t settle down. I would have painted them on…woulda, coulda, shoulda, as my mother would say…but you know, sometimes towards the end of a long project I just get lazy.
|
FINAL ASSEMBLY |
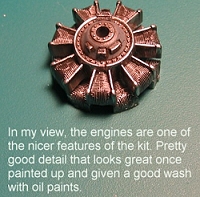 Once every thing was painted
up there is not much to talk about. I could single out the engines, which in my
opinion are a star of the show. The propellers are also quite nice…but then I
would be forgetting that awful vacform canopy.
Once every thing was painted
up there is not much to talk about. I could single out the engines, which in my
opinion are a star of the show. The propellers are also quite nice…but then I
would be forgetting that awful vacform canopy.
The canopy (actually canopies) that come with the MDC conversion at first glance appear not to be canopies at all, but a giant thumbprint in a sheet of clear plastic. Such is the apparent formlessness of it all. If you look really close you can almost see a vague crease line where I assumed one should cut it out, but to see actual canopy frame lines? No way.
 I was able to cut it out
reasonably successfully on my first crack. After much sanding I actually managed
to get it to halfway fit where it was supposed to. There was no way I could get
it to fit as well as the injected canopy on the other kit, unfortunately. To
solve the canopy frame issue I used the True Details “Fast Frames”. If you
follow the directions on the package these actually seem to work OK, but I
don’t think I prefer these to the old masking method. In this case it was an
inelegant solution, but all I could think of.
I was able to cut it out
reasonably successfully on my first crack. After much sanding I actually managed
to get it to halfway fit where it was supposed to. There was no way I could get
it to fit as well as the injected canopy on the other kit, unfortunately. To
solve the canopy frame issue I used the True Details “Fast Frames”. If you
follow the directions on the package these actually seem to work OK, but I
don’t think I prefer these to the old masking method. In this case it was an
inelegant solution, but all I could think of.
Although it may not be fair to point out (Now that it was actually installed) but the Lone Star cockpit set truly me failed again. I had come to the stage of installing the nose wheel and having had the Boston Invader kits parts go together like a dream was expecting the same from the after-market version (though based on past experience you’d have to wonder why). I gingerly slid in the first piece and of course found it simply didn’t fit. No way, no how. The wheel well is about 1/16th of an inch too narrow. I try it with the other two parts with the same result. The only solution is to chop down these somewhat delicate bits and try to shoe-horn them in. In the end it is simply unworkable for one of the part and I have to leave it out. So my nose wheel setup is unfortunately a hatchet job
So there you go. My last word on my first experience at the after-market “enhancement”. I sincerely hope it gets better.
The last thing I have to offer is to promote this amazing new product I found. In the past my method for making aerial wires has been to stretch sprue, superglue it in and hope it holds for longer than a few days. However this new product (to me) is a very thin elastic thread that I found at Aeroclub (I don’t know of a NA source) which they market as rigging for biplanes. You just tack it in at each end with super glue, stretching it as you go. This really makes this always frustrating detail many times easier and there is no danger of breaking it later.
|
CONCLUSIONS |
Well, In many ways I felt like I was swimming against the tide on this project. I think that I took on too many things I hadn’t tried before and combining it with doing two twin-engine kits at once it is no wonder that my enthusiasm flagged towards the end.
 Ultimately the AMT A-20’s
are very nice kits even though they have a few quirks. I can recommend them
without hesitation to modelers of all skill levels except the very the very
beginner. My advice would be to seek out alternate markings because the kit
decals are so poor, with that in mind, the small conversion to the single stack
exhaust is a simple one and with some creativity, it opens up a wealth of
options.
Ultimately the AMT A-20’s
are very nice kits even though they have a few quirks. I can recommend them
without hesitation to modelers of all skill levels except the very the very
beginner. My advice would be to seek out alternate markings because the kit
decals are so poor, with that in mind, the small conversion to the single stack
exhaust is a simple one and with some creativity, it opens up a wealth of
options.
The MDC conversion is basically a good one in that it provides all you need to make a Night Invader. This is a conversion I would recommend to the experienced because of the canopy aspect.
The KMC control surfaces are now out of print. I sort of liked them but am still not sure if it was all worth the extra effort.
Ahhhh…The Lone Star Models cockpit set. I wanted to like this so badly but was so horribly let down by the awful fit. Now I’ll concede that it may be that I am new to this aftermarket world and the problems I had are commonplace. If this is the case I think I may become a completely devoted out-of-the-box modeler, because for me dealing with it was frustration rather than fun.
|
REFERENCES |
Hall Park Warpaint No.32-Douglas A-20 Boston/Havoc- by Richard J.Caruana
AJ Press Monograph (Polish)- A-20 Havoc/Boston- S.Fleisher,M.Rhys,J.Jandera
Squadron/Signal #144 – A-20 Havoc In Action- by Jim Mesko
Concise Guide to American Aircraft if WWII- by David Mondey
Camouflage and Markings RAF Northern Europe 1936-45 Douglas Boston/Havoc
If you would like your product reviewed fairly and quickly, please contact me or see other details in the Note to Contributors.