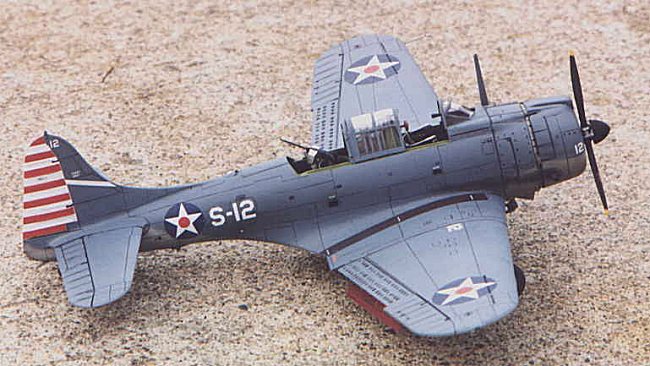
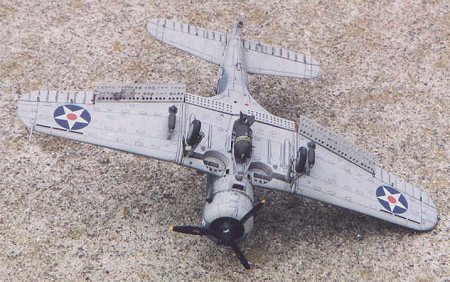
Accurate Miniatures SBD-3 Dauntless
|
KIT # |
4002 |
|
PRICE: |
$31.95 |
|
DECALS: |
Battle of Coral Sea arcraft |
|
REVIEW : |
|
|
NOTES: |
|
|
HISTORY |
In early 1942, US aircraft carriers were harassing Japanese forces in the South Pacific causing great distress to the Japanese Army for their upcoming campaign to conquer the Solomon’s and Papua New Guinea. Aware of the awesome firepower of the aircraft carrier, The Japanese Army insisted on carrier support for their operations. Admiral Yamamoto agreed to lend his newest fleet carriers, Shokaku and Zuikaku along with the smaller carrier Shoho to support the invasion of Port Moresby. Intelligence intercepts indicated that the Japanese carriers would pass into the Coral Sea before the third of May setting the stage for the upcoming battle.
Opposing the Japanese forces were only the Yorktown and Lexington, as the remaining two US aircraft carriers, the Enterprise and the Hornet, were busy launching Doolittle’s famous raid on Japan with B-25 bombers (the subject of the newest Accurate Minatures kit). On 3 May, Japanese forces successfully occupied Tulagi in the Solomon Islands aided by the carrier Shoho. The Yorktown countered with an airstrike at Tulagi, successfully sinking several Japanese ships, but not finding the Shoho that had already left to join the Port Moresby invasion force. The attack alerted the Japanese to the presence of the US aircraft carriers and the stage was set for the first major carrier battle of the war.
 The Shokaku and Zuikaku proceeded south to engage the US
carriers and they were directly in their path. On the sixth of May, the two
battle groups passed within 70 miles of each other at night, but neither side
was aware of the presence of the opposing forces. On 7 May, a Japanese
reconnaissance plane sighted what they believed to be the US carriers and
aircraft from the Shokaku and Zuikaku were ordered to destroy the carriers. This
began the Battle of the Coral Sea. Unfortunately, the Japanese misidentified the
US force as the large ships that they thought were US carriers were in reality
the Fleet Oiler Neosho and her destroyer escort, the Sims. Both ships were hit
with the Sims sinking immediately and the Neosho was scuttled two days later.
The Shokaku and Zuikaku proceeded south to engage the US
carriers and they were directly in their path. On the sixth of May, the two
battle groups passed within 70 miles of each other at night, but neither side
was aware of the presence of the opposing forces. On 7 May, a Japanese
reconnaissance plane sighted what they believed to be the US carriers and
aircraft from the Shokaku and Zuikaku were ordered to destroy the carriers. This
began the Battle of the Coral Sea. Unfortunately, the Japanese misidentified the
US force as the large ships that they thought were US carriers were in reality
the Fleet Oiler Neosho and her destroyer escort, the Sims. Both ships were hit
with the Sims sinking immediately and the Neosho was scuttled two days later.
The Lexington and the Yorktown responded with a strike of their own based on faulty intelligence on the position of the two Japanese carriers. Unfortunately, the Japanese aircraft carriers were two cruisers and two destroyers. However, luck was with the Americans that day as an SBD-3 from the Lexington sighted the light carrier Shoho. The SBD’s from the Lexington dropped into their bombing run, followed 15 minutes later by the strike force from the Yorktown. From this battle came one of the most famous quotes of the war, "scratch one flattop" as LTCDR Robert Dixon radioed the success of the successful sinking of the Shoho with the loss of 545 of her crew. The Japanese misfortunes continued that day, as a counter strike was launched against the US carriers only to meet disaster. Nine Japanese aircraft were shot down by US fighters and the harried bombers beat a hasty retreat. In the confusion of war the pilots mistakenly identified the Yorktown as their own carrier and tried to land on its deck! Only one aircraft was shot down by the time the Japanese realized their mistake, but the pilots were so rattled by the experience that while trying to land in the dark on their own carriers, 11 aircraft missed the flight deck and crashed.
 Japanese misfortune changed the next day, as on 8 May a strike
from the Japanese carriers successfully attacked the Lexington and severely
damaged the Yorktown. The Lexington was severely damaged in the attack but
remained afloat until an explosion of fuel later in the day doomed the vessel.
She was scuttled later in the day, sunk by torpedoes from the USS Phelps. US
forces also launched a strike against the Japanese carriers but were less
successful. SBD-3’s from the Yorktown found the Japanese carriers and
successfully attacked the Shokaku scoring several direct bomb hits but the
carrier did not sink. The Zuikaku was much luckier as it ducked into a
rainsquall to evade the American attack and emerged unscathed.
Japanese misfortune changed the next day, as on 8 May a strike
from the Japanese carriers successfully attacked the Lexington and severely
damaged the Yorktown. The Lexington was severely damaged in the attack but
remained afloat until an explosion of fuel later in the day doomed the vessel.
She was scuttled later in the day, sunk by torpedoes from the USS Phelps. US
forces also launched a strike against the Japanese carriers but were less
successful. SBD-3’s from the Yorktown found the Japanese carriers and
successfully attacked the Shokaku scoring several direct bomb hits but the
carrier did not sink. The Zuikaku was much luckier as it ducked into a
rainsquall to evade the American attack and emerged unscathed.
The final tally was one Japanese light carrier sunk (Shoho) and one carrier severely damaged (Shokaku) versus the US losses of the carrier Lexington and the severely damaged Yorktown, plus the loss of the Neosho and Sims. Based on these numbers it appeared that US forces loss the battle in the tactical sense. However the battle thwarted the invasion of Port Moresby as it was called off due to the presence of the American carriers and resulted in a strategic victory and the first time in the young war that Japanese forces had been stopped. The tide had finally turned in the Pacific.
|
THE KIT |
I always enjoy building an Accurate Minatures (AM) kit as no other manufacturer combines the accuracy, detail, and quality of an AM kit. The name accurate is no marketing hype! The kit consists of well over 100 injected molded plastic parts that are the envy of the business in quality. A feature I really like is the "trap door" box where the separately bagged clear parts and decals reside that protect them from damage in shipment. The instruction book is typical AM, detailed and loaded with information that you need to build up a great model. A word of caution to you "expert" model builders out there, better follow those directions because some of the assembly sequences will "bite ya in da butt" if you don’t follow them! The kit features only one decal option, the aircraft flown by pilot Ensign Leppla and gunner ARM-3C Liska during the Battle of the Coral Sea.
|
CONSTRUCTION |
This was a straight out-of-the-box build (OOB) of the kit since it is highly accurate and no additional parts are really necessary to produce a quality model. After washing the parts in mild dishwater soap and letting them dry, I then pre-painted all the parts as indicated in the instructions. Starting with the interior, I built up the kit as per the instructions. Much has been made of the rudder pedal assembly sequence being difficult to assemble, but I followed the instructions closely and had no problems at all. A word of advice about installing the map table, DO NOT follow the instructions. If you wait until afterwards (as recommended in the instructions) you will need fingers that bend unnaturally to get that piece in. I couldn’t and ended up tearing that wonderful decal off and ended up tossing the piece in frustration. I can’t give you any advice as to when to install it as I obviously blew it on this piece!
 The turret ring assembly is actually easier to do than it looks and I had no
problems completing it. I followed the instruction sequence by cementing the
lower wing to the fuselage and then cementing the upper wings in place. I didn’t
like the fit this way and it resulted in some minor gaps along the leading edge
of the wing root that required putty.
The turret ring assembly is actually easier to do than it looks and I had no
problems completing it. I followed the instruction sequence by cementing the
lower wing to the fuselage and then cementing the upper wings in place. I didn’t
like the fit this way and it resulted in some minor gaps along the leading edge
of the wing root that required putty.
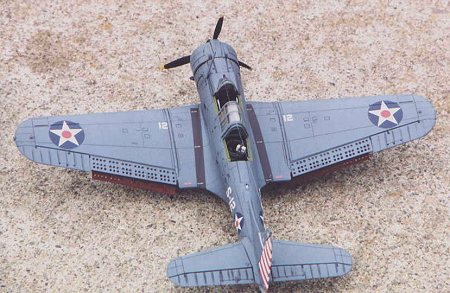
Assembly of the nose and engine was completed as described in the instructions with the following tip. Wrap the leading portions of the machine guns in parafilm before installing and you won’t have to worry about overspray when painting. After installation of the bomb fairing (E53) I stuffed tissue paper into the cowl and used the complete canopy as a mask for the fuselage interior as I was going to leave the canopies in the stacked position. Next stop was the paint shop.
The model was painted, decaled, and weathered as described in the following subsections and then final assembly took place.
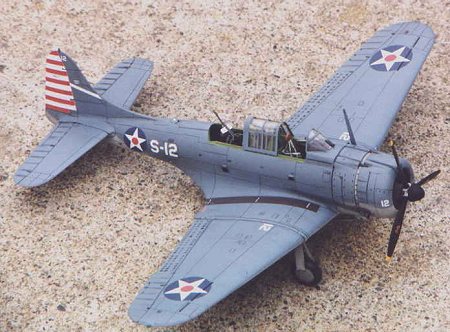
For final assembly I installed all the landing gear components, bombs, dive flaps, and cockpit details. Next I stacked the cockpits in the open position, but I left off the gunner’s canopy (it was frequently removed) as it didn’t fit very well and I was getting lazy at this point. Lastly, I installed the machine guns, propeller, pitot, and antenna. The antenna wire was completed with invisible thread painted gunmetal, with globs of paint at each end for insulators and at the cockpit wire junction.
|
PAINT & DECALS |
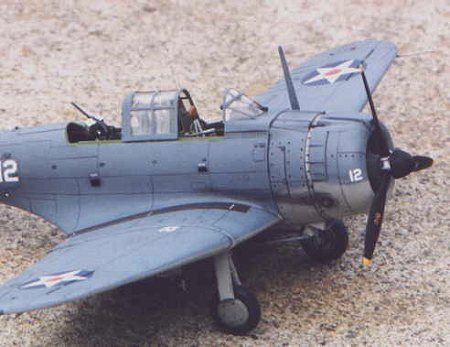 The model was very easy to paint since it was in the early Navy scheme of
blue/gray over light gray. I airbrushed Polly Scale USN Lt. Gray A/N 602 for the
bottom and USN Blue/Gray for the top. This was followed by a light topcoat of
Future to prepare the flat surface for decaling. The kit only comes with one
decal option, but at least they are of very high quality. After a short drying
period of about an hour, I applied MicroSol setting solution to get the decals
to melt into the surface. I repeated with a second coat of setting solution to
get all the decals fully down. They responded very well to the setting solution
with no permanent wrinkling. After drying overnight, I wiped the decals off with
a moist cloth with a bit of soap to remove any residue and after drying I shot a
very light coat of Future thinned with rubbing alcohol (50:50 mix) over the
decals to seal them.
The model was very easy to paint since it was in the early Navy scheme of
blue/gray over light gray. I airbrushed Polly Scale USN Lt. Gray A/N 602 for the
bottom and USN Blue/Gray for the top. This was followed by a light topcoat of
Future to prepare the flat surface for decaling. The kit only comes with one
decal option, but at least they are of very high quality. After a short drying
period of about an hour, I applied MicroSol setting solution to get the decals
to melt into the surface. I repeated with a second coat of setting solution to
get all the decals fully down. They responded very well to the setting solution
with no permanent wrinkling. After drying overnight, I wiped the decals off with
a moist cloth with a bit of soap to remove any residue and after drying I shot a
very light coat of Future thinned with rubbing alcohol (50:50 mix) over the
decals to seal them.
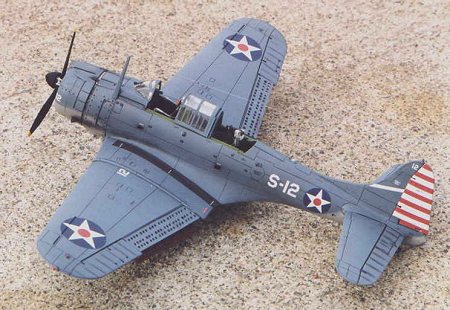
For weathering, I chose to accentuate the engraved panel lines and surface detail with a burnt umber oil wash. After spraying a mix of equal parts Future and Tamiya Flat Base (X-21), I then randomly applied some ground up black and burnt umber pastels with a soft brush to simulate staining and exhaust.
|
CONCLUSIONS |
This is an excellent model of an important WW II aircraft. Overall the quality and accuracy are exceptional. The level of detail engraved in the kit is downright incredible. AM still lives up to their awesome reputation with this kit. Many modelers have been noted as not recommending AM kits to beginners, but I disagree strongly with that. I highly recommend this kit for beginners since there are no major construction problems to deal with. There are a lot of parts, and that may deter beginners, but with very little effort a beginner can build an exceptional kit. I spent a little under 20 hours building this kit which is about average for me on an AM build.
|
REFERENCES |
 Squadron/Signal Publications, Golden Wings 1941-1945, $10.95
Squadron/Signal Publications, SBD Dauntless In Action, $8.95
Presidio Press, The War In The Pacific, $18.95
Time-Life Books, The Carrier War, (Sold as a set)
Copyright ModelingMadness.com
Back to Reviews Page 2017