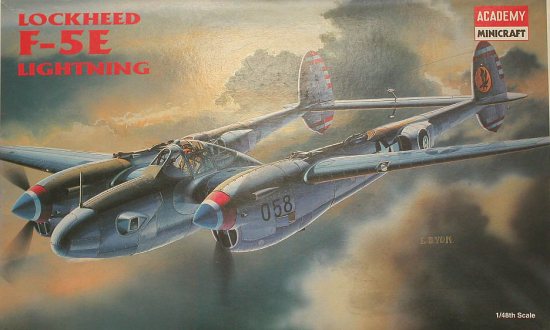
Academy 1/48 F-5E (P-38) Lightning
|
KIT # |
2149 |
|
PRICE: |
$26.00 MSRP |
|
DECALS: |
One aircraft |
|
REVIEWER: |
|
|
NOTES: |
True Details wheels and cockpit used |
|
HISTORY |
The photo variants of the Lockheed P-38 Lightning, referred to as F-4 and F-5, were arguably the finest execution of airborne reconnaissance by any nation during World War II. The P-38 made an excellent platform for aerial photography, with multiple downward and oblique cameras being mounted in the nose taking the space normally reserved for machine guns and cannon. The speed, altitude, and exceptional range capabilities of the Lightning were put to good use, with models being used with great success in Europe, the Mediterranean, and the Pacific Theaters of Operation.
 F-4s were based on the early P-38E airframe. A good number of these were
painted in the top-secret camouflage known as Haze paint. Difficult to apply
and prone to maintenance and weathering headaches, it was replaced by a more
blue camouflage termed Synthetic Haze paint. This was applied to F-5A, B, and
C aircraft. By mid 1944, the use of camouflage paint had been discontinued for
USAAF aircraft. F-5Es were not manufactured at the Lockheed factory in
Burbank, California, but rather were converted from stock P-38J platforms at
the modification depot in Dallas. Some of these aircraft were painted using
British stocks of PRU Blue paint upon their arrival in England.
F-4s were based on the early P-38E airframe. A good number of these were
painted in the top-secret camouflage known as Haze paint. Difficult to apply
and prone to maintenance and weathering headaches, it was replaced by a more
blue camouflage termed Synthetic Haze paint. This was applied to F-5A, B, and
C aircraft. By mid 1944, the use of camouflage paint had been discontinued for
USAAF aircraft. F-5Es were not manufactured at the Lockheed factory in
Burbank, California, but rather were converted from stock P-38J platforms at
the modification depot in Dallas. Some of these aircraft were painted using
British stocks of PRU Blue paint upon their arrival in England.
Over 1400 Photo Lightnings were delivered. These aircraft were called upon constantly to photograph enemy troop disbursements, make bomb damage assessments, and to identify future targets. The missions were long and dangerous, often taking the pilot and the aircraft to the utmost limits of their physical endurance. F-5s flew alone and were constantly on the lookout for high-altitude enemy fighters, relying only on the pilot’s wits and the high-speed capabilities of their unarmed Lightnings to survive.
|
THE KIT |
Academy’s series of P-38s are among the best available in 1/48 scale. Competition comes from Hasegawa’s offerings, which are notorious for poor fit (I know – it happened to me when I built one) of the twin booms. Minicraft also makes a P-38 that I haven’t seen personally so I can’t comment on it, but reports from other modelers have been lukewarm at best. Of course there’s always the old favorite Monogram P-38, which is quite accurate dimensionally but can’t measure up to the Academy and Hasegawa kits in regards to fit and finesse of detail.
Molded in light gray styrene, Academy includes the nose and clear pieces
needed to make the F-5E photo variant of the Lightning on separate sprues.
Panel lines are of the engraved variety, with a few fasteners molded into the
engine access panels. Detail in the wheel well bays is simplistic, but
satisfactory. The propeller spinners are provided in two pieces trapping
 the
individual blades. This arrangement is different than what is on real P-38s,
whose blades poke through an unbroken section of cone. There’s not much one
can do about it, other than fill the resultant seam after gluing the blades
into the spinner. The P-38 had handed engines, meaning that the blades are
specific for a particular side. Looking at the aircraft from straight ahead,
the propellers rotate away from the fuselage as they travel over the top of
the wing. The cockpit is adequately detailed, but could stand to be replaced
by the True Details or soon to be released Black Box set. Like Hasegawa and
Monogram, the kit depicts the coaming over the instrument panel deployed in
such a manner as to look like an extension of the aluminum fuselage, although
Academy does impart a rather crude fabric effect. In most close-up pictures
I’ve seen of P-38 cockpits, this fabric glare shield was either stowed or
eliminated. Fixing it involves cutting quite a bit of plastic and making sure
to retain a mounting surface for the windscreen. The gun sight molded to the
coaming has to be removed from Photo Lightnings. Separate clear windows are
provided for the camera ports, although the interior of the nose is completely
hollow and needs a blanking plate to prevent the see-through effect. The
canopy pieces are very thin and nicely transparent with raised framing lines,
although there is a slight misalignment of the framing on the rear piece that
can be fixed by masking and painting.
the
individual blades. This arrangement is different than what is on real P-38s,
whose blades poke through an unbroken section of cone. There’s not much one
can do about it, other than fill the resultant seam after gluing the blades
into the spinner. The P-38 had handed engines, meaning that the blades are
specific for a particular side. Looking at the aircraft from straight ahead,
the propellers rotate away from the fuselage as they travel over the top of
the wing. The cockpit is adequately detailed, but could stand to be replaced
by the True Details or soon to be released Black Box set. Like Hasegawa and
Monogram, the kit depicts the coaming over the instrument panel deployed in
such a manner as to look like an extension of the aluminum fuselage, although
Academy does impart a rather crude fabric effect. In most close-up pictures
I’ve seen of P-38 cockpits, this fabric glare shield was either stowed or
eliminated. Fixing it involves cutting quite a bit of plastic and making sure
to retain a mounting surface for the windscreen. The gun sight molded to the
coaming has to be removed from Photo Lightnings. Separate clear windows are
provided for the camera ports, although the interior of the nose is completely
hollow and needs a blanking plate to prevent the see-through effect. The
canopy pieces are very thin and nicely transparent with raised framing lines,
although there is a slight misalignment of the framing on the rear piece that
can be fixed by masking and painting.
The wheels are two-piece assemblies upon which synthetic rubber tires are mounted. This is a weak point of the kit and really calls out for replacement by True Details resin. Even thought the instructions state that the kit represents a F-5E-2-LO, the kit really depicts an F-5E-3-LO, which was fabricated from a P-38J-25-LO airframe. This P-38 variant had the leading edge landing light and the powered dive flaps underneath each wing. To make an earlier F-5E-1 or –2, the modeler will need to sand off the dive flaps and represent the circular landing light under each wing.
Armament is left over from the regular P-38J fighter variant, with HVAR rockets, two 500 LB bombs, and two 165 gallon drop tanks molded integrally with their mounting pylons. Other than the drop tanks, a Photo Lightning would use none of this, so your spares box gets a few goodies. A boarding ladder is provided, although the modeler will have to cut out the slots in the rear fuselage to display the ladder in the open position.
|
CONSTRUCTION |
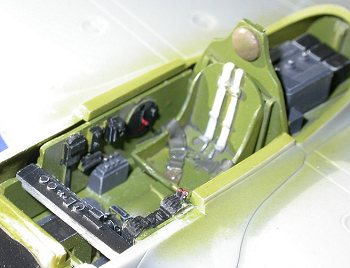 It was an easy decision to use a True Details resin cockpit. While not as
nicely detailed as the out-of-production Kendall Model Corporation set I used
on an earlier project, it gives a more realistic depiction of highly visible
P-38 office than what is provided in the kit. I painted it Interior Green
overall with black instrument panel and boxes. A wash of burnt umber gave
depth to the recesses and a drybrushing with very light gray highlighted the
raised detail. I was able to fit the resin cockpit into the fuselage with a
moderate amount of fiddling. I didn’t have to do major sanding or removal of
the pour block. The shoulder straps of the seat harnesses were painted light
gray, with Olive Drab for the lap belts.
It was an easy decision to use a True Details resin cockpit. While not as
nicely detailed as the out-of-production Kendall Model Corporation set I used
on an earlier project, it gives a more realistic depiction of highly visible
P-38 office than what is provided in the kit. I painted it Interior Green
overall with black instrument panel and boxes. A wash of burnt umber gave
depth to the recesses and a drybrushing with very light gray highlighted the
raised detail. I was able to fit the resin cockpit into the fuselage with a
moderate amount of fiddling. I didn’t have to do major sanding or removal of
the pour block. The shoulder straps of the seat harnesses were painted light
gray, with Olive Drab for the lap belts.
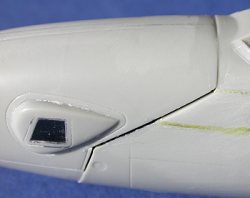
I turned my attention to the camera nose. First I glued in a large lead
fishing sinker to insure that the tail-heavy model would sit properly on the
nose gear. Unfortunately I miscalculated, forgetting to take into account that
the main landing gear are slightly angled forward and would suffer when the
model was put onto its landing gear for the first time. (Mental note to
 self:
use TWO big fishing sinkers next time. There’s plenty of room.) I installed a
small plastic sheet in the nose to block off the light between the two oblique
camera ports and painted the interior flat black. The camera windows were then
installed and carefully faired in with gap-filling CA glue and polished back
to clarity. The two bottom camera windows had sink marks right smack dab in
the middle of them. I sanded them down as much as I could to eliminate the
marks, but they are still slightly visible. In retrospect, I should have
replaced them with clear styrene sheet.
self:
use TWO big fishing sinkers next time. There’s plenty of room.) I installed a
small plastic sheet in the nose to block off the light between the two oblique
camera ports and painted the interior flat black. The camera windows were then
installed and carefully faired in with gap-filling CA glue and polished back
to clarity. The two bottom camera windows had sink marks right smack dab in
the middle of them. I sanded them down as much as I could to eliminate the
marks, but they are still slightly visible. In retrospect, I should have
replaced them with clear styrene sheet.
I glued the wing/fuselage top and bottom together after drilling out the holes necessary for the ordnance mounting pylons. Since the aircraft I was modeling was a F-5E-2, I didn’t install the leading edge landing light and instead drilled large holes under each wing and inserted a small piece of clear styrene rod and sanded it flush with the surrounding surface. This was followed with a bit of polishing with a tri-grit file to give a reasonable replica of the circular landing lights. The –2 also didn’t have dive flaps, so I got out the heavy grit sandpaper and eliminated the outline of those under each wing.
The nose section was then glued onto the fuselage. Fit here is quite poor, with fairly large seams needing to be filled. The twin booms were assembled, boxing in the wheel wells. These were then glued to the wings, keeping in mind to insert the horizontal stabilizer. Fit was fair, but alignment was pretty good, unlike Hasegawa’s P-38. I filled and sanded the seams and rescribed all the lost panel lines. A thorough cleaning with dishwashing soap and warm water prepared the model for the paint shop.
|
CAMOUFLAGE & MARKINGS |
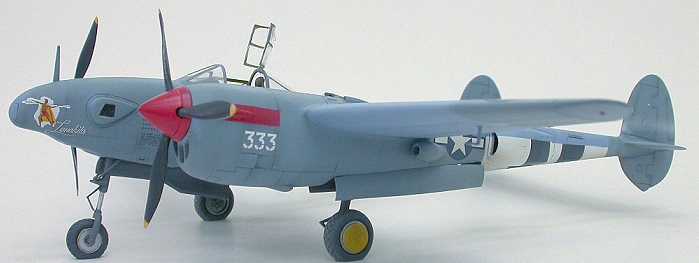
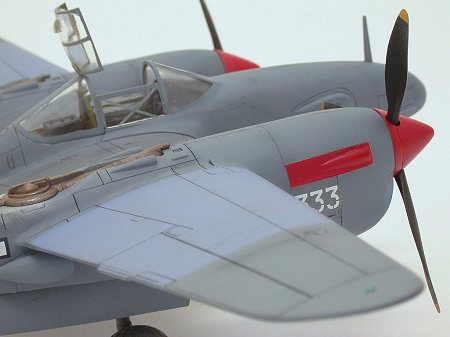
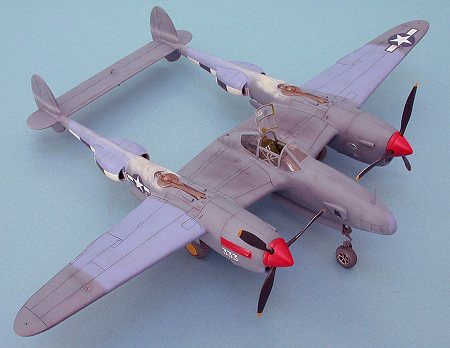
The aircraft that I intended to do is depicted on an old AeroMaster sheet 48-082 Recon Birds. F-5E-2-LO serial number 43-28333 was assigned to the 27th Photo Squadron of the 7th Photo Recon Group based at Mount Farm, England during 1944. The decal sheet instructions state that the aircraft was painted in Synthetic Haze paint, but this counters the photographic evidence seen in three very high-quality Kodachrome slides of the aircraft that I found in the references listed below. This aircraft was painted with RAF stock PRU Blue overall, with gloss red spinners and an accent panel on the outside of each engine nacelle. D-Day stripes are also evident, although at the time depicted by the mission markings on the side of the nose, these had been mostly painted over with a lighter and bluer paint. This again was most likely a RAF stock paint, probably Azure Blue.
 Wanting to try the ‘pre-shading" method of highlighting panel lines that is
so popular at the moment, I started by spraying Polly Scale RLM 66 Scale Black
along every line and access hatch. This was followed by carefully spraying
Polly Scale PRU Blue in the center of each panel, allowing a light overspray
of blue to fall over the surrounding panel lines. It certainly took a lot
longer to do than my regular method. The results turned out fine, but nothing
spectacular. At the moment I am undecided as to whether I’ll use pre-shading
on future models. At least I gave it a try.
Wanting to try the ‘pre-shading" method of highlighting panel lines that is
so popular at the moment, I started by spraying Polly Scale RLM 66 Scale Black
along every line and access hatch. This was followed by carefully spraying
Polly Scale PRU Blue in the center of each panel, allowing a light overspray
of blue to fall over the surrounding panel lines. It certainly took a lot
longer to do than my regular method. The results turned out fine, but nothing
spectacular. At the moment I am undecided as to whether I’ll use pre-shading
on future models. At least I gave it a try.
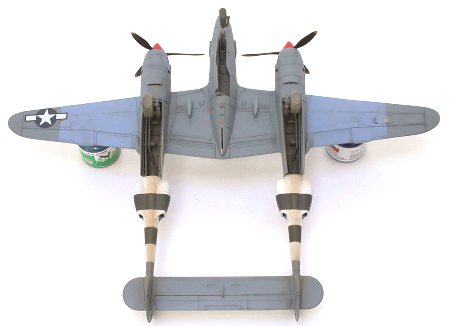
The D-Day stripes under the booms were masked and painted, followed by the Azure Blue bands on the tops of the booms and both wings, reflecting the orders to remove the striping in August of 1944. Sometimes ground crews removed the stripes using a solvent such as aviation gas, or simply painted over the stripes as was done on this F-5E. Reference photos are very helpful in determining which approach was taken, as it differed from plane to plane. Polly Scale Azure Blue was also spot-painted on a few areas on the nose and nacelles, most likely to combat places where the unprimed PRU Blue had chipped off.
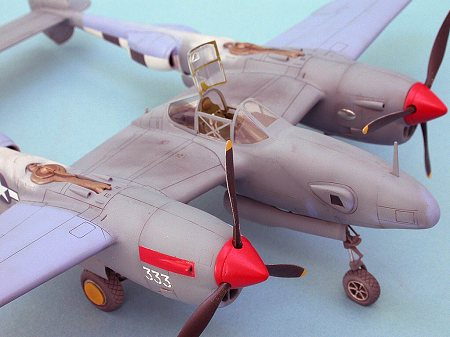
The prop blades were painted and decaled. The prop spinners and the red
accent panel on each nacelle first received a coat of flat white, then
Insignia Red. The wheel wells were masked and painted along with the landing
struts with Polly Scale Neutral Gray A/N 603. The main wheels had covers
which I fashioned from a spare set and glued over the spoked pattern of the
resin wheels after they were painted Insignia Yellow. Several thin coats of
Future floor polish was used to produce a gloss surface for the application of
the decals. The markings are simple, with a nice piece of nose art of a
Hawaiian (?) warrior entitled "Lanakila". After the decals were dry, I washed
away any traces of decal glue and setting solutions and
 sprayed another coat
of Future.
sprayed another coat
of Future.
A brownish-black wash made of Payne’s Gray and Burnt Umber artist’s oils mixed with Turpenoid was applied to all the recessed panel lines and in the wheel wells. A silver pencil was used to represent some mild paint chipping on the leading edges of each propeller blade and around the entrance to the cockpit. The turbosuperchargers were painted with Testors Burnt Metal Metalizer and drybrushed with Polly Scale Rust. The distinctive ash gray exhaust pattern made by these units was done with an airbrush using highly thinned paint. The wheels were painted with Testors Steel Metalizer, followed by Polly Scale RLM66 Scale Black for the tires. The same oil wash was applied to the wheel recesses, and the tires were lightly sprayed with a very thin tannish-gray mixture. This was also sprayed around the underside of the booms to depict the mud and dust thrown up during takeoffs and landings. Dark Gray pastel chalks were used to dirty up the areas on either side of the cockpit, as well as around each refueling port. Finally, Polly Scale Clear Flat was used to seal the weathering.
|
FINAL CONSTRUCTION |
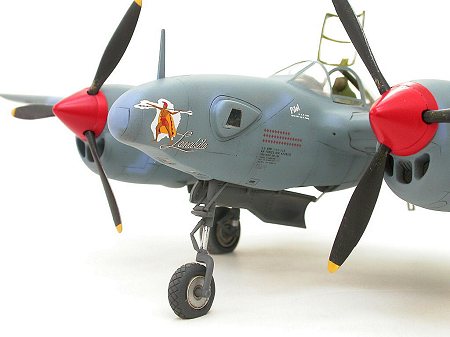
 P-38s have a very distinctive nose-high stance when parked on the ground.
The Academy kit (unlike Hasegawa) has this to some degree, but I wanted to
make sure so I cut the nose landing gear and extended the oleo strut by
inserting a piece of aluminum tubing. This didn’t help the precarious balance
any, owing to my failure to install enough weight into the nose, so I drilled
a big hole in the front of each nacelle and started dropping in copper BBs
that I dipped in CA glue. I managed to get enough in to allow the model to sit
on its nose gear properly.
P-38s have a very distinctive nose-high stance when parked on the ground.
The Academy kit (unlike Hasegawa) has this to some degree, but I wanted to
make sure so I cut the nose landing gear and extended the oleo strut by
inserting a piece of aluminum tubing. This didn’t help the precarious balance
any, owing to my failure to install enough weight into the nose, so I drilled
a big hole in the front of each nacelle and started dropping in copper BBs
that I dipped in CA glue. I managed to get enough in to allow the model to sit
on its nose gear properly.
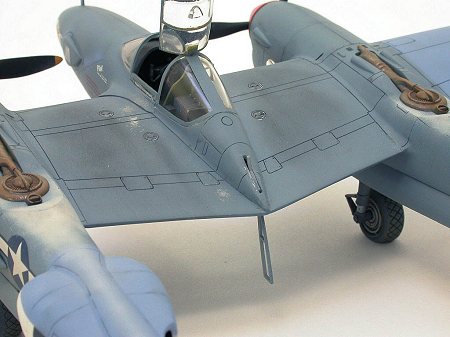
The canopy was glued on using white glue. I was not satisfied with the look
of the seam between the windscreen and the surrounding fuselage, so I faired
it in using CA glue. It took a couple of hours of work and required
repolishing of the clear glass and a bunch of masking and painting, but I
think the effort was worth it. I cut down the left side window to depict it in
the rolled down position, and I attached the top hatch to the rear canopy
piece with a tiny length of brass wire. I drilled out and cleaned up the slots
on the top and bottom sides of the rear fuselage pod for the pilot’s boarding
ladder. The ladder’s operation is kind of complex, so pay close
 attention to
its appearance in the open position.
attention to
its appearance in the open position.
The resin wheels were glued on after I had sanded off the ridiculous bulged effect that True Details somehow thinks looks realistic. The landing gear doors took quite a bit of fiddling to get placed properly, a common problem with all P-38 kits. I had to sand the attachment points down to get an even gluing surface. I managed to break the tiny elevator balance weights off only twice, which is pretty good for me. I hate the stupid things. I was successful in keeping the nose antenna post on without breaking it, which I consider a modern miracle.
I used chrome Bare-Metal Foil to represent the polished metal mirrors on the inner side of each nacelle that were used by the pilot to check the position of the landing gear. I’m glad I’m not much of a car modeler because I really don’t like the stuff. The propeller spinners don’t fit snugly up against the front of the nacelle because of interference with the propeller attachment channels in the backside of the spinner plate. I ground this down with a motor tool and attached the spinners with a friction fit on the shafts so that they can be removed when the model is transported. With that task, I was officially done. I clocked 50 hours of work on the completed model.
|
CONCLUSIONS |
 I had a great time building this F-5, and came to the realization that I
have a special affinity for the P-38 and all its variants. I’ve noticed at
model contests that you don’t see many built-up Lightnings, probably because
of their complexity when compared to other popular single-engine fighters. The
Academy kit is not as nicely detailed as the Hasegawa offerings, but fit is
certainly better in regards to boom alignment. The weak points of the Academy
kit are the poor fit of the nose section, the lousy rubber tires, and the
simplistic cockpit. So, which is the better choice, Hasegawa or Academy? I’d
say it is a toss-up, and when pressed I’d go with Academy as long as the
wheels and cockpit are replaced by aftermarket items. Perhaps one day we will
be blessed with a definitive version, but for now a nice model can be had with
a little work on the part of the modeler.
I had a great time building this F-5, and came to the realization that I
have a special affinity for the P-38 and all its variants. I’ve noticed at
model contests that you don’t see many built-up Lightnings, probably because
of their complexity when compared to other popular single-engine fighters. The
Academy kit is not as nicely detailed as the Hasegawa offerings, but fit is
certainly better in regards to boom alignment. The weak points of the Academy
kit are the poor fit of the nose section, the lousy rubber tires, and the
simplistic cockpit. So, which is the better choice, Hasegawa or Academy? I’d
say it is a toss-up, and when pressed I’d go with Academy as long as the
wheels and cockpit are replaced by aftermarket items. Perhaps one day we will
be blessed with a definitive version, but for now a nice model can be had with
a little work on the part of the modeler.
|
REFERENCES |
Bell, Dana: Air Force Colors, Volume 2
Bodie, Warren: The Lockheed P-38 Lightning
Davis, Larry: P-38 Lightning in Action
Ethell, Jeffrey and Warren Bodie: World War II War Eagles, Global Air War in Original Color
Freeman, Roger: The Mighty Eighth in Color
Copyright ModelingMadness.com. All rights reserved. No reproduction in part or in whole without express permission from the editor. If you would like your product reviewed fairly and quickly, please contact the editor or see other details in the Note to
Contributors.