Revell/Monogram 1/48 T-6 Texan
|
KIT # |
4347 'Reno Race Set' |
|
PRICE: |
$12.00 |
|
DECALS: |
Two aircraft |
|
REVIEWER: |
Kelly Jamison |
|
NOTES: |
Dense Foam resin base |
|
HISTORY |
The T-6 has been called many names in its long and varied history. Harvard, Yale, Mosquito come to mind. Most pilots just called it "T-6". North American built or licensed the production of over 17,000 Texans for many nations both friendly and hostile to the United States over the years. It has been considered one of the most important and over-looked aircraft ever made. It has shot down more enemy planes and in turn has been shot down more times than any other aircraft, on film. Hollywood loved the T-6 because of its abundance of airframes and parts, a readily available staff of pilots, its ability to look like the good guys or bad guys with just a coat of paint and the relative slow airspeed it flew at for filming. Many surplus T-6's found their way to private hands over the years and have been used for everything from cloud seeding to crop dusting to air racing.
I was at my local hobby store when I saw the Revell "Reno Racer Set P-51D & T-6" combo for $11.99. What a bargain! I knew that the P-51D was the old Revell dog and wasn't worth the plastic it was molded out of. But the T-6 was the good old Monogram kit that still holds true after all this time. One way you can model on a budget is to look for kits that have bad paint schemes or options that you will never use. Case in point is the Ramjet F-51D by Hasegawa. I have found it on sale for next to nothing because no one wants to build it. It is the same P-51D as other kits but with the extra parts added. I picked mine up for $10.00. All you need is a set of AeroMaster or Super Scale decals of your choice and you have a great kit on your hands. Another one I bought off the discount table is the Hasegawa 1/48 scale “Strange Insignia USA/UK” A6M2 Type 52c Zero. Some war paint and a few decals from the decal dungeon turned this into a great little kit for under $10.00.
|
THE KIT |
The P-51D went into a box as spare parts for the High Planes Griffon Mustang "WORLD JET" racer project waiting to be built. Then I turned my attention to the T-6. It was molded in a deep red. The plastic was real soft but the surface detail is still very good. The raised panel lines are more accurate than recessed panel lines on this plane. Next time you are at an air show, spot the T-6 and give it a good look-over. Lapped metal surfaces, raised rivets, and loose fitting fairings are abundant.
|
CONSTRUCTION |
 The cockpit parts are very
well done. Excellent engineering makes it look complicated and detailed with a
minimum of parts. It went together quickly and looks great when complete. I used
some small diameter plastic rod to make push/pull rods for the flight controls
and some strip plastic to continue the detail deep into the tail. You can't see
it now that the plane is finished anyway. Everything got a coat of Model Master
Interior Green. Some highlighting with oil based black and raw umber then a
light dust of oil based pastel light gray made the ‘pit’ look like a million
bucks. Bits of wire and a few data plaques were sprinkled according to reference
throughout the cockpit. I used some dials from a Monogram P-51/P-39 Instrument
sheet for the instrument panel. It needed a bit of trimming to fit but looked
great when finished.
The cockpit parts are very
well done. Excellent engineering makes it look complicated and detailed with a
minimum of parts. It went together quickly and looks great when complete. I used
some small diameter plastic rod to make push/pull rods for the flight controls
and some strip plastic to continue the detail deep into the tail. You can't see
it now that the plane is finished anyway. Everything got a coat of Model Master
Interior Green. Some highlighting with oil based black and raw umber then a
light dust of oil based pastel light gray made the ‘pit’ look like a million
bucks. Bits of wire and a few data plaques were sprinkled according to reference
throughout the cockpit. I used some dials from a Monogram P-51/P-39 Instrument
sheet for the instrument panel. It needed a bit of trimming to fit but looked
great when finished.
The fuselage halves have detail molded into them and took minimum detailing and highlighting on the inside to get the right weathered look to this workhorse. I did have a problem with the front section that is hidden under a cowl. It seemed too wide and I had to cut about a 16th of an inch to make it fit properly. Once everything was dry, the two fuselage halves went together. There are a series of three status lights on the bottom of the fuselage. I superglued them in place after painting the backside of the lights (from front to back) green, red, yellow. I really don’t know if they were used on Korea era Texans. I saved the top cowl piece for later since it would be a different color. Some might want to glue it on now. You have two choices of top front cowls. The first one has a port for the machine gun and the large antenna mast. The other is a smooth surface for the later models. My piece was a bit undershot but looked ok when cleaned up.
The wing is molded in a single piece lower and two upper halves. You have the ability to have the flaps up or down. I found that about 90% of all my reference photos show the flaps in the up position. Maybe some of you guys that fly or work on the real thing can shed some light on this. On my plane, flaps up! The lower flap and upper wing do not meet too well on the trailing edge. Some work will need to be done cleaning up this area. I would not sweat it too bad because this area didn't fit too well on the real thing either. The wings came together with a little problem. The top half wing tip completes the bottom of the wing. You will see what I am talking about on the kit if you have one. They do not line up very well and I had to sand the lower side of the wing tip to get the shape right with the bottom of the wing. I lost some rivet detail in this area because of this. I detailed out the landing light areas with the nub off some scrap plastic. Shaped it to a lens and used bare-metal foil on the front. Some superglue sealed the lens to the wing and some passes with a sanding stick smoothed it over.
The elevators are molded in one piece. I think Monogram did a good job on the look of the fabric surfaces. Most companies are heavy handed in replicating this area. I took some spare time in making sure the tail planes were aligned perfectly.
 Then the
fuselage got mated to the wings at this time. This fit was so-so. It took some
shimming and forcing to get it right. Take your time in this area. Now I started
filling and sanding all areas. Make sure to NOT putty over the flap on the
bottom part of the wing where it meets the fuselage. Remember the flap is one
long piece down there. Due to my zeal in sanding, I broke off the tail wheel,
which disappeared into the unknown. I will find it years from now with that one
sock, my car keys and most of the photo-etch I have ever tried to use. I will
replace the tail wheel later with the one from the P-51. I taped off the cockpit
and then used Rub-N-Buff over the entire model. I got it polished out real nice.
It looked brand new. I used some more on the fabric surfaces but did not polish
it out completely giving it a mat finish. The front cowl came next. I used
Alclad Aluminum on the whole cowl to give it a bit of a different shade. I knew
I would be masking on it since the olive drab anti-glare extends to the very
front of the cowl. Rub-N-Buff doesn't like masking very well. I also painted
the air scoop on the left side of the plane and superglued it to the fuselage at
this time. The landing gear covers got a quick shot of Alclad too. Then I set
all the silver pieces off to the side for about a week to let dry.
Then the
fuselage got mated to the wings at this time. This fit was so-so. It took some
shimming and forcing to get it right. Take your time in this area. Now I started
filling and sanding all areas. Make sure to NOT putty over the flap on the
bottom part of the wing where it meets the fuselage. Remember the flap is one
long piece down there. Due to my zeal in sanding, I broke off the tail wheel,
which disappeared into the unknown. I will find it years from now with that one
sock, my car keys and most of the photo-etch I have ever tried to use. I will
replace the tail wheel later with the one from the P-51. I taped off the cockpit
and then used Rub-N-Buff over the entire model. I got it polished out real nice.
It looked brand new. I used some more on the fabric surfaces but did not polish
it out completely giving it a mat finish. The front cowl came next. I used
Alclad Aluminum on the whole cowl to give it a bit of a different shade. I knew
I would be masking on it since the olive drab anti-glare extends to the very
front of the cowl. Rub-N-Buff doesn't like masking very well. I also painted
the air scoop on the left side of the plane and superglued it to the fuselage at
this time. The landing gear covers got a quick shot of Alclad too. Then I set
all the silver pieces off to the side for about a week to let dry.
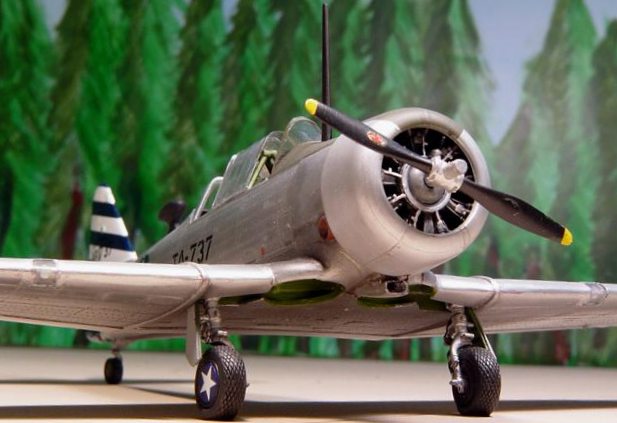
In the mean time I detailed out the engine, which is very good might I add and spruced it up with a wiring harness from the Kingfisher photo-etch detail set that Monogram makes. I cleaned up the landing gear. Added a strip of Bare Metal Foil to the struts and painted the brake lines Testors Rubber. A set of True Detail wheels finish off the landing gear. The prop was no problem at all. All you have to do is knock off the sharp edges and leave the seam running along the center hub. This is to replicate where the two hub pieces that retain the blades meet. I need to look and see if this model had the constant speed prop counterweights installed. It might be something I add later. I superglued the windscreen to the top of the cowl deck and sanded it smooth where the screen meets the deck. I masked off the area and sprayed it with a Badger Precision OD Green. It looks faded to the right tone so I was happy with the shade. The firewall then got painted silver and the exhaust ring got a coat of Model Master Rust Brown. After that dried. The engine was glued on to its engine mount and then onto the fuselage. It is a simple design that works well.
|
PAINT & DECALS |
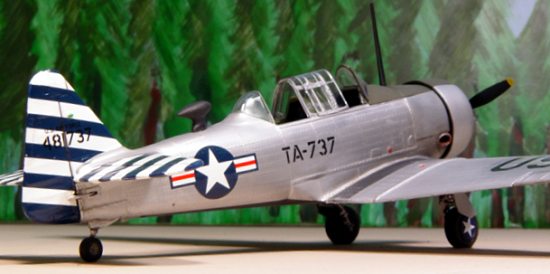
I then had to make my final choice on how I wanted to dress out the T-6. There are so many choices that it boggles the mind. I have already committed myself to silver although I could have easily sprayed it yellow and gone “Harvard” within minutes. (The exhaust pipe is included in the kit but the spade control grip will have to be scrounged. There are a few other little differences that you will have to check your references with) I had picked up a set of Decals Carpena Ref 48.58 T-6 Texan & Mosquito decals at a swap meet earlier this year.
 Now time
to pick which one I wanted to do out of the two choices. A T-6F from the 36th FG
or LT-6G from the 6147 TCG are the two choices. I have wanted to build an F-84
from the 36th FG because I liked the blue and white striped tail. So I picked
this set over the T-6G "Scream N Rebel Mosquito that comes on the same sheet. I
will save that one for another T-6 I want to build at a later date. Besides I
thought the T-6F would look great next to the F-84G in the same markings. I
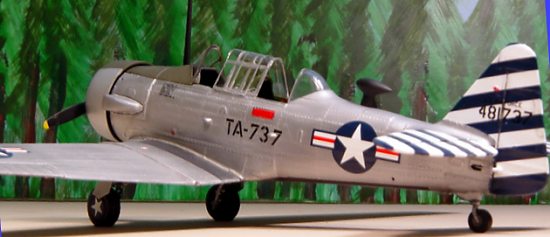
painted the black panel on the lower fuselage that the decal sheet calls for.
Squadron “T-6 Texan In Action” backs up the decal sheets accuracy on this. The
white and blue tail stripes come in precut form to cover the entire tail surface
area. They are vivid and not translucent at all but they are thick and did not
react to Solva-Set very well. Once I put them down I went back with a brand new
#11 blade and cut down the control surfaces. Another coat or three of Solva-Set
got them to lie down finally. They did not meet up very well in front or back
and I had to do lots of touch-ups in the leading and trailing areas.
Now time
to pick which one I wanted to do out of the two choices. A T-6F from the 36th FG
or LT-6G from the 6147 TCG are the two choices. I have wanted to build an F-84
from the 36th FG because I liked the blue and white striped tail. So I picked
this set over the T-6G "Scream N Rebel Mosquito that comes on the same sheet. I
will save that one for another T-6 I want to build at a later date. Besides I
thought the T-6F would look great next to the F-84G in the same markings. I
painted the black panel on the lower fuselage that the decal sheet calls for.
Squadron “T-6 Texan In Action” backs up the decal sheets accuracy on this. The
white and blue tail stripes come in precut form to cover the entire tail surface
area. They are vivid and not translucent at all but they are thick and did not
react to Solva-Set very well. Once I put them down I went back with a brand new
#11 blade and cut down the control surfaces. Another coat or three of Solva-Set
got them to lie down finally. They did not meet up very well in front or back
and I had to do lots of touch-ups in the leading and trailing areas.
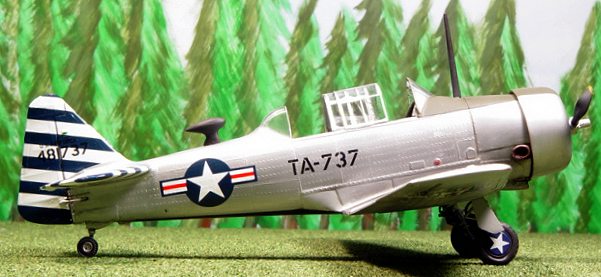
Disappointed now I turned my attention to other decals and put the buzz numbers and the USAF on the wings. They wend down great! I couldn't believe my eyes. Carrier film on silver has always been one of my nightmares. They were perfect. On the left side of the plane the buzz number had to have the last digit cut away to clear the foothold that sticks out the side of the fuselage. Luckily it is the number 7 and tucked up to the foothold real easy. The star and bars went down with no problem so I turned my attention back to those dreaded tail stripes and finished them out. A bit of Future over the tail decals and they cleaned up very well. The tail numbers slid on with no problems and looked great on that big striped tail.
|
FINAL CONSTRUCTION |
I used the tail
wheel out of the P-51D that came with the combo kit. It looks much better than
the stock wheel, which has a real toy-like look to it. The gear went on easily
in the sockets molded to the wings and the plane was sitting on its own. The F
Model had a frame-less rear canopy. I sanded off the frames and polished out the
glass. Then I tried to make the kit canopy sections work but they just don’t
fit. They are too thick so I bought a Squadron Vac-u-form canopy to replace the
segments between the front windscreen and back frame-less canopy. What seemed
like a half a week of masking followed
 getting the greenhouse ready
for paint. Then I spent the rest of the week cutting the canopy out and cleaning
it up. I am still not totally happy with this area of the kit. This is the bane
of this kit in my opinion. There is so much glass and it is the one thing people
notice the most about the T-6. If you do a G model, make sure to check your
references. The canopy is different on those later models. No vertical
framing pieces in the center of the canopies.
getting the greenhouse ready
for paint. Then I spent the rest of the week cutting the canopy out and cleaning
it up. I am still not totally happy with this area of the kit. This is the bane
of this kit in my opinion. There is so much glass and it is the one thing people
notice the most about the T-6. If you do a G model, make sure to check your
references. The canopy is different on those later models. No vertical
framing pieces in the center of the canopies.
Front cowling, prop, forward cowl with the large antenna mast, and DF antenna (which is not totally accurate for this particular airframe but looked really good when installed) finished off the bits and pieces. I stole the DF antenna off a Revell “Memphis Belle” B-17F.
|
CONCLUSIONS |
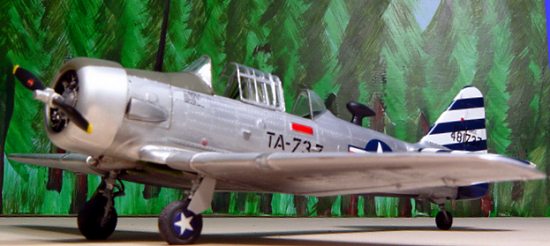
All in all I had fun building this kit from my past again. I thought this was a great kit even at its advanced age. It looks terrific and stands up to other modern kits with a little resin help, basic modeling skills and aftermarket decals. People should take a second look at these little gems again. You might find they hold up well to the Hasegawa/Tamiya products that have taken over the shelves. I recommend this kit to all levels of modeler.
Copyright ModelingMadness.com
If you would like your product reviewed fairly and fairly quickly , please contact the editor or see other details in the Note to Contributors.