
Monogram 1/48 P-47D Thunderbolt
|
KIT # |
6838 |
|
PRICE: |
$5.00 when new back a long time ago |
|
DECALS: |
2 options |
|
REVIEWER: |
|
|
NOTES: |
Aeromaster 48-348 used |
|
HISTORY |
So much has been written about the Jug. Beautiful, ugly, tough and aggressive all rolled into one beast of a fighter. Its eight-.50 cal machine guns would knock the Luftwaffe out of the skies above Germany at a most astounding rate. Once those guns were turned to the ground in free for all strafing raids, the German Army felt the sting of the 7 ton Behemoth.
Most Thunderbolt Squadrons transitioned to the more nimble P-51D Mustang by the end of the war but the 56th Fighter Group hung on to their P-47’s until well after the war. They were the only group in the 8th Air Force to do this. There is a lot of information out there now on the P-47 to fill one’s library to capacity and it is easy to pick up a book or two for reference.
 My built collection has been missing a
few standard stable mates on the shelf. One of the many holes in my
collection is the mighty P-47 Thunderbolt. In my tradition of building
the old Monogram while Tamiya is releasing the latest state of the art
kit, I continued this exercise with the celebrated release of Tamiya’s
new Bubbletop.
My built collection has been missing a
few standard stable mates on the shelf. One of the many holes in my
collection is the mighty P-47 Thunderbolt. In my tradition of building
the old Monogram while Tamiya is releasing the latest state of the art
kit, I continued this exercise with the celebrated release of Tamiya’s
new Bubbletop.
I gathered all the research I needed and pulled one of my old dusty, musty, trusty, Monogram kits from the dungeon. Along with Monogram’s amazingly long lived P-40C, this P-47 kit and its Razorback brother brought the plastic model out of the realm of a toy to that of a detailed replica and furthered the art of model building. Many of us cut our teeth on this wonderful kit as a kid. It was state of the art when it was released and stayed at the top of the pile for years until other manufacturers started producing upgraded and updated moldings of the P-47.
|
THE KIT |
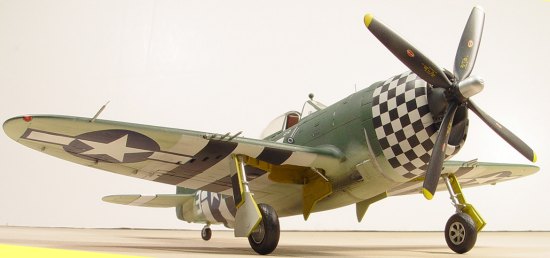
The kit I pulled down from my shelf was “THE TURTLE” from the 509th FS, 405th FG of the 9th AF, kit #6838. (Here's a preview of that kit, though the decals are different, Ed) The kit comes molded in silver plastic and flash free. The quality of the plastic seems much better than some of today’s manufacturers. The decals are exceedingly thick and are not very useable. The cockpit is dated and needs to be replaced. There are so many aftermarket decals available for the Jug that I would just throw the kit decals back into the dungeon for use on some other project. I am going to use AeroMaster’s sheet # 48-348 P-47D-25-RE, Lt. Howard Scholz, from the 82nd FS, 78th FG of the 8th AF.
I have collected many aftermarket cockpits, wheels and decal sheets over the years so I hit on the idea of using the “leftovers” from all the kits the resin parts replaced. So this kit is a Hodge-podge of parts that would have gone into the parts dungeon anyway.
|
CONSTRUCTION |
I started with the cowling. The shape is a bit off from my references. A little sanding on the bottom of the cowl brought it into a little more accurate shape. You also need to clean up the seam around the lip of the cowl. I had bought the fantastic Scale Quest Thunderbolt Enhancement set for my Tamiya Razorback earlier in the year, so this freed up the Tamiya lower cowl intake and cowl flaps for my use with the Monogram kit. They mated up with some sanding and Mr. Surfacer but really improve the look of the cowl. Since I was going to use the Curtis prop with my Tamiya Razorback, I would not need the Hamilton-Standard prop that came extra in the kit. I airbrushed it Model Master Aircraft Interior Black and painted the hub with Alclad Aluminum.
 The cockpit comes next. I had bought a
True Details replacement for my Hasegawa Razorback so that freed up the
cockpit for me. It is a nice cockpit and just needed a little dressing up
to make it a great cockpit. I replaced the throttle quadrant and added
some wiring and other assorted details. A set of True Detail photo-etch
seatbelts put the finishing touches on it. I used Humbrol #88 Bronze
Green as seen on the un-restored P-47D-30-RA 44-32691 cockpit in the
Warner-Robins Museum.
The cockpit comes next. I had bought a
True Details replacement for my Hasegawa Razorback so that freed up the
cockpit for me. It is a nice cockpit and just needed a little dressing up
to make it a great cockpit. I replaced the throttle quadrant and added
some wiring and other assorted details. A set of True Detail photo-etch
seatbelts put the finishing touches on it. I used Humbrol #88 Bronze
Green as seen on the un-restored P-47D-30-RA 44-32691 cockpit in the
Warner-Robins Museum.
Now you can turn your attention to the fuselage halves. The raised panel lines will have to go. I cut out the supercharger doors and the small flaps in-front of the exhaust pipe and replaced them with small plastic vents. I cut off the antenna for replacement later and cut off the gun sight from the left fuselage. I used plastic card to remake the supercharger doors in the almost closed position. The cockpit got fitted into the fuselage and then the two halves got glued together. I cut off the mountings on the belly for the external tank. Everything got sanded smooth and re-scribed using a carbon tip etcher and labeling tape. Rivet detail was added back with a small needle. I also used plastic card to replicate the inspection hatches and sanded them to a lower profile. I drilled out the exhaust manifold and built another with wire and a miniature hole-punch to replicate the butterfly valve that closes to redirect the engine exhaust to the supercharger.
Time to move onto the wings. The plane I
had chosen to model didn’t have the bomb shackles so I cut them off and
filled the holes with plastic strips. Be careful not to bend the wings
because they become real weak having this area cut out. Some putty and
Mr. Surfacer cleaned them up nicely. Then I drilled out the landing light
and used some clear plastic rod to replicate it. I couldn’t stand that
infamous seam in the wheel well so I cut it all out and used strip and
sheet plastic to rebuild
 the wheel well tubs. It was tricky making it fit
into the fuselage from the wings. The machine guns are molded wrong on
the wings. They should be level with the ground and not along the wing
leading edge. So they got cut off and sanded down. I re-drilled the holes
and used some micro tube to replace the barrels after painting. Take your
time doing this and use your reference material.
the wheel well tubs. It was tricky making it fit
into the fuselage from the wings. The machine guns are molded wrong on
the wings. They should be level with the ground and not along the wing
leading edge. So they got cut off and sanded down. I re-drilled the holes
and used some micro tube to replace the barrels after painting. Take your
time doing this and use your reference material.
The elevators got glued on and then the wings. I spent a lot of time getting the dihedral right and aligning the tail. This pays off later when trying to capture that Thunderbolt squat look. I sanded the wings smooth and re-scribed them using my method mentioned above for the fuselage. Most of the lines are long and straight and should be no problem for anyone learning the technique. One small anomaly about the Monogram P-47 is that there is a trim tab scribed onto the top of the right wing but not on the bottom. There is not supposed to be a trim tab on the right aileron at all. It took just a bit of putty to clean this up.
Now I needed to finish up the cowl and engine. I took the engine out of my Academy P-47D “Big Ass Bird” that is going to get a Engines and Things replacement. It got dressed up with some copper wire and painted Alclad Aluminum. I added some other plumbing and some aftermarket metal magnetos and carburetor from an old Hi-Tech set I had. It fit into the cowling real nice. I had to sand a bit off the nose of the gearbox but other than that it was a good match. I also sanded a bit off the back of the engine so it would fit onto the fire wall of the fuselage better.
|
CAMOUFLAGE & MARKINGS |
After masking off the cockpit area, I
gave the plane a coat of white to make sure I got all the scribing and
sanding done. Mask off the invasion stripes. I used Tamiya masking tape
to tape up the stripes then I painted the top of the plane Model Master
Dark Green 34092 Enamel and Acryl Sky Type “S” for the bottom. Then all
that got taped up in preparation for
 painting the wheel wells Yellow Zinc
Chromate. The plane was starting to look like a mummy with all that tape
on it. I decided to use the stock landing gear legs and airbrushed them Floquil Old Silver. The struts got a coat of Chrome and some wire to
replicate the hydraulic brake lines. The landing gear cleaned up nicely
but the wheels could use some improvement so I used the 6 spoke wheels
out of my Academy kit. You have to drill out the axle diameter a bit to
make them fit onto the Monogram gear legs. The landing gear struts fit
well into the landing gear sockets and do a good job of aligning the gear
without much fiddling. I used small bits of wire for the linkage that
holds the landing gear covers to the legs. The tail wheel is not too bad.
I cleaned it up and shot it with old silver. It goes into a small
butterfly looking panel that represents the tail wheel covers. It is a
nice little bit of engineering here. The plane is now sitting on its own,
sans the nose.
painting the wheel wells Yellow Zinc
Chromate. The plane was starting to look like a mummy with all that tape
on it. I decided to use the stock landing gear legs and airbrushed them Floquil Old Silver. The struts got a coat of Chrome and some wire to
replicate the hydraulic brake lines. The landing gear cleaned up nicely
but the wheels could use some improvement so I used the 6 spoke wheels
out of my Academy kit. You have to drill out the axle diameter a bit to
make them fit onto the Monogram gear legs. The landing gear struts fit
well into the landing gear sockets and do a good job of aligning the gear
without much fiddling. I used small bits of wire for the linkage that
holds the landing gear covers to the legs. The tail wheel is not too bad.
I cleaned it up and shot it with old silver. It goes into a small
butterfly looking panel that represents the tail wheel covers. It is a
nice little bit of engineering here. The plane is now sitting on its own,
sans the nose.
Once you paint the cowl white you can start to decal it with the black checkerboard. The checkerboard pattern is very difficult to get right with all the different curves. Take your time with it and keep it damp so you don’t tear the decals compounding your alignment problems. The rest of the decals went down with no problem at all and works well with Solva-Set. With a final coat of clear flat and some weathering with pastels and the painting is done.
|
FINAL CONSTRUCTION |
 The canopy is a bit on the
thick side and can be replaced with a squadron vac-u-form set. Since two
come in a pack you can use the other for a future project. I finished off
the kit by gluing the vertical antenna and wire antenna on and used a set
of True Details Crosshair Gun Sights #48-705 to the kit gun sight. I cut
off the round solid plastic disk and added a small clear plastic disk to
really dress up the electronic gun site. A small piece of wire on the
front cowl is all that is needed to complete the ring and bead gun sight.
The canopy is a bit on the
thick side and can be replaced with a squadron vac-u-form set. Since two
come in a pack you can use the other for a future project. I finished off
the kit by gluing the vertical antenna and wire antenna on and used a set
of True Details Crosshair Gun Sights #48-705 to the kit gun sight. I cut
off the round solid plastic disk and added a small clear plastic disk to
really dress up the electronic gun site. A small piece of wire on the
front cowl is all that is needed to complete the ring and bead gun sight.
|
CONCLUSIONS |
With just a bit more work
and some spare parts you can have a great looking model for next to
nothing. You can use your imagination and try different techniques and
mess it up without the large investment in a Tamiya or Hasegawa kit. I
recommend the Monogram kit to all skill of builders. You can take it to
what ever level you want. A pre-painted version of this kit is out there
for those of you who don’t want to mess with all the buildup and want a
tabletop model for the desk. Or as we call them “A three footer” Don’t
get any closer than 3 feet and it looks great!

Aftermarket stuff:
True Details Crosshair Gun Sights #48-705
AeroMaster’s sheet # 48-348
Hi-Tech Pratt & Whitney R2800 Engine
Donor Kits:
Academy Kit # 2211 “Big Ass Bird” P-47D Nose Art
Tamiya Kit #86 P-47D Thunderbolt “Razorback”
Hasegawa Kit #9404 P-47D Razorback “In The Mood”
|
REFERENCES |
Republic’s P-47 Thunderbolt-From Seversky to Victory by Warren M. Bodie
Osprey Aviation Elite 2-56th Fighter Group by Roger A Freeman
Classic Colours American Eagles, P-47 Thunderbolt Units of the 8th AF
Squadron/Signal Walk Around #11 P-47 Thunderbolt
Detail & Scale P-47 Thunderbolt Vol 54 by Bert Kinzey
Squadron/Signal P-47 In Action #67 by Larry Davis
Squadron/Signal Thunderbolt in the European Theater by Ernest R McDowell
Doubleday Press P-47 Thunderbolt At War by William N. Hess
Arco-Aircam Aviation Series #2 Republic P-47 Thunderbolt
If you would like your product reviewed fairly and quickly, please contact me or see other details in the Note to Contributors.