|
KIT: |
Monogram 1/48 P-51B Mustang |
|
KIT # |
5214 |
|
PRICE: |
$6.00 in 1989 |
|
DECALS: |
One aircraft |
|
REVIEWER: |
|
|
NOTES: |
Re-issue |
|
HISTORY |
For an overview of the Mustang’s development and operational history, GO HERE
|
THE KIT |
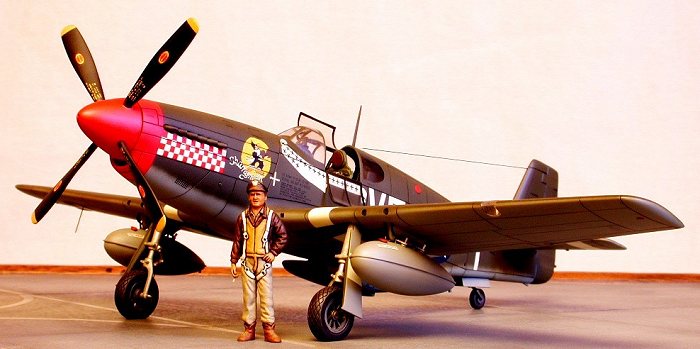
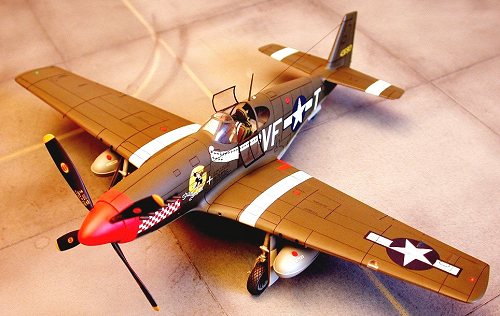
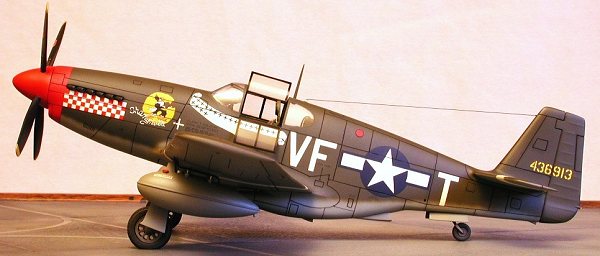
Monogram’s P-51B kit contains thirty parts molded in olive drab with four clear pieces, including an optional Malcom hood which requires some modification to use. A relatively small instruction sheet directs the assembly sequence and offers generic color call-outs for painting and detailing the model. With typical Monogram quality, the decal sheet offers markings for 43-12214, a P-51B assigned to the 4th FG, 8th AF, with nose art and named the “Rebel Queen”.
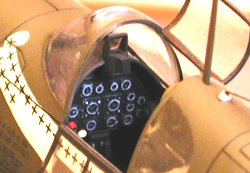
 Reflecting the 1960’s vintage, the
cockpit is very rudimentary with only a seated pilot figure, seat, control
stick, floorboard, and instrument panel decal provided. Molded sidewall items
offer only a meager depiction of the equipment found in a Mustang cockpit while
the fuselage fuel cell and radio gear are for the most part ignored.
Reflecting the 1960’s vintage, the
cockpit is very rudimentary with only a seated pilot figure, seat, control
stick, floorboard, and instrument panel decal provided. Molded sidewall items
offer only a meager depiction of the equipment found in a Mustang cockpit while
the fuselage fuel cell and radio gear are for the most part ignored.
The undercarriage is one of this geriatric kit’s bright spots, being properly engineered with diamond tread tires, separate outer hubs, and detailed wells. The separate gear doors feature inner casting detail and fit the wells adequately if a gear-up model is desired. The single-piece tailwheel unit is properly presented though no well is provided and the doors are molded integral with the fuselage halves.
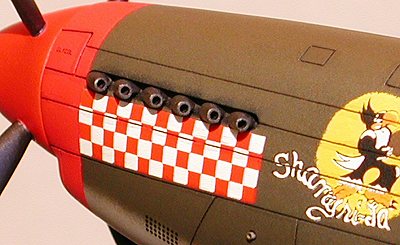
Surface detail is of the raised variety and is generally correct, though somewhat over-stated. The exhaust manifolds are the shrouded style and are molded integral with the fuselage. Ailerons and elevators are smooth to indicate metal construction while the rudder correctly exhibits the doped fabric surface common to all P-51s. A pair of 75-gallon drop tanks are furnished as the kit’s only exterior stores.
|
CONSTRUCTION |
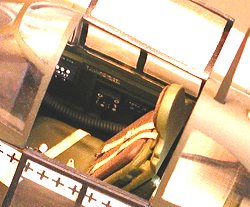 Predictably,
I started with the cockpit after removing the vague sidewall detail molded to
the fuselage halves. Parts from Monogram’s later P-51D kit were used to detail
the interior, along with scratch-built accouterments from the usual materials.
As this particular aircraft was sans the shrouded exhausts, I removed them and
installed the optional un-shrouded pair that Monogram included with its P-51D
model. The fuselage was then assembled as I sized up the windscreen problems
and began to formulate a solution.
Predictably,
I started with the cockpit after removing the vague sidewall detail molded to
the fuselage halves. Parts from Monogram’s later P-51D kit were used to detail
the interior, along with scratch-built accouterments from the usual materials.
As this particular aircraft was sans the shrouded exhausts, I removed them and
installed the optional un-shrouded pair that Monogram included with its P-51D
model. The fuselage was then assembled as I sized up the windscreen problems
and began to formulate a solution.
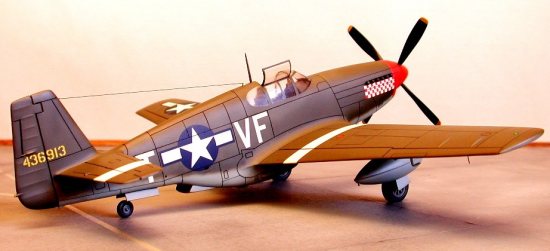
After foraging through my spares box I found a rear canopy piece from Monogram’s P-38. The width, height and overall angle looked close and the wall thickness would permit a modest amount of re-contouring. I cut the kit’s instrument panel coaming away and pre-fit the new windscreen to the fuselage. After many adjustments an acceptable fit was achieved so I re-built the coaming area with sheet stock and attached the glass with gap-filling Hot Stuff. After the glue had set up, some work with file, sandpaper, and polishing compound finished the job.
 The tabs for the horizontal stabilizers are too
small for the slots they mate to so I drilled a hole in each stabilizer and used
a piece of brass wire as a spar, both to maintain the correct zero-angle
dihedral and to snug up the fit. The carburetor scoop on the cowling front was
drilled out to provide some depth, then that part was glued to the front of the
fuselage and sanded flush to the nose. After assembling the prop, I removed the
cuffs as they seemed misshaped. A brass tubing shaft was glued to the spinner
while a brass bearing was added to the nose to permit rotation.
The tabs for the horizontal stabilizers are too
small for the slots they mate to so I drilled a hole in each stabilizer and used
a piece of brass wire as a spar, both to maintain the correct zero-angle
dihedral and to snug up the fit. The carburetor scoop on the cowling front was
drilled out to provide some depth, then that part was glued to the front of the
fuselage and sanded flush to the nose. After assembling the prop, I removed the
cuffs as they seemed misshaped. A brass tubing shaft was glued to the spinner
while a brass bearing was added to the nose to permit rotation.
The wing was assembled conventionally, though I
rebuilt the guns with aluminum tubing mounts and used #20 hypodermic needles for
the gun barrels. An MV lens was installed in the port wing as a landing light,
under a vacuformed cover, while colored MV lenses were used at the wingtips as
position lights and under the starboard wing as combat ID lights. I installed a
new pitot tube, also constructed of a hypodermic needle and bent into a ninety
degree shape. The marker beacon dipole antenna was replicated with a small
length of .010” guitar string.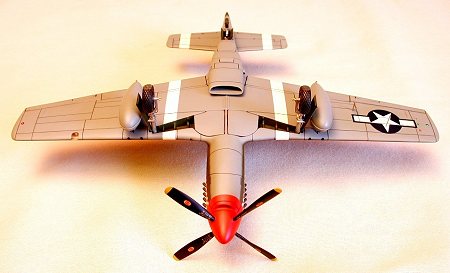
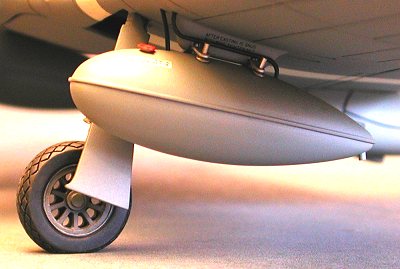
Moving to the undercarriage, I thinned out the outer wheel hubs from the rear until the spokes showed light between them, then removed the reminder of the solid areas with a knife. On the brake side of the wheel, I drilled out the holes then installed the outer hubs, carefully lining the spokes to the holes on the brake side. Using the molded tread pattern as a guide, I re-cut the tire tread to create more definition since much had been lost during the seam removal. Holes were then drilled into the rear of the hub near the axle hole so I could add some brake lines.
I removed the compression tubes from the landing gear struts then drilled through the torque links to likewise remove the oleo sections. These areas were re-built using aluminum tubing and in the case of the oleos, polished to simulate chrome steel. Brass eye-bolts installed at the bottom of the forks replicated the tie-down rings, while small diameter computer wire was used as hydraulic brake lines. A well was constructed for the tail wheel and installed after removing the molded-on doors and building a new set from sheet stock.
Mating the fuselage to the wing resulted in the
predictable problems inherent with most Mustang models. Gaps at both wing roots
were shimmed with sheet stock and glued solidly with CA.
 After sanding all seams
I attached the quarter windows to the cockpit then carefully fitted the right
side window and glued it as well. The remaining raised surface detail was
sanded away so I could do a total rescribe of the entire model. The intercooler
needed a bit of attention so I drilled out the front and rear portions to give
the area some depth and detail.
After sanding all seams
I attached the quarter windows to the cockpit then carefully fitted the right
side window and glued it as well. The remaining raised surface detail was
sanded away so I could do a total rescribe of the entire model. The intercooler
needed a bit of attention so I drilled out the front and rear portions to give
the area some depth and detail.
After assembling the drop tanks I installed some brass pins to mount them to the pylons with, then fitted scratch-built sway braces, plumbing, and photo-etched fuel caps to enhance the effect. Monofilament line was used as an HF antenna, rigged from the fin tip to an insulated antenna lead-in on the fuselage while a piece of re-shaped clear sprue sufficed as a rear position light on the rudder. I vacuformed new clear pieces for the top and side canopies then set them aside for later installation. Finally, I installed the gear struts, wheels and doors to support the model during the painting phase.
|
CAMOUFLAGE & MARKINGS |
Home-brewed colors mixed from the Modelmaster line of enamels were used exclusively while the model was decaled using the MicroScale finishing system and SuperScale decals. I used Liquitex tempera paint as a wash to highlight the surface detail, gun mounts, and the various recessed areas of the radiator, then sealed the surface with Testor’s Dullcote lacquer. Thinned white glue was used to attach the vacuformed canopy sections, the landing light cover, and the wingtip position lights. Spinning the propeller onto the front of the cowling completed the project.
|
CONCLUSIONS |
 Though surpassed by newer
state-of-the-art kits from Asia, novice builders will find this model a simpler
and cheaper alternative to the wunderkits, while veterans may enjoy the
intrigue of actually building a model! Even if constructed straight out
of the box, the end result will be a pleasing representation of the P-51B
despite the shape problems with the windscreen. With the myriad of excellent
aftermarket decals now available, one can easily construct an entire flight of
Mustangs for the equivalent price of one Tamiya or Accurate Miniatures kit.
Though surpassed by newer
state-of-the-art kits from Asia, novice builders will find this model a simpler
and cheaper alternative to the wunderkits, while veterans may enjoy the
intrigue of actually building a model! Even if constructed straight out
of the box, the end result will be a pleasing representation of the P-51B
despite the shape problems with the windscreen. With the myriad of excellent
aftermarket decals now available, one can easily construct an entire flight of
Mustangs for the equivalent price of one Tamiya or Accurate Miniatures kit.
This kit was released about the same time that Lyndon Johnson told the country-at-large that he would “not seek nor will I accept my party’s nomination” for a second presidential term as his administration foundered amid the nebulous prosecution of the Vietnam War. The model followed on the heels of Monogram’s landmark P-47D kit and abandoned the toy-like juvenile operating features common to the company’s previous quarter-scale releases in favor of detail and fidelity of scale. This, despite Monogram’s ownership by the parent company at the time, the Mattel Toy Corporation.
Gone were the gimmicky retractable landing gear, movable control surfaces, and generic color schemes of the past. In its stead, Monogram’s design engineers, mold cutters, and graphic artists gave us solid, accurately-scaled replicas, with credible detail in the critical areas. As with the earlier milestone Thunderbolt model, the original-issue decals featured another historically significant aircraft, specifically Medal of Honor winner Jim Howard’s famous “Ding Hao”. It was from this ship that the 8th Air Force’s most outrageous radio transmission was made.
|
REFERENCES |
P-51 Mustang In Action - Larry Davis; Squadron-Signal Publications
Aces Of The Eighth – Gene B. Stafford & William N. Hess; Squadron-Signal Publications
Fighting Colors: P-51 Mustang In Color – Larry Davis; Squadron-Signal Publications
P-51 Mustang Aces – Thomas G. Ivie & William N. Hess; Motorbooks International
Classic Aircraft: Fighters – Bill Gunston; Motorbooks International
AAF: The Official WWII Guide To The Army Air Forces – Reprint by Bonanza Books
Fighters Of The Mighty Eighth – William N. Hess & Thomas G. Ivie; Motorbooks International
Fighter Command: American Fighters In Original WWII Color – Jeffrey L. Ethell & Robert T. Sand; Motorbooks International
January 2003 by Roger M. Jackson
If you would like your product reviewed fairly and quickly by a site that has well over 175,000 visitors a month, please contact me or see other details in the Note to Contributors.
Back to the Reviews Index Page