|
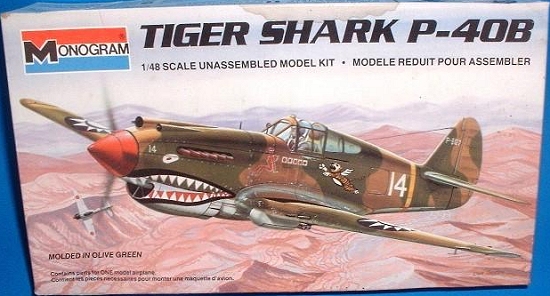
KIT: |
Monogram 1/48 P-40B/C |
|
KIT # |
5209 |
|
PRICE: |
$6.00 in 1995 |
|
DECALS: |
Three aircraft |
|
REVIEWER: |
|
|
NOTES: |
Aeromaster SP-07 decals used. |
|
HISTORY |
The Curtiss P-40B was an evolutionary development of the company’s earlier radial-engined Hawk 75A which had been procured in limited numbers for the United States Army Air Corps and given the designation P-36. Curtiss engineer Don Berlin, designer of the original P-36, posited that a new pursuit ship powered by Allison’s V-1710 liquid-cooled in-line would offer a substantial performance increase over the production P-36.
A new fuselage was designed to mate with a standard Hawk 75 wing and empennage, featuring a tightly-cowled Allison V-12. A turbo-supercharger was mounted behind the engine, necessitating a relocation of the cockpit aft of the wing. The radical looking design was given the designation Hawk 75I and Air Corps interest was sufficient enough that fourteen aircraft were ordered as the P-37, one experimental model and thirteen prototypes.
Though acceleration, top speed, and high altitude capability were enhanced, the P-37 was plagued by poor low-speed handling qualities, pilot visibility problems, and developmental difficulties with the turbo-supercharger. Valuable data was gleaned with the program and many unproven theories had been validated but ultimately no production orders were placed and the program was tabled.
 Concurrently, the fires of nationalistic
expansion began to burn earnestly in both Europe and Asia. Though President
Roosevelt officially preached a policy of neutrality to Congress and the
American electorate, both he and the senior leadership of the armed services and
the War Department were convinced that only time separated the United States
from eventual involvement.
Concurrently, the fires of nationalistic
expansion began to burn earnestly in both Europe and Asia. Though President
Roosevelt officially preached a policy of neutrality to Congress and the
American electorate, both he and the senior leadership of the armed services and
the War Department were convinced that only time separated the United States
from eventual involvement.
Though the country was still saddled with the final vestiges of the Great Depression, word went out quietly to defense contractors and the heavy industries to prepare for war. Wright Field was especially encouraging of and accommodating to the nation’s aircraft manufacturers and it wasn’t long before Curtiss submitted a new Don Berlin-inspired proposal.
Using lessons learned from the aborted P-37 project, this new design would mate the Allison V-1710 to a P-36 airframe in a more conventional layout. The Prestone cooler was mounted under the fuselage behind the cockpit and the armament array was identical with the then-extant P-36C—a pair of cowl-mounted .50 caliber guns and a .30 caliber weapon in each wing.
The Army ordered the aircraft as the XP-40 and after an extensive flight test program directed several modifications, the most visible of which was relocating the radiator to the familiar chin position below the engine. After a competitive fly-off against rivals from Bell, Lockheed, Republic, and Curtiss’ own P-36, the USAAC awarded the company a production contract for 524 P-40s.
 While the Curtiss plant in Buffalo, New York
geared up to begin production, company engineers and Army personnel at Wright
Field fine-tuned the P-40 to ease construction problems and wring more speed out
of the aircraft. Gone were the awkwardly complex gear doors carried over from
the P-36 while a separate carburetor scoop was added between the nose gun
fairings. By the time full production began in March of 1940 enough
modifications to the original design resulted in a new company designation, the
H-81.
While the Curtiss plant in Buffalo, New York
geared up to begin production, company engineers and Army personnel at Wright
Field fine-tuned the P-40 to ease construction problems and wring more speed out
of the aircraft. Gone were the awkwardly complex gear doors carried over from
the P-36 while a separate carburetor scoop was added between the nose gun
fairings. By the time full production began in March of 1940 enough
modifications to the original design resulted in a new company designation, the
H-81.
Following the Curtiss corporate tradition, the Army named the new pursuit ship Tomahawk and midway though the initial AAC order engineers in Buffalo added a second .30 caliber weapon in each wing, using design data from the XP-36D prototype. Provisions for bomb racks under the wings would allow the P-40 to carry several small fragmentation bombs, increasing the air-to-ground capability. The Army eagerly embraced the increased firepower and added payload potential, re-designating the up-gunned variant as the P-40B (the “A” subtype identifier was apparently never used).
With the war in Europe in full swing following Germany’s invasion of Poland the previous year, Great Britain and France sent purchasing agents to the United States in a frantic search for an additional source of modern combat aircraft. Both nations selected the P-40 as a reconnaissance and close air support platform. Due to the desperate situation on the Continent the USAAC diverted much of its initial purchase to enable Curtiss to fulfill the French and British orders, though France’s capitulation in June of 1940 rendered their order moot and these aircraft were instead delivered to the RAF.
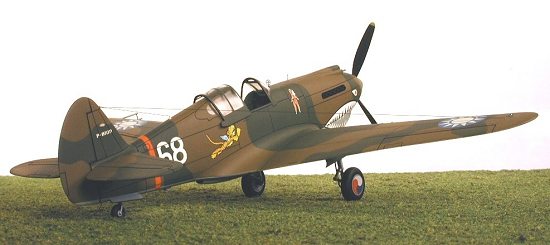
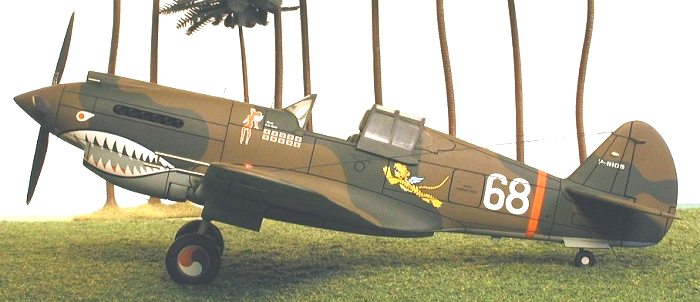
 One hundred P-40Bs destined for the British took
a detour in 1941 in order to equip a mercenary force of American aviators who
would embark upon a clandestine operation in Asia at the behest of the United
States Government. This menagerie of former military flyers became known as the
American Volunteer Group, and would fly and fight their way into history
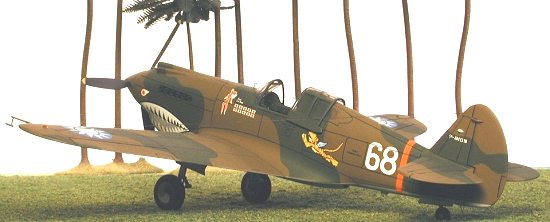
as the legendary “Flying Tigers”.
One hundred P-40Bs destined for the British took
a detour in 1941 in order to equip a mercenary force of American aviators who
would embark upon a clandestine operation in Asia at the behest of the United
States Government. This menagerie of former military flyers became known as the
American Volunteer Group, and would fly and fight their way into history
as the legendary “Flying Tigers”.
Combat experience with the Tomahawk dictated some necessary changes to keep the airframe viable as technology and tactics continued to evolve during the war’s progression. Many of the modifications were internal, consisting of upgraded radio equipment and better oxygen systems. The most visible of these amendments were adding provisions for a jettisonable fuel tank to be carried under the fuselage. This variant of the Tomahawk was designated the P-40C. Both the ‘B’ and ‘C’ versions saw only limited combat use with the United States Army in the early days of WWII following America’s entry after Pearl Harbor, as the more powerful and more heavily-armed P-40D and P-40E Warhawk were already entering service. By late 1943 the Tomahawks had been designated as “limited standard” and were relegated to stateside training units.
|
THE KIT |
Monogram’s P-40B kit consists of fifty-four parts molded in dark olive styrene, five clear pieces, and complete decals for three different aircraft. A small instruction sheet is included offering a recommended assembly sequence, color call-outs for the detail painting (overall camouflage information has been curiously deleted), and a brief history of the aircraft.
Surface detail consists of raised rivets, panel lines, and rib detail for the doped fabric control surfaces. The kit is engineered conventionally with right/left fuselage halves and a three-piece wing, minimizing dihedral problems. The interior is comprised of a seat, floorboard, control stick, flap handle, instrument panel, and some sidewall pieces. A seated pilot figure is optional though a large slot in the seat must be filled if the figure is not used.
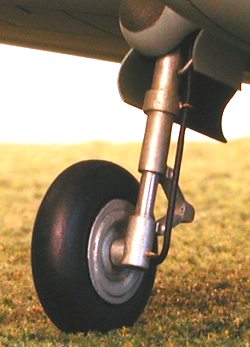
 The landing gear
though simplified is adequate considering the kit’s age and includes separate
struts, doors, and a pair of four-piece main wheels. One-piece doors are
furnished for modelers opting for a ‘gear-up’ presentation, though directions
for using these parts are not included. Other options available are an open or
closed canopy, movable flaps, and a drop tank (P-40C only).
The landing gear
though simplified is adequate considering the kit’s age and includes separate
struts, doors, and a pair of four-piece main wheels. One-piece doors are
furnished for modelers opting for a ‘gear-up’ presentation, though directions
for using these parts are not included. Other options available are an open or
closed canopy, movable flaps, and a drop tank (P-40C only).
Two complete canopies are included, a single-piece unit and a sectioned set with separate windscreen and quarter windows. Both choices, while clear enough, provide a poor fit and beg for replacement. Individual cowl gun fairings likewise fit poorly and the ring and bead gunsight parts are overly thick for the scale.
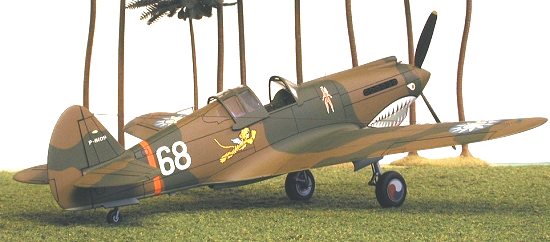
The included decals feature US Army, Royal Air Force, and Flying Tiger schemes, though the carrier film is thick, heavily glossed, and permeated with the kindergarten paste adhesive typical of Monogram decals. Replacement is recommended though a plethora of aftermarket sheets make this an easy task.
|
CONSTRUCTION |
Initially, this model was hastily built in
sub-assembly fashion so I could use it as a visual training aid while conducting
a scribing demonstration for our local club. As such, the exterior parts
were roughed in and the interior, gear wells, and other details were
deliberately ignored as they were unnecessary to my presentation. After my
dog-and-pony show the model was boxed up and forgotten, later to be
re-discovered as I conducted an inventory of my ‘hangar queens’.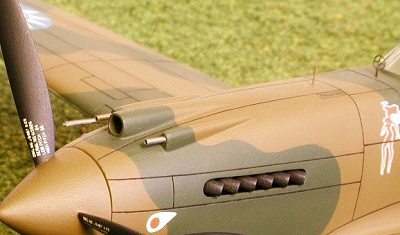
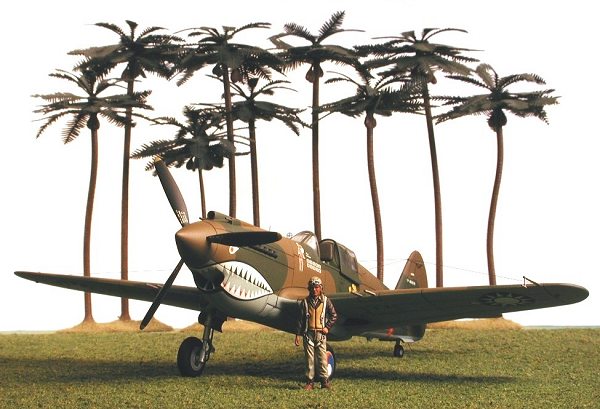
I decided to complete the build, both to put a new model into my display case and to make room in the closet for new purchases (cain’t never have too many kits!). The first order of ‘bidness’ was to adroitly tweeze the exhaust manifolds into position from the bottom of the fuselage and glue them with Testor’s liquid cement. I drilled out the front of the radiator/oil cooler then sized and cut a piece of Evergreen sheet to fit into the lower cowling and act as a baffle to prevent see-through. The propeller was assembled and re-engineered with a 3/32” aluminum tubing shaft to allow for installation after painting and decaling. An aluminum tubing bearing was inserted at the front of the cowl to allow for free rotation.
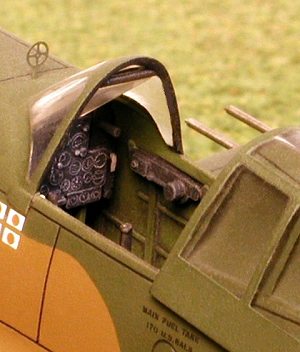 The cockpit was
next, and after detailing the kit parts with items from the True Details
photo-etched interior set I installed the assembly from the bottom and glued it
into position. The instrument panel was detailed with various knobs and levers
and I added the visible portions of the nose machinegun breeches. After filling
the slot in the seat for the unused figure I glued a set of True Details
photo-etched belts to it. A rectangle of clear acetate was used to replicate
the armored glass and once affixed, I attached the windscreen and turned my
attention to the wings.
The cockpit was
next, and after detailing the kit parts with items from the True Details
photo-etched interior set I installed the assembly from the bottom and glued it
into position. The instrument panel was detailed with various knobs and levers
and I added the visible portions of the nose machinegun breeches. After filling
the slot in the seat for the unused figure I glued a set of True Details
photo-etched belts to it. A rectangle of clear acetate was used to replicate
the armored glass and once affixed, I attached the windscreen and turned my
attention to the wings.
There are no gear wells to speak of in the kit so I used some Monogram F-4 tailpipe parts to create recesses for the tires. The plastic machineguns and pitot tube were discarded in favor of new items fabricated from various sizes of hypodermic needles. Colored sprue bits were fashioned into teardrop blisters to serve as position lights (white for the vertical fin) then I drilled holes in the wingtips where I would later anchor the HF antenna wires.
Back at the fuselage I drilled holes on the fin and spine for the remaining antenna wire elements then installed a rudder bellcrank on the port side of the fin. Holes were drilled into the top of the cowling were the ring-and-bead gun sight would go, then I tackled the antenna array.
 Three pieces of
monofilament line were glued into a short piece of #25 hypo needle then this was
set aside for later installation. Next I mated the wing to the fuselage and
spent several enjoyable hours filling and sanding the wing root seams. Typical
of kits engineered in this manner the fit here is poor, compounded by a slightly
warped lower wing.
Three pieces of
monofilament line were glued into a short piece of #25 hypo needle then this was
set aside for later installation. Next I mated the wing to the fuselage and
spent several enjoyable hours filling and sanding the wing root seams. Typical
of kits engineered in this manner the fit here is poor, compounded by a slightly
warped lower wing.
Once the fillets were smooth I rescribed some panel lines obscured by sanding then scratch-built new landing gear struts from aluminum tubing and steel wire. The strut doors were too small for the knuckle fairings so I replaced them as well, using large-diameter aluminum tubing sectioned into curved rectangles.
The kit wheels were assembled and fitted to the new struts then I installed the
antenna aerials. After inserting the hypo needle into the hole in the fin
I glued it with a tiny drop of CA. Once it was dry I threaded one of the
leads into the hole on the f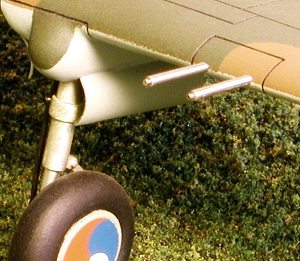 uselage
spine, then pulled it taut through the opening for the tail wheel. After
gluing it to the interior of the fuselage the remaining wires were inserted
through the wingtip holes, pulled taut, and glued securely from the bottom.
When the CA had set up the excess was cut off and the areas sanded smooth.
uselage
spine, then pulled it taut through the opening for the tail wheel. After
gluing it to the interior of the fuselage the remaining wires were inserted
through the wingtip holes, pulled taut, and glued securely from the bottom.
When the CA had set up the excess was cut off and the areas sanded smooth.
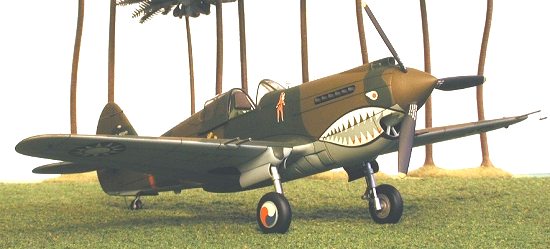
The tail wheel was added at this point then it was back to the canopy for some rebuilding. Rails were fabricated from Evergreen rod and sheet then glued to the fuselage sides, while rail guides were added to the inside of the canopy. The quarter windows were a pathetic fit (always have been) and were supplanted by .005” clear acetate. After replacing the .50 caliber nose guns with #20 hypo needles and installing a Waldron photo-etched gun sight it was off to the paint shop.
|
PAINT & DECALS |
Just as debate continues to rage over the colors of Colonel Gabreski’s final P-47 mount, what Future is called in Botswana, and if the bear really is Catholic, there is a myriad of opinions regarding the true colors used on AVG P-40s (and by extension, all US-manufactured Lend-Lease aircraft). Conventional wisdom holds that these British-spec P-40s were painted with “US-equivalent” Dark Green/Dark Earth uppers and Azure Blue/Duck Egg Blue/Sky Type “S” (take your pick) lowers.
 All of these
assumptions regarding the ventral colors are wrong.
All of these
assumptions regarding the ventral colors are wrong.
After consulting the instruction manual included with Aeromaster’s commemorative decal set SP48-07—American Volunteer Group: The First American Aces, which contains several color photographs, I revisited all of my references to confirm Aeromaster’s assertion that the underside color was 26473 Aircraft Gray. Color photos in an old copy of “Air Enthusiast Quarterly” seem to support this conclusion.
As well, I had recently watched “Captains Of The Clouds” with James Cagney. This outstanding melodrama was filmed during wartime in Technicolor, and during the flight line scenes showing real bound-for-Britain Lockheed Hudsons it is patently obvious that the US-equivalent underside color used on these aircraft is semi-gloss ADC Interceptor Gray.
Armed with this confirmation, the underside of the model was sprayed with ADC Gray, mixed years ago using Pactra enamels. When it was dry the gray areas were masked off and the entire top side was painted with Modelmaster Field Drab (FS 30118). The US-equivalent “Dark Green” became problematic at this point.
Most sources cite
FS 34092 Euro I Green as the correct shade (which in fact it may well be).
However, to my eye, this color seems a little too “bright” and too “green”. I
sprayed some 34092 on a scrap wing—I have loads of ‘em—that I had previously
shot with Field Drab. I didn’t care for the color or the contrast at all. Then
I did some experimenting with FS 34079 Dark Green and decided that I liked that
a whole lot better. (note: this problem may be due to the fact that
the Euro I Green was applied over a base coat of Field Drab—I would urge further
testing.)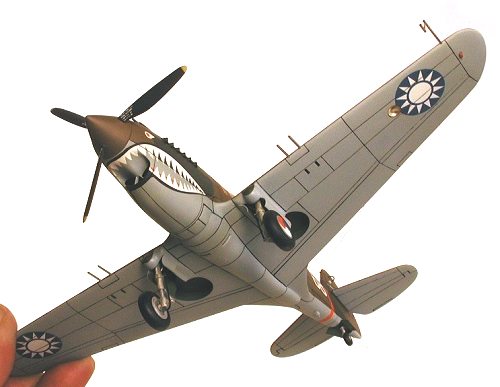
Shapes were cut from masking tape and lightly stuck to the dorsal surfaces then I painted the mottling using Modelmaster FS 34079 Dark Green. For what it’s worth this green was a near dead-on match with color photos in the “Air Enthusiast” article I consulted for reference. Once the masking was removed I shot three heavy coats of Testor’s gloss lacquer overall to prep the model for decals.
Decaling proved almost anticlimactic after the tedium of masking each individual camo color. The Aeromaster decals laid down well, requiring only a single application of diluted Solvaset. Thankfully, the AVG P-40s were devoid of most of the service stenciling prevalent among their USAAC counterparts, save for a Prestone logo applied to the coolant expansion tank cover, some NO STEP warnings on the wings, and the usual fuel tank and battery location data.
When the decals were dry I sprayed the model overall with Testor’s Dullcote. A few days later I highlighted the panel lines with a Liquitex watercolor wash and sealed the effects, again with Testor’s Dullcote. After painting the antenna aerials with flat black enamel the remaining pieces were attached.
The acetate quarter panel windows were affixed using a thin bead of Elmer’s white glue. After it had set up I waterproofed the adhesive by carefully hand-painting over the glue with Dullcote. Next, strips of black decal were airbrushed with the appropriate exterior color to serve as framework for the panes. These were applied using as little water as possible. After setting them firmly with Solvaset I hand-brushed Dullcote over the decal frames to ensure a uniform sheen with the rest of the model.
A single drop of white glue was daubed into each of the wing and cowling holes, then the machineguns and pitot tube were inserted. Likewise, Elmer’s glue was used to attach the canopy to the rails. Spinning the prop into its bearing mount on the cowling completed the model.
|
CONCLUSIONS |
Monogram’s P-40B has been near-continuously cataloged for almost forty years, soldiering on since the Beatles first appeared on the Ed Sullivan show in 1964. Current issues suffer from modest amounts of flash, warpage, and other molding errata but despite this, the kit remains the only true scale model of a Tomahawk in the 1:48th venue.
 True, Hobbycraft
released their own P-40B a few years back, with recessed surface detail and
presumably a more comprehensive interior. However, the honeymoon ends when the
ridiculous shape of the lower fuselage and wing roots is factored in--lines that
horribly botched hardly qualify the kit as a representational prototype.
Superior cockpit parts and engraved exterior detail alone can scarcely be
considered when the lion’s share of the pooch herself has been so severely
ravished.
True, Hobbycraft
released their own P-40B a few years back, with recessed surface detail and
presumably a more comprehensive interior. However, the honeymoon ends when the
ridiculous shape of the lower fuselage and wing roots is factored in--lines that
horribly botched hardly qualify the kit as a representational prototype.
Superior cockpit parts and engraved exterior detail alone can scarcely be
considered when the lion’s share of the pooch herself has been so severely
ravished.
The basic Monogram kit, when competently assembled, yields an accurate if not completely detailed scale replica. Available aftermarket parts can more than alleviate this geriatric model’s obvious shortcomings though a new-tool, state-of-the-art P-40B is clearly needed. Accurate Hobby Kits allegedly has one in the works but only time will tell if this actually becomes a reality. Pending that event I’d continue to recommend the Monogram kit as the best method for modeling the Tomahawk.
Review kit courtesy of John Nitka – IPMS Tucson
Additional background provided by Wayne Sharp and “Modeler Al” Superczynski
|
REFERENCES |
Nov 2002 by Roger M. Jackson
First Time North American Rights To Scott Van Aken and ‘Modeling Madness’
If you would like your product reviewed fairly and quickly by a site that has well over 150,000 visitors a month, please contact me or see other details in the Note to Contributors.