
Accurate Miniatures 1/48 B-25B Mitchell
|
KIT # |
3430 |
|
PRICE: |
AUD $90.00 |
|
DECALS: |
All 16 Doolittle Raiders |
|
REVIEWER: |
|
|
NOTES: |
|
HISTORY |
One quiet Sunday morning in early December 1941 at Pearl Harbour, the US Naval Base became the brunt of an attack that was designed to bring the USA into the Second World War. This attack was launched by Japan from a Carrier group that had sailed from the Japanese mainland a few weeks earlier. Its movements were noted but contact with the group was lost and the rest, as they say, is history. The “day of infamy” had begun and the USA was just about to suffer its greatest single military defeat in its short history. The well-orchestrated attack took out a number of capitol ships as well as a large amount of aircraft, the latter as a result of a poor decision to keep the aircraft in lines out in the open, ostensibly to prevent sabotage! What it really did was make for a perfect placement for strafing aircraft. The loss of life in this attack was very high and the American public reeled in horror from the news. It galvanized Roosevelt into bringing the US into the war, despite his protestations early in his tenure as President that young American lives would not be sacrificed on European battlefields. Japan’s attack on Pearl Harbour changed all of that.
Following the Pearl Harbour attack the US continued to suffer losses as the Japanese pushed home their advantage. America looked for a way to raise morale and to strike back at the Japanese. A brave plan was put forward that called for a lightning strike at the Japanese homeland itself. The biggest problem with such plans was the distances a bomber force would need to fly to accomplish the job. Lt. Colonel James Doolittle proposed to fly the B-25 Mitchell bomber off an aircraft carrier, bomb Tokyo and then continue on into China and, hopefully to be picked up by the Chinese and not the Japanese occupational forces still present in mainland China. It was a gutsy plan and one that was fraught with danger, so much so that the men who volunteered did not expect to survive the mission.
There were sixteen aircraft that made up the “Doolittle Raiders”, Mitchell B-25B bombers, stripped down to the bare essentials for the flight off the USS Hornet’s deck to the Japanese homeland and her cities of Tokyo, Yokohama, Kobe and Nagoya on April 18, 1942. Pan American Airways began ferrying 30,000 gallons of aviation fuel and 500 gallons of lubricants from Calcutta into an airstrip at Asansol in China as early as April 6 using ten of their DC-3 airliner fleet. These products were intended to allow the “Doolittle Raiders” to refuel after their bombing mission.
The B-25’s used in the raid were fitted without tail guns and some of the participating aircraft installed wooden dowels to mimic the twin rear gun arrangement. This was in the belief that the dorsal and ventral turrets would more than make up the deficiency in lack of tail armament. As it turned out the ventral turret was deleted from the Doolittle aircraft to allow for additional gasoline tanks. In addition a rubber bladder carrying 160 gallons was stowed in the crawl space and ten five-gallon gasoline cans were also carried. This raised the total fuel of each of the bombers to 1, 141 gallons, of which 1,100 gallons was considered useable.
 The fully laden aircraft
weighed around 31,000 pounds, including bomb load, and were required to take off
from a wooden aircraft carrier deck with a distance of 467 feet. These aircraft
were too large to be stowed below decks and stayed in the open up to their
launch point. The take off was certainly not normal for these aircraft and
required perfect timing and precision under even the most ideal conditions,
something in which “Murphy” always seems to interfere!
The fully laden aircraft
weighed around 31,000 pounds, including bomb load, and were required to take off
from a wooden aircraft carrier deck with a distance of 467 feet. These aircraft
were too large to be stowed below decks and stayed in the open up to their
launch point. The take off was certainly not normal for these aircraft and
required perfect timing and precision under even the most ideal conditions,
something in which “Murphy” always seems to interfere!
The Norden bombsight was considered too valuable to risk on such a mission and was also deemed superfluous due to the low level nature of the mission. This was eventually resolved by one of Doolittle’s airmen, Captain C.R. Greening, who designed a simple yet effective sight. The test results showed that this jury-rigged sight had a greater degree of accuracy at 1500 feet than the much-vaunted Norden bombsight. Captain Greening was noted in Doolittle’s report on the mission, dated June 5, 1942.
As history shows the Hornet intercepted and avoided a Japanese vessel at 3:10 a.m. on April 18, 1942, a second vessel was sighted and while trying to avoid being detected by this patrol a third picked up the Hornet. This patrol was sunk but it was generally believed that she had managed to get a radio message to shore that may have compromised the mission and this required the earlier launch of the aircraft approximately 400 miles from the target launch area. This resulted in fifteen of the aircraft either crashing into the sea or crash landing after crew bail out over mainland China, despite an unexpected tailwind. One aircraft made it to Vladivostok where it was interned by the Soviets as the USSR was not yet at war with Japan.
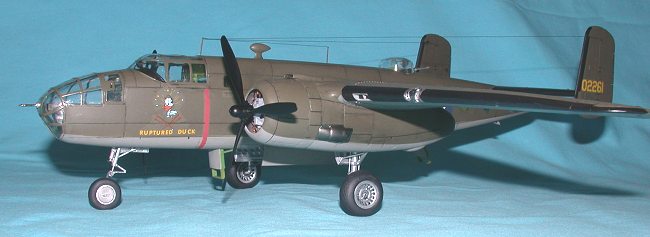
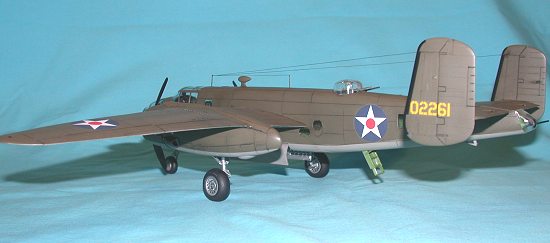
Lt. Col. James Doolittle took off at 8:20 a.m. ship time and, after successfully bombing Tokyo eventually bailed out at 9:20 p.m. ship time from 8,000 feet. All crewmembers survived. Other aircraft of the raid were successful in gaining the Chinese coast, although not all were able to bail out over land, and one landed on Russian soil as mentioned earlier. Three crew of aircraft No. AC 40-2298 were captured by the Japanese with two members being declared missing. Soldiers of the puppet government captured the crew of aircraft AC 40-2268 that landed on the coast of China at Shipu. The crew of aircraft AC 40-2261, The Ruptured Duck and the subject of this review, bombed Tokyo and landed in the water off the coast of China, west of Shangxhow. One crewmember was seriously injured, three injured and one slightly, Sgt. Thatcher, the Engineer-Gunner. He swam out to the aircraft to recover the medical kit and was singularly responsible for the lives of the remaining crew.
|
THE KIT |
This is the first Accurate Miniatures kit that I have had the good fortune to attempt, although there are a couple in my current “stash”. I am extremely impressed with the wealth of data and the state of the parts supplied with this model, especially the attention to detail and the helpful hints provided at critical points in the construction. It is a shame that this company “went to the wall” during 2000, although there are some rumblings about it being resurrected; something that I hope is not just rumour. The company certainly put together some amazing kits during its life.
I choose to follow the
instructions, almost to the letter and included Eduard photo-etch to add
to an otherwise great kit. The other concession was to others who had complained
that the engine cowls are too small (how rude of AM to not have noticed this
glitch!), and included resin cowls from Cutting Edge. Other inaccuracies have
come to light since the model was completed but not to the state where I am too
concerned about them. The most glaring of these is the wheels that are
supposedly too small. It was suggested that an aftermarket set offered by True
Details or those in the Monogram kit be used
 to replace these. Neither option
was exercised, as it looks OK to me! Besides I am more than a little concerned
that I would be unable to perform the necessary surgery without really stuffing
up an otherwise great job of fitting the damn things in the first place!
to replace these. Neither option
was exercised, as it looks OK to me! Besides I am more than a little concerned
that I would be unable to perform the necessary surgery without really stuffing
up an otherwise great job of fitting the damn things in the first place!
The inclusion of paint masks is a very nice touch, although one needs to be aware that not all are a perfect fit. It is also a great idea to include weights to keep the aircraft from being a tail-sitter. Unfortunately I ended up using lead weights as it was easier to fit them in the nose wheel bay and keep the illusion that the bay is empty – smoke and mirrors being the order of the day.
The plastic is a very fine medium grey presented in separate bags for major components. The instructions, decals, clear parts and brass weights are stored in a separate area under the grey sprues. In addition to the instruction sheet, which is presented as a twenty-four-page booklet, and represents one of the most detailed set of instructions I have ever encountered, there is also an accurate account of the report given by the then Brigadier General James H. Doolittle. The amount of flash and sink marks on the very fine moldings is negligible and where they do occur it is in places where they are not visible once the kit is completed. The clear parts are crisp with no discernible distortion.
All in all I was very keen to start this project and things went together very well, with the usual suspects of poor fit and unclear instructions seemingly being not present. Well… so much for “Murphy’s Law”, which was alive and well and present right from the start, as you will see.
|
CONSTRUCTION |
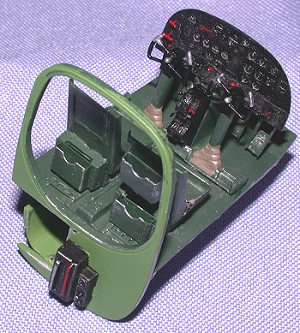 The cockpit is well laid out and the
instructions are very clear. It was here that Eduard photo-etch was used
to great advantage, with an instrument panel, seats, harness and throttle levers
all being replaced. The seat belts were lap belts only for the Raider’s aircraft
and are given as decals in the kit. The instrument panel was painted in semi
gloss black acrylic and highlighted with dry-brushed silver. Knobs were painted
red where appropriate. The cockpit floor, seats and side panels were painted
with Tamiya XF26, Deep Green with electrical cables picked out in white
and black. Dry brushing was carried out throughout the cockpit.
The cockpit is well laid out and the
instructions are very clear. It was here that Eduard photo-etch was used
to great advantage, with an instrument panel, seats, harness and throttle levers
all being replaced. The seat belts were lap belts only for the Raider’s aircraft
and are given as decals in the kit. The instrument panel was painted in semi
gloss black acrylic and highlighted with dry-brushed silver. Knobs were painted
red where appropriate. The cockpit floor, seats and side panels were painted
with Tamiya XF26, Deep Green with electrical cables picked out in white
and black. Dry brushing was carried out throughout the cockpit.
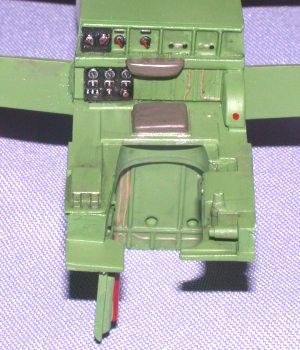 The underside of the cockpit floor also serves
as the crawl space between the bombardier’s station and the radio station. This
was painted with Alclad II Aluminium, as was the crawl space. The cockpit
rear bulkhead was painted with Model Master Acryl, WP5973 Green
Zinc Chromate, as was the radio station. The seat cushions were painted in
Gunze Sangyo, H310 Brown. Other parts were painted as per references with
the instruments within the station highlighted with white and the dials then
filled with white glue to simulate glass using Testors Clear Parts
Cement.
The underside of the cockpit floor also serves
as the crawl space between the bombardier’s station and the radio station. This
was painted with Alclad II Aluminium, as was the crawl space. The cockpit
rear bulkhead was painted with Model Master Acryl, WP5973 Green
Zinc Chromate, as was the radio station. The seat cushions were painted in
Gunze Sangyo, H310 Brown. Other parts were painted as per references with
the instruments within the station highlighted with white and the dials then
filled with white glue to simulate glass using Testors Clear Parts
Cement.
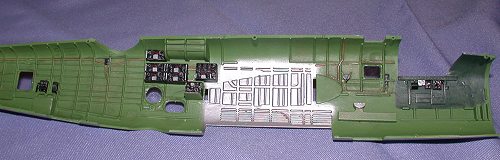
The Fuselage and Wings
The bomb bay, front and rear bulkheads along with the long-range fuel tank, specifically for the Doolittle Raiders, were painted with Alclad II Aluminium. The bomb bay has two ribs that extend through the port and starboard fuselage sides and provide positive location points for the wings that are fitted at a later stage.
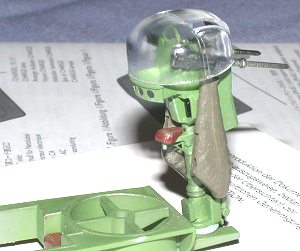 During this phase of construction the
dorsal turret along with the left and right fuselage halves were painted and
details picked out as per references. This included the addition of the glazing
as the masks are presented for each window. Machine guns were painted in
Gunze Sangyo Black and then dry-brushed with a special blend of enamel
silver and artist oil umber. This mixture gives a dull silver brassy appearance
and seems to work quite well, provided you do not overdo the umber. The mixture
stays wet enough to last through a single sitting (an hour or so) and was also
used on the cartridge bags for the dorsal turret. With the exception of the seat
and the casing bags the entire dorsal turret was painted with Model Master
Acryl, WP5973 Green Zinc Chromate. I elected not to use the Eduard
photo-etch barrels and drilled out the barrel ends. Photo-etch was extensively
used in the dorsal turret.
During this phase of construction the
dorsal turret along with the left and right fuselage halves were painted and
details picked out as per references. This included the addition of the glazing
as the masks are presented for each window. Machine guns were painted in
Gunze Sangyo Black and then dry-brushed with a special blend of enamel
silver and artist oil umber. This mixture gives a dull silver brassy appearance
and seems to work quite well, provided you do not overdo the umber. The mixture
stays wet enough to last through a single sitting (an hour or so) and was also
used on the cartridge bags for the dorsal turret. With the exception of the seat
and the casing bags the entire dorsal turret was painted with Model Master
Acryl, WP5973 Green Zinc Chromate. I elected not to use the Eduard
photo-etch barrels and drilled out the barrel ends. Photo-etch was extensively
used in the dorsal turret.
Once all the individual parts had been
completed the two halves were glued together and set aside. The nose weights
supplied with the kit were put aside and I used lead weight flattened to fit
into the areas nominated. My reason for using lead instead of the supplied brass
plates was that they did not fit as well as I would have hoped and, the lead was
easier to shape in the nose wheel bay and painted Aluminium. The nose,
bombardier and cockpit glazing was attached and then painted Tamiya XF26,
Deep Green prior to painting the final colour of Gunze Sangyo H304, Olive
Drab. It was at this point that things began to go pear-shaped! Firstly the
 forward portion of the nose is presented as a separate piece and contains the
bombardier station. The fit to the main fuselage is not good and requires some
careful filling and subsequent filing. Not so bad I hear you say! Yeah right!
All the really fine detail presented in the kit is immediately wiped off and
needs careful work to put it back again. Fortunately I had the Squadron
scribing tool that has a very sharp and fine point, which was used to simulate
the rivets so easily sanded off when the parts were mated. One for the good
guys! The second problem was self-made, as I had painted the forward bombardier
station in Master Master Acryl, Green Zinc Chromate - very
carefully into the bargain. It is a shame that it was supposed to be Tamiya
XF26, Deep Green and required even more careful repainting. Talk about reading
instructions and then forgetting what it was that was read. Oh Hum!
forward portion of the nose is presented as a separate piece and contains the
bombardier station. The fit to the main fuselage is not good and requires some
careful filling and subsequent filing. Not so bad I hear you say! Yeah right!
All the really fine detail presented in the kit is immediately wiped off and
needs careful work to put it back again. Fortunately I had the Squadron
scribing tool that has a very sharp and fine point, which was used to simulate
the rivets so easily sanded off when the parts were mated. One for the good
guys! The second problem was self-made, as I had painted the forward bombardier
station in Master Master Acryl, Green Zinc Chromate - very
carefully into the bargain. It is a shame that it was supposed to be Tamiya
XF26, Deep Green and required even more careful repainting. Talk about reading
instructions and then forgetting what it was that was read. Oh Hum!
 One other addition to the bombardier’s
station was the inclusion of the Captain Greening bombsight. This was made with
a semi-circular piece of scrap photo-etch and a thin length attached to the
semi-circle on the outer edge. It was then attached to the main body of the
Norden sight, which had been filed down to accept the scratch-built piece. It’s
pretty hard to see it through the nose glazing but I know it’s there. The nose
was temporarily attached for painting of the Olive Drab and Neutral Grey and
removed later to attach the forward machine gun.
One other addition to the bombardier’s
station was the inclusion of the Captain Greening bombsight. This was made with
a semi-circular piece of scrap photo-etch and a thin length attached to the
semi-circle on the outer edge. It was then attached to the main body of the
Norden sight, which had been filed down to accept the scratch-built piece. It’s
pretty hard to see it through the nose glazing but I know it’s there. The nose
was temporarily attached for painting of the Olive Drab and Neutral Grey and
removed later to attach the forward machine gun.
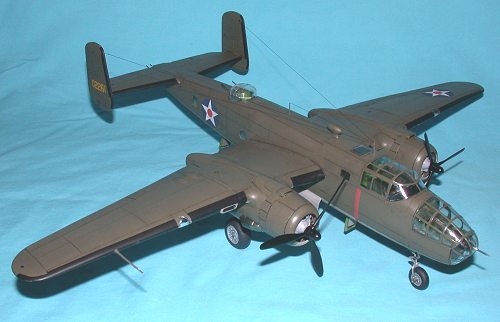
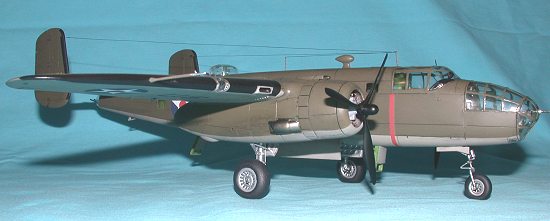
The wings were assembled as per the instruction sheet with the engine nacelles being attached to the assembled wings. Problems were very much the order of the day at this point in construction with poor fit being evident at the rear and front of the nacelles. It was necessary to fill and sand and yet more rescribing using my special Squadron tool. The inside of each wheel well and the doors were painted with Alclad II, Aluminium and set aside. The landing light recess was painted with flat black and a MV lens installed in each. The clear glazing was then attached using Testors Clear Parts Cement after the edges had been painted with black, as per the recommendations in the instructions. The outboard starboard wing had the identification lights in the underside as well as both wings having the navigation lights at the tips. These were not present on the B25-B, which had the navigation lights on the upper and lower wing tips. These were added using successive build up of white glue and then painted the appropriate colours.
It was at this point that I elected to depart from my normal “fit the wings on and paint the whole thing”. Because there is a distinct colour difference between the underside Neutral Grey and the upper surface Olive Drab and the distance to the lower wing surface is quite small on this part of the fuselage, I elected to leave the wings off until after the painting. This made it easier to paint the engine nacelles adjacent to the fuselage and it also helped to have temporarily fitted the engine cowls. Once the upper and lower surfaces were painted with Gunze Sangyo H304, Olive Drab and H306, Neutral Grey (FS36270 – as per the instructions) respectively, the leading edges of the wings were masked off and the de-icing strips were painted in Flat Black.
 In the B25-B the fuel vent tubes, located at
the rear of the engine nacelles in later models, did not exist. As they were
present on the kit it was necessary to remove them. These pipes were added to
the B25-C and continued through all subsequent marks.
In the B25-B the fuel vent tubes, located at
the rear of the engine nacelles in later models, did not exist. As they were
present on the kit it was necessary to remove them. These pipes were added to
the B25-C and continued through all subsequent marks.
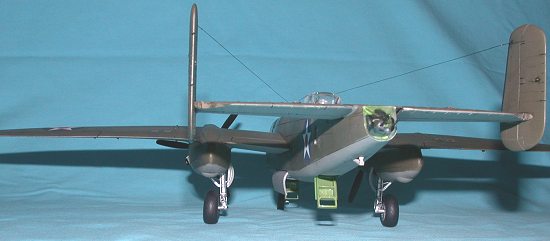
The rear stabilizers and tail assembly was attached at this point and here again the fit is less than desirable requiring copious quantities of filler, Milliput in this case, which was then followed up by much sanding and loss of detail. Again the lost detail was rescribed, but by this stage of the operation I was starting to become less than amused. I did not fit the rear glazing to the fuselage at this point, as it was a simple job to attach it after painting, along with the cut down broom handles, courtesy of the USS Hornet.
The engines come in four parts per wing, made up of two banks of cylinders, the crankcase and the propeller shaft. The detail on the crankcase is superb except that the number of ignition leads is incorrect and they do not extend back to the rear cylinder bank. The Eduard photo-etch for this part is also quite poor and does not extend past the first bank. I decided to simply scratch build the ignition ring and wires to give it a better look. This was achieved using plastic rod for the ignition ring, painted in Tamiya XF16, Flat Aluminium and very thin plastic-coated wire as the ignition leads. Holes were drilled in the plastic rod ignition ring to accept the thin wire, which was painted brownish red. After the cowls were installed the amount of detail is somewhat obscured by the cowl, but again I know it is there and if you look closely you can just make out the detail.
The exhaust stacks are the long type and they were painted with Alclad II Jet Exhaust and Pale Burnt Metal, the former blended towards the rear of the exhaust to simulate soot. Both these parts were left off until the decals and final painting was completed.
Undercarriage
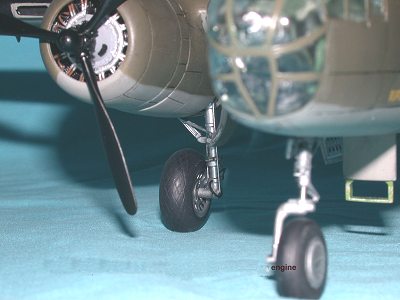 The landing gear on the B25-B is a tricycle
arrangement and the kit comes with pre-weighted wheels. The main gear legs were
painted with Alclad II Aluminium and the piston was given the Bare
Metal Foil treatment. In addition I added the brake lines down both sides of
the legs and painted these in Aluminium. The brake hoses were made out of black
plastic-coated wire. Eduard photo-etch was used to replace the scissor
links. Accurate Miniatures supply the wheel hubs as separate items to the
tyres making the painting so much easier, these being painted with Alclad II
Aluminium and the tyres painted with Gunze Sangyo Tire Black.
The landing gear on the B25-B is a tricycle
arrangement and the kit comes with pre-weighted wheels. The main gear legs were
painted with Alclad II Aluminium and the piston was given the Bare
Metal Foil treatment. In addition I added the brake lines down both sides of
the legs and painted these in Aluminium. The brake hoses were made out of black
plastic-coated wire. Eduard photo-etch was used to replace the scissor
links. Accurate Miniatures supply the wheel hubs as separate items to the
tyres making the painting so much easier, these being painted with Alclad II
Aluminium and the tyres painted with Gunze Sangyo Tire Black.
The front wheel as presented in the kit slopes forward a little too much and was bent back to give a much steeper angle. Again Eduard photo-etch was used on the strut and the front wheel skewed slightly to the left. This wheel did not steer but was allowed to castor up to 60 degrees left or right. Unlike the main wheels where spoked hubs were used, the outer hub was covered with a plate and painted Aluminium.
Once all the wheels had dried they were attached to the wings and fuselage in preparation for the attachment of the wings to the fuselage.
|
PAINT & DECALS |
As indicated earlier much of the main components of the kit were painted prior to joining the main wings to the fuselage. This decision enabled a much easier task of masking off the boundary between upper and lower colours. The lower colour, Gunze Sangyo H306, Neutral Grey was painted first and set aside to dry. This was then masked off using Blue Tack covered with paper to give a feathered edge, and the upper colour, Gunze Sangyo H304, Olive Drab was sprayed all over the airframe. The de-icing strips were masked off and painted Flat Black. Everything was set aside to dry and await the decal placement.
The decals presented in this kit allow all sixteen aircraft of the raiders to be built. I had elected to build the “Ruptured Duck” mainly because it had a bit more colour than the other aircraft, that and the fact that ducks are notoriously despicable – ask Daffy! The decals are very thin and settle down well; perhaps a little too well as I used some decal set and almost lost one or two of the decals. I had some trouble with the decal for the “Ruptured Duck” and completely screwed up one of the serial numbers on the tail fins making it necessary to cannibalise the other decals. I had some silvering on the lower decals but after careful treatment have managed to reduce the effect.
The only thing that caused me some concern is where the carrier film is bigger than the decal, especially in the case of the Ruptured Duck decal. When it was attached to the fuselage the area under the decal becomes a shade lighter than the surrounding area. This would not be a good thing and require the area to be sprayed with an extremely thin solution of original colour and thinners to blend the decal. However, in the case of all the aircraft of the Doolittle Raiders they were painted prior to being put aboard the USS Hornet and one of my reference books shows this particular aircraft with the nose art having a lighter colour than the surrounding fuselage colour. I suspect that the nose art was masked off prior to re-spraying and this would account for the slight colour variation. It’s my excuse and I am sticking to it!!
 Once the decals had dried
and the setting solution removed the aircraft was treated to a thin wash of
Artist watercolours and allowed to sit for a day before this was carefully
removed. At this point a coat of Gunze Sangyo Flat Clear was applied to
the entire airframe and allowed to dry before the masks were removed from the
glazing. The final treatment was the attachment of the antennae and the pitot
tubes, nose glazing was removed and the forward machine gun installed. Both the
nose glazing and the rear glazing were then attached and the rear glazing
received two vertical black stripes to simulate window openings, further
increasing the illusion of a real twin machine gun in an otherwise vulnerable
rear. Both the front and rear crew entrance hatches were upgraded with
photo-etch and attached after painting and dry brushing to simulate wear and
tear.
Once the decals had dried
and the setting solution removed the aircraft was treated to a thin wash of
Artist watercolours and allowed to sit for a day before this was carefully
removed. At this point a coat of Gunze Sangyo Flat Clear was applied to
the entire airframe and allowed to dry before the masks were removed from the
glazing. The final treatment was the attachment of the antennae and the pitot
tubes, nose glazing was removed and the forward machine gun installed. Both the
nose glazing and the rear glazing were then attached and the rear glazing
received two vertical black stripes to simulate window openings, further
increasing the illusion of a real twin machine gun in an otherwise vulnerable
rear. Both the front and rear crew entrance hatches were upgraded with
photo-etch and attached after painting and dry brushing to simulate wear and
tear.
Armament
The Doolittle raiders carried a relatively small bomb load, as their aim was not so much to destroy great swags of property but to deal a psychological blow to the enemy. Each aircraft carried either incendiary clusters or demolition bombs, or a mixture of each. The Ruptured Duck carried three demolition bombs and one incendiary cluster. The bombs were all 500 lbs and painted grey prior to be attached to the bomb rails. The bomb fins were upgraded using the photo-etch.
The ventral turret was deleted from the Raiders aircraft for the reason of weight; however there is another reason why this turret did not find its way past the B25-Gs from 42-65001 onwards. The operator was required to kneel and sight using a periscope arrangement that restricted his capabilities to such a point that he became ineffective. The turret was also prone to problems. In the kit the turret is replaced by a single piece that covers the opening where the turret would be lowered or raised. The fit of this piece requires that the internal part of the turret is retained and the outer portion is pushed into place. In my example it was more of a hard shove with thoughts of using special tool part “A” – the geology hammer!
The dorsal turret was a manned Bendix unit and was covered by a clear dome. The gunner lined up his targets using a sight located between the twin 0.50 caliber machine guns. The operator sat on a “bicycle” seat and rested his feet on two pedals on the gun’s post. Elevation and azimuth were controlled by two black grips just in front of the seat. The turret was powered by a one-half horsepower electric motor. It had two metal boxes that carried 400 rounds per gun and could fire at a rate of 550 rounds per minute. Two canvas bags were attached at either side of the guns and were used to catch spent cartridges and links. The kit turret dome seems to lack depth and its edge is visible above the fuselage almost as if a rubber sealing has been omitted. I elected to leave this as is mainly because it is only visible on the sides and, if pushed down into the fuselage would be covered.
The Ruptured Duck also had a single 0.30 caliber machine gun located in the nose and this was attached through a flexible gun socket mounted in the Plexiglas. There is little photographic evidence to suggest that a second machine gun was installed on the port side of the bombardier’s canopy and this was left off the model.
The rear turret was usually devoid of armament but Doolittle installed two broomstick handles into his aircraft and painted two back strips to simulate slots. This was supposed to act as a deterrent to would be attackers. Other pilots that took part in the raid were reported to have followed this lead and one has been installed in the Ruptured Duck.
|
CONCLUSIONS |
 Accurate Miniatures were
absolutely lambasted for this kit when it was first released to an ever
increasingly demanding modelling public. This is unfortunate as neither the kit,
nor the company deserved the bad press. Yes there were inaccuracies, and sadly
the fit in some areas leaves a lot to be desired, but the few poor features have
overshadowed the amount of stunning detail and other huge pluses to be found in
this kit. How many times have we waited with anticipation for a new release from
Tamiya or Hasegawa only to be sadly disappointed by the outcome? The recent
Spitfire releases from Hasegawa immediately jump to mind. How many of us would
wish a return to the Dark Ages where the best kits were all raised panels and
you would be lucky to be able to see through the so called clear parts? Accurate
Miniatures attempted to give us an exemplary kit that would build into an
excellent replica of a very important historical aircraft. I believe they
succeeded and did so admirably. I hope that recent rumours end up being true;
that this company is destined to rise from the ashes. It would be a nice change
to have a company be prepared to make kits available for non-mainstream
aircraft, with the quality equal to and better than some of the bigger
companies.
Accurate Miniatures were
absolutely lambasted for this kit when it was first released to an ever
increasingly demanding modelling public. This is unfortunate as neither the kit,
nor the company deserved the bad press. Yes there were inaccuracies, and sadly
the fit in some areas leaves a lot to be desired, but the few poor features have
overshadowed the amount of stunning detail and other huge pluses to be found in
this kit. How many times have we waited with anticipation for a new release from
Tamiya or Hasegawa only to be sadly disappointed by the outcome? The recent
Spitfire releases from Hasegawa immediately jump to mind. How many of us would
wish a return to the Dark Ages where the best kits were all raised panels and
you would be lucky to be able to see through the so called clear parts? Accurate
Miniatures attempted to give us an exemplary kit that would build into an
excellent replica of a very important historical aircraft. I believe they
succeeded and did so admirably. I hope that recent rumours end up being true;
that this company is destined to rise from the ashes. It would be a nice change
to have a company be prepared to make kits available for non-mainstream
aircraft, with the quality equal to and better than some of the bigger
companies.
The kit is relatively easy to build and, if the instructions are followed an excellent model can be produced. I truly enjoyed building this model and the result is that I have an aircraft of historical significance of a time when a nation was at its lowest ebb. It represents the best in all of us – the ability to think outside our narrow vision and propel us into the history books.
|
REFERENCES |
B-25 Mitchell Kinzey, B., Detail and Scale Volume 60, Squadron/Signal Publications, 1999 ISBN 1-888974-13-3
North American B-25 Mitchell Johnsen, F.A., Warbird Tech Series, Volume 12, Specialty Press Publishers, 1997 ISBN 0-933424-77-9
Report on Aerial Bombing Of Japan Doolittle, J.H., Brig. Gen. U.S. Army, June 5, 1942 War Department Report, Washington courtesy of Accurate Miniatures
Walk Around B-25 Mitchell Drendel, L. Greer, D. Squadron Publications No 12, 1997 ISBN 0-89747-379-5
If you would like your product reviewed fairly and quickly, please contact me or see other details in the Note to Contributors.