| KIT #: | 09086 (Jt 86) |
| PRICE: | $29.98 MSRP |
| DECALS: | Two options |
| REVIEWER: | Andrew Garcia |
| NOTES: | Eagle Strike decals and Eduard P.E. used |
| HISTORY |
The Curtis Aircraft H-87A (USAAF P-40) series of aircraft is one which I have never heard a modeler express a lack of interest. No matter what you build, a good P-40 with a shark mouth will be part of your collection one day.
The P-40E was the P-40B/C Tomahawk replacement. Using the new Allison V-1710-39 engine to get better performance at altitude the RAF specifications drew Curtis into building an extensively redesigned aircraft which externally looked similar to its predecessor but changed enough to be a sibling rather than a warmed-over clone.
The fuselage was modified with a reduced upper cross-section to improve rearward visibility. The nose guns found in the P-40B/C were removed and wing armament improved with six .50 caliber guns installed with increased rounds per gun. The distinctive gun charging handles found in the P-40B/C were removed with a hydraulic gun charger put in its place. A provision for a future armament of two 20mm guns per wing became part of the specification but was never implemented. The radiator assembly was redesigned and the carburetor intake relocated to the upper nose giving the P-40E its distinctive appearance. Fittings for a 500 pound bomb or a 52-gallon drop tank were added. Pilot armor was increased and the landing gear legs were shortened and strengthened.
 The distinctive
exhausts were initially simple round tubes. Midway through the production
of the P-40E, the exhausts were flattened to reduce the flame visibility
(what we call the “exhaust signature” today). This is the bane of P-40
modelers who can build a beautiful kit only to someday find a reference
showing you used the wrong exhaust! In general most P-40E’s and Kittyhawk
I-IA’s used the tubular exhaust. But – there are quite a few with the
flattened exhaust and some may have been retrofits to the same airframe
resulting in photos of the same aircraft on different occasions using the
two alternatives. You may not be able to say the early ones had it and the
late ones did not. As an example, look on page 17 of the Squadron In Action
#1026 for a fine photo of Col. Holloway of the AVG’s aircraft. It is serial
number 41-5741 and uses the flat or fishtail exhaust style.
The distinctive
exhausts were initially simple round tubes. Midway through the production
of the P-40E, the exhausts were flattened to reduce the flame visibility
(what we call the “exhaust signature” today). This is the bane of P-40
modelers who can build a beautiful kit only to someday find a reference
showing you used the wrong exhaust! In general most P-40E’s and Kittyhawk
I-IA’s used the tubular exhaust. But – there are quite a few with the
flattened exhaust and some may have been retrofits to the same airframe
resulting in photos of the same aircraft on different occasions using the
two alternatives. You may not be able to say the early ones had it and the
late ones did not. As an example, look on page 17 of the Squadron In Action
#1026 for a fine photo of Col. Holloway of the AVG’s aircraft. It is serial
number 41-5741 and uses the flat or fishtail exhaust style.
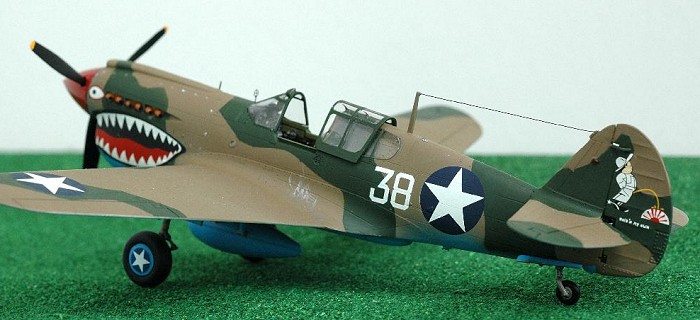
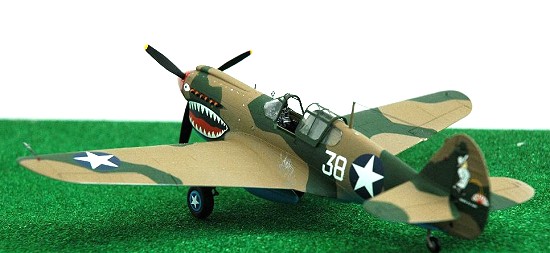
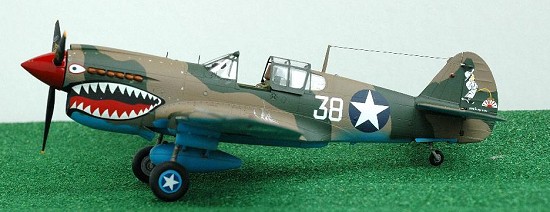
The other P-40E concern for modelers is determining which antennae configuration is correct for the model you are building. The P-40D/E started out with aerial wires strung from the wing tips to the vertical tail’s edge. Later changes resulted in antenna masts. As the saying goes, use a photo reference to be sure. Drawings, decal instruction profiles and color profiles are not to be relied upon. Having said this, I relied upon the aftermarket decal manufacturer’s instruction color profile since I could not find a full aircraft photograph. I could find close ups of the tail art but not the entire aircraft.
| THE KIT |
Hasegawa’s P-40E is an all-around winner. Out of the box this kit gives you a nicely detailed cockpit. I did not hesitate to build the kit without waiting for a good resin cockpit to be released. Like the Tamiya P-47 cockpit, the Hasegawa P-40E with a bit of painting and drybrushing looks perfect. The kit I used was part of the initial import batch which included the DragonUSA “Bonus” etched metal fret. The etched fret includes seat belts and a seat-raising lever. This was really appreciated and motivated me to build the kit as soon as I received it. The seat belts are a must have to properly finish off the OOB cockpit. I left the etched parts for the seat raising lever off – way to much work for the benefit. I could scratch build it from plastic flat and rod stock if I wanted it. The bonus fret should have included a post and ring gun sight, which is a very prominent feature on the P-40! The injected ones that come with the kit are very well made and delicate but for an improved scale effect and durability to future brushes with clumsy hands and fingers, I opted for flat metal etched replacements.
This was my only addition to the kit along with aftermarket decals. I added the etched metal from an Eduard release to replace the plastic kit parts representing the ring and post external gun sight. This kit is an excellent candidate for a reasonably priced, unpainted, Eduard Zoom etched metal release. If Eduard could provide a few items like seat belts, ring and post gun sights, etc. as they have in their other Zoom sets, I would buy one for each of my Hasegawa P-40 builds because that’s all they need. I am not interested in the $30.00 etched sets for a $20.00 kit, which replaces seats, adds flaps and replaces other 3-D plastic with 2-D (i.e. flat) metal parts. Something similar to the great Zoom set they made for the Hobbycraft P-40C, but aligned to the needs of the Hasegawa P-40E, is something I would love to see and will add to every P-40E I build, if one is released. I will be building many more P-40’s from Hasegawa.
 This is one nice kit.
I was happy looking at it in the box and as I built it no vices or problems
were experienced. The instructions were clear. The parts went together well
and as building progressed I kept thinking, “what a nice kit this is to
work with”. It is so pleasant to build that I ordered several more, before
I was finished, along with the P-40N Hasegawa recently released.
This is one nice kit.
I was happy looking at it in the box and as I built it no vices or problems
were experienced. The instructions were clear. The parts went together well
and as building progressed I kept thinking, “what a nice kit this is to
work with”. It is so pleasant to build that I ordered several more, before
I was finished, along with the P-40N Hasegawa recently released.
I kept comparing this kit to the Tamiya P-47D Razorback in 1/48th which was the last WW II kit I built that impressed me more and more as I built it. My awareness of its improvement over previous kits just grew and was derived while building not from AMS looking at the plastic sprues with a magnifying glass in hand nit-picking any perceived fault. It was great just admiring the added details and incremental improvements over previously released kits. I enjoy kits that are such a sweet build.
In the past I have often thought, “Hasegawa builds such great kits but …”. I would find one or two parts misfits (like a wing-to-fuselage join) or my only disappointment would be the lack of a really good out-of-the-box cockpit or underwing pylons and stores for those pylons to make me keep looking for alternatives to build. Small details make the difference between a good kit and a great kit. The P-40E turned out to be a great kit in my opinion. It is acceptably priced and turns into a real beauty when finished giving the average modeler an enjoyable build and a delightful end result. I am sure the better modelers, who build for contests, will have a great time showing off their Hasegawa P-40E’s.
There are a number of added details that shows someone in Hasegawa did their homework although an occasional nit will be identified or expressed in the many modeler web forums. My summary - this baby made me happy!
What does this kit have that makes it such a big improvement? First let’s list the alternatives – all of them fine kits and still buildable. I have them all and have built some. Where it is priced the Hasegawa kit has a chance of providing a value where you can decide for yourself – is it worth the added initial price? If you strive for a very good P-40E model the others will require added etched and resin and other after-market purchases to make them into better models. The Hasegawa kit, out of the box will be just fine unless Hasegawa or its importer puts more price increases into the equation.
If Scott gives me an opportunity, I would like to provide a build review for each of the alternative P-40E’s. For this article, and in short order, I start the 1/48th P-40E family with the Otaki kit, which was reissued by Arii. A nice kit with recessed panel lines. In the same generation of plastic Revell came out with a P-40E. I have a 1983 Revell Kit # 4319 release that was very nice except for raised panel lines and a poor cockpit. A 1995 re-release with a reworked mould, #5921 Revell-Monogram Pro-Modeler, featured the basic parts from the Revell Kit with some new sprues containing a very nice new cockpit, excellent decals and reworked clear parts with first-class instructions courtesy of Bert Kinsey’s help. I purchased these before they disappeared and added Moskit exhausts and True Details resin wheels and P-40N resin cockpit to the box for a future build.
 Not long ago Amtech
issued the never released AMT mould of the P-40E as kit #484602 . It is a
nice kit featuring recessed panel lines and detail improvements over the
earlier kits with an acceptable, but can be improved upon, cockpit. This
was a great candidate for aftermarket enhancements from True Details and
Eduard and I have seen some very nice builds come from this kit. I
personally bought quite a few since it was priced right and looked good.
The kit decals were superb microscale printed and Three Guys Replica’s
researched, so you can’t go wrong with it. An initially flawed production
execution of the fuselage mould hurt the release but excellent customer
service and a mid-production fix was well received. The main weakness was
the cockpit and the True Details resin cockpit #48451 pretty much
ameliorated this issue for me since the price of the cockpit was reasonable
and I hope to show you what his combination looks like in the near future
to encourage you to build some of these to place next to your Hasegawa and
ProModeler builds. I will be building all of the Amtech P-40’s that I
purchased.
Not long ago Amtech
issued the never released AMT mould of the P-40E as kit #484602 . It is a
nice kit featuring recessed panel lines and detail improvements over the
earlier kits with an acceptable, but can be improved upon, cockpit. This
was a great candidate for aftermarket enhancements from True Details and
Eduard and I have seen some very nice builds come from this kit. I
personally bought quite a few since it was priced right and looked good.
The kit decals were superb microscale printed and Three Guys Replica’s
researched, so you can’t go wrong with it. An initially flawed production
execution of the fuselage mould hurt the release but excellent customer
service and a mid-production fix was well received. The main weakness was
the cockpit and the True Details resin cockpit #48451 pretty much
ameliorated this issue for me since the price of the cockpit was reasonable
and I hope to show you what his combination looks like in the near future
to encourage you to build some of these to place next to your Hasegawa and
ProModeler builds. I will be building all of the Amtech P-40’s that I
purchased.
The term “future build” is my rationalization for buying more kits, decals, resin and etched than I may ever be able to build. The feeling I get from the “If I want to I can” is one of life’s small pleasures that gives me great satisfaction. I call it Modeling Nirvana because my skills certainly don’t cause Nirvana when I am finished with a build.
So – what are the great improvements Hasegawa made to the history of 1/48th scale P-40E’s?
1) An excellent injection moulded cockpit and instrument decal only in need of etched shoulder and seat belts and some work on the gun sight clear prism area. The gun sight itself is well molded and looks great. A portion should be modified to look right. You need to carve away some of the plastic and add a clear flat piece.
2) A properly shaped spinner, excellent oil and radiator cooler internal areas that can be viewed and are visible – the closer you look the better it gets.
3) Optional clear lenses for the red, green and clear wing and fuselage lights.
4) Well moulded auxiliary fuel tank and 500 pound bomb and shackles/pylons.
5) Superb main and tail landing gear and wheel well areas. Look at the eyelet’s for the tow or hold-down area of the landing gear – that’s detail! Part T12, vent pipes under the fuselage – well rendered and missing on most other P-40 kits.
6) Accurate aileron and rudder control linkages and bars running through the exposed tail section.
7) Extra parts (for future P-40 versions) such as the DF football antenna, wheel hubs, and antenna masts.
| CONSTRUCTION |
The Hasegawa kit goes together well without any vices. The first step is the cockpit and it looked great after an airbrushed coat of Gunze zinc chromate green. I have seen reference photos of the P-40 cockpit seat in bare aluminum but perhaps the humid climates the P-40 lived in warranted a zinc chromate coating for the seat as well? Inconclusive references led me to paint the seat the cockpit color with some silver drybrushing helping to lessen my anxiety over the correct painting step for the seat.
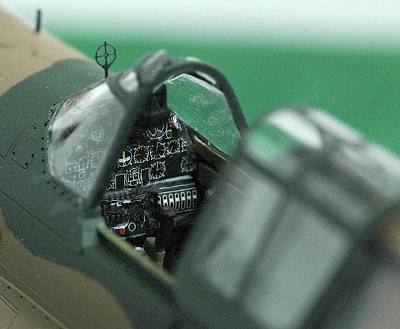 I used the kit
supplied decal for the instrument dials and faces over the kit plastic part
K1 + K2. There are two choices. You can paint the instrument panel flat
black and place a clear decal (#39 + 40) with white outlines or use a solid
sheet (#35+36+37) with a black background featuring white dials. I chose
the solid sheet approach preferring to spray it with a flat clear coat to
get the right tone. It worked well. I used Microset on the plastic laying
the Hasegawa kit decal #35+36+37 with additional application of Microset on
top. I pierced the decal while it was still hard with a sharp pin on the
key dials to allow trapped air to escape and the decal fit flawlessly. I am
pleased with the results – they are better than I could do with a
paintbrush. The decal fit on all the dial faces and I like it!
I used the kit
supplied decal for the instrument dials and faces over the kit plastic part
K1 + K2. There are two choices. You can paint the instrument panel flat
black and place a clear decal (#39 + 40) with white outlines or use a solid
sheet (#35+36+37) with a black background featuring white dials. I chose
the solid sheet approach preferring to spray it with a flat clear coat to
get the right tone. It worked well. I used Microset on the plastic laying
the Hasegawa kit decal #35+36+37 with additional application of Microset on
top. I pierced the decal while it was still hard with a sharp pin on the
key dials to allow trapped air to escape and the decal fit flawlessly. I am
pleased with the results – they are better than I could do with a
paintbrush. The decal fit on all the dial faces and I like it!
I enjoy building resin cockpits and use Eduard etched parts, “when it makes sense”. Some cockpits are wide open and they look great (because you can look into them) when properly painted and weathered. I am not the type of modeler who will spend hours detailing an interior if it cannot be seen. This cockpit looked great when it was finished and dropped right into place. You can actually do this after the fuselage halves are glued and dry or as the instructions seem to encourage, you can add the cockpit before the fuselage goes together. It’s your choice. Both seem to be workable. I added the radiator first holding the cockpit halves together with clamps until the radiator was in place. I then glued the fuselage together and added the cockpit as a drop in component in order to align the back headrest area. I left the headrest off until later in assembly to allow me to more easily mask this area for painting and add the headrest at the end of construction or just before final flat coat.
There have been many comments regarding the fuselage split and how nice it would be to have a one-piece fin to nose fuselage half. Yes, it would be nice. No, it was not hard to attach the tail section and fill in any gap. There were no gaps. It is split along a panel line so its up to you how much you want to fill and re-scribe. I did not spend much time on this since the use of Tenax glue and Gunze Mr. Surfacer cured all my concerns. I used the same technique on the wing .50 caliber guns. A bit of sanding and a tri-stick polish and the guns fit flush and showed no seams when painted.
In step three I took the kit exhausts, parts Q1-Q2-Q3, and hollowed out the exhausts with a Dremel bit. It looks much better after this step. The alternative is to get the Ultracast resin exhausts. Each exhaust part goes in a separate area – that’s an example of Hasegawa’s attention to detail in this kit. Instead of the usually good enough they provided what we want – the unique aspects of the exhaust detailed in plastic. I attached these after the kit was painted and flat coated.
I recommend you dry fit the clear part # V2, the rear canopy glass for the left or port side. You may want to sand down the rear area inside of part V2 so it fits flush with the fuselage. Using one of the tri-grit polishing and sanding sticks will fix this problem. The part fits but it does not fit well.
Part number A12 and clear part U3 are an extra step needed only to fix an included option for another version of the P-40. This was a small annoyance taking some extra effort to fix a kit engineering option.
 In step 12 I did not add
parts T20 and T22 since I replaced them with an etched metal gun sight from
Eduard using a post & bead gun sight from fret # 48-411. The alternative is
to get it from the Eduard Zoom for the P-40B/C and use a piece of guitar
wire for the front post as I did. I enhanced the cockpit gun sight, part
W1, by using a circular dremel saw to cut away the center. This left two
triangular supports for the glass lens. A small square piece of clear
plastic on the new “supports” and I was done. The solid block gun sight in
the kit part just detracts from a flawless execution on the rest of the gun
sight and overall cockpit.
In step 12 I did not add
parts T20 and T22 since I replaced them with an etched metal gun sight from
Eduard using a post & bead gun sight from fret # 48-411. The alternative is
to get it from the Eduard Zoom for the P-40B/C and use a piece of guitar
wire for the front post as I did. I enhanced the cockpit gun sight, part
W1, by using a circular dremel saw to cut away the center. This left two
triangular supports for the glass lens. A small square piece of clear
plastic on the new “supports” and I was done. The solid block gun sight in
the kit part just detracts from a flawless execution on the rest of the gun
sight and overall cockpit.
An additional step I suggest is to add a wire hydraulic line to each of the main landing gears. They are well illustrated in the color detail photos in Squadron’s P-40 Walk Around # 5508 found on page 4.
I like having the rubber bushing that allows you to remove a propeller blade for transit and cleaning but it may make for a wobbly prop. I am considering gluing the prop on since the fit is not tight enough for my liking.
| COLORS & MARKINGS |
Painting:
I used a Gunze Sangyo acrylic paint # H25 Sky Blue (for Azure FS35231) on the underside and Tamiya XF-58 Olive Green (for FS34086) and Tamiya XF-52 Flat Earth (for FS30118) on the topside. I used Testors Model Master enamel metallics for the exposed metal areas. I used Pactra rust for the exhausts.
Decals:
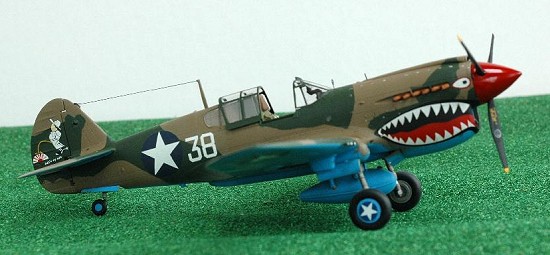
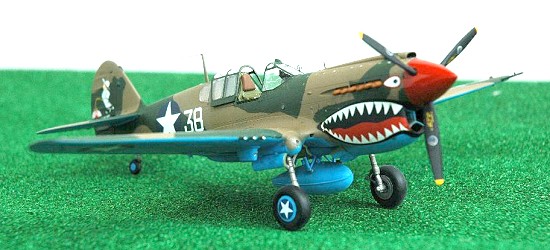
I used the Eagle Strike Productions #48-190 decal, item # B “White 38” , which is an aircraft from the 16th FS, 51st FG, Peishihwa, China circa October 1943. I used two other decal items that I found with the Amtech P-40E kit sheet – a small radiating red stripe decal that changes a white semi-circle into the rising sun emblem of the IJAF along with the words “Hold’n My Own”. It added an extra dimension to the decal that maybe Eagle Strike forgot or was missing from the Eagle Strike sheet because it was not part of the time period they used for photo references.
| FINAL CONSTRUCTION |
 I chose to remove the
injection moulded lights on the wings and tail and replaced them with the
clear parts that are provided with the kit (assembly part (4) step 1,2,3).
I did this after all the final decals and clear coats had dried. When I
build a kit I re-read the instructions and look at reference books to see
if there are any details missing or that should be added. I do this when I
am unable to keep working on it; such as while it is drying from a coat of
paint.
I chose to remove the
injection moulded lights on the wings and tail and replaced them with the
clear parts that are provided with the kit (assembly part (4) step 1,2,3).
I did this after all the final decals and clear coats had dried. When I
build a kit I re-read the instructions and look at reference books to see
if there are any details missing or that should be added. I do this when I
am unable to keep working on it; such as while it is drying from a coat of
paint.
I write up a list of new additions and determine which parts can or will break, like pitot tubes, antennas or ring and bead gun sights and add them at this point after determining if the flat coat is needed or not for the affected part. This also allows me to list and group the steps according to paint colors so I use the same paint in one step. As an example on this kit I added a small inlet pipe and gas cap to the belly tank. Weathering was limited to some silver on the exhaust panels dzus fasteners. It worked. The kit was done in under two weeks of occasional building activity and was it ever worth the effort!
| CONCLUSIONS |
Hasegawa’s P-40E Warhawk is a very enjoyable build. Whether you build it OOB or take the path I did on this build and add a few etched bits and decals available from aftermarket providers you will be delighted with your final results.
I am just waiting for the Aires resin exposed Allison engine for the P-40 for a new build!
| REFERENCES |
American Warplanes of World War 2' (Aerospace / AIRtime [UK / USA], 1995
P-40 Warhawk Walk Around series, No. 8; #5508 Squadron/Signal [USA],1996
Amercian Volunteer Group Colours and Markings (P40 Tomahawks of AVG) Osprey Aircraft of the Aces series, No. 41; Osprey [UK], 2001 by T. Clements
Curtiss P-40 (MBI [Czech Republic], 1993; in Czech and English by Ehrman
Curtiss P-40 (MBI [Czech Republic], 1998 by Ehrman and Roman
US Army Air Forces World War Two: Volume I - Warbirds Illustrated series, No. 38; by Jeff Ethell , Arms and Armour Press [UK], 1986
P-40 Warhawk in World War II Color (Enthusiast Color series [unnumbered] – by Jeff Ethell; Motorbooks International [USA], 1994
Red Stars 4: Lend-Lease Aircraft in Russia' (Red Stars series, No. 4; Apali Oy [Finland], 2001; in Finnish and English; by Geust and Petrov: US
US Army Air Force Fighters, Part 1 (WW2 Aircraft Fact Files series ; Arco [USA], 1977
P-40 Warhawk Wabird History, MBI Motorbooks Inc., 1998 ISBN 0-7603-0253-7 by Frederick A. Johnsen
P-40 Warhawk, Part 1 Detail & Scale series, No. 61; #8261 Squadron/Signal [USA], 1999 by Bert Kinzey
P-40 Warhawk, Part 2 (Detail & Scale series, No. 62; #8262 Squadron/Signal [USA], 1999 by Bert Kinzey
Curtiss P-40 in Action' No. 1026; Squadron/Signal [USA], 1976 by Ernest McDowell
Checkertails- The 325th Fighter Group in the Second World War' Squadron/Signal [USA], 1994 by Ernest McDowell
P-40 Warhawk Aces of the CBI' Osprey Aircraft of the Aces series, No. 35; Osprey [UK], 2000 by Molesworth
P-40 Warhawk Aces of the MTO' (Osprey Aircraft of the Aces series, No. 43; Osprey [UK], 2002 by Molesworth:
Building The P-40 Warhawk – Glen Phillips & Kevin Hjermstad; Kalmbach Books
Cockpits - Early WWII' (Cockpits series, No. 1; Peregrine Publishing [USA], 2001; 11 pages; US$9.95) -- P-40E [Kittyhawk I] cockpit detail on pg. 6 by Muth
Curtiss P-40' (Wydawnictwo Militaria series, No 104; Wydawnictwo "Militaria" [Poland], 2000; in Polish and English by Nowicki and Zbiegniewski:
Curtiss P-40 Vol. II' (Wydawnictwo Militaria series, No. 122; Wydawnictwo "Militaria" [Poland], 2000; in Polish and English by Nowicki and Zbiegniewski: '
USAAF Fighters of World War Two in Action (Blandford Press[UK], 1986 by O'Leary
Curtiss P-40 Tomahawk/Kittyhawk/Warhawk, cz. 1 (Monografie Lotnicze series, No. 64; AJ Press [Poland], 2000 by Rys
The Curtiss Hawks (Wolverine Press [USA], 1972 by Shamburger and Christy
Tigers over China: The Aircraft of the A.V.G (Eagle Files series, No. 4; Eagle Editions [USA], 2001; 87 pages) by Tom Tullis
Curtiss Kittyhawk Mk.I-IV in RAF, SAAF, RAAF, RNZAF, RCAF, NEIAF Service (Aircam Aviation series, No. 6; Arco [USA], 1969 by Ward and Shores
Curtiss P-40D-N Warhawk in USAAF, French and Foreign Service' (Aircam Aviation series, No. 7; Arco [USA], 1969 by Ward and Shores
Curtiss P-40 Warhawk' (Famous Airplanes of the World (1) series, No. 117; Bunrin-Do [Japan], 1980
Curtiss P-40 Warhawk' (Famous Airplanes of the World (2) series, No. 39; Bunrin-Do [Japan], 1993
December 2005
Review kit, and decals courtesy of my stash, my wife’s cooperation and my three son’s encouragement. They have found a kind compliment like “Hey Dad, cool kit, nice job.” gets a quick positive reply to the question “Can I have the car for a while?”
Copyright ModelingMadness.com. All rights reserved. No reproduction in part or in whole without express permission.
If you would like your product reviewed fairly and quickly, please contact the editor or see other details in the Note to Contributors.