|
KIT: |
Hobbygram 1/48 P-40B/C Tomahawk |
|
KIT # |
HC 1451/85-5209 |
|
PRICE: |
$16 and $10 |
|
DECALS: |
see review |
|
REVIEWER: |
|
|
NOTES: |
Kitbash of Mongram and Hobbycraft P-40s |
|
HISTORY |
13,738
examples of the P-40 in various makes and models rolled off of the
assembly line of the Curtiss Wright Aircraft Corporation of Buffalo New
York from 1939 to 1944.
 Curtiss at one time was the premiere fighter plane builder in the world.
The P-40 can trace its roots back to the Curtiss built P-36. Donavan
Berlin was an engineer with Curtiss Wright and was assigned the task of
designing a fighter plane for the 1936 Air Corps fighter competition. His
design was the P-36. Berlin had purposely left room to grow the P-36
airframe for engines that had yet to be perfected. The Air Corps felt the
future of fighters laid in the development of the inline engine and
streamlining of the airframe. Thinking of the time felt that an inline
engine installed into a streamlined airframe would be faster than a
radial engine installed in a nonstreamlined airframe. A contract was
awarded to Curtiss to produce a fighter based on the P-36 airframe mated
to a General Motors Allison V-1710 inline liquid cooled engine. The Air
Corps and General Motors had quite a bit of time and money invested in
the still unproven Allison V-1710 liquid cooled engine and hopes were
high that this airframe and engine combination would prove to be a
winner. In a 1939 Air Corps fighter competition between the Lockheed
XP-38, Bell XP-39 and the Curtiss XP-40 found the XP-40 to be the winner.
The facts that the clouds of war were looming on the horizon and that
the XP-40 was ready for mass production helped the Air Corps make their
decision.
Curtiss at one time was the premiere fighter plane builder in the world.
The P-40 can trace its roots back to the Curtiss built P-36. Donavan
Berlin was an engineer with Curtiss Wright and was assigned the task of
designing a fighter plane for the 1936 Air Corps fighter competition. His
design was the P-36. Berlin had purposely left room to grow the P-36
airframe for engines that had yet to be perfected. The Air Corps felt the
future of fighters laid in the development of the inline engine and
streamlining of the airframe. Thinking of the time felt that an inline
engine installed into a streamlined airframe would be faster than a
radial engine installed in a nonstreamlined airframe. A contract was
awarded to Curtiss to produce a fighter based on the P-36 airframe mated
to a General Motors Allison V-1710 inline liquid cooled engine. The Air
Corps and General Motors had quite a bit of time and money invested in
the still unproven Allison V-1710 liquid cooled engine and hopes were
high that this airframe and engine combination would prove to be a
winner. In a 1939 Air Corps fighter competition between the Lockheed
XP-38, Bell XP-39 and the Curtiss XP-40 found the XP-40 to be the winner.
The facts that the clouds of war were looming on the horizon and that
the XP-40 was ready for mass production helped the Air Corps make their
decision.
|
THE KITS |
Upon
opening the Hobbycraft box one is greeted with 3 gray sprues and 1 clear
sprue. One of the gray sprues are borrowed form the Hobbycraft P-36 kit
and explains the extra propeller assembly and ADF football not used on
the P-40. The parts of the kit have fine engraved surface detail for the
metal airframe and slightly raised rib detail for the fabric covered
flight controls. An adequately detailed cockpit is provided and looks
okay when painted. The main gear struts look toy like and there is no
detail on the main gear doors and the inboard gear door is undersized.
There is a size and shape discrepancy between the bulged and non-bulged
wheel and tire assembly. The tail wheel resembles a grocery cart caster
and the tail 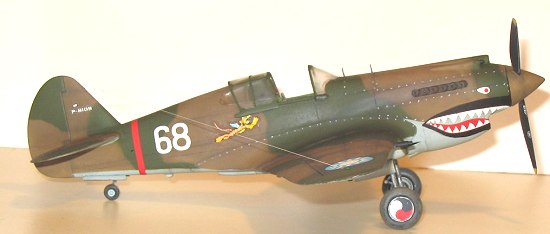 wheel strut looks as if it would fold like a cheap suit. The
windscreen is undersized, the canopy is the wrong shape and size, and the
rear view windows have the framing angled which is wrong. The main gear
wheel wells have fictitious detail and the tail wheel well has no detail.
The decal sheet in this release provides markings for two AVG Tomahawks:
White 67 and R.T. Smith's White 77. A tri fold instruction booklet is
included with good assembly pictures for each step. As with all
Hobbycraft instruction booklets the exterior painting guide is good and
the interior painting call outs are omitted.
wheel strut looks as if it would fold like a cheap suit. The
windscreen is undersized, the canopy is the wrong shape and size, and the
rear view windows have the framing angled which is wrong. The main gear
wheel wells have fictitious detail and the tail wheel well has no detail.
The decal sheet in this release provides markings for two AVG Tomahawks:
White 67 and R.T. Smith's White 77. A tri fold instruction booklet is
included with good assembly pictures for each step. As with all
Hobbycraft instruction booklets the exterior painting guide is good and
the interior painting call outs are omitted.
When one opens the Monogram box you see a parts bag with olive drab
colored parts and a set of clear parts. The detail on the kits is all
raised and appears to have a case of chicken pox because of all of
rivets. The cockpit is lacking in detail and the instrument panel
resembles one from a P-40 E. The main gear struts are well detailed and
the wheel and tire assembly are good reproductions of the original. The
main gear doors and inboard gear doors have the right size and shape as
well as good detail. The tail wheel looks okay but the wheel and tire are
molded to the wrong side of the tail wheel strut. There is no detail in
the main gear wheel wells or the tail wheel wells. The decal sheet in
this kit provides markings for three aircraft: White 14 of the AVG, White
KHR of the RAF and an Air Corps marked ship. An instruction sheet with a
brief history and good pictures for each step are provided. Painting call
outs provided for the interior are great but the exterior call outs leave
much to the imagination.
|
CONSTRUCTION |
Since
I can remember the P-40 has been my favorite airplane. It must be
genetics because my Father was also a P-40 lover. Over the years I have
built many Monogram P-40 out of the box with Testors tube cement and
painted them with PLA tan, green, and light blue with a red spinner for
good measure. Modeling has come a long way since then and I hope to think
I have as well.
 I have built one Hobbycraft Tomahawk out of the box and came to the
realization that while the kit had a few whistles and bells that the
Monogram kit did not have the finished product looks as much like a real
Tomahawk as the Tomahawk props used in the John Wayne classic film "The
Flying Tigers." I have also built the Monogram Tomahawk out of the box
and with some TLC it can be a real gem. (See the reviews of Roger Jackson
or Tom Cleaver) One might ask why not build the Monogram kit out of the
box and call it a day? If I could rescribe an entire kit I would have it
made. In the New World Order of recessed detail it is hard for me to not
have a better Tomahawk with the detail I want my models to have. I have
enough trouble cutting straight lines into flat plastic surfaces.
I
decided that I would use the best parts of the Monogram kit with the best
parts of the Hobbycraft kit to make the Tomahawk I have longed for.
I have built one Hobbycraft Tomahawk out of the box and came to the
realization that while the kit had a few whistles and bells that the
Monogram kit did not have the finished product looks as much like a real
Tomahawk as the Tomahawk props used in the John Wayne classic film "The
Flying Tigers." I have also built the Monogram Tomahawk out of the box
and with some TLC it can be a real gem. (See the reviews of Roger Jackson
or Tom Cleaver) One might ask why not build the Monogram kit out of the
box and call it a day? If I could rescribe an entire kit I would have it
made. In the New World Order of recessed detail it is hard for me to not
have a better Tomahawk with the detail I want my models to have. I have
enough trouble cutting straight lines into flat plastic surfaces.
I
decided that I would use the best parts of the Monogram kit with the best
parts of the Hobbycraft kit to make the Tomahawk I have longed for.
The Hobbycraft fuselage is not without its faults but it comes scribed
and looks almost spot on. I started with the Hobbycraft fuselage halves
and used my motor tool to eliminate the molded in cockpit detail. I
substituted a resin cockpit from Legend. I also compared the Monogram and
Hobbycraft fuselage halves to each other and found that where the
windscreen mounts to the Hobbycraft fuselage is 1/8th of an inch too far
aft. I reworked the opening to match the Monogram kit. I also opened up
where the exhaust pipes come out of the fuselage sides and drilled out
the exhaust pipes from the Monogram kit and installed them from the
inside. I opened up the area on the leading edge of the rudder where the
elevator torque tube passes thru. The Hobbycraft fuselage halves were
then glued together and then the radiator/oil cooler inlet installed to
the lower forward cowling. I used the Monogram nose machine gun faring as
they look more the part than the Hobbycraft offerings.
 The Hobbycraft wing assembly and horizontal stabilizer assembly have
serious shape problems. I elected to use the Monogram wing and horizontal
stabilizer and rescribe them to match the Hobbycraft fuselage. I
rescribed the detail on the upper and lower wings and horizontal
stabilizers of the Monogram kit using the tips Roger Jackson sent me on
scribing. I attached the Monogram horizontal stabilizers to the
Hobbycraft fuselage with super glue. The main gear wheel well was filled
with plastic to simulate the lower wing/top of the wheel well and masking
tape was used to simulate a canvas liner installed in the wing box area
where the wheels retracted into. The upper wing halves were then glued to
the lower wing. I cut away the cowl flaps from the Hobbycraft fuselage
and superglued the Monogram wing to the fuselage. Open cowl flaps were
then simulated by using the cowl flaps cut out from the Monogram
fuselage.
The Hobbycraft wing assembly and horizontal stabilizer assembly have
serious shape problems. I elected to use the Monogram wing and horizontal
stabilizer and rescribe them to match the Hobbycraft fuselage. I
rescribed the detail on the upper and lower wings and horizontal
stabilizers of the Monogram kit using the tips Roger Jackson sent me on
scribing. I attached the Monogram horizontal stabilizers to the
Hobbycraft fuselage with super glue. The main gear wheel well was filled
with plastic to simulate the lower wing/top of the wheel well and masking
tape was used to simulate a canvas liner installed in the wing box area
where the wheels retracted into. The upper wing halves were then glued to
the lower wing. I cut away the cowl flaps from the Hobbycraft fuselage
and superglued the Monogram wing to the fuselage. Open cowl flaps were
then simulated by using the cowl flaps cut out from the Monogram
fuselage.
The Monogram spinner/propeller assembly was used instead of the
Hobbycraft offering. The Monogram windscreen was fitted to the Hobbycraft
fuselage. The Monogram canopy was modified with rail guides superglued to
each side of the canopy. I used the Monogram rear view windows. I drilled
out the openings in the rear view windows to correspond with the gas and
oil caps molded into the recess of the Hobbycraft fuselage. The Monogram
wheel and tire assemblies were built up and fitted to the Monogram main
gear strut and installed in their respective positions. I sawed the
Monogram tail wheel strut in half above the wheel and superglued the
wheel to the right side of the strut. The Monogram outboard main gear
doors were trimmed at an angle on the aft side of each door and
installed.
|
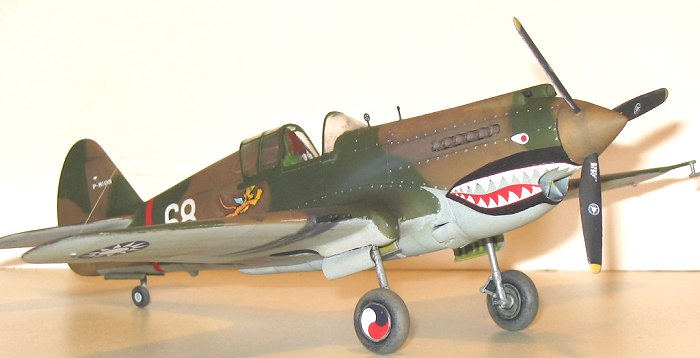
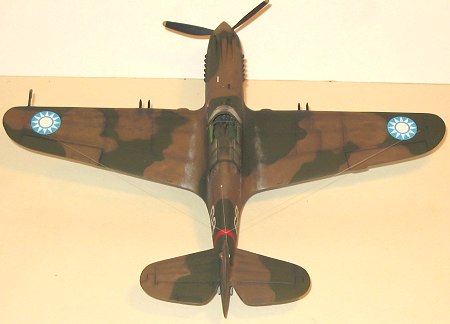
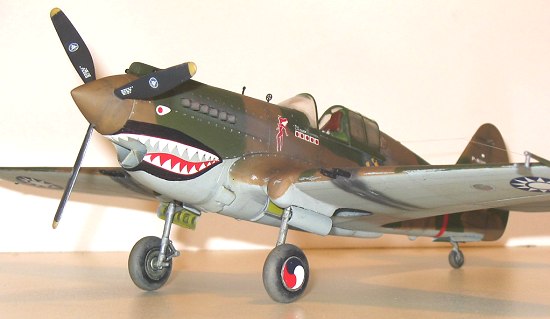
CAMOUFLAGE & MARKINGS |
 Since
the original customer for the Tomahawks that were delivered to the
Chinese was the RAF, Curtiss painted these aircraft to British
specifications. Curtiss used DuPont enamel paints and matched the colors
as close as they could to the British specifications. Ever wonder where
the expression "Close enough for Government work!" came from? For the
lower surfaces of the Tomahawk I used Model Master enamel Aircraft Gray
which looks like the color on the pictures of the AVG Tomahawks I have
seen. The lower surfaces were then masked off and Model Master enamel
Dark Earth and Dark Green was sprayed on for the upper surface camouflage
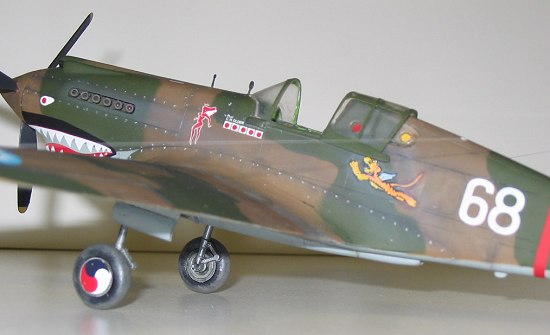
colors using home made paper masks. I sprayed two coats of Testors
Glosscote and started looking for decals to do Charles Older's White 68.
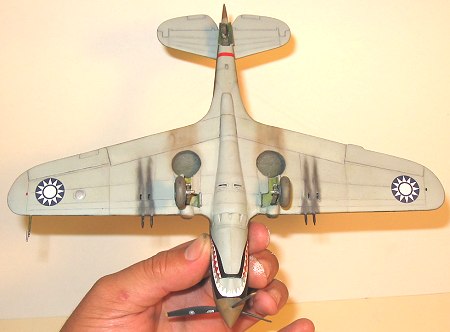
The Chinese roundels, red fuselage band, and kill flags came from the
Hobbycraft kit. The Disney Flying Tiger decals, the White 68, the
aircraft serial number and other small stencils came from the Academy
1/48 P-40C (The Academy P-40 mold is the Hobbycraft mold) . The teeth,
eyes and the wheel cover pinwheels came from the Sky Models P-40 decal
sheet.
Since
the original customer for the Tomahawks that were delivered to the
Chinese was the RAF, Curtiss painted these aircraft to British
specifications. Curtiss used DuPont enamel paints and matched the colors
as close as they could to the British specifications. Ever wonder where
the expression "Close enough for Government work!" came from? For the
lower surfaces of the Tomahawk I used Model Master enamel Aircraft Gray
which looks like the color on the pictures of the AVG Tomahawks I have
seen. The lower surfaces were then masked off and Model Master enamel
Dark Earth and Dark Green was sprayed on for the upper surface camouflage
colors using home made paper masks. I sprayed two coats of Testors
Glosscote and started looking for decals to do Charles Older's White 68.
The Chinese roundels, red fuselage band, and kill flags came from the
Hobbycraft kit. The Disney Flying Tiger decals, the White 68, the
aircraft serial number and other small stencils came from the Academy
1/48 P-40C (The Academy P-40 mold is the Hobbycraft mold) . The teeth,
eyes and the wheel cover pinwheels came from the Sky Models P-40 decal
sheet.
|
CONCLUSIONS |
Now that I have finished turning two good kits into spare parts it is okay for a major manufacturer to release their much anticipated 1/48th scale Tomahawk/Hawk 81/P-40B-C offering. Would I put one Monogram P-40, one Hobbycraft P-40, and one resin cockpit together again? I have already started. If you are looking for a project with the challenge of doing algebra in Chinese, this Bud's for you.
|
REFERENCES |
Monogram 1/48 P-40B/C by Roger Jackson @ ModelingMadness.com
Monogram 1/48 P-40B Tomahawk by Tom Cleaver @
ModelingMadness.com
Tigers Over China The Aircraft of the A.V.G. by
Thomas A. Tullis 2001 Eagle Editions Ltd.
If you would like your product reviewed fairly and quickly by a site that has over 200,000 visitors a month, please contact me or see other details in the Note to Contributors.