|
KIT # |
72033 |
|
PRICE: |
$20.00 AUD |
|
DECALS: |
Four aircraft |
|
REVIEWER: |
|
|
NOTES: |
Short run kit with vac and resin bits. |
|
HISTORY |
For a look at what’s in the box and a short history here is the preview of the Hawk
|
THE KIT |
Pavla's Hawk
81 is molded in a light grey soft plastic that had caused most of the large
pieces to become detached from the sprue in transit, damaging a number of parts
in the process. The first order of
 business was to carefully go
through all the pieces and try and clean up the jagged edges and see what sort
of repair work was going to be needed. Thankfully most of the damage was
confined to the fuselage attachment points.
business was to carefully go
through all the pieces and try and clean up the jagged edges and see what sort
of repair work was going to be needed. Thankfully most of the damage was
confined to the fuselage attachment points.
The instruction book is 18 pages crammed full of decal options and painting details with the 14 construction steps well thought out and easy to follow. Paint colors have Humbrol call outs as the Humbrol is more common in Eastern countries than other brands, FS numbers are given for each color for those of you that use them.
For some reason the lower wing looked like it had been damaged by a solvent of some type and the plastic had a rough grainy like surface that when sanded went like rubber cement and rolled off in little balls.
|
CONSTRUCTION |
 Once the
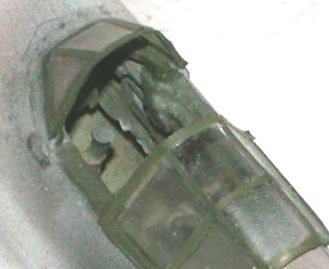
fuselage parts were cleaned the resin cockpit was carefully assembled and
painted up. With sidewalls, seat, floor and instrument panel in place the
cramped cockpit is looking very detailed for this scale. careful painting
brought out the detail in the control panel and sidewalls. The only thing that
was needed to finish off the cockpit was a set of seatbelts that were made from
the foil top of a good Kiwi wine, great stuff that foil but is becoming harder
to get now the wine industry has switched to screw-top bottles.
Once the
fuselage parts were cleaned the resin cockpit was carefully assembled and
painted up. With sidewalls, seat, floor and instrument panel in place the
cramped cockpit is looking very detailed for this scale. careful painting
brought out the detail in the control panel and sidewalls. The only thing that
was needed to finish off the cockpit was a set of seatbelts that were made from
the foil top of a good Kiwi wine, great stuff that foil but is becoming harder
to get now the wine industry has switched to screw-top bottles.
Before closing up the fuselage backing plates were added to the exhaust slots and the resin nose insert was cleaned up and added to one side, once everything was lined up the fuselage was taped up and MEK run along the joint using a modified sewing needle as an applicator, being careful to not destroy the fine detailing that Pavla had produced on the Hawk. Once dry (about 5 mins) the tape was removed and MEK run into the areas that had been covered by tape. A light sand was all that was needed to finish off the joint.
The one piece lower wing was glued into place at this point and the whole plane was left for a few days. On returning I wasn’t happy with the amount of dihedral that the lower wing had, this was a problem that the Academy Hawk had as well and both Pavla’s and Academy's Hawks had a very flat wing completely throwing out the undercarriage geometry. Using photographs and three view drawings the wing was very gently heated with steam and bent into the right angle. Once I was satisfied the upper wings were trimmed slightly at the wing roots and fixed to the lower wing.
 The only
tricky part in the remaining construction was the exhaust stubs which Pavla had
molded as separate resin stubs, all of 1mm in length. Now have you ever tried
cutting resin that small and thin? not and easy job, Heres and account of trying
to cut the 12 stubs. One stub shot into the cats ear, cat exits stage left, down
to 11, two and three off with no problems, four and five broke, down to 9, six
went click ……..*dink* gave up after 25 minutes of searching now down to 8, seven
through to twelve managed to at least get as far as the desk. Okays, now I have
eight stubs and two broken ones, right-o time for the super glue. After managing
to glue one of the broken stubs back together the other one decided it liked
sticking to the table better and refused to budge *sigh * Not a happy
chappy.
The only
tricky part in the remaining construction was the exhaust stubs which Pavla had
molded as separate resin stubs, all of 1mm in length. Now have you ever tried
cutting resin that small and thin? not and easy job, Heres and account of trying
to cut the 12 stubs. One stub shot into the cats ear, cat exits stage left, down
to 11, two and three off with no problems, four and five broke, down to 9, six
went click ……..*dink* gave up after 25 minutes of searching now down to 8, seven
through to twelve managed to at least get as far as the desk. Okays, now I have
eight stubs and two broken ones, right-o time for the super glue. After managing
to glue one of the broken stubs back together the other one decided it liked
sticking to the table better and refused to budge *sigh * Not a happy
chappy.
At this point the model was put on hold for a few weeks as I had lost interest in the sodding exhausts, the P-40 contest and the fact that this was a FBN model meant that I was going to have to pull finger and finish it. Only problem was that two more of those @#$% stubs had gone AWOL during the lay-off. Nothing left but to scratch build some new ones out of sprue. finally I had 6 stubs on each side glued in but not straight as it was almost impossible to get them all sitting correctly, in the end the single stubs may work on 1/48th scale aircraft but in 1/72nd scale they are just too small and finicky to use, a separate single piece stack would be far better and would save a lot of grief.
|
CAMOUFLAGE & MARKINGS |
Given the wonderful selection of decals that Pavla includes you would be forgiven if you spend weeks trying to decide which scheme to do. I my case it was an easy choice because if a decal sheet has red stars on it that’s the one that I will do. Heres a quick run down of the options offered in this kit.
 Decals are
given for no less than four aircraft, A P-40-CU of the 8 pursuit Group
Commanders Flight, Langley Field Base, Virginia, summer 1940, secondly a
Tomahawk IIB F/Lt Clive R "Killer" Caldwell of 250 squadron, North Africa 1942,
he gained ten confirmed air victories with this Tomahawk. Third aircraft is a ex
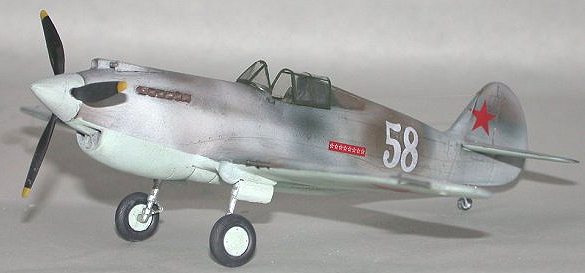
British Tomahawk IIB “white 58" Lt Alexey S.Khobystov of the 147th Fighter
airwing Murmashi airfield, Spring 1942, and finally is a Curtiss H-81A-2 of Lt
Charles N.Older from the American Volunteers 3rd squadron "Hells Angels"
1941/1942 this aircraft is also one of the decal options from the Academy kit in
the same scale.
Decals are
given for no less than four aircraft, A P-40-CU of the 8 pursuit Group
Commanders Flight, Langley Field Base, Virginia, summer 1940, secondly a
Tomahawk IIB F/Lt Clive R "Killer" Caldwell of 250 squadron, North Africa 1942,
he gained ten confirmed air victories with this Tomahawk. Third aircraft is a ex
British Tomahawk IIB “white 58" Lt Alexey S.Khobystov of the 147th Fighter
airwing Murmashi airfield, Spring 1942, and finally is a Curtiss H-81A-2 of Lt
Charles N.Older from the American Volunteers 3rd squadron "Hells Angels"
1941/1942 this aircraft is also one of the decal options from the Academy kit in
the same scale.
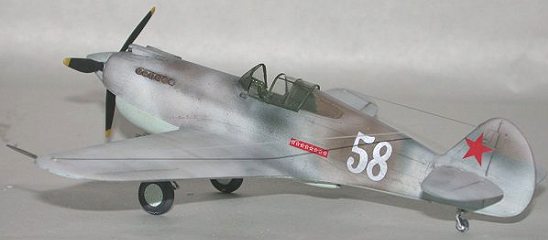
As “White 58”
was an ex RAF Tomahawk the first order was to paint it using standard RAF camo
of Dark earth over Green. This scheme is shown in both winter and summer
configurations with the white winter distemper. As my confidence has improved
somewhat over the last year or so since finding MM I decided it was time to try
a winter scheme. Decals were applied over the glossed “RAF” scheme using my
usual homebrewed decal softener and once dry the decals were sealed with a
couple of light coats of Humbrol Mate Kote. Now time for some fun. after masking
off the underside as the instructions
 only showed the white on the upper
surface, the airbrush was loaded up with a very thin mix of white with a few
drops of light grey added to kill the starkness of pure white, working very
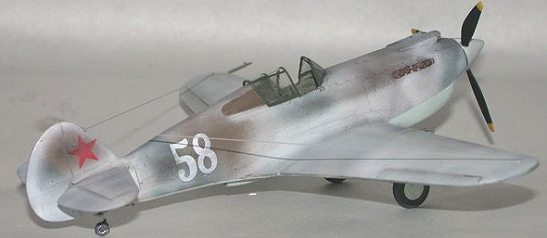
slowly I built up a patchy, blotchy effect on the upper wings and fuselage
taking care not to completely cover up the decals This is the first time I have
tried an effect like this and I am reasonably happy with the final effect, once
dry a rub over with a soft nylon pot scrubber removed a little of the thin white
paint and highlighted the streaks and patches.
only showed the white on the upper
surface, the airbrush was loaded up with a very thin mix of white with a few
drops of light grey added to kill the starkness of pure white, working very
slowly I built up a patchy, blotchy effect on the upper wings and fuselage
taking care not to completely cover up the decals This is the first time I have
tried an effect like this and I am reasonably happy with the final effect, once
dry a rub over with a soft nylon pot scrubber removed a little of the thin white
paint and highlighted the streaks and patches.
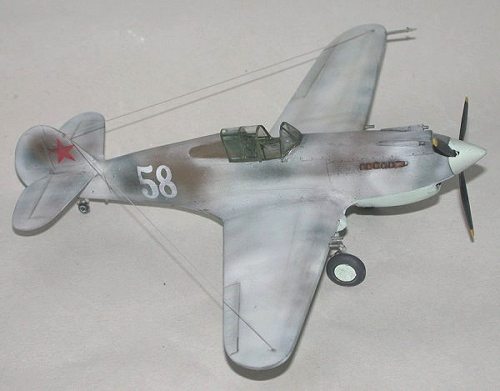
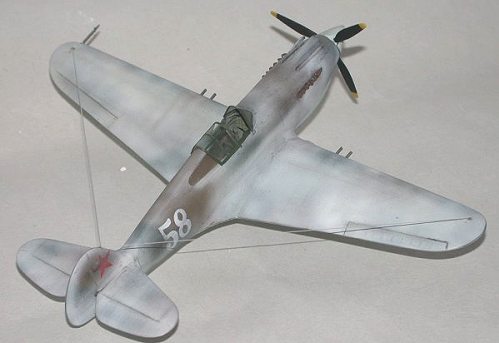
The propeller was assembled at this point using a home-made rig as it consisted of separate resin blades and a plastic spinner. I replaced the guns with copper tubing and used some more tubing to add a little extra detailing on the undercarriage legs. Pavla includes two Vac formed canopies and a small section of clear sheet to create the rear windows. Using the supplied template from the plan two new windows were cut out from substituted clear sheet from a modem package as it was thinner and clearer, once cut to shape they were glued in using white glue. The main canopy was cut from it’s backing sheet and carefully trimmed to fit, by opening up the canopy it made it easier to hide the fact that the canopy was slightly too narrow.
Final details like aerial wires were added from stretched sprue and the Pitot tube came from sewing pin and the plane was then weathered using grey, brown and black chalk pastels, brown pastels were also used to do some post shading around panel lines and to grime up the exhaust. Once finished a couple more coats of Matt Kote was gunned on to seal in the pastels.
|
CONCLUSIONS |
Apart from the single exhaust piece’s which there really is no need to do like that in this scale the rest of the kit fell together with no major problems and is streets ahead of the Academy Hawk for overall “rightness”. Recommended for providing a good looking Hawk 81 in your collection and for someone wanting to advance their modelling skills a little bit with the inclusion of some multimedia bits.
|
REFERENCES |
http://home.att.net/~jbaugher1/p40_6.html
Fighting Aircraft of WWII , Bill Gunston ISBN 1-84065-092-3
Kit courtesy of FBN Productions overseas assistance fund.
If you would like your product reviewed fairly and fairly quickly, please contact the editor or see other details in the Note to Contributors.