Accurate Miniatures 1/48 TBM Avenger
|
KIT # |
3406 |
|
PRICE: |
$34.95 MSRP |
|
DECALS: |
VT-10 |
|
REVIEWER: |
|
|
NOTES: |
Superscale 48-566 used. |
|
HISTORY |
This kit represents a Grumman TBM-3 Avenger. The TBF was designed in response to a U.S. Navy request for an aircraft to replace the obsolete TBD Devastator torpedo bomber. The TBF was ordered for production in December of 1940. The first aircraft were delivered to the Navy on January 30, 1942 and by this time had been christened with its official name "Avenger," in response to the attack on Pearl Harbor. By mid-1942, Grumman Aircraft was producing sixty aircraft a month.
 However, the Navy requirement for aircraft
was more than Grumman Aircraft could produce, so the Eastern Aircraft
Division of General Motors was authorized to begin building the Avenger.
These aircraft were identical to the Grumman Aircraft and were designated
"TBM". By the end of 1943 the Eastern Aircraft Division was the sole
producer of Avengers, and by VJ Day had produced over 7,500 aircraft.
However, the Navy requirement for aircraft
was more than Grumman Aircraft could produce, so the Eastern Aircraft
Division of General Motors was authorized to begin building the Avenger.
These aircraft were identical to the Grumman Aircraft and were designated
"TBM". By the end of 1943 the Eastern Aircraft Division was the sole
producer of Avengers, and by VJ Day had produced over 7,500 aircraft.
|
THE KIT |
Accurate Miniatures TBM-3 Avenger will overwhelm you when you open the box. The cockpit alone consists of 22 parts, half of which make up the detailed rear turret. All surface detailing is of the recessed variety, (with enough raised rivets to make it a viable Iron Works aircraft…) The canopy parts are well molded, exceptionally thin, and very clear. Unfortunately this boxing has only the Mk-13 torpedo. If you want other ordnance, you’ll have to get the other boxings.
Modelers are also provided with the option of cutting out the landing flaps and displaying the model with them deployed. This is a nice feature, but no details are provided on the underside of the top half of the wings.
|
CONSTRUCTION |
Before commencing construction, take some time and thoroughly read the instructions. They aren’t the usual diagrams I’ve become accustomed to, but are detailed assembly steps with paragraphs containing technical assembly notes. I swear I was reading and re-reading the instructions every ½ an hour just to make sure I wasn’t missing anything.
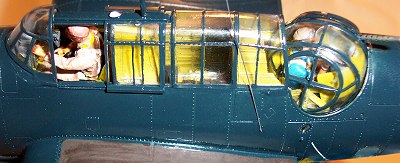
Construction naturally began with the cockpit. I started by gluing together the cockpit floor, bomb bay roof and bulkheads as well as bomb racks. This was then airbrushed using Testors Zinc Chromate. Also finished in chromate were the fuselage halves, and any other interior components, except for the instrument panel. After the paint had dried, I gave it a heavy coat of Dull Cote, in preparation for the dark green wash that followed. Once the wash had dried, the interior parts were dry-brushed with a mixture of Chromate and white. The interior of this kit is a dry-brusher's dream—it really brings out the amount of detail.
 Accurate Miniatures supplies two instrument
panels, and while looking the same, there are subtle differences. Make
sure you use the proper one for the variant you are building—again, read
the instructions. The instrument panel is molded in clear in an attempt
to replicate the glass on the instruments. I painted the back of it a
dark gray and then painted the around the instruments w/ black, followed
by dry-brushing the small warning areas were picked out using red.
Accurate Miniatures supplies two instrument
panels, and while looking the same, there are subtle differences. Make
sure you use the proper one for the variant you are building—again, read
the instructions. The instrument panel is molded in clear in an attempt
to replicate the glass on the instruments. I painted the back of it a
dark gray and then painted the around the instruments w/ black, followed
by dry-brushing the small warning areas were picked out using red.
As this plane was going to be displayed in flight, it needed some aircrew. Figures were robbed from several Pro- Modeler SB2C Helldiver kits. The pilot was painted so that he’s wearing the khaki flight suit so prevalent to the Pacific and the aircrewmen are wearing dungarees. Of course adding figures completely covered up all that great detail in the cockpit…
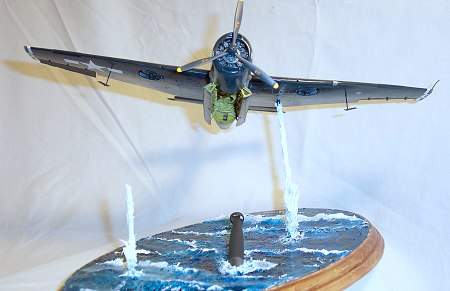
After installing the ventral gun, the fuselage halves were glued together and set aside while I tackled the wings. I began by removing the ailerons and elevators from the wings and tail. To display the plane in-flight I planned on using a brass rod running from the base to the wing. I drilled a hole in the bottom port wing half and inserted the rod. At one time I had toyed with the thought of motorizing the model and running wires up the rod and through the aircraft to an electric motor hidden in the fuselage, but time constraints prevented me from doing this. The wing halves were all glued together and set aside to dry. After drying, the landing gear was glued in the wheel well, and the gear doors glued in place. It pained me to cover up all this detail, but such is the price one pays to display a plane in flight.
Next the wings were attached to the fuselage. The fit is so tight, that there is literally no way you could need filler. With the wings attached, I attached the control surfaces using super glue and bits of wire, making sure that I was attaching them in a manner that was correct for a climbing left hand turn.
 The engine assembly is comprised of 4 parts
- front and rear cylinders, engine crankcase with the ignition harness
and a propeller shaft. I painted the cylinders black, followed by a
silver dry brushing. The crankcase was finished in dark gray with the
ignition harness painted gloss black. All this is trapped within the
three-piece engine cowling. It’s such a tight fit, that you can’t even
see the inside of the engine bay.
The engine assembly is comprised of 4 parts
- front and rear cylinders, engine crankcase with the ignition harness
and a propeller shaft. I painted the cylinders black, followed by a
silver dry brushing. The crankcase was finished in dark gray with the
ignition harness painted gloss black. All this is trapped within the
three-piece engine cowling. It’s such a tight fit, that you can’t even
see the inside of the engine bay.
The last bit of construction prior to painting entailed gluing the large greenhouse canopy and windscreen to the fuselage. After doing this, I began to paint the canopy framing by masking off each frame and brush painting it. Although this was extremely tedious, it allowed me to ensure that there were no heinous seams that would show up after painting. After painting all this, I attached the turret to the plane and masked off the whole cockpit.
|
CAMOUFLAGE & MARKINGS |
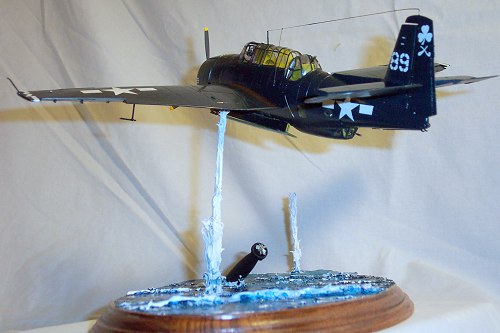
 The nice thing about having a brass rod
sticking out of the port wing was that I had a handy spot to grip the
model while painting. I painted the entire Model Master Gloss Sea Blue
(FS15042). That’s the nice thing about the late war color schemes on USN
aircraft—they’re quite easy to paint!
The nice thing about having a brass rod
sticking out of the port wing was that I had a handy spot to grip the
model while painting. I painted the entire Model Master Gloss Sea Blue
(FS15042). That’s the nice thing about the late war color schemes on USN
aircraft—they’re quite easy to paint!
Because the paint was gloss, there was no need to spray a gloss coat for the decals. I used the Super Scale sheet 48-566 as I really liked the markings from the USS Shamrock Bay. The decals went on fine with no problems whatsoever. The only decals I used from the Accurate Miniatures sheet were the walkways, which also went on fine. A coat of Future sealed everything. Weathering was kept to a minimum other than the normal streaks and exhaust stains. I applied a wash around the flight controls for some definition and kept it at that. I didn’t do any paint chipping, as I don’t think you’d see it on naval aircraft at sea. Metal rusts so quickly out there, that bare metal just isn’t allowed; it’s always painted over quickly lest corrosion begin to attack the remainder of the plane.
|
FINAL CONSTRUCTION |
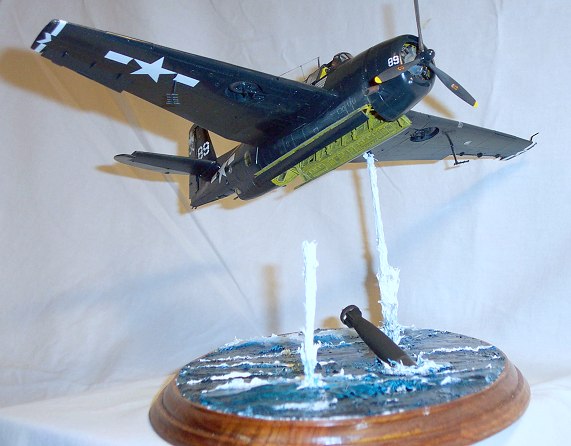
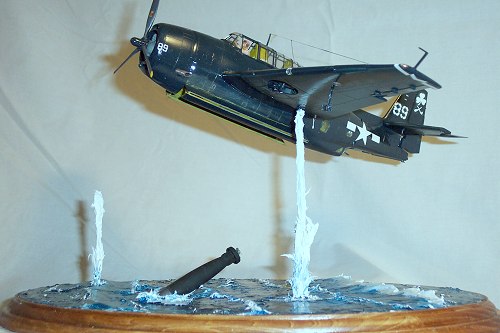 All that remained was the installation of
the bomb bay doors, Yagi antennae and the stretched sprue antenna wire.
The sliding canopy sections were tacked in place with Cyao. The model
was then mounted to its display base. Another rod was inserted into the
base to help form the splashes. The Torpedo was cut at an angle and
glued to the base as well, (although after finishing the project, I think
the angle I used makes it look like a bad drop—I’d hate to be the pilot
who just put his and his aircrews lives on the line, and then messed up
by not dropping his torpedo properly…)
All that remained was the installation of
the bomb bay doors, Yagi antennae and the stretched sprue antenna wire.
The sliding canopy sections were tacked in place with Cyao. The model
was then mounted to its display base. Another rod was inserted into the
base to help form the splashes. The Torpedo was cut at an angle and
glued to the base as well, (although after finishing the project, I think
the angle I used makes it look like a bad drop—I’d hate to be the pilot
who just put his and his aircrews lives on the line, and then messed up
by not dropping his torpedo properly…)
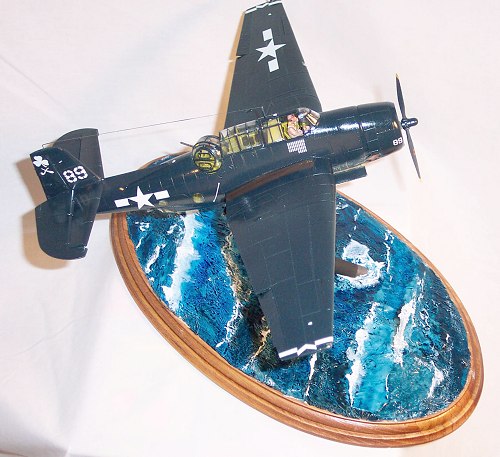
The water was made from silicon bathroom caulk. This was my first time using it and it proved malleable enough to make swells and the various splashes from ordnance etc… After it had dried, I then painted it with a mixture of Gloss Sea Blue mixed with differing shades of blue. Gloss white was used to dry brush the edges of the waves.
|
CONCLUSIONS |
This is an extremely satisfying kit. I used absolutely no filler on the entire kit, and it was a joy to build. I spent most of my time on the cockpit and bomb bay trying to do justice to the great amount of detail in there. When building this kit, if you follow the instructions and have a little patience you will be rewarded with a superb finished product. I highly recommend this kit.
Review courtesy of my wallet and me.
August 2003
|
REFERENCES |
TBF/TBM Avenger in Action, No 82, Squadron Signal.
USN Carrier Bombers of WW II, Squadron Signal/Aerodata International
If you would like your product reviewed fairly and quickly, please contact me or see other details in the Note to Contributors.