MPM 1/72 PT-19 Cornell
| KIT #: | 72063 |
| PRICE: | $15.98 MSRP |
| DECALS: | Four options |
| REVIEWER: | Les Dorr Jr |
| NOTES: | Kitbashed interior, mix of markings |
| HISTORY |
For basic information on the PT-19, I suggest Da Boss’ most excellent preview.
The Fairchild PT-19 played a key role in training pilots at the Civil Primary Schools, a program that was the brainchild of Maj. Gen. “Hap” Arnold, the Army Air Corps Chief of Staff. Sensing that war in Europe was inevitable, Arnold saw a need to train thousands of new pilots. The problem was that the U.S. Army had only two major facilities for such training: Randolph Field and Kelly Field in Texas.
 In 1939, Arnold’s
staff met with eight civilian flight school operators to gauge their
interest in starting a program to train Air Corps flight cadets. All eight
jumped in, unhesitatingly, for the good of their country. As Col. Robert F.
Shirmer wrote in the AAHS Journal: “They required no prodding, no
guarantees, no contracts. They were businessmen willing to forget
business.”
In 1939, Arnold’s
staff met with eight civilian flight school operators to gauge their
interest in starting a program to train Air Corps flight cadets. All eight
jumped in, unhesitatingly, for the good of their country. As Col. Robert F.
Shirmer wrote in the AAHS Journal: “They required no prodding, no
guarantees, no contracts. They were businessmen willing to forget
business.”
The first eight Civil Primary Schools began training Air Corps cadets under Army supervision in 1939. By the end of 1943, there were more than 60 schools in the system churning out tens of thousand of pilots per year.
 One of the original
eight schools was Parks Air College in Cahokia, IL, which ushered in its
first class of 42 cadets in June 1939. The school at that time was equipped
with two North American BC-1s (a T-6 ancestor) and 14 Stearman PT-13As.
One of the original
eight schools was Parks Air College in Cahokia, IL, which ushered in its
first class of 42 cadets in June 1939. The school at that time was equipped
with two North American BC-1s (a T-6 ancestor) and 14 Stearman PT-13As.
Parks cadets began flying the Fairchild PT-19 sometime in 1940. Most or all of the planes later mounted canopies a la the manufacturer’s PT-26. Information is very sketchy, but at least one of the school’s PT-19s (the one I modeled from an old postcard) initially served with two open cockpits before getting a canopy.
The most famous student to train at Parks was WWII ace Lt. Col. Francis S. "Gabby" Gabreski, who – after almost washing out – completed primary training in November 1940.
| THE KIT |
The PT-19 was a relatively simple aircraft, and MPM’s replica of the plane is a relatively simple kit, with just 21 injection-molded parts, a small fret of photoetched (PE) parts and two vacuform windshields.
 Cockpit detail is
provided by a mix of injected and PE parts. The seats, control sticks and
instrument panels are a little clunky-looking, but serviceable. The PE
throttle quadrants, cranks, belts and pedals are finely detailed. The
rudder pedals don’t look like those I’ve seen in photos, and the throttle
levers are almost impossibly tiny to work with, at least for me.
Cockpit detail is
provided by a mix of injected and PE parts. The seats, control sticks and
instrument panels are a little clunky-looking, but serviceable. The PE
throttle quadrants, cranks, belts and pedals are finely detailed. The
rudder pedals don’t look like those I’ve seen in photos, and the throttle
levers are almost impossibly tiny to work with, at least for me.
The fuselage halves include the vertical tail, and have simplified raised framing on the cockpit sidewalls. A separate top piece with two openings encloses the cockpit. The wings and horizontal stabilizers are one-piece affairs; the wings butt-join against the fuselage, but the stabilizers have well-fitting tabs. Separate exhaust stacks and a PE rollover structure are provided. The landing gear is simple: just two struts, two main wheels and a small tailwheel structure.
The kit’s Propagteam decals are nicely done and include markings for two USAAF PT-19As – the A was just a PT-19 with a slightly more powerful engine – and two Norwegian-marked aircraft (an M62 and PT-19) with which the Royal Canadian Air Force trained pilots from Norway. All carry a blue-fuselage/orange-yellow wings scheme. The Army aircraft have either the pre-May 1942 insignia or the star without the red dot, depending on the time frame. I haven’t researched the markings for 41-20353, but putting the tail number at a slant as shown in the instructions would be unusual.
| CONSTRUCTION |
 I long ago stopped
believing in Santa Claus, the Tooth Fairy and the Easter Bunny. So why, oh
why, do I persist in thinking that the parts in MPM kits will fit together
without a major effort?
I long ago stopped
believing in Santa Claus, the Tooth Fairy and the Easter Bunny. So why, oh
why, do I persist in thinking that the parts in MPM kits will fit together
without a major effort?
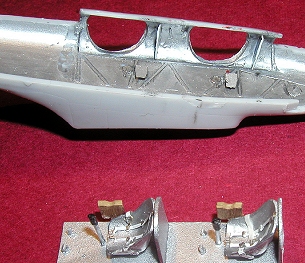
Actually, I assembled the plastic and PE parts that form the PT-19A cockpit without much problem. After scribing lines on the top of the bulkheads to match photos, I glued them in place on the floorboard, followed by the seats and control sticks. I fiddled with the PE rudder pedals, but subsequently pitched them in favor of simpler (and more accurate) substitutes cut from plastic strip. I brush-painted the whole assembly Testors Metallic Silver (shot from the spray can into a cup), which I find a good match for the aluminum lacquer of the period. I then painted and installed the PE seat belts; the side belts seem too short; maybe that’s the way they were on the real aircraft. I also scratchbuilt a couple of map cases from sheet plastic, painted them tan, and superglued one to the right side of each seat. (They are supposed to mount to the sidewall, but you can’t really tell the difference when the cockpit is assembled.)
The PE throttle
consoles folded easily into shape, but the teeny-weeny PE levers quickly
disapp eared
into the carpet. I replaced them with knobs cut from plastic rod. I
attached the PE flap(?) cranks without difficulty. When everything was in
place, I painted the sidewalls and the underside of the cockpit top piece
(part 7) metallic silver, then applied a “sludge wash” to the sidewalls to
give the framing some definition.
eared
into the carpet. I replaced them with knobs cut from plastic rod. I
attached the PE flap(?) cranks without difficulty. When everything was in
place, I painted the sidewalls and the underside of the cockpit top piece
(part 7) metallic silver, then applied a “sludge wash” to the sidewalls to
give the framing some definition.
I discarded the simplistic instrument panels and substituted photos of actual PT-19 panels properly downsized with Adobe Photoshop. I white-glued them to the cockpit top piece. Next, I glued the top piece to the left fuselage half to help me align the interior assembly properly. To complete the interior – or so I thought -- I applied CA glue to the tops of the bulkheads and snuggled the whole thing inside the top piece.
Unfortunately,
when I mated the fuselage halves, I got a surprise: They wouldn’t close.
Whether I’d botched placement of the interior parts or the parts themselves
were oversized, there was a 1/16” gap – huge in 1/72 scale. I tried
grinding down the sides of the floor and bulkheads, but it was still no g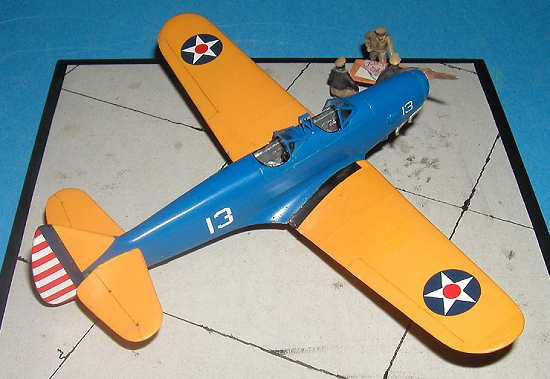 o.
Ultimately, I just ripped the assembly out and
scratchbuilt a new floor and bulkheads. Even after numerous test fittings
showed the fuselage halves going together fine with the new parts, I was
still left with a small gap when I glued the fuselage together. I
shimmed the offending seam behind the rear cockpit opening, then filled
with CA glue and sanded it. A little CA filler and sanding was needed on
the rest of the fuselage seam as well.
o.
Ultimately, I just ripped the assembly out and
scratchbuilt a new floor and bulkheads. Even after numerous test fittings
showed the fuselage halves going together fine with the new parts, I was
still left with a small gap when I glued the fuselage together. I
shimmed the offending seam behind the rear cockpit opening, then filled
with CA glue and sanded it. A little CA filler and sanding was needed on
the rest of the fuselage seam as well.
Remaining assembly was reasonably uneventful. I attached the horizontal stabilizers with liquid cement. Using a #69 bit, I drilled a hole in the end of each wing and the corresponding spot on the fuselage. I then superglued a short length of metal paper clip into each wing hole and mated the wings to the fuselage. I firmed up the assembly with liquid cement. Next, I went back and rescribed the underfuselage panel lines lost during sanding. I also replaced the scribed lines for the luggage compartment on the left upper fuselage with a piece of Scotch tape cut to size; I didn’t trust myself to rescribe the lines correctly.
I wrapped up basic airframe construction by painting the engine firewall and cowling interior Testors chromate yellow (in the small bottle) and the “engine” itself aluminum. I attached the cowling front to the fuselage with CA glue.
| COLORS & MARKINGS |
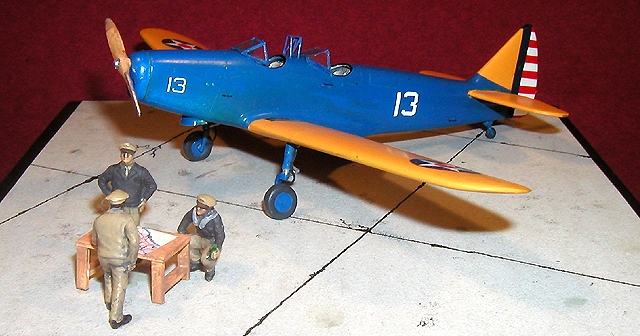
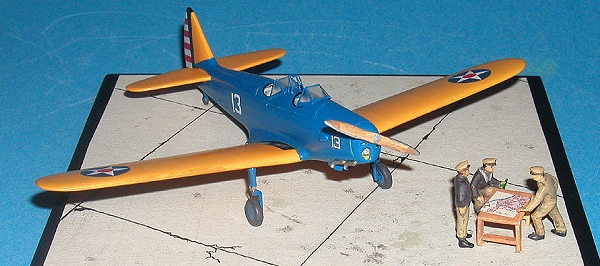
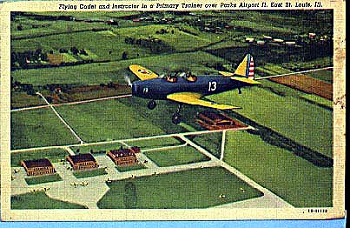
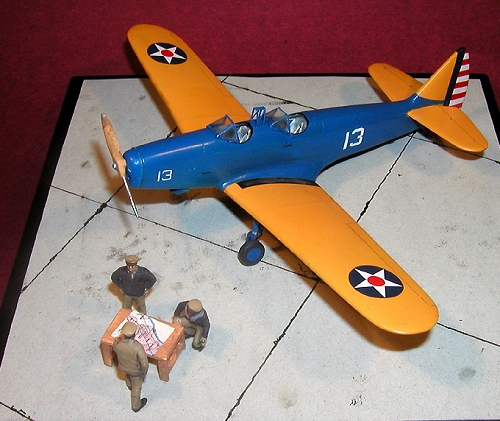
I took the color scheme for my model from an old postcard showing a PT-19 flying over Parks Airport. Although the postcard appears to be a hand-colored photo, the scheme is representative of pre-WWII PT-19s: True Blue fuselage and gear struts, Orange-Yellow wings, stabilizers and tail.
 I started by
airbrushing several coats of flat white over the entire airplane to serve
as a base for the orange-yellow and to check for flaws. After fixing a
couple seam dings, I airbrushed a custom mix of Testors Model Master (MM)
Insignia Yellow and a small amount of MM Insignia Red to produce the ANA
(Army-Navy) standard orange-yellow. Next, I hand-brushed the rudder flat
white -- the instructions don’t mention that the rudder decal contains only
the red stripes. When the paint was dry, I masked the yellow
surfaces and rudder, and airbrushed MM True Blue over the fuselage.
I started by
airbrushing several coats of flat white over the entire airplane to serve
as a base for the orange-yellow and to check for flaws. After fixing a
couple seam dings, I airbrushed a custom mix of Testors Model Master (MM)
Insignia Yellow and a small amount of MM Insignia Red to produce the ANA
(Army-Navy) standard orange-yellow. Next, I hand-brushed the rudder flat
white -- the instructions don’t mention that the rudder decal contains only
the red stripes. When the paint was dry, I masked the yellow
surfaces and rudder, and airbrushed MM True Blue over the fuselage.
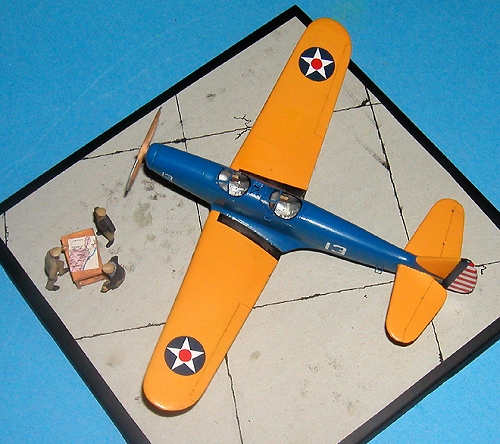
The decals went on without any major issues. Markings on PT-19s were generally pretty sparse, and the Parks Air College bird appears typical. The pre-May 1942 national insignia should be on the upper and lower surfaces of both wings. Although I can’t document it, the Parks PT-19 likely had the large “U.S. ARMY” lettering across the bottom wing. (Like in almost all other kits, the decal is black, but the letters should be dark blue.) The rudder decal is oversized, so place it carefully to make sure you get all the red stripes on. I scrounged the large and small “13” numerals from my spares box; they aren’t the exact font shown in the postcard picture, but look OK to me! The instructions aren’t clear on the exact placement of some of the small stencils. If you use the stenciling, make sure that you place two of the small PE grab handles above the “lift” decals.
Several overall coats of MM Semi-Gloss lacquer toned down the shine of the paint to a more realistic appearance and sealed the decals.
| FINAL CONSTRUCTION |
I attached the tiny grab handles and the rollover structure to the fuselage and painted them True Blue. I painted the propeller acrylic flesh, then streaked it using brown eye shadow to produce a fairly convincing wood grain. I used dark tan to reproduce the canvas protectors on the outer third of the prop blades and metallic silver for the steel prop guards.
 Next, I hand
painted the gear struts and attached them to the wings. Normally, I don’t
bother with brake lines on my models, but those on the PT-19 are very
prominent. I cut black thread to the right length, drilled a hole next to
each strut, then ran the thread from the hole down the strut and onto the
wheel axle. I secured the thread with white glue.
Next, I hand
painted the gear struts and attached them to the wings. Normally, I don’t
bother with brake lines on my models, but those on the PT-19 are very
prominent. I cut black thread to the right length, drilled a hole next to
each strut, then ran the thread from the hole down the strut and onto the
wheel axle. I secured the thread with white glue.
The wheels had a lot of flash on them, and required considerable sanding. The holes for the axles were both too small and too shallow, so I opened them further using a drill bit and cut-off X-Acto knife blade tip. (Be careful – it’s easy to drill all the way through the wheel, as I unfortunately found out!)
The vacuformed windshields were easy to cut out and trim, but they don’t fit as is. I shaped the straight-line bottom front of each piece with a sanding drum until it approximately matched the curve of the fuselage top. After painting the framing true blue, I attached them to the aircraft.
The Parks aircraft
I modeled sans canopies likely would have been in almost-new
condition, so I kept weathering to a minimum. I darkened the control
surface gaps with an art pencil after a “sludge wash” failed to fill the
shallow lines. I also sludge-washed the landing gear struts. Using a silver
art pencil, I put a few chipped paint areas around the edge of the
 cowling
and at a couple spots on the engine panels. I added some scuffing to the
wing walkways with light-colored eye shadow.
cowling
and at a couple spots on the engine panels. I added some scuffing to the
wing walkways with light-colored eye shadow.
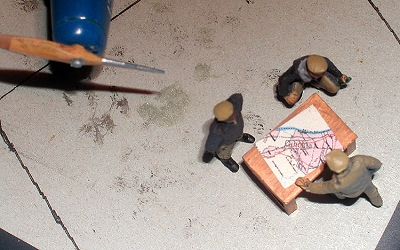
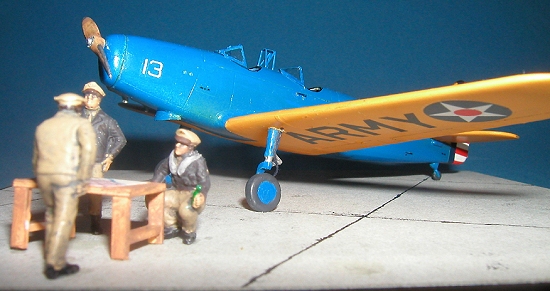
As always, I decided to create a vignette to display my model. I imagined three Parks Air College instructors gathered around a makeshift table in the morning, discussing the lessons to be taught to their students that day. The figures came from my spares box, suitably modified with officer-type heads. I painted them to resemble pictures of Parks instructors I’d found on the web and in the AAHS Journal. I scratchbuilt the table. The “map” is a greatly reduced scan of a Cahokia, IL, map I downloaded off the Internet!
The base is a ceramic tile painted flat black. The “concrete” section is a piece of kit boxtop with black gel pen “tar” lines, suitable weathered by drybrushing grimy black paint and goop from my thinner jar.
| CONCLUSIONS |
The PT-19 is a typical early MPM kit. You’ll need intermediate modeling skills to build it into a decent replica. But you just gotta love MPM and other Eastern European manufacturers for tackling kits of “Golden Age” aircraft in 1/72 scale!
| REFERENCES |
“AAC & AAF Civil Primary Flying Schools 1939-1945 (Part I),” AAHS Journal, Spring 1991
Fiddlersgreen.net
http://www.fiddlersgreen.net/AC/aircraft/Fairchild-PT26/pt26_info/pt26_info.htm
American Aces of WWII
http://www.acepilots.com/usaaf_gabby.html
Heritage Flight Museum
http://www.heritageflight.org/Aircraft_Pages/PT-19_1_main.htm
Butler County Warbirds
http://www.bcwarbirds.com/parks_air_college.htm
http://www.bcwarbirds.com/william_small_parks_air_college_iii.htm
Warbird Alley
http://www.warbirdalley.com/pt26-fa.htm
April 2005
Copyright ModelingMadness.com. All rights reserved.
If you would like your product reviewed fairly and quickly, please contact the editor or see other details in the Note to Contributors.