Classic Airframes 1/48 Lockheed Hudson
|
KIT # |
449 |
|
PRICE: |
$54.95 |
|
DECALS: |
Two aircraft - RAAF Mk. VI, 1 Squadron, 1941; USN VP-82, 1942. |
|
REVIEW & |
|
|
NOTES: |
Short run kit with resin parts. |
|
HISTORY |
The Hudson - The Plane That Saved Lockheed
While Lockheed Aircraft had been known since 1929 as designers and builders of aircraft that not only were state-of-the-art, but stretched that art in terms of performance, the company had been a money-loser from the beginning.
The Lockheed "Stars" - the Air Express, Sirius, Vega, Altair and Orion - on which the company's early success was based, were only built in very small numbers. The same was true of the Model 10 Electra that followed them. In part, this was due to the fact the Stars appeared in the early 1930s when the country was locked in the depths of the Depression and few airline companies could afford new equipment no matter how good; the fortunes of the Electra were due to bad timing - the Douglas DC-3, which could get in and out of just about any airfield the Electra could use, was a far more capable airliner. The Model 14 Super Electra that appeared in 1937 suffered from the fact that while it was faster than the DC-3, its load-carrying capacity was half that of the DC-3, which made it economically non-competitive. at the end of 1937, only the design of what would become the P-38 (an airplane that was hopefully expected to have a production run of 60) kept the company meeting its payroll.
 Events beyond
Lockheed's control were about to change this. In the face of the continuing
German military buildup, the British had finally come to their senses and
commenced their own re-armament program. Starting as far behind as they were,
the British looked to the United States for aircraft. In early 1938, the
British Purchasing Commission arrived in Southern California, and the management
of Lockheed was ready for them.
Events beyond
Lockheed's control were about to change this. In the face of the continuing
German military buildup, the British had finally come to their senses and
commenced their own re-armament program. Starting as far behind as they were,
the British looked to the United States for aircraft. In early 1938, the
British Purchasing Commission arrived in Southern California, and the management
of Lockheed was ready for them.
What Lockheed proposed was turning their Model 14 airliner into a light bomber and general reconnaissance aircraft. The proposal had the benefit that there would be only modification to an existing airframe, and the fact that the British knew the performance of the Model 14 since it was operated by British European Airways on express runs. The British accepted the proposal, and in September 1938 signed an agreement for the production of 200 airplanes. It was the biggest contract in Lockheed's history, and the event that would move the company into the front ranks of U.S. aircraft manufacturers. The bomber, named the Hudson, was the first American aircraft ordered for the Royal Air Force.
By the spring of 1939, the first 200 Hudson Is had been delivered; they were turned over to Coastal Command as replacement for the Avro Anson in general reconnaissance. The aircraft were successful, and more were ordered, to be equipped with more powerful engines. These would become the Hudson Mk. III, IV and V - they would go on to become some of the most important participants in the Battle of the Atlantic.
The Hudson Mk. VI:
That summer, the Australian Government ordered a version of the Hudson that became the Mk.VI; deliveries to Australia commenced in late 1940, and the aircraft formed the backbone of the RAAF's multi-engine bomber and reconnaissance force by the fall of 1941.
When the Japanese attacked Malaya on December 8, 1941, the Hudson's of No. 1 Squadron, RAAF, were stationed in Singapore. Operating with the RAF's aging Blenheim I's, the Hudsons formed the British strike force against the Japanese. With such few numbers, the aircraft operated singly, or in formations that were almost never more than 3 or 4 at the most. Flying unescorted, the Hudsons suffered high losses before the survivors were withdrawn to Australia as Malaya fell to the invaders in early 1942. The Hudsons of 1, 2, and 32 Squadrons took on the task of harrying the Japanese wherever they could.
After the Japanese attacks on Darwin, the Hudsons were used as a bombing force to attack the new Japanese bases in Timor, in the southern Netherlands East Indies. These raids were all unescorted, and losses in men and machines were heavy, but they kept the Japanese from mounting a sustained campaign against the almost-defenseless northern region of the continent. The Hudsons also flew bombing missions in support of the defense of Port Moresby in New Guinea, which was in extreme danger of falling to the Japanese that desperate spring and summer.
An example of the kind of battles the RAAF's Hudsons fought happened on July 22, 1942 near Buna, when eight Zeroes of the Tainan Air Group - led by Saburo Sakai - intercepted Hudson A16-201 of 32 Squadron, flown by Pilot Officer Warren Cowan, RAAF. Anticipating an easy kill, Sakai dove on the Hudson's tail. Cowan whipped the surprisingly-maneuverable Hudson around and made a head-on attack on Sakai! Outnumbered 8 to 1, Cowan maintained the offensive and scattered his opponents in wild disorder. Eventually, Sakai got on Cowan's tail, knocked out the turret, and shot up both engines - the Hudson crashed into the sea with no survivors. Sakai always considered the pilot of this Hudson to be the bravest opponent he fought in the entire war. (In 1997, as the only living eyewitness of the action, Sakai wrote a testimonial to the Australian Defense Minister, requesting Cowan and his crew be cited for bravery. This was denied on the bureaucratic grounds that an award could not be made on the testimony of the opponent in such an action.)
Eventually, Hudsons were replaced by more capable aircraft with better performance, both in Australia and in Europe, and the aircraft passed out of operational use by late 1943. But the airliner that went to war made its mark on history at a time when it was most needed.
|
THE KIT |
Prior to Classic Airframes' releasing their 1/48 Hudson in the late summer of 2001, the only other kit of this airplane I am aware of was a 1/72 kit released by Airfix in the mid-60s. While acceptable at the time, the model now shows its age badly, though someone willing to put forth the effort to correct its mistakes and provide the missing detail can come up with a good model in that scale.
Classic Airframes released two basic kits: the first being the Lockheed Model 14 Super Electra airliner and its military mate, the Hudson Mk. I, and the second kit reviewed here, which makes up into the later Mks. III, IV, V, VI and PBO-1. The major differences between the two releases are found in the different engines and cowls provided for the Mk. IV, V, and VI versions.
 The kit itself is
comprised of three sprues of limited-run injection-molded plastic of the older
type done by MPM prior to the release of the Re.2001, with resin engines and
interior detail. The glass nose of the bomber version is made in three parts -
nose cap and upper and lower sections - with the bulbous Boulton-Paul turret in
two parts. The turret is not correctly shaped, being too flat on top; however,
the only way to correct it would be to create a new master and vacuform a
difficult shape.
The kit itself is
comprised of three sprues of limited-run injection-molded plastic of the older
type done by MPM prior to the release of the Re.2001, with resin engines and
interior detail. The glass nose of the bomber version is made in three parts -
nose cap and upper and lower sections - with the bulbous Boulton-Paul turret in
two parts. The turret is not correctly shaped, being too flat on top; however,
the only way to correct it would be to create a new master and vacuform a
difficult shape.
Decals printed by MicroScale are provided for a Hudson Mk.VI of 1 Squadron RAAF, serving in Malaya at the outbreak of the Pacific War, and a PBO-1 of the US Navy patrol squadron VP-82, based in Argentia, Newfoundland, the first Navy unit to sink a U-boat in World War II. Additionally, Classic Airframes Decals have released several sheets which provide markings for Hudsons of the other marks the kit is capable of being made as.
|
CONSTRUCTION |
I started with the fuselage, which is certainly the most difficult part of the model. After separating the resin interior parts from their molding blocks, I painted them and the interior of the fuselage in Interior Green. I then proceeded to try and make enough sense of the instruction sheet to be able to assemble the interior. I was finally helped in this by the publication in a recent "Air Progress" of an article by Phil Makanna of the sole surviving flyable Hudson in Australia, which included some interior photos. The instruction sheet is vague in its drawings. I was only able to figure out the placement of the navigator-bombardier's table after I had given up and gone on to attach the glass nose to the fuselage. With some fiddling, I was able to insert the table with tweezers and use the "ship in a bottle" technique to finally position it properly.
Before gluing the fuselage halves together, I glued the cabin windows in position. These are each separate, and cause their own trouble by the fact that they and the window openings are not the same size, and this varies from window to window, just enough to give you fits. Looking back on it, were I to do another of these, I would take all the clear plastic windows and file their edges at an angle, then I would open out the windows in the fuselage so that the outer side was slightly larger than the inner. Then the windows could be positioned after the model was painted, rather than having to be masked with the likelihood that 2 or 3 will pull out when you pull off the masking tape - this happened to me. To my mind, this is the worst aspect of the entire design of the kit; the time spent modifying the windows will certainly reduce both your blood pressure and the volume of purple air over the workbench further on.
 The glass nose
provided its own problems, since the centerline seam has to be filled without
screwing up the areas immediately above and below, where the windows are, as
well as the fact that the nose when assembled is just slightly smaller in
circumference than the forward fuselage it mates to. After the purple air
cleared over the workbench upon my discovery of this fact, I spent a
considerable bit of time sanding down the forward fuselage so that it would
smoothly mate to the glass nose. I used quite a bit of Mr. Surfacer 500 on that
seam once I attached the nose; the result now is that the nose looks like it
should.
The glass nose
provided its own problems, since the centerline seam has to be filled without
screwing up the areas immediately above and below, where the windows are, as
well as the fact that the nose when assembled is just slightly smaller in
circumference than the forward fuselage it mates to. After the purple air
cleared over the workbench upon my discovery of this fact, I spent a
considerable bit of time sanding down the forward fuselage so that it would
smoothly mate to the glass nose. I used quite a bit of Mr. Surfacer 500 on that
seam once I attached the nose; the result now is that the nose looks like it
should.
I then proceeded with the wing and tail sub-assemblies. The engine nacelles on the wings required considerable test-fitting to get the parts together smoothly, as well as lavish use of Mr. Surfacer 500 on all the various seams. After a test-fit of one of the vertical fins to the horizontal stabilizer, I determined it would be necessary to sand down the fins from the inside prior to gluing them together to get a decent fit to the stabilizer. Once again, lavish use of Mr. Surfacer 500 was made to these joints, as well as to the seams from gluing the horizontal stabilizer to the fuselage.
Once the wings were cleaned up and the engines and cowlings installed and cleaned up, as well as the flap guides attached and the fit gaps sealed, I used some plastic rod glued inside the wing fore and aft to create tabs for gluing the wing to the fuselage, since otherwise it is the standard MPM-designed butt joint. I drilled holes at appropriate locations in the fuselage wing roots, and glued the wings in position. It is important to be sure you got the tail attached with correct alignment, so that you can get the wings at the proper angle of dihedral. There is a drawing in the instructions that shows this correctly. I then proceeded to fill in the gap of the wing and fuselage joint with cyanoacrylate, and then cover that over with Mr. Surfacer 500. Overall, I think I used a good one-fourth of the bottle of Mr. Surfacer on this kit.
When all the joints were finally covered with Mr. Surfacer 1000 and sanded smooth, I rescribed the panel lines that had been sanded off, masked off the various windows on the cabin and canopy and nose, and the model was ready for painting.
|
PAINT & MARKINGS |
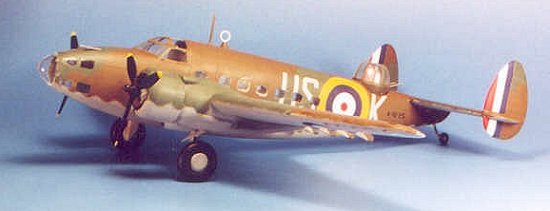
What Color Was The Hudson?
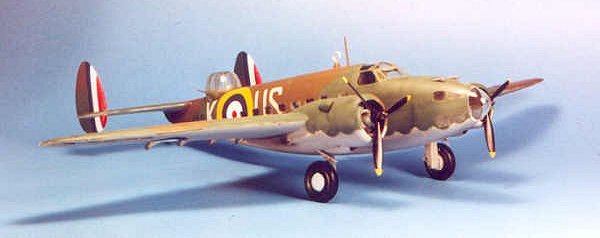
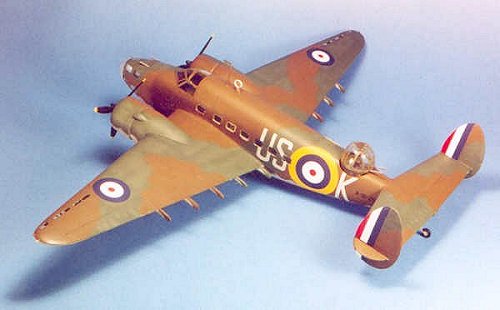
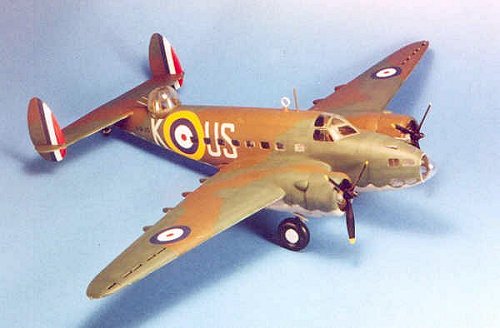
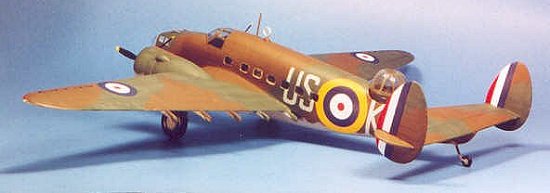
The boxart of the kit shows a Hudson VI with an upper camouflage of Dark Earth and Dark Green, and natural aluminum lower surfaces, which has been traditionally thought to be the way these airplanes emerged from the Lockheed factory in Burbank. However, the flyable Hudson in Australia is painted in what looks to be Olive Drab for Dark Earth, Medium Green for Dark Green, and Sky Grey for the lower surface. Phil's article commented on the amount of research that had gone into the restoration of this airplane; given that these colors are "U.S. Equivalent" colors, I suspect they may be right. At the time the Hudson Is were ordered, there were no American camouflage colors, and they were likely painted with commercial paints that were close to the British specifications.
 However, the situation was different by late 1940, when the later Hudsons like
the Mk. VI were coming out of the factory. Official U.S. camouflage paints did
exist. Fortunately, I happen to live not far from the old Lockheed factory in
Burbank, and know several former Lockheed employees. One of these is a lady
named Addie, who began her career in the Lockheed paint shop in 1941 and retired
as chief model-maker for the Lockheed wind tunnel; she's the "A" in "T & A Hobby
Lobby" in Burbank. When I asked her if she remembered painting any Hudsons, she
said that was all she did for her first year on the job. When I asked what
colors, she said "Olive Drab, standard Green and a light grey on the bottom."
I showed her the Makanna photos in the magazine, and she said the airplane
looked exactly right to her.
However, the situation was different by late 1940, when the later Hudsons like
the Mk. VI were coming out of the factory. Official U.S. camouflage paints did
exist. Fortunately, I happen to live not far from the old Lockheed factory in
Burbank, and know several former Lockheed employees. One of these is a lady
named Addie, who began her career in the Lockheed paint shop in 1941 and retired
as chief model-maker for the Lockheed wind tunnel; she's the "A" in "T & A Hobby
Lobby" in Burbank. When I asked her if she remembered painting any Hudsons, she
said that was all she did for her first year on the job. When I asked what
colors, she said "Olive Drab, standard Green and a light grey on the bottom."
I showed her the Makanna photos in the magazine, and she said the airplane
looked exactly right to her.
Dana Bell says the Hudson was not painted with Olive Drab that he knows of, though he thinks the other two colors would be right. I decided to go with the eyewitness testimony, especially since it was from someone whose job it was to apply the paint. Therefore, this model is painted with Gunze-Sanyo H-52 "Olive Drab I," which is Shade 43 WW2 Olive Drab, and H-302 Green (FS34092), and Tamiya XF-19 "Sky Grey." The colors in the jpgs here are right, so I think you can see how close WW2 Olive Drab can be to meeting the requirements of British Dark Earth as an "equivalent color."
Decals:
The kit decals for the RAAF 1 Squadron airplane were applied. Given these are printed by MicroScale, no problems were encountered and they went down with no problem over a coat of Future and with the help of an application of Micro-Sol.
Final Finish:
After washing off the decal solvent residue, I applied another coat of Future, then used Tamiya "Smoke" to create exhaust stains. Other than fading the paint scheme during painting, I only applied a few "dings", since at the time the model is depicted it was a relatively new airplane that benefitted from prewar maintenance standards. I followed up with a coat of thinned Testor's Dullcote.
|
CONCLUSIONS |
I started this project determined to do a Hudson, since my previous attempt at a Model 14 had been ruined by misapplication of Alclad. Over the course of the project, the model "grew on me," and in the end I can say I am glad I pushed through the difficulties and completed it. I think overall the kit is more difficult than the Blenheims (other than that block of resin on the wheel wells in the Blenheim). It represents the last "hurrah" of the old way of creating molds for MPM. Comparing this kit to the later Walrus I am working on, the Walrus is far better-produced. The kit has some inaccuracies, most of which can be worked out if you are determined to do so, and some of which - like the shape of the turret - will just have to wait till a genius like Tore Martin at Falcon shows us how to vacuform one right.
This is not a kit for the Tamigawa "assembler." Quite a bit of modeling ability and sheer determination to finish it are needed to turn the kit into a model. I like the final result and am glad I persevered. Overall, I am sure it was easier than it would have been had it shown up in a box with "Hi-Tech" or "Fonderie Miniatures" on the label. The Hudson is an important aircraft historically, deserving of a place in any collection of significant airplanes.
If you would like your product reviewed fairly and fairly quicklyh, please contact the editor or see other details in the Note to Contributors.
Back to Reviews Page 2015