Hasegawa 1/72 XB-38 (conversion)
|
KIT # |
? |
|
PRICE: |
$? |
|
DECALS: |
See Revuew |
|
REVIEWER: |
Fabio Beato |
|
NOTES: |
|
HISTORY |
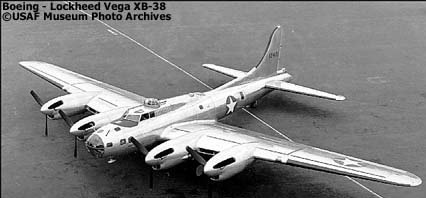 The
XB-38 was a modification project, done by Lockheed Vega, on the 9th
Boeing B-17E (S/N 41-2401) built. Vega proposed, in March 1942, to
convert a B-17 airframe by replacing the standard Wright R-1820 radial
engines with Allison V-1710 'Vee' engines.
The
XB-38 was a modification project, done by Lockheed Vega, on the 9th
Boeing B-17E (S/N 41-2401) built. Vega proposed, in March 1942, to
convert a B-17 airframe by replacing the standard Wright R-1820 radial
engines with Allison V-1710 'Vee' engines.
The XB-38 project was initiated primarily to try to improve on the overall performance of the basic B-17 and to provide an alternate version in case the Wright R-1820 radial engine became scarce. The Vega Airplane Division of Lockheed received the B-17E and intended to use it as a pattern source for an all new design. Serial number 42-73515 was reserved for this design, but because of the urgency of the project, the B-17E was used and the new design was never completed.
The
modifications on the -E model took less than a year to complete and the
aircraft made its first flight on 19 May 1943. Initial performance tests
showed the aircraft to be
 slightly faster than
the production B-17E. The XB-38 was grounded after a few flights because
of a serious problem with leaking engine exhaust manifold joints. After
this problem was fixed, the test program continued until 16 June 1943 and
the XB-38's ninth test flight. On this flight, the right inboard engine
(#3) caught fire in flight. The test pilots were unable to put the fire
out and bailed out. The resulting crash destroyed the XB-38. All future
plans for the XB-38 were dropped because the V-1710 engines were needed
for higher priority projects.
slightly faster than
the production B-17E. The XB-38 was grounded after a few flights because
of a serious problem with leaking engine exhaust manifold joints. After
this problem was fixed, the test program continued until 16 June 1943 and
the XB-38's ninth test flight. On this flight, the right inboard engine
(#3) caught fire in flight. The test pilots were unable to put the fire
out and bailed out. The resulting crash destroyed the XB-38. All future
plans for the XB-38 were dropped because the V-1710 engines were needed
for higher priority projects.
(Historical notes and photo taken from the USAF Museum website)
|
THE KIT |
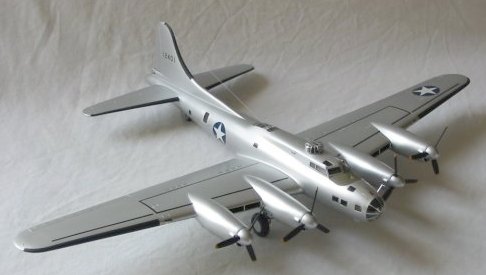
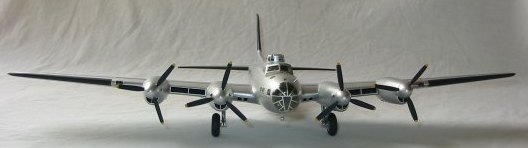
I based my conversion on the Hasegawa B-17F mainly because I had it ready to hand in my pile of unbuilt kits, however after comparing the finished kit with the newer and fully engraved Academy offering I still think that the older issue captures much better the look of the real aircraft in terms of ‘sit’ and wing dihedral.
|
CONSTRUCTION |
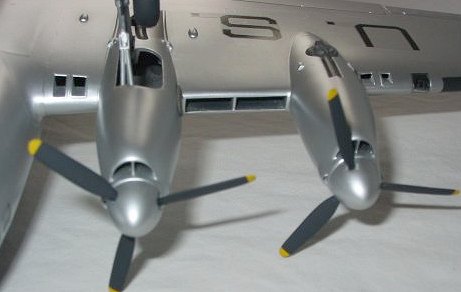 Since
there are no ready parts for the Allison engines, I tackled first the
hardest part and after measuring the kit nacelle diameter and enlarging
some views from the Detail & Scale book, I built a plasticard skeleton on
which I applied several layers of two-parts automotive putty. After much
sanding and re-puttying I reached a smooth and symmetrical shape which
resembled satisfactorily the real thing. Finally I added the two
airscoops near the spinner and took a rubber mould to cast four resin
copies.
Since
there are no ready parts for the Allison engines, I tackled first the
hardest part and after measuring the kit nacelle diameter and enlarging
some views from the Detail & Scale book, I built a plasticard skeleton on
which I applied several layers of two-parts automotive putty. After much
sanding and re-puttying I reached a smooth and symmetrical shape which
resembled satisfactorily the real thing. Finally I added the two
airscoops near the spinner and took a rubber mould to cast four resin
copies.
I now started construction from the wings removing the front 5 mm. of each engine nacelle and boxing in the landing lights. I also removed part of the wing leading edge between the engines because later there were the wing radiators to be installed.
After
joining and sanding the wing halves I added the resin nacelles with
slow-drying superglue checking their alignment with t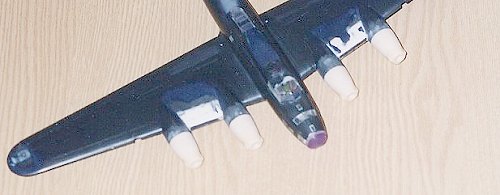 he dry fitted
fuselage; the joint lines were then thoroughly filled and sanded before
adding the wing radiators. These were first built starting with a square plasticard
box with a central dividing wall, then they were installed in the wings
and faired in with several applications of automotive putty and model
filler.
he dry fitted
fuselage; the joint lines were then thoroughly filled and sanded before
adding the wing radiators. These were first built starting with a square plasticard
box with a central dividing wall, then they were installed in the wings
and faired in with several applications of automotive putty and model
filler.
While
work on the wings slowly progressed, I measured the position of the
window under the rear fuselage: there are two small windows each side and
a round hole on the centerline and all were positioned with reference to
the ball turret hole. I cut the holes with a minidrill and then refined
the shape with jeweller’s files. Construction then followed the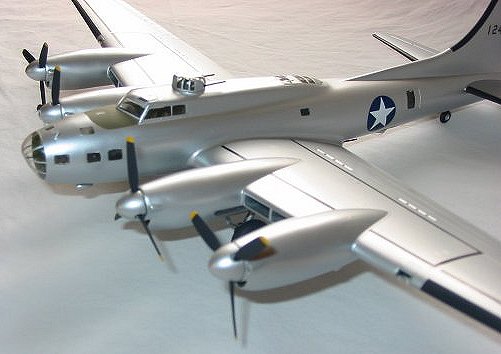 Hasegawa
instructions and I assembled the whole fuselage without any
modifications; there was some work to do on the cheek windows which are
optional parts to allow for the B-17G boxing, however with much patience
and care the joints finally disappeared. The wings and tailplanes were
attached to the fuselage and the join lines dealt with, but there’s
nothing more to say. Finally I added the kit transparencies and
heat-moulded a new blunter nose for the –E variant and the peculiar
ventral cupola for the dummy aiming station. Before painting could begin
I had to modify the ventral ball turret into a perfect sphere as it was
only a mockup of the proposed weapon. I also needed spinners for the
propellers and I found a suitable shape in the Matchbox Mosquito. I
slightly modified the original piece and took a mould of that too,
casting then four perfect copies.
Hasegawa
instructions and I assembled the whole fuselage without any
modifications; there was some work to do on the cheek windows which are
optional parts to allow for the B-17G boxing, however with much patience
and care the joints finally disappeared. The wings and tailplanes were
attached to the fuselage and the join lines dealt with, but there’s
nothing more to say. Finally I added the kit transparencies and
heat-moulded a new blunter nose for the –E variant and the peculiar
ventral cupola for the dummy aiming station. Before painting could begin
I had to modify the ventral ball turret into a perfect sphere as it was
only a mockup of the proposed weapon. I also needed spinners for the
propellers and I found a suitable shape in the Matchbox Mosquito. I
slightly modified the original piece and took a mould of that too,
casting then four perfect copies.
Now came the worst part of all: I applied a heavy coat of gray primer and there appeared many blemishes to remedy, so I started the boring loop fill-sand-prime again and again until I reached a sufficiently good surface for the natural metal finish to be applied later.
|
COLORS AND MARKINGS |
 I
washed thoroughly the model and sprayed a light coat of matt black for the
ice-boots, then followed the olive drab antiglare panel in front of the
windscreen. These were then carefully masked and two coats of Humbrol
Polished Aluminium were sprayed on the whole model, not forgetting the
spinners.
I
washed thoroughly the model and sprayed a light coat of matt black for the
ice-boots, then followed the olive drab antiglare panel in front of the
windscreen. These were then carefully masked and two coats of Humbrol
Polished Aluminium were sprayed on the whole model, not forgetting the
spinners.
The decals came mainly from an old Frog B-17 sheet (stars, walkways and ‘US ARMY’ underwing titles) while the fin serial was assembled from a generic sheet. After some touch-ups of the masked surfaces I applied a thin coat of Johnson’s Klear over the decals only and passed to the final details. The undercarriage was assembled and painted without any add-on, apart from applying a plain plasticard disk over the wheel centres as this was a peculiarity of early B-17. Since I had no alternatives, I cut each blade from the propeller boss and reattached them to the resin spinners (not much fun you can guess).
|
CONCLUSIONS |
This conversion was much more time-consuming than I had initially planned however I’m now happy to have persevered since it’s really hard to find another XB-38 on the show tables!
|
REFERENCES |
· USAF Museum website http://www.wpafb.af.mil/museum/research/bombers/b3-87.htm
· B-17 in Detail & Scale part 1 and 2
February 2004
Copyright ModelingMadness.com
If you want to look at some more photos of this conversion, please check this website: http://members.xoom.virgilio.it/dh108/mysite/mymodels/boeing_xb-38.html
If you would like your product reviewed fairly and quickly, please contact the editor or see other details in the Note to Contributors.