|
INTRODUCTION |
As this kit is previewed elsewhere on this site, I'll not go into detail about the contents. Also, for those interested in the developmental and operational history, check out Tom Cleaver's excellent article on the Classic Airframes kit in the review section.
|
CONSTRUCTION |
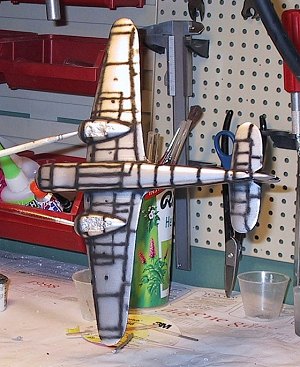
This kit is the little brother of Classic Airframes' 1/48 offering, with a similar parts breakdown and clear, injected nose halves. No structural sidewall detail for the crew office is included though and on my sample, the sprue with all the small parts have a lot of flash and mold lines plus the molds appears to have shifted a bit. The plastic on this sprue is very soft and workable though so it's not as much work as it initially seems to clean up these parts. I still opted to replace a few with scratch built items.
 When receiving this kit, I
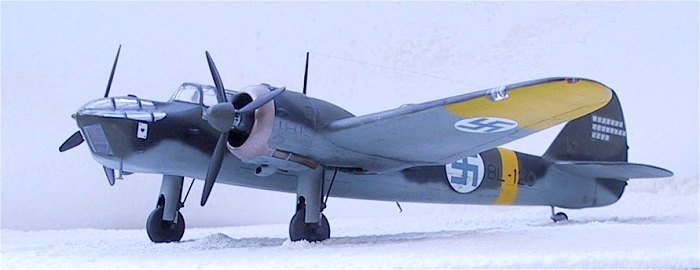
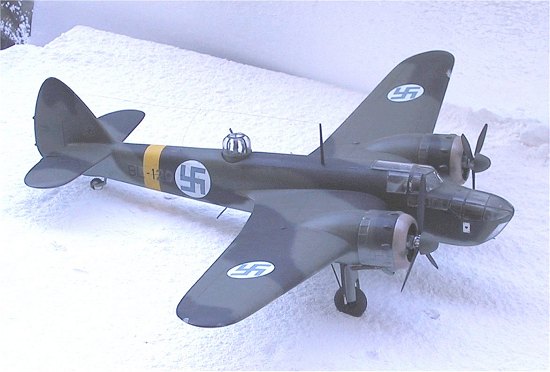
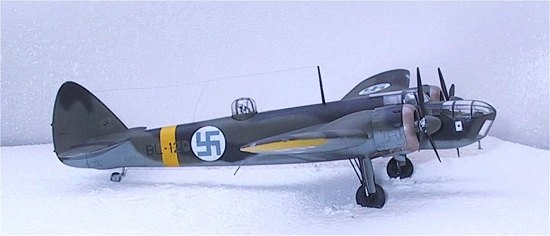
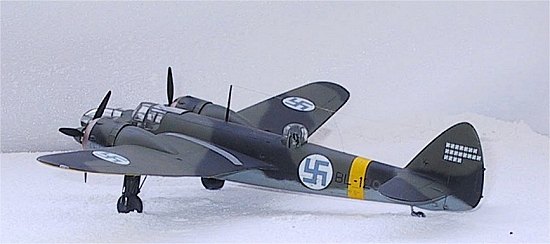
decided right away to model my Blenheim as a Finnish Air Force (Soumen
Ilmavoimien) machine during the continuation war. One of the kit decal
options is for BL 129 of LeLv48 (Bomber Squadron 48), which was part of
the first batch of Mk IV machines delivered to Soumen Ilmavoimien in
early 1940.
When receiving this kit, I
decided right away to model my Blenheim as a Finnish Air Force (Soumen
Ilmavoimien) machine during the continuation war. One of the kit decal
options is for BL 129 of LeLv48 (Bomber Squadron 48), which was part of
the first batch of Mk IV machines delivered to Soumen Ilmavoimien in
early 1940.
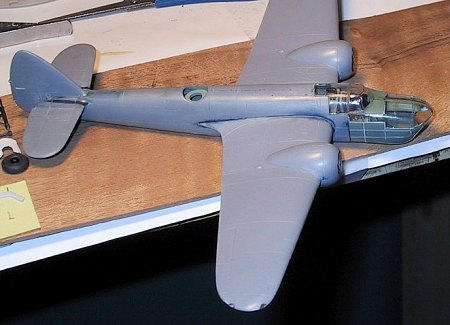
Fuselage and interior
I diverted somewhat from regular practice and started out with gluing the fuselage halves, the rear bulkhead for the cockpit and the insert for the dorsal turret together. No serious fit problems were encountered, but most seams needed some extra attention. I used CA glue as a filler. Consulting my references, I noticed that the panel lines outlining the bomb bay were placed too far aft. These were filled with superglue and new lines were added in the correct position.
I modified the mount for the dorsal turret to enable me to fit this later. To do this, I shaved off plastic from the turret base on two sides until it was possible to drop it in place from the outside. Then I fitted a small shelf made from sheet styrene at the forward part of the insert, and a piece of styrene tubing at the rear part of the ring. This piece was made just long enough to touch the bottom of the fuselage with the turret in place.
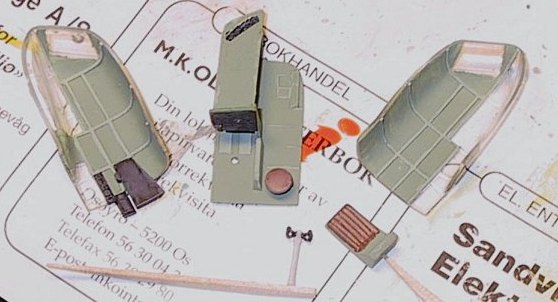 Next came the cockpit interior.
The details included are very nice, but as mentioned the kit lacks
structural sidewall detail. I glued on small bits of strip styrene to add
a bit of busyness and visual interest. In hindsight, I wish I had added
more detail here, since almost everything is visible when the model is
finished. The interior was painted British grey-green, the instrument
panel and side consoles were painted "scale black" and the seats were
given a red-brown leather colour. I dry brushed everything with lightened
versions of the base colours and used a dirty watercolour wash to deepen
the shadows. Some weathering was later added using pastels and a silver
coloured pencil. I decided that it would probably be a good idea to leave
the interior and all the clear parts for the nose off until the rest of
the model was finished to prevent any damage.
Next came the cockpit interior.
The details included are very nice, but as mentioned the kit lacks
structural sidewall detail. I glued on small bits of strip styrene to add
a bit of busyness and visual interest. In hindsight, I wish I had added
more detail here, since almost everything is visible when the model is
finished. The interior was painted British grey-green, the instrument
panel and side consoles were painted "scale black" and the seats were
given a red-brown leather colour. I dry brushed everything with lightened
versions of the base colours and used a dirty watercolour wash to deepen
the shadows. Some weathering was later added using pastels and a silver
coloured pencil. I decided that it would probably be a good idea to leave
the interior and all the clear parts for the nose off until the rest of
the model was finished to prevent any damage.
Wheel wells and landing gear
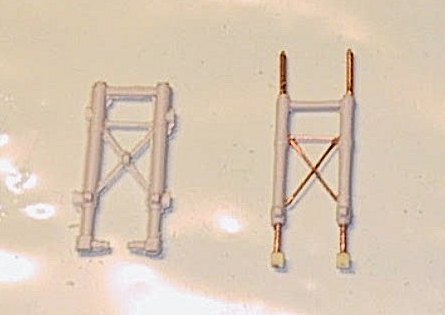 As the gear legs were suffering
from a lot of flash, I decided to replace parts of them with copper rod.
This involved a lot of precision measuring, drilling, cutting and gluing
(add a bit of swearing to mix as well) before they started to look
acceptable. I also modified the way they are attached to the roof of the
wheel wells. A short tab on each gear leg is supposed to fit into a
shallow depression in the well insert. I drilled through each of the
mounting recesses, and positioned short pieces of styrene tubing on the
opposite side. These were aligned by pushing a piece of copper rod
through the holes
As the gear legs were suffering
from a lot of flash, I decided to replace parts of them with copper rod.
This involved a lot of precision measuring, drilling, cutting and gluing
(add a bit of swearing to mix as well) before they started to look
acceptable. I also modified the way they are attached to the roof of the
wheel wells. A short tab on each gear leg is supposed to fit into a
shallow depression in the well insert. I drilled through each of the
mounting recesses, and positioned short pieces of styrene tubing on the
opposite side. These were aligned by pushing a piece of copper rod
through the holes
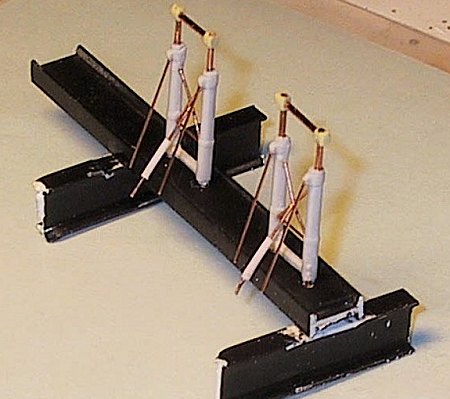 in the inserts and into the tubing, which was glued in
place with liquid plastic cement. Then I drilled out the top of the gear
legs and inserted mounting pins from sections of copper rod, making sure
everything lined up. The retraction struts were also made from copper rod
and I fashioned pieces of stretched styrene tubing to pose as retraction
cylinders.
in the inserts and into the tubing, which was glued in
place with liquid plastic cement. Then I drilled out the top of the gear
legs and inserted mounting pins from sections of copper rod, making sure
everything lined up. The retraction struts were also made from copper rod
and I fashioned pieces of stretched styrene tubing to pose as retraction
cylinders.
I proceeded to paint the landing
gear aluminum only to discover that the aircraft I was modeling was
delivered in Dark Green and Dark Earth over Black undersides, gear
included. Studying my references, it became clear that the gear
apparently wasn't re-painted when the aircraft received its
characteristic Finnish camouflage but rather left in its original colour.
It also seemed that the paint was quite worn and chipped here. Due to
leaks in the hydraulic system perhaps? The solution I opted for was to
dry-brush heavily with black, something that worked very well and left me
with a pair of suitably scruffy gear legs. The wheels were cleaned up,
assembled and painted without incident. The well doors included in the
kit are nice but awfully thick. Being lazy, I figured that instead of
sanding them down it would be less labour-intensive to make repl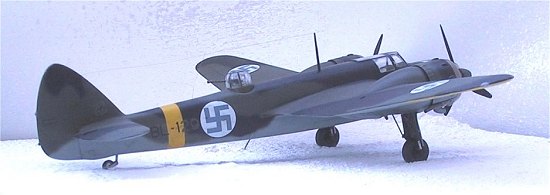 acements
from scratch. Using the kit doors as templates, I cut new ones from sheet
styrene and shaped them by taping them to a suitably sized piece of brass
tube and heating them in boiling water. An internal brace was added and
the new doors were painted grey green on the inside.
acements
from scratch. Using the kit doors as templates, I cut new ones from sheet
styrene and shaped them by taping them to a suitably sized piece of brass
tube and heating them in boiling water. An internal brace was added and
the new doors were painted grey green on the inside.
As mentioned, there are inserts for each wheel well that form a roof and bulkheads. Some rather noticeable gaps into the wing interior are left at the sides though so I glued on some strip styrene to close them. After a coat of interior grey-green followed by the same light/shadow treatment as the cockpit the gear wells were done. It is possible that the wells should have been black too, as this seems to have been the practice with other British bombers in factory-applied night camouflage at the time. I chose to leave them as they were and moved on.
Wings and tail
 Each wing is made up from the
traditional upper and lower halves. Test fitting these revealed a pretty
good fit except for the engine nacelles protruding from the leading
edges. Also, the trailing edges of the wings were a bit thick. On a
darker note, the way the wings mount on the fuselage is a potential
problem as they are supposed to be butt-joined inside recesses on the
fuselage sides. I imagined a world of problems with the wings falling off
every single time the model fell to the floor! Being ham-fisted, I opted
to make spars from sections of brass tubing. This would also help a lot
when aligning the
Each wing is made up from the
traditional upper and lower halves. Test fitting these revealed a pretty
good fit except for the engine nacelles protruding from the leading
edges. Also, the trailing edges of the wings were a bit thick. On a
darker note, the way the wings mount on the fuselage is a potential
problem as they are supposed to be butt-joined inside recesses on the
fuselage sides. I imagined a world of problems with the wings falling off
every single time the model fell to the floor! Being ham-fisted, I opted
to make spars from sections of brass tubing. This would also help a lot
when aligning the
 wings. As the assembled wings had a slight sag about
mid-chord where they meet the fuselage, I used small pieces of sprue to
pry the halves apart to ensure a tight fit.
wings. As the assembled wings had a slight sag about
mid-chord where they meet the fuselage, I used small pieces of sprue to
pry the halves apart to ensure a tight fit.
The horizontal tail surfaces
were a little bit thinner than the fuselage fairings so I aligned them to
fit flush at the lower side, leaving a slight step on the top which was
easily eliminated with putty and superglue. I made mounting pins from
copper rod
 to add strength to the assembly.
The navigation lights were cut out and replacements made from clear plastic. The landing light is a spare from Eduard's He 280 in 1/48.
Engines and cowlings
The
engines are beautiful resin castings, and needed only paint to look
great. Some valve pushrods were broken off during shipping so I replaced
the damaged ones with short pieces of .010 guitar string. Ignition
harness detail or exhaust stubs are not included, but in this scale it's
not overly noticeable as the engines are quite obscured by the
propellers. Note that it was not necessary to remove the casting blocks
on the engines rear face on my kit, as these blocks were just big enough
to
 properly space the engines from the firewalls. I sanded the cowling
halves on the inside a little bit to make more room for the engines and
glued the halves together trapping the engines inside. When the seams
were taken care of, I aligned the engines properly and glued them with
superglue. The carburettor air intakes, remaining cowl bulges and exhaust
pipes were also glued on at this stage. During sanding, the cowl bulges
directly on top of each nacelle had become quite mis-shaped. I sanded
them smooth, made resin copies of an undamaged bulge and stuck the new
bulges in place with superglue. Finally, I made a mounting pin for each
engine/cowl assembly from styrene tubing to aid the alignment of these
later.
properly space the engines from the firewalls. I sanded the cowling
halves on the inside a little bit to make more room for the engines and
glued the halves together trapping the engines inside. When the seams
were taken care of, I aligned the engines properly and glued them with
superglue. The carburettor air intakes, remaining cowl bulges and exhaust
pipes were also glued on at this stage. During sanding, the cowl bulges
directly on top of each nacelle had become quite mis-shaped. I sanded
them smooth, made resin copies of an undamaged bulge and stuck the new
bulges in place with superglue. Finally, I made a mounting pin for each
engine/cowl assembly from styrene tubing to aid the alignment of these
later.
 The Finns often mounted propeller
spinners on their Blenheims during winter to protect the engines from
flying bits of ice and such. These are not included in the kit, so I
decided to make a pair from scratch. I intended to use resin copies of a
modified Hampden spinner, but the resin proved too fragile to be thinned
out sufficiently. Plan B was to heat pieces of styrene sheet and pull it
over the cast resin item. After a few attempts, I had a reasonably
identical pair.
The Finns often mounted propeller
spinners on their Blenheims during winter to protect the engines from
flying bits of ice and such. These are not included in the kit, so I
decided to make a pair from scratch. I intended to use resin copies of a
modified Hampden spinner, but the resin proved too fragile to be thinned
out sufficiently. Plan B was to heat pieces of styrene sheet and pull it
over the cast resin item. After a few attempts, I had a reasonably
identical pair.
With all the grunt work done, I decided that it would be a good idea to paint the exhaust collector rings and exhaust pipes now. These were sprayed with a metallic "champagne" colour mix of Humbrol Enamels (see the colour mix section)
Back to the nose
 With
most of the construction work done, I decided to attach the clear parts.
After a bit of trial-and-error, I ended up using two-component epoxy glue
to attach the clear parts. This was the only stuff I found that was able
to hold the parts together sufficiently. I spent some time tinkering with
these parts to ensure a good fit, but along the fuselage/nose joint I had
some work to do. No complaints about the fit but the clear plastic's
ability to repel almost everything I threw at it made this rather tedious
and difficult. After several runs with Tamiya putty and wet sanding all
traces of the seam were gone. I also needed some filler to smooth out a
step at the bottom of the windscreen. When done, I masked the clear
panels using Bare Metal Foil and sprayed the framing grey-green.
With
most of the construction work done, I decided to attach the clear parts.
After a bit of trial-and-error, I ended up using two-component epoxy glue
to attach the clear parts. This was the only stuff I found that was able
to hold the parts together sufficiently. I spent some time tinkering with
these parts to ensure a good fit, but along the fuselage/nose joint I had
some work to do. No complaints about the fit but the clear plastic's
ability to repel almost everything I threw at it made this rather tedious
and difficult. After several runs with Tamiya putty and wet sanding all
traces of the seam were gone. I also needed some filler to smooth out a
step at the bottom of the windscreen. When done, I masked the clear
panels using Bare Metal Foil and sprayed the framing grey-green.
Almost final assembly
 I
made a simple interior for the dorsal turret, including a mount for the
single Browning .303 and the ammo feed chute. Only the mount and the
chute are visible on the finished model so there's no need to pull out
all the stops here. As the kit includes two different and not very
spectacular twin guns, I used a white metal gun from Airwaves that look a
lot better.
I
made a simple interior for the dorsal turret, including a mount for the
single Browning .303 and the ammo feed chute. Only the mount and the
chute are visible on the finished model so there's no need to pull out
all the stops here. As the kit includes two different and not very
spectacular twin guns, I used a white metal gun from Airwaves that look a
lot better.
Being no fan of butt-joined parts, I made mounting pins for all the propeller blades and antennas. The pitot head broke during cleanup so I made a new one from scratch.
Air intakes for the oil coolers were fashioned from very thin-walled copper tubing.
|
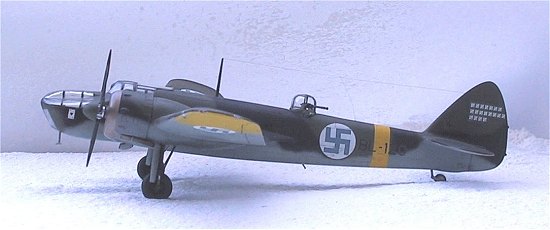
COLORS & MARKINGS |
After masking off the wheel wells
and engines with tissue paper and liquid mask, I followed my regular
practice and base-coated the model with a silver colour. This revealed a
few blemishes and lost panel lines that needed some attention. After the
mistakes were fixed and the basecoat re-applied, I pre-shaded the model
with Tamiya flat black. Next, the yellow ID
 markings were sprayed using
Tamiya Lemon Yellow. Note that the yellow markings on the wingtips are
shown with a wavy edge in the instructions, This is incorrect, the
demarcation line should follow the panel joint just outboard of the inner
edge of the ailerons. I mixed the camouflage colours from Humbrol Enamels
using the recipes found on IPMS Stockholm's colour chart pages. The mixes
were altered a bit to suit my taste and to obtain the "right" look for
the scale - see the paint mix section. I used Winsor & Newton kneading
rubber to mask off the individual colours (as suggested by Mr Rick
markings were sprayed using
Tamiya Lemon Yellow. Note that the yellow markings on the wingtips are
shown with a wavy edge in the instructions, This is incorrect, the
demarcation line should follow the panel joint just outboard of the inner
edge of the ailerons. I mixed the camouflage colours from Humbrol Enamels
using the recipes found on IPMS Stockholm's colour chart pages. The mixes
were altered a bit to suit my taste and to obtain the "right" look for
the scale - see the paint mix section. I used Winsor & Newton kneading
rubber to mask off the individual colours (as suggested by Mr Rick
![]() Brownlee - thanks mate!). When finished, the demarcation lines were
softened with some careful free-hand spraying, some additional shading
was applied to the black areas of the camouflage and the model was rubbed
down with a bathroom tile scrub.
Brownlee - thanks mate!). When finished, the demarcation lines were
softened with some careful free-hand spraying, some additional shading
was applied to the black areas of the camouflage and the model was rubbed
down with a bathroom tile scrub.
Next, I applied a coat of Future over the entire model using a flat, wide brush and when dry, it was time to tackle the decals. Although I have heard a lot of good things about them and they look great on the backing paper, these decals gave me more grief than any other part of the build. They were very thick and matte, refused to settle into the panel line detail plus they silvered badly despite the gloss surface of the model. I had to do a lot of touch-up painting to hide the silvered areas, but some are still visible. I also had to paint the green section of the serial number as the colour on the decal didn't match the paint but this was expected.
When I was pleased with the result, another coat of Future sealed the decals and a thin coat of Humbrol clear matte prepared the surface for the weathering process.
|
FINAL CONSTRUCTION |
 The very first task was to add
some discoloration to the exhausts. I mixed up a dark brown colour from
Humbrol enamels, painted it on the exhaust pipes and then removed most of
it using a q-tip. One pipe was finished before moving on to the next. I
tried to make the pipes gradually darker towards the outlet. When dry, I
rubbed on some rust-coloured pastel dust to the rear section of the pipes
and sealed them with clear flat.
The very first task was to add
some discoloration to the exhausts. I mixed up a dark brown colour from
Humbrol enamels, painted it on the exhaust pipes and then removed most of
it using a q-tip. One pipe was finished before moving on to the next. I
tried to make the pipes gradually darker towards the outlet. When dry, I
rubbed on some rust-coloured pastel dust to the rear section of the pipes
and sealed them with clear flat.
For the rest of the model, I
followed my normal procedure and applied a dirty wash of watercolours to
the entire surface. When dry, I wiped off the excess with a moist paper
towel and a few panel lines were enhanced using a pencil. Service panels,
control surfaces and hatches plus any lines running under a decal
benefitted from this treatment. Next, exhaust stains were added using
black pastel dust carefully applied and rubbed out with q-tips. Finally,
a few patches of bare metal was added using a silver pencil. Some to the
leading edges of the wings behind the propeller
 arcs, a few to the grey
walkway and a bit around the cockpit framing. A final dusting of clear
flat sealed the weathering and I was on to the final step: removing masks
and gluing on all the small parts. The foil left some glue residue behind
on the clear panels but this was easily removed using q-tips soaked in
plastic polish. I spent some time getting the landing gear alligned
before adding the antennas, propellers and the dorsal turret. The antenna
wires were replicated using strands of my own hair.
arcs, a few to the grey
walkway and a bit around the cockpit framing. A final dusting of clear
flat sealed the weathering and I was on to the final step: removing masks
and gluing on all the small parts. The foil left some glue residue behind
on the clear panels but this was easily removed using q-tips soaked in
plastic polish. I spent some time getting the landing gear alligned
before adding the antennas, propellers and the dorsal turret. The antenna
wires were replicated using strands of my own hair.
Now I was finally able to sit back and behold the fruits of my labour! But something looked wrong!? I shot some pictures of the model and studied them side-by-side with my references - as I feared, two goofs showed up. Firstly, the tail wheel leg was too long and needed to be cut in half. Next, I realized that the Finnish Blenheims weren't fitted with the under wing fuel dump pipes. Duh! These were promptly removed and the area was re-finished. And NOW I was done!
|
CONCLUSIONS |
Building this model has proven to be one of the most enjoyable modeling experiences I have ever had. The overall quality of the kit is in my opinion so good that the extra attention and TLC it needed in some places didn't seem like a chore at all. Anybody who has built a limited run kit or two in their past should be able to produce a beautiful model from this kit.
Positive remarks: General quality, detail, fit, instructions, much needed subject.
Negative remarks: Flash and mold-shifting on the detail parts sprue, decals, instructions fail to mention some features unique to the Finnish version, some strange colour callouts for the camouflage.
July 2004
Paint mixes used:
"Champagne" exhaust colour:
2x Humbrol 133 Satin Red Brown
1x Humbrol 11 Silver Fox
1x Humbrol 16 Gold
Vaaleansininen (light blue on lower sides): FS35414
IPMS Stockholm gives the following mixing ratio:
5x Humbrol 34 Matt White
3x Humbrol 115 Matt Russian Blue
3x Humbrol 65 Matt Aircraft Blue
I replaced H65 with H64 (light grey) to tone down the blue tint.
Oliivinvihreä (olive green on top side): FS34096
IPMS Stockholm gives the following mixing ratio:
6x Humbrol 116 Matt US Dark Green
6x Humbrol 117 Matt US Light Green
1x Humbrol 163 Dark Green (RAF Dk. Green)
I used a bit more H163 to give the paint more brown tint.
Musta (black on top side) : FS37038
Any black will do, but to give it more of a scale effect, I used the following mix:
4x Humbrol 33 Flat Black
1x Humbrol 67 Matt Tank Grey
Copyright ModelingMadness.com