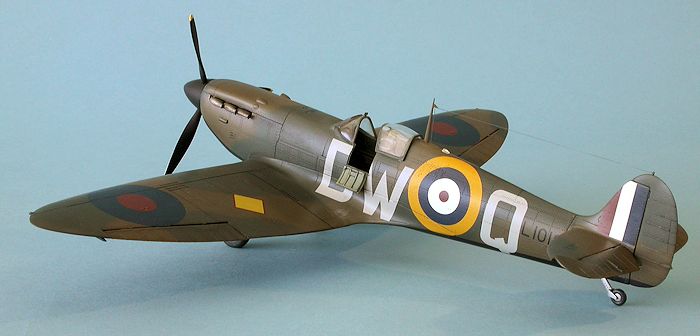
Revell 1/32 Spitfire I
| KIT #: | 03986 |
| PRICE: | $29.95 SRP |
| DECALS: | Two options |
| REVIEWER: | Lee Kolosna |
| NOTES: |
BarracudaCast resin correction set, EagleCals decals, Scale Aircraft Conversions white metal tail strut, Eduard harness |
| HISTORY |
 ollective memories as the airplane that
staved off the hordes of attacking German bombers and saved the realm from
certain defeat. While that last sentence is highly debatable, it in no way
detracts from the capabilities and accomplishments of the Supermarine
fighter.
ollective memories as the airplane that
staved off the hordes of attacking German bombers and saved the realm from
certain defeat. While that last sentence is highly debatable, it in no way
detracts from the capabilities and accomplishments of the Supermarine
fighter.| THE KIT |
Oil cooler. The big, stinking flaw in this kit is the fact that it features an underwing oil cooler that belongs to a Mk V, and not the half-round version found on the Mk I and II. Fortunately, Roy Sutherland’s Barracuda Studios provides a resin replacement and I strongly recommend that you purchase this set if you tackle this kit.
Ailerons. On a Mark I and II, these should be
fabric covered, not metal-covered as provided in the kit. You can sand the
metal panel lines
 down and re-scribe the stitching or use the replacements
included in the above-mentioned BarracudaCast set.
down and re-scribe the stitching or use the replacements
included in the above-mentioned BarracudaCast set.
Spinner. This is another howling error that has one scratching one’s head as to how Revell’s designers could make such an obvious shape error. The kit piece is way too short and squat, not looking like either the blunt Rotol spinner seen on most Mk IIs or the pointed deHavilland spinner seen on most Mk Is. Grey Matter and Eagle Editions make resin Rotol replacements, but I had a deHavilland spinner leftover from a Hasegawa Mk V kit that I used on my model.
Propeller blades. The blades are too fat at the ends and not properly tapered. I sanded the pieces down to the correct shape.
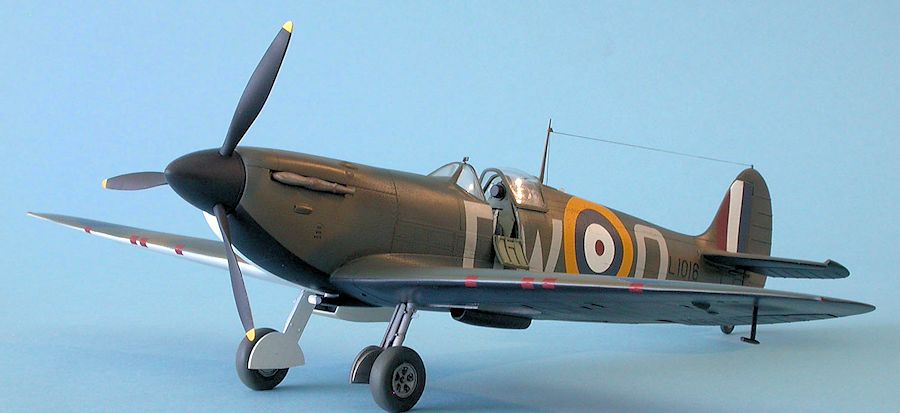
Canopy. The most labor-intensive issue for me to fix was the too-short rear-vision piece that accommodates another surprising flaw of a square notch cut out of the upper rear corner of the cabin door opening. No Spitfire had this notch, ever. It was something that Hasegawa messed up with their Mk V kit from the 1970s and for some bizarre reason Revell copied it onto this kit. One solution is to add sheet styrene to plug up the notch, and carve a new backlight master for use to vacuform a properly-sized replacement piece. That’s a lot of work, so I took a shortcut and grafted on a thin slice of sheet styrene on each side of the backlight, knowing that it would partially hidden underneath the open canopy and therefore not very noticeable. Speaking of the canopy, it is not quite wide enough to be posed in the open position. I had to really force it down on the spine to get it to sit properly and would not be surprised if the piece didn’t split because of the pressure. Finally, the windscreen comes in two pieces, one for the windscreen itself and one for the armored glass seen on all Mk IIs. I understand why Revell engineered this the way that they did because early Mk Is didn’t have the armored glass, but I really wish they had provided an extra clear piece that combined both elements as I found it a real pain in the neck to get them both glued on and properly blended into the surrounding fuselage.
Aerial wire posts. The main post is missing the characteristic triangular attachment point for the wire. I fabricated an addition using very thin sheet styrene. The post on the top of the vertical stabilizer is not correct and the top of the T should be lopped off.
Flaps. Revell provides these as separate pieces as do a number of other model kit manufacturers. The thing is, the flaps were never left down on a parked Spitfire unless there was some kind of maintenance procedure underway. Pilots were even fined by their Squadron Leaders if they forgot to pull the flaps up immediately after landing. The kit flaps add unnecessary complexity and don’t fit very well.
Wheels and tires. The five-spoke kit wheels are dished outwards, instead of inwards. BarracudaCast has very nice resin replacements. I had a pair of wheels leftover from a Pacific Coast Models Mk IX kit, and while they are a bit too wide, are still an improvement over what Revell provides. The instructions direct the builder to add the tail strut before gluing the two fuselage halves together. I did this and broke the piece three times in the course of construction. I strongly recommend leaving the piece out until the very end, as it is quite fragile. My broken strut was replaced with a Scale Aircraft Conversions white metal piece I had lying around.
Rudder and elevators. The fabric ribbing tape depicted on the kit pieces is ridiculously oversized. I recommend sanding these down to near imperceptibility. But I do give Revell kudos for making these separate pieces, as nearly every photo of a Spitfire at rest shows the elevators deflected downwards at an 18 degree angle.
Crowbar in the cockpit access door. Mk IIs didn’t have one, so the modeler is advised to scrape it off the kit piece or purchase a BarracudaCast resin replacement. And for goodness’ sakes, NEVER paint a wartime crowbar red on any Spitfire! This is a post-war/warbird characteristic that modelers unfortunately repeat over and over again on their models.
Cockpit. In general, there is actually a decent amount of detail although one could get very nitpicky as to the equipment provided and whether it is appropriate for a Mk II. The seat does not have a padded leather backrest, so I grafted on a piece of sheet styrene and carved in groves for the stitching. I used an Eduard photo-etch Sutton harness. Unfortunately there is no pilot’s armor provided, so one can be fabricated from sheet styrene.
 Fuselage. The kit is covered in recessed divots
representing flush or raised rivets on the real aircraft. I don’t get too
upset about this as it seems to be the standard for all new models now, but
I do object to the exaggerated raised fasteners around the engine
panels. On a Spitfire, these are actually recessed slightly from the
surrounding fuselage so I sanded all of them off and replaced each of them
with a few turns of a twist drill. There is a slight mound on each wing
root fillet that should be removed by sanding, and the profile of the
cowling just ahead of the windscreen is a bit too squared off. I bent the
kit’s plastic with my hands to give a more circular profile but it really
isn’t noticeable to anyone other than a Spitfire fanatic. There are tiny
clear windows on either side of the fuselage that are probably inspection
ports of some kind. These were fitted to only a few airframes in the Mk II
run, so unless you have clear evidence that they existed on the aircraft you
are depicting, I would recommend filling the holes and painting over them.
Fuselage. The kit is covered in recessed divots
representing flush or raised rivets on the real aircraft. I don’t get too
upset about this as it seems to be the standard for all new models now, but
I do object to the exaggerated raised fasteners around the engine
panels. On a Spitfire, these are actually recessed slightly from the
surrounding fuselage so I sanded all of them off and replaced each of them
with a few turns of a twist drill. There is a slight mound on each wing
root fillet that should be removed by sanding, and the profile of the
cowling just ahead of the windscreen is a bit too squared off. I bent the
kit’s plastic with my hands to give a more circular profile but it really
isn’t noticeable to anyone other than a Spitfire fanatic. There are tiny
clear windows on either side of the fuselage that are probably inspection
ports of some kind. These were fitted to only a few airframes in the Mk II
run, so unless you have clear evidence that they existed on the aircraft you
are depicting, I would recommend filling the holes and painting over them.
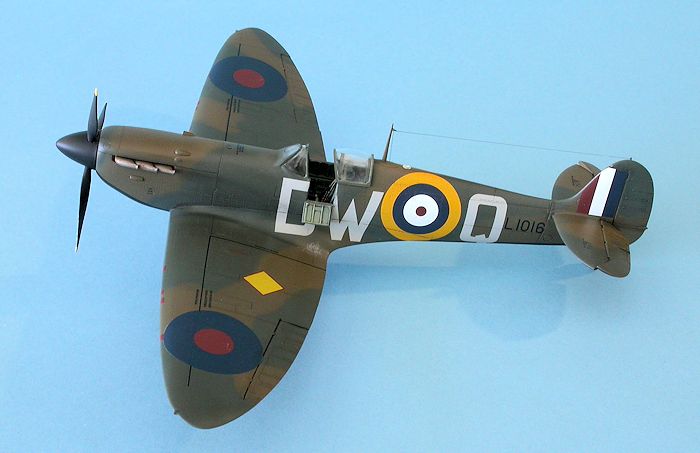
Wings. The area of the wings directly under the fuselage should be flat whereas the kit has an odd mounded profile. I bent the kit’s lower wing piece until it was as flat as I could make it without breaking it in two. This imparted a nice crack in the piece that had to be filled afterwards. There are two hexagonally-shaped raised strengthening plates on the tops of the wings that need to be sanded flush. The same is true for two oblong raised plates underneath the wings.
| CONSTRUCTION |
 The cockpit required some work to make more
accurate. The seat back is missing the leather pad. I added a piece of
sheet styrene and carved notches for the stitching. The seat was painted
red-brown and the leather pad was painted black. The Very pistol cartridge
storage rack on the front of the seat was left off – this was not likely
present on these aircraft. I drilled out the lightening holes in the
bulkheads. Using a piece from Tamiya’s Mk VIII kit as a guide, I fashioned
a piece of armor plating from sheet styrene and glued it between the seat
and the bulkhead. Eduard photo-etch harness pieces were used.
The cockpit required some work to make more
accurate. The seat back is missing the leather pad. I added a piece of
sheet styrene and carved notches for the stitching. The seat was painted
red-brown and the leather pad was painted black. The Very pistol cartridge
storage rack on the front of the seat was left off – this was not likely
present on these aircraft. I drilled out the lightening holes in the
bulkheads. Using a piece from Tamiya’s Mk VIII kit as a guide, I fashioned
a piece of armor plating from sheet styrene and glued it between the seat
and the bulkhead. Eduard photo-etch harness pieces were used.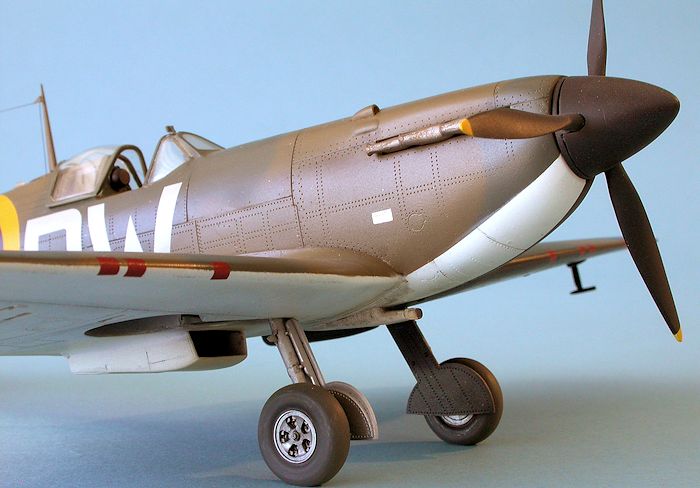 Since I had changed the cross section profile of the
front fuselage, I had to do a lot of sanding of the attachment points of the
windscreen in order to get it to fit without any noticeable gaps. After the
windscreen was glued on, I filled the seams with CA glue and blended the
transition between the windscreen and surrounding fuselage. Finally, the
armored glass was added and the seams again filled. This whole process was
a real pain in the butt and I lost my desire to continue working on the kit
so I put it away for a month and worked on another model before I could
muster up the enthusiasm to resume work.
Since I had changed the cross section profile of the
front fuselage, I had to do a lot of sanding of the attachment points of the
windscreen in order to get it to fit without any noticeable gaps. After the
windscreen was glued on, I filled the seams with CA glue and blended the
transition between the windscreen and surrounding fuselage. Finally, the
armored glass was added and the seams again filled. This whole process was
a real pain in the butt and I lost my desire to continue working on the kit
so I put it away for a month and worked on another model before I could
muster up the enthusiasm to resume work.| COLORS & MARKINGS |
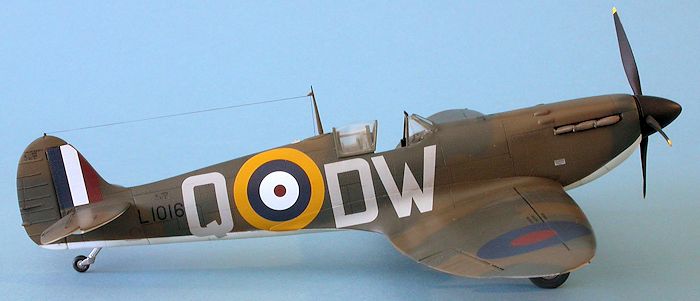
 Green and Dark Earth was done
with Testors acrylic paints. The demarcation between the top and bottom was
hard-masked, but the topside pattern was free-handed with multiple passes
made to insure the slightest feathering between the two colors that I could
manage.
Green and Dark Earth was done
with Testors acrylic paints. The demarcation between the top and bottom was
hard-masked, but the topside pattern was free-handed with multiple passes
made to insure the slightest feathering between the two colors that I could
manage.| FINAL CONSTRUCTION |
 rial post and attached
a small piece of brass rod to make for a very secure attachment to the
fuselage spine since the whole thing would be under tension from two aerial
wires which were fashioned from nylon “invisible” thread and painted with
dark gray paint. The kit’s post is missing the characteristic triangular
pip, so I fashioned that from tiny pieces of thin sheet styrene and glued
them over the point where the wires intersect. The top of the T was lopped
off from the aerial post on the top of the tail and the wire attached with
CA glue and accelerator. The exhaust stubs were glued in as was the pitot
tube underneath the wing. The final step was to attach the canopy, which is
not wide enough for properly fitting over the fuselage spine as mentioned
above. I added two tiny drops of CA glue on the rails and forced the canopy
down on the spine, holding it there for several minutes until I was sure the
glue had dried to prevent the canopy from popping back up. It held, but
there is so much tension there that I will not be surprised if sometime in
the future it either pops off or the canopy splits in half.
rial post and attached
a small piece of brass rod to make for a very secure attachment to the
fuselage spine since the whole thing would be under tension from two aerial
wires which were fashioned from nylon “invisible” thread and painted with
dark gray paint. The kit’s post is missing the characteristic triangular
pip, so I fashioned that from tiny pieces of thin sheet styrene and glued
them over the point where the wires intersect. The top of the T was lopped
off from the aerial post on the top of the tail and the wire attached with
CA glue and accelerator. The exhaust stubs were glued in as was the pitot
tube underneath the wing. The final step was to attach the canopy, which is
not wide enough for properly fitting over the fuselage spine as mentioned
above. I added two tiny drops of CA glue on the rails and forced the canopy
down on the spine, holding it there for several minutes until I was sure the
glue had dried to prevent the canopy from popping back up. It held, but
there is so much tension there that I will not be surprised if sometime in
the future it either pops off or the canopy splits in half.| CONCLUSIONS |
 Is a kit excused from harsh criticism because it is
inexpensive? Does $24 plus another $50 or more in necessary aftermarket
items make this a less attractive proposition? I have a hard time coming to
a conclusion that doesn’t slam Revell for not getting things right from the
get-go. This is an iconic airplane and modelers deserve to have a really
good kit of it. The Revell kit disappoints in so many ways, from overdone
surface detail to inexplicable accuracy goofs to fit that shouldn’t be as
poor for something designed in the 21st Century. Does it look like a
Spitfire? Sure. Can it be made to look like a really good model of a
Spitfire? Of course. Would I recommend it to other modelers who want to
build a model in this scale of one of the most beautiful airplanes that ever
flew? Maybe not. I leave it to the reader to decide if all the trouble I
went through to get to a finished model is worth it to you.
Is a kit excused from harsh criticism because it is
inexpensive? Does $24 plus another $50 or more in necessary aftermarket
items make this a less attractive proposition? I have a hard time coming to
a conclusion that doesn’t slam Revell for not getting things right from the
get-go. This is an iconic airplane and modelers deserve to have a really
good kit of it. The Revell kit disappoints in so many ways, from overdone
surface detail to inexplicable accuracy goofs to fit that shouldn’t be as
poor for something designed in the 21st Century. Does it look like a
Spitfire? Sure. Can it be made to look like a really good model of a
Spitfire? Of course. Would I recommend it to other modelers who want to
build a model in this scale of one of the most beautiful airplanes that ever
flew? Maybe not. I leave it to the reader to decide if all the trouble I
went through to get to a finished model is worth it to you.| REFERENCES |
Lucas, Paul: Camouflage & Markings No 2 – The Battle For Britain – RAF May to December 1940
Humphreys, Robert: The Supermarine Spitfire, a Comprehensive Guide for the Modeller Part 1: Merlin Powered
Brooks, Edgar: Posted comments about the kit on Large Scale Planes forum
Summerfield, Ben: Posted comment about the kit on Large Scale Planes forum
Bradshaw, Derek: Posted comments about the kit on Large Scale Planes forum
Olgivie, Iain: Posted comments about the kit on Large Scale Planes forum
October 2015
If you would like your product reviewed fairly and fairly quickly, please contact the editor or see other details in the Note to Contributors.