ICM 1/48 Spitfire IXc
| KIT: | ICM 1/48 Spitfire IXc |
| KIT #: | ? |
| PRICE: | ? |
| DECALS: | ? |
| REVIEWER: | Fernando Rolandelli |
| NOTES: |
| HISTORY |
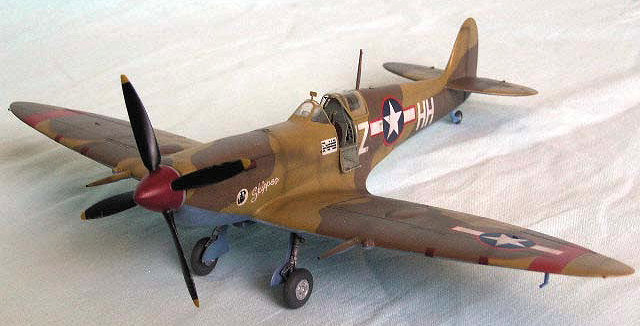
Lacking any suitable air superiority fighter, the first USAAC groups to fight in Europe were issued British planes, on an arrangement known as “Reverse Lend-and-Lease”. One of this was the 31st, which was blooded in the Channel Front before taking part on the Torch Operation, mounted on Spits Vbs and cs, and later going into Italy on VIIIs and IXs, which were finally replaced by P-51B Mustangs in late 1944. Today, it still exists, flying F-16CJs. The group was very successful, claiming 571 victories, with a kill ratio of 8-1, and produced more than 30 aces, but Cpt. Barr was not apparently among them. However, he is recorded as shooting down a 109 on November 9th, 1944, and a 190 four days later.
| THE KIT |
Nowadays there are a lot of different options to portray the Spitfire VIII/IX family, the most popular –however the proven shape issues- seems to be the Hasegawa kit, while the Aeroclub/Hase combo seems to be the expert’s choice, with the new Airfix kit having strong supporters and critics alike.
 However,
having supported, recommended and presented to friends the infamous ICM Spitfire
kit, I thought it was high time to actually build one myself. I bought mine for
cheap (from Alanger), moreover being augmented by a Yak-7 and a MiG-3 and some
Soviet personnel in the same box (ICM Baltic Fleet Aviation combo), all of them
are about the best ICM has to offer. To this I added the Eduard FE142 Zoom Set,
designed for this kit (and a few leftovers from the equivalent set for the
Hasegawa’s) and an ICM decal sheet, for several 31st Group machines.
For good measure, I used the customary Squadron vac canopy (more on this later),
and a quantity of Hasegawa leftover parts.
However,
having supported, recommended and presented to friends the infamous ICM Spitfire
kit, I thought it was high time to actually build one myself. I bought mine for
cheap (from Alanger), moreover being augmented by a Yak-7 and a MiG-3 and some
Soviet personnel in the same box (ICM Baltic Fleet Aviation combo), all of them
are about the best ICM has to offer. To this I added the Eduard FE142 Zoom Set,
designed for this kit (and a few leftovers from the equivalent set for the
Hasegawa’s) and an ICM decal sheet, for several 31st Group machines.
For good measure, I used the customary Squadron vac canopy (more on this later),
and a quantity of Hasegawa leftover parts.
I must say that this late boxing of the ICM kit looked perfectly good on the sprues, with a fairly reasonable amount of flash and sink marks. The plastic had a lurid bluish white shade and was very soft, but nothing to get alarmed about. Clear parts were a bit opaque (“scale-opaqueness”?) Decals were horrible, extremely matt and lacking all sort of stencils, and the “aftermarket” ones did not look much better.
I settled for a IXc (instead of an VIII) on the basis that the short carburetor scoop and single piece lower cowling would be much easier to build than the long one involving a two piece lower cowling. I was right.
| CONSTRUCTION |
Cockpit
 I used
some parts fro
I used
some parts fro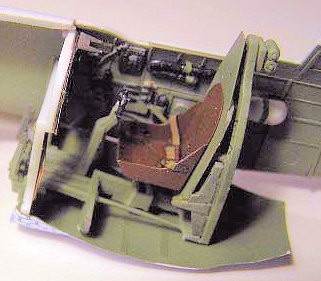 m the kit, some from the Eduard set and some from the spares box,
augmented by some scratch building. Main bulkhead frames were the kit’s, as was
the back armor and some of the fittings; the seat, harness, instrument panel and
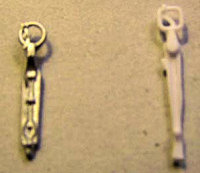
head armor were Eduard’s; the control column was an Aeroclub metal piece (the
kit’s has a square grip!), the sight a Hasegawa leftover; and many fittings were
either Eduard’s or scratch built. I “hollowed” the “floor”, and put a rounded
cardboard “false floor” to mimick the visible
m the kit, some from the Eduard set and some from the spares box,
augmented by some scratch building. Main bulkhead frames were the kit’s, as was
the back armor and some of the fittings; the seat, harness, instrument panel and
head armor were Eduard’s; the control column was an Aeroclub metal piece (the
kit’s has a square grip!), the sight a Hasegawa leftover; and many fittings were
either Eduard’s or scratch built. I “hollowed” the “floor”, and put a rounded
cardboard “false floor” to mimick the visible
 fuselage bottom, attached to the
previously rounded bulkheads. It worked.
fuselage bottom, attached to the
previously rounded bulkheads. It worked.
Fuselage
Having
from the start discarded the idea of exposing the engine (blanking plates
providing a mount for the exhausts), I decided to fix the main shape problem of
the kit: the fuselage spine being too slim. You can easily check this by
comparing the rear quarter light window to that of any other Spitfire kit: it is
almost “v-shaped”, while it should be gently curved. It was a no-brainer: I had
the Squadron vac set, which includes both a “kit-shaped” as well as a
“corrected” one, but any would do. Putting a spreader in between the fuselage
halves right after the canopy does the trick easily, with just a sliver of
putty, and the Eduard set provides a new antennae mast base. The rear frame of
the cockpit is still “v-sha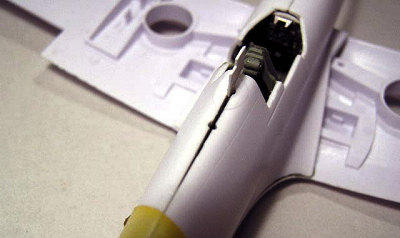 ped”, but some putty compensates for this. The whole
fuselage was built and glued from the cockpit “box” to the back and front; it is
a very flimsy, hopeless looking structure until you add the firewall. The upper
engine cover fits well, but it has a funny shape, like a “wasp-waist” when it
joins the firewall. I have never seen, much less caressed, this area of a real
Spit, and I understand it has some very subtle compound curves, so I do not dare
say it is wrong, but just funny. Anyway, it seemed somewhat too pronounced to
me, so I compensated it with putty. The subtle bulge over the rocker covers
still shows, and looks good. The fin is much thicker than the rudder; while
sanding the insides may be a good idea, I realized too late, so I proceeded to
sand the outsides until they matched. The under nose cover was glued after the
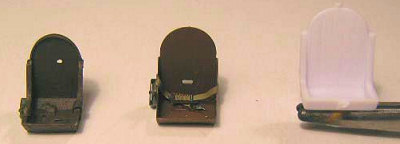
wings were in place. Windscreen is well shaped and fits nicely, but mine had an
internal seam line right in the middle which was i
ped”, but some putty compensates for this. The whole
fuselage was built and glued from the cockpit “box” to the back and front; it is
a very flimsy, hopeless looking structure until you add the firewall. The upper
engine cover fits well, but it has a funny shape, like a “wasp-waist” when it
joins the firewall. I have never seen, much less caressed, this area of a real
Spit, and I understand it has some very subtle compound curves, so I do not dare
say it is wrong, but just funny. Anyway, it seemed somewhat too pronounced to
me, so I compensated it with putty. The subtle bulge over the rocker covers
still shows, and looks good. The fin is much thicker than the rudder; while
sanding the insides may be a good idea, I realized too late, so I proceeded to
sand the outsides until they matched. The under nose cover was glued after the
wings were in place. Windscreen is well shaped and fits nicely, but mine had an
internal seam line right in the middle which was i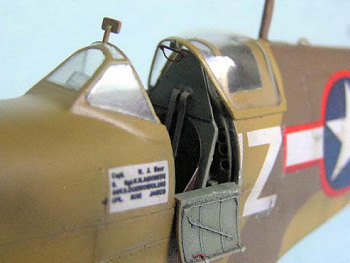 mpossible to eradicate; I
resorted to the vac piece, whose fit was less than perfect and which lacked the
characteristic “cheek frames” completely; these were added in sheet styrene cut
to shape and laboriously blended into the fuselage, as was the windscreen
itself.
mpossible to eradicate; I
resorted to the vac piece, whose fit was less than perfect and which lacked the
characteristic “cheek frames” completely; these were added in sheet styrene cut
to shape and laboriously blended into the fuselage, as was the windscreen
itself.
Propeller
was made out of Hasegawa pieces. I felt the kit’s spinner was a tad too small
and too a straight-shaped cone, and that the separate blades would be a chore to
get right. Therefore I used the Hase’s blades; probably a mistake, because the
ones in the kit do seem better shaped. For the spinner, I found that the too
longish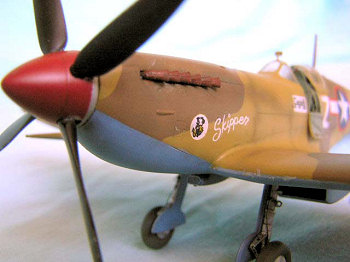 Hase’s piece was the correct length and diameter if deprived of the base
plate. It even matched the subtle compound curve shown in SAMI’s drawings. So I
fitted the kit’s backplate inside the spinner, having previously attached the
propeller to it, enlarged the forward of the openings and filling the back. It
looks fine, and the whole arrangement is very similar in shape to the Aeroclub
piece.
Hase’s piece was the correct length and diameter if deprived of the base
plate. It even matched the subtle compound curve shown in SAMI’s drawings. So I
fitted the kit’s backplate inside the spinner, having previously attached the
propeller to it, enlarged the forward of the openings and filling the back. It
looks fine, and the whole arrangement is very similar in shape to the Aeroclub
piece.
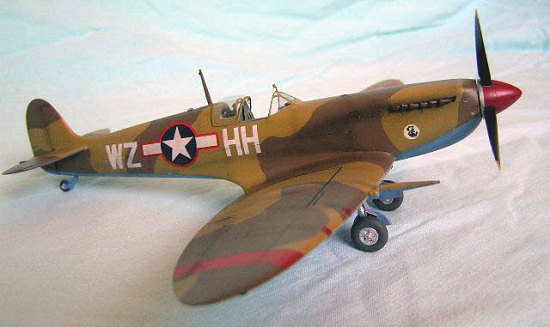
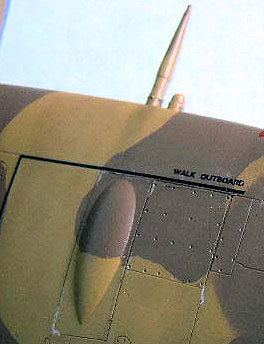
Exhaust tubes were fitted after final varnish, along with undercarriage, mirror and other small things. As they are, they protrude too much out of the nose, so, after some time trying to convince me it was nothing serious, I proceeded to hack each single one and reattach them all to the proper extension. They look much better; in some of the photos you can see the first unsuccessful arrangement.
 Wings
Wings
This bird had the “double cannon” bulges; these were affixed first, so that they can be easily maneuvered up and down: their fit was little short of exemplary. The exhaust ports were drilled next; as a rule, this is a most untidy work. I was already aware of the difference in thickness between the wing and the tips; I sanded the interior a good deal and then finished by confining the remaining step to the underside and sanding it down. All was well until I tried the ailerons; they had the thickness of the original wing and, being one piece, I had no choice but sanding the outside; again, I sanded and rescribed their undersurfaces. The radiator faces were taken from the Eduard set for the Hase Spit; it really does not need that.
Wings were fixed to the fuselage, and a little coercion exerted to achieve a nice dihedral; doing this before attaching the tips might be a good idea, to prevent any breakages. The lower nose section was added, and a lot of putty needed to fair it into the wing’s recess; then, the carburetor scoop was added; I feel it is a tad small. Some putty and sanding was needed to fair the Karmans into the wings, and a tad in the trailing edge “tail”, but nothing out of the ordinary. Gun tubes came from Hasegawa leftovers, but the caps outboard of those are the kit’s.
| COLORS & MARKINGS |
After the customary Light Grey Primer and black-umber preshading, the model went to the paint boot (It’s a lie, I have never had one).
I wanted
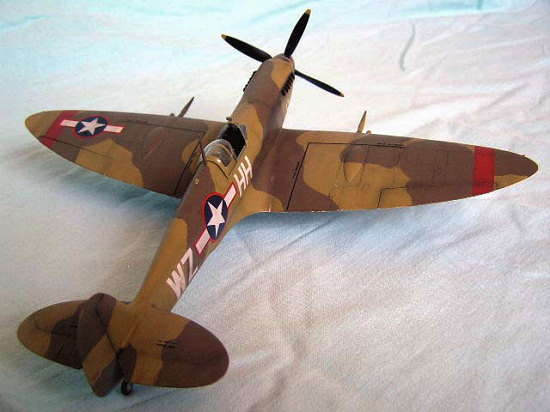
a Spit IX and a Desert Scheme one, that were the facts that made me choose Cpt.
Barr’s “Skipper”. The model was painted entirely in Xtracrylix paints, which are
wonderful but use to clog the airbrush after a couple of seconds’ burst (very
calmly I 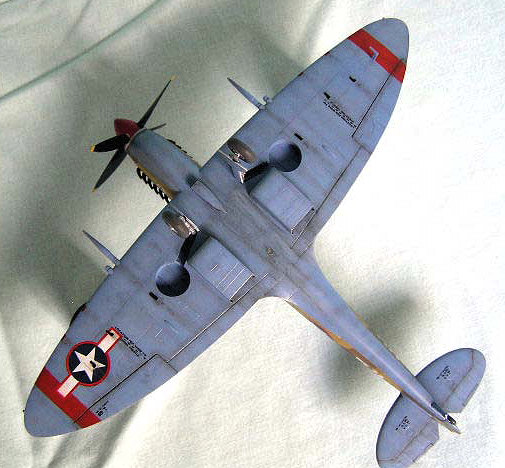 unscrew the tip cap and clean the needle tip with a brush every five)
In my research I found some problems, of course: at first sight, this was a
British plane used by the Americans, who should have painted on their own
insignia after having overpainted the original roundels. But in the scarce
quantity of pictures I found (I lack any specific printed source, like the
Ventura book) I saw that the overpainting was very neat and almost unnoticeable
on the fuselage and fin, but very obvious on the upper wings. Maybe, as they
were usually manufactured in different places, word had reached the fuselage
makers only? But Desert Scheme Spits might have been painted at MUs instead of
at the factory, where they left in Day Fighter Scheme. Maybe the templates the
wings were painted with already included the space for the roundels? In any
event, I painted freehand big DE circles for the upper wing roundels and Azure
Blue for the undersurface ones, but nothing like that on the fuselage and fin.
unscrew the tip cap and clean the needle tip with a brush every five)
In my research I found some problems, of course: at first sight, this was a
British plane used by the Americans, who should have painted on their own
insignia after having overpainted the original roundels. But in the scarce
quantity of pictures I found (I lack any specific printed source, like the
Ventura book) I saw that the overpainting was very neat and almost unnoticeable
on the fuselage and fin, but very obvious on the upper wings. Maybe, as they
were usually manufactured in different places, word had reached the fuselage
makers only? But Desert Scheme Spits might have been painted at MUs instead of
at the factory, where they left in Day Fighter Scheme. Maybe the templates the
wings were painted with already included the space for the roundels? In any
event, I painted freehand big DE circles for the upper wing roundels and Azure
Blue for the undersurface ones, but nothing like that on the fuselage and fin.
The Red color or the many Reds… I reasoned that the 309th FS Red recognition bands were painted by the Americans, so it would have been in American Insignia Red. Problem was that it should match the Red outline in the insignia decals… which was very light. I used some Xtracrylix Red Arrows Red and some RLM 23. After all the weathering, they ended up a bit darker than expected. The Red spinner, on the contrary, was a normal ID feature on RAF’s Desert Scheme fighters (remember the story about P-47s strafing the P-40s from 112 Sqn.?), so it would be painted at the factory/MU, in British colors… I used some Insignia Red mixed with just a bit of Brown, having the NMF backplate painted first and masked. The tape patches over the guns… I understand some US Navy units in the Pacific used White tape over the gun muzzles, but these were British aircraft serving the USAAC in Europe… I guessed that the ground crews would have received some training and British tools for servicing (you know, these non-metric speaking people…) including… yes, some standard Red tape. I used the same Insignia Red with a much higher proportion of the same Brown.
Decals and Weathering
The decals were awful. They were thin enough to break under the slightest pressure, but still they were unable to settle nicely and they silvered at the first opportunity. After pondering about coming to my senses and ordering some good decals, I resorted to some sanding with the finest, most worn-out thing I could find, interspersing the sessions with huge quantities of Micro Sol. It worked, but I would now trim the carrier all I could before committing the decals to water.
 Weathering was quite extensive; after having built a couple of very clean birds,
I wanted to have some fun with that. I used a heavy oil wash, as spilled fuel,
oil and grease; on hinges, detachable panels and panel lines, and after that
randomly in the direction of the airflow. Similarly, I made a well thinned dark
concoction and airbrushed it as exhaust fumes; on hinges, stressing structural
features and in random lines and mottles. A bit of chalk pastels followed. The
end result looks just a tad pronounced, but nice.
Weathering was quite extensive; after having built a couple of very clean birds,
I wanted to have some fun with that. I used a heavy oil wash, as spilled fuel,
oil and grease; on hinges, detachable panels and panel lines, and after that
randomly in the direction of the airflow. Similarly, I made a well thinned dark
concoction and airbrushed it as exhaust fumes; on hinges, stressing structural
features and in random lines and mottles. A bit of chalk pastels followed. The
end result looks just a tad pronounced, but nice.
| CONCLUSIONS |
ICM Spitfires (and the new Bf 109Fs) are precision-designed kits, not blobby limited run concoctions. A lot of ingenuity has been put into their design, and a general will of following the way the real thing is manufactured is obvious. That precision has been lost somewhere afterwards; may be the tolerances to which the moulds were designed could not be met by the actual mould-maker; may be the injection pressure to which the moulds were designed is a bit higher than that to which they were made. The softish plastic did not help catching precision fit and details, nor did the sloppy –if any- quality control in the first batches. But the kit is indeed enjoyable and not that difficult to build in its “bare form”. It was not a longish build either (it took just five weeks, and a lot of these pondering what to do with the windscreen), and it certainly looks good. As per the American Spitfires issue, they are a very interesting subject, and I am glad Osprey is devoting an entire volume to them (of course, it will arrive too late for this project!).
| REFERENCES |
- “The Supermarine Spitfire Part 1: Merlin-Powered”, SAM Publications
- “Late Marque Spitfire Aces, 1942-1945”, Dr. Alfred Price, Osprey Publishing.
- Several websites including the official 31st FG site
February 2008
If you would like your product reviewed fairly and quickly, please contact me or see other details in the Note to Contributors.