
Tamiya 1/72 Spitfire I
|
KIT # |
60748 |
|
PRICE: |
$16.50 MSRP |
|
DECALS: |
Two options |
|
REVIEWER: |
Bill Michaels |
|
NOTES: |
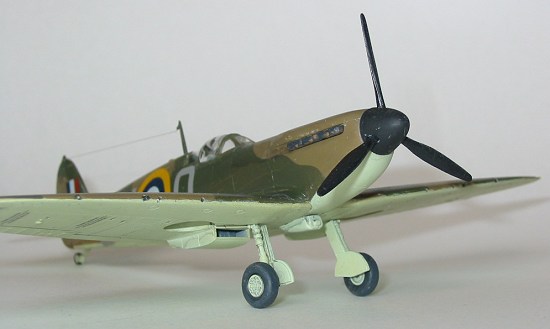
Nose seems a bit off. |
|
HISTORY |
See Scott’s preview of the kit for both the history and a photo of the contents of the kit.
|
THE KIT |
Scott described the kit very well in his preview, so I’ll just hit the highlights here. The kit consists of about 35 parts, molded in light gray plastic. The kit features fine recessed panel lines throughout. Moldings in my kit were generally good, but some of the smaller pieces had noticeable mold lines. (The hardest parts to clean up had to be the landing gear.)
Options: The model includes two different canopies, so you can build a model with either the “straight” or “blown” canopy. The profiles in the instructions for the two aircraft the kit builds both use the straight canopy- I suspect the blown canopy is a part intended for use on the Mk V kit.
 The kit can build one of two different aircraft.
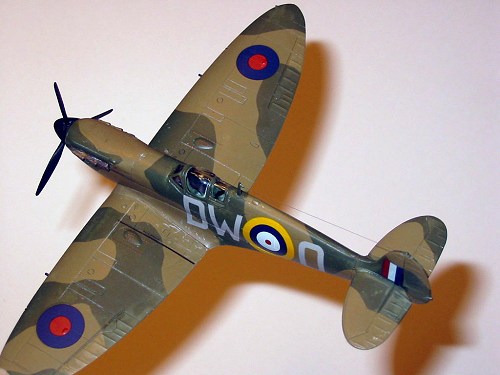
The first is DW*O, from 601 Squadron. This plane has green/brown upper
surfaces, and sky undersides. There are no markings on the underside of
the aircraft. The second option is QJ*B, from 92 Squadron. The upper
surfaces are the same green and brown, with sky on all of the underside
except the port wing, which is black.
The kit can build one of two different aircraft.
The first is DW*O, from 601 Squadron. This plane has green/brown upper
surfaces, and sky undersides. There are no markings on the underside of
the aircraft. The second option is QJ*B, from 92 Squadron. The upper
surfaces are the same green and brown, with sky on all of the underside
except the port wing, which is black.
Accuracy: I don’t normally do this, but because this is my first review since my 1 year anniversary as a MM contributor, I went ahead and checked the kit parts for accuracy of shape. (OK, so I also happen to own a reference with a good set of 1/72 scale drawings for this one!) Here’s what I found:
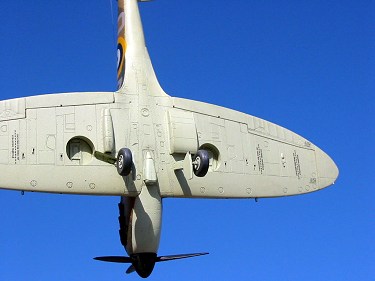
The wings are very close in shape and span, generally within a half millimeter or less. The fuselage, however, does have a couple of shape problems. Now, normally, I’m not one to worry about minor errors in shape, as long as the model looks right. However, just looking at the photo of the model on the box top caused me to notice that the top of the fuselage looked too flat over the engine. This was confirmed when I placed the fuselage half over the drawing- it was about 1/16 of an inch too short.
Because I was checking the shape of the fuselage on the drawings, I discovered that the fuselage has a second minor problem: The nose is about 1/16 of an inch too short. From the cockpit to the tail, the fuselage part matched the drawing very closely, but the nose is a little short. Now, to me, this is not a serious problem, and not one I would have ever noticed if I hadn’t checked the fuselage part against the drawings. Still, since I found it, I figured I’d report it.
|
CONSTRUCTION |
 I constructed the model OOB, and followed the kit
instructions pretty closely. I chose to go with an OOB build because the
model was on the bench with my 1/32 scale SPAD, which was getting a lot
of scratch-built interior detail, and I wanted a simple change of pace.
Also, I figured that with such a narrow cockpit opening, extra detailing
would mostly go unseen.
I constructed the model OOB, and followed the kit
instructions pretty closely. I chose to go with an OOB build because the
model was on the bench with my 1/32 scale SPAD, which was getting a lot
of scratch-built interior detail, and I wanted a simple change of pace.
Also, I figured that with such a narrow cockpit opening, extra detailing
would mostly go unseen.
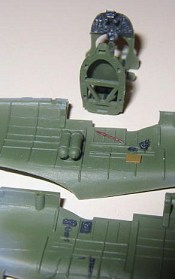
Fuselage: First thing I did was to paint the interior of the fuselage in the cockpit area. I then picked out some of the details in black and red, and drybrushed with a little silver to highlight the sidewall detail. Of course, Tamiya doesn’t tell you to use British Interior green here- they give you a recipe to concoct the color from three different colors in the Tamiya paint line. I wish they’d at least tell you what color you were trying to mix!
I wasn’t using Tamiya paints, and didn’t have a British Interior green in my collection. So, I used Pollyscale RLM 62 green as a “close enough” substitute for the interior color. I arrived at this using another of my advanced modeling techniques, which I’ll share here: I compared the paints I had on hand to the picture of the cockpit interior on the side of the Tamiya Swordfish Mk. I kit box, and the RLM color looked pretty close to me!
 Once the interior is painted, the fuselage halves
can be glued together. Here’s where I made my fist mistake—I forgot to
put in the bushing for the prop. Fortunately, I realized this right
after I had applied the liquid glue, and was able to pry the parts apart
and add the piece. Still, my nice clean seams were messed up a little,
adding a little extra cleanup after the glue had set.
Once the interior is painted, the fuselage halves
can be glued together. Here’s where I made my fist mistake—I forgot to
put in the bushing for the prop. Fortunately, I realized this right
after I had applied the liquid glue, and was able to pry the parts apart
and add the piece. Still, my nice clean seams were messed up a little,
adding a little extra cleanup after the glue had set.
The stabs are keyed so they will only fit on the correct side. When I first test fitted them, there was a noticeable seam, but a little fine sanding on the root of the stabs improved the fit to the point where the seam just about disappeared.
I left the air scoop off of the model until final assembly. I did this because the join line is the demarcation between the upper and lower colors, so by waiting for final assembly, I didn’t have to mask the color demarcation line.
The cockpit is assembled out of the model, and then fitted into place from underneath before the wing goes on. I painted the pieces while they were on the sprue, and then assembled them, touching up the paint as I went. The instrument panel features raised detail. I just painted the panel black, and then dry brushed with silver to highlight the instrument rings. Some dabs of Future to simulate the glass completed the panel. In hindsight, even that is probably overdoing it, as you can’t really see the results in the finished model.
The Wing consists of three main pieces—the bottom, and the left and right top wings. The top wing pieces include the full aileron, flap, and wingtips, so there’s no seam at the trailing edge. Fit was pretty good here, except that there was a gap where the end of the bottom wing piece met the wing tip. I wanted to fill this gap with out completely eliminating the panel line. To do this, I filled the gap with a mix of squadron white putty, diluted with enamel paint thinner, to the consistency of paint. I applied it with a brush, let it dry, and repeated the process a couple of times until the gap was gone, but I still had a panel line effect.
 I was unsure about what color to paint the inside
of the landing gear doors, wheel hubs, and landing gear. After posting
here on the MM forum, and getting some great answers, I decided to go
with the colors recommended in the kit instructions: Sky for all three
items. These parts were painted while still on the sprue, and then
assembled when dry.
I was unsure about what color to paint the inside
of the landing gear doors, wheel hubs, and landing gear. After posting
here on the MM forum, and getting some great answers, I decided to go
with the colors recommended in the kit instructions: Sky for all three
items. These parts were painted while still on the sprue, and then
assembled when dry.
The fuselage/wing joint is a pretty tight one. In fact, I had to sand away a little bit of the wing fillet to get the wing to fit. Before the wing goes on, you need to remember to put the cockpit in! (Almost got me there!) The wing fit was a little problematic. It fit well along the root, and at the leading edge. Near the trailing edge, though, you need to match up the large fillet on the fuselage with the same area on the wing. This is an awkwardly shaped area, and the mating surfaces are small. It took some fiddling, but in the end it came out OK. The shape is very good, though, and the wing has the right amount of dihedral. (Compared to the Aircam book.)
After the wing had dried, I did a final painting touchup on the cockpit, and then masked the cockpit with tissue. On to the painting!
|
COLORS AND MARKINGS |
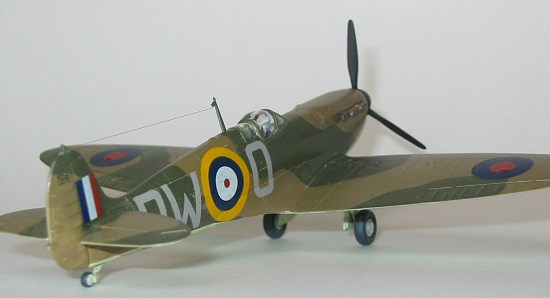
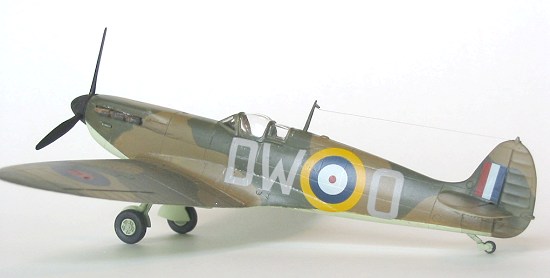
I chose the 601 Squadron plane, the one pictured on the box art. I chose this one because I’m not that fond of the black wing scheme, and because I didn’t want to hassle with the masking it required.
My model is finished in standard RAF colors- Dark Brown and Dark Green on top, and Sky undersides. I used PollyScale acrylics for all the colors. First, I painted the underside of the model in sky, then masked and did the top in two steps- brown first, then the green. I used frisket to mask the hard edges between the green and brown. Once that was finished, it was back to the sky for a little touch up. (On some days, “sky” isn’t a very good color match, as the pictures show…..)
 The canopy comes in two pieces- the windscreen and
the hood. The windscreen is the armored version, and, as mentioned
earlier, there are two styles of hood. The clear parts were all well
cast and clear, and looked pretty good after the usual dip in Future.
Posing the canopy in the open position is not really practical, because
of the thickness of the parts. If you wanted to do an open canopy,
vacuform replacements are available.
The canopy comes in two pieces- the windscreen and
the hood. The windscreen is the armored version, and, as mentioned
earlier, there are two styles of hood. The clear parts were all well
cast and clear, and looked pretty good after the usual dip in Future.
Posing the canopy in the open position is not really practical, because
of the thickness of the parts. If you wanted to do an open canopy,
vacuform replacements are available.
I am a slow builder, and I didn’t want the masking sitting on the canopy for weeks. So, I waited until after painting was nearly complete. With the airframe painted, I then installed the canopy with Testors canopy glue, and then masked it. The canopy is within one of the green bands of the camo, so it was easy to paint at this late stage.
Of course, at this point I had another little mishap. While preparing the tiny windscreen, I managed to break a corner off. Fortunately, the kit comes with two complete canopies, so I just used the other one. (And that’s why my model does not have an armored windscreen!)
The model was then given a brushed on coat of Future, in preparation for decaling. I didn’t bother to apply future to the sky parts of the airframe, as no decals went there.
Once the Future had set, the kit decals went on. The decals are typical Tamiya—thick, but they will settle down OK. I used a couple of tricks to get them down—first, I soaked them in hot, hot water, to make them more pliable. Second, I used Future as the setting solution, to help prevent silvering.
Once the decals had fully cured, I treated the decals with some decal solvent to help snuggle down. Once that was cured, a second coat of Future was brushed on to make the edges disappear.
Now, the decals for the fuselage are one large decal with the letters and the roundel all in one big decal. I was apprehensive about using these decals- I was afraid that I’d getting them to lay down properly without silvering over such a large area would be hard to pull off. However, I when I didn’t find any aftermarket decals I like, I went ahead and gave the kit decals a try.
I needn’t have worried. The decals set well, and the use of Future as the setting agent preventing any silvering. The only area I had any trouble was along the top edge, where you can still see the step of the thick decal, even after being topcoated with Future. I can live with it though, as you have to look just at the right angle to notice it.
|
FINAL CONSTRUCTION |
First, the landing gear, prop, tailwheel, airscoop,
and antennas went on. Then, the model was given an airbrushed coat of
Polly Scale flat. When that dried, the masking came off the canopy and
the antenna was added. I used smoke color invisible
 thread for the
antenna. I’ve never had luck getting the ends to invisible thread to
stay in place when glued, so I improved the attachment points. Using a
micro drill bit, I drilled a hole in the flange on the mast, and drilled
a hole through the base of the little nub at the top of the fin. This
gave a larger thread to plastic area for the super glue to work with.
thread for the
antenna. I’ve never had luck getting the ends to invisible thread to
stay in place when glued, so I improved the attachment points. Using a
micro drill bit, I drilled a hole in the flange on the mast, and drilled
a hole through the base of the little nub at the top of the fin. This
gave a larger thread to plastic area for the super glue to work with.
Weathering was kept to a minimum. I used a wash and some dark pastel chalk to add a little engine exhaust. I also used a silver artist’s pencil to add a little paint chipping effect to the leading edge of the wings and props, and around the cockpit. I applied a dark wash to the bottom of the model, using artists tube-based watercolor paint.
It was now time to remove the canopy masking. The bare metal foil had been in place for over two weeks, and the canopy looked kind of nasty with adhesive residue when it was finally removed. A little “Goo Gone on a cotton swab took all the crud of the canopy and brought the shine back to the futured plastic. The model was now finished!
|
CONCLUSIONS |
Recommended. This is my first Spitfire in 1/72 in a long, long time, and I liked it. It was an enjoyable build, and met my needs exactly. It went together fast, needed a tiny amount of filler, and was a pleasant diversion from the more involved projects I’ve been working on.
The only complaint I have about the kit is the odd shape to the nose. I will say that the nose of the model on the box art looks worse (flatter) than my model- it must be the angle in the photo. But, I expect better from Tamiya. I don’t really care about the length of the fuselage- that’s not something I would have ever noticed if I hadn’t been checking the drawings for the other shape issue…..
Just for fun, I took a look at the Hasegawa Spitfire Mk I, which I have in my kit stash. The Hasegawa kit has fine raised panel lines, and a similar parts breakdown. I checked the fuselage from the Hasegawa kit against the drawings in the Aerodata book—it matched the drawings. The shape of the nose over the engine also looks better, more like the shape in the pictures in the book. (Of course, it wouldn’t surprise me at all if the Hasegawa kit had other shape errors somewhere else- these things seem to have a way of balancing out.)
Overall, I feel that the kit is nice, but maybe a little over-priced. I got mine on sale for about $12, and I’m happy with it. If I had paid full price, I’d be a little less happy with it perhaps, but still happier than not.
One last thought: I wonder how many of these kits have been purchased by mistake, by people looking for a 1/48 scale model. It would be an easy error: The box is the same size as some 1/48 scale kit boxes, and this kit happens to be kit number “48” in the 1/72 line. The big “48” is prominently displayed- much larger than the scale of the model. Just wondering……
Review kit courtesy of my wallet.
May 2004
|
REFERENCES |
Aerodata International No. 2 Supermarine Spitfire I & II, by Philip J. Moyes, Vintage Aviation Publications, Inc., 1977.
If you would like your product reviewed fairly and quickly, please contact me or see other details in the Note to Contributors.