| KIT #: | A02069 |
| PRICE: | GBP 7.99, which is about $11.75 USD |
| DECALS: | Two options |
| REVIEWER: | Bill Michaels |
| NOTES: |
New tool kit- Airfix's best yet? |
| HISTORY |
In 1935, the
British Air Ministry issued a specification for a “Turret Fighter”.
The thinking at the time was that turret-armed fighters could get into
the enemy bomber stream and be effective at bringing down enemy bombers,
especially if they attacked from below and coordinated their fire.
Of the seven
designs submitted by various firms, Boulton Paul's was number two, behind the
Hawker entry. B-P had experience with the 4-gun turret used, and their
experience showed in their design. Normally being in second place doesn't win
you a contract, but in this case, the Air Ministry wanted Hawker to focus on the
Hurricane, so B-P ended up with an order for its design. There were two
prototypes built, and then the aircraft went into production as the Defiant Mk
I. According to the Wikipedia
article, 723 Mark I aircraft were built.
 The first Defiant
squadrons were formed at the end of 1939, and the first operational flights were
in the summer of 1940. The aircraft
had some early success, as the turret was effective against enemy bombers.
The Defiant squadrons had some initial success against Luftwaffe
fighters, too- when German fighters
would attack from the rear, mistaking the planes for Hurricanes. But the Germans
soon learned that the Defiant was very vulnerable when attacked from the front.
Losses mounted, and the plane was soon withdrawn from use as a day
fighter, and used for training and night fighter duties.
The first Defiant
squadrons were formed at the end of 1939, and the first operational flights were
in the summer of 1940. The aircraft
had some early success, as the turret was effective against enemy bombers.
The Defiant squadrons had some initial success against Luftwaffe
fighters, too- when German fighters
would attack from the rear, mistaking the planes for Hurricanes. But the Germans
soon learned that the Defiant was very vulnerable when attacked from the front.
Losses mounted, and the plane was soon withdrawn from use as a day
fighter, and used for training and night fighter duties.
Another factor that
contributed to the Defiant being pulled from front line use was the high
casualty rate among the gunners, compared to the loss rate of fighter aircrew in
other types. To bail out, the
gunner had to rotate the turret to point 90 degrees off the aircraft's
centerline, in order to be able to open the hatch on the rear of the turret. The
extra time this took was undoubtedly a big part of the reason why fewer gunners
escaped from the aircraft on the way down!
Another unique
feature of the gunner position was that there wasn't room for the gunner to wear
a standard seat pack or backpack type of parachute.
Instead, he wore a “GQ Parasuit, commonly called a “Rhino Suit” by the
crews. It was a special all-in-suit
that enclosed the parachute and inflatable life vest close to the body.
Gunners weren't too keen on it, but there was no alternative-- unlike in
a bomber, you couldn't stow your chute close by in a Defiant.
| THE KIT |
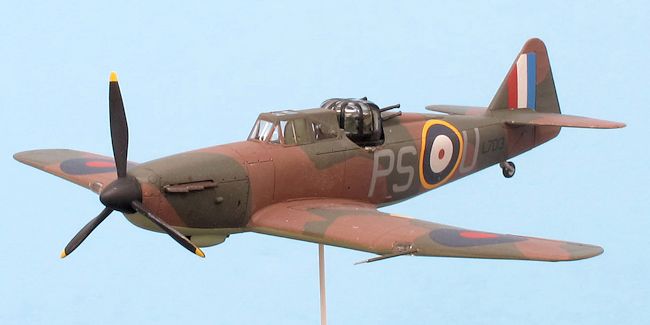
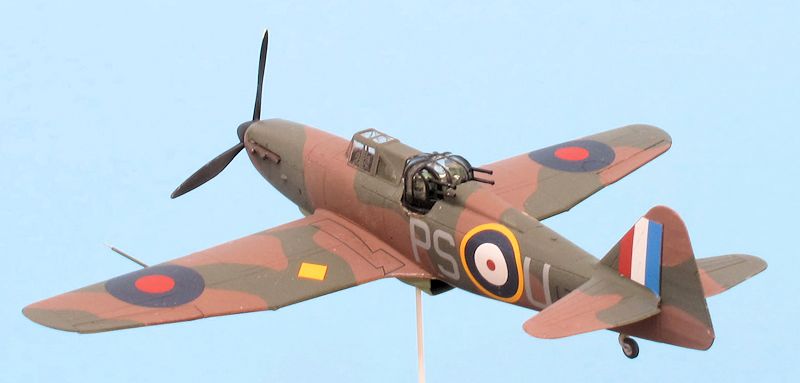
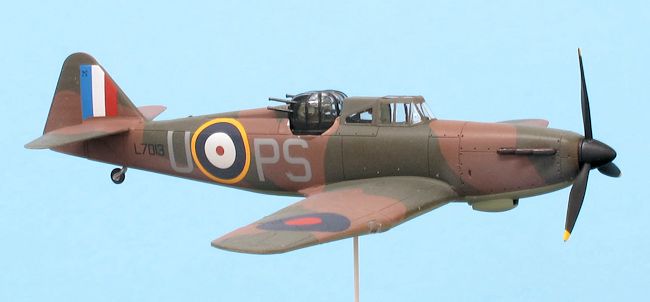
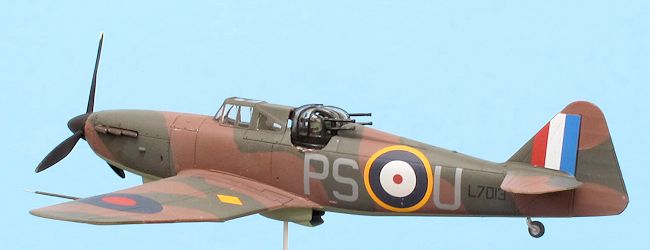
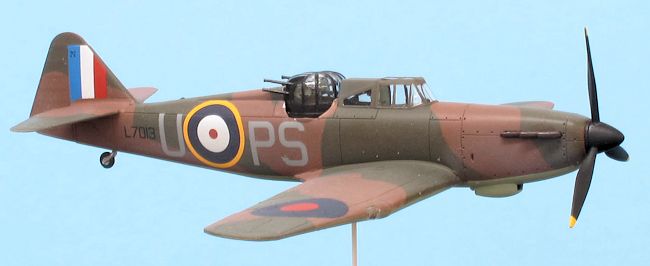
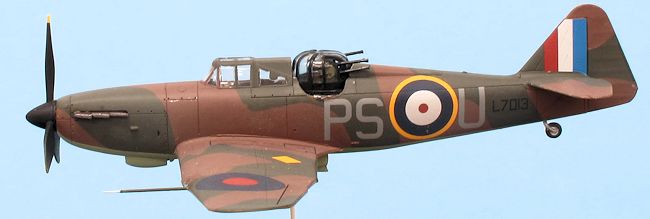
Markings for two
aircraft are included in the kit-- a day fighter from 264 Squadron, July 1940, and night
fighter from 151 Squadron, 1941.
The kit includes a comprehensive set of stencils, as part of the “common” decals used on on both aircraft. The instructions also come with a separate sheet that shows the stencil placement. I found it interesting that the fuselage squadron codes and roundel are all one large decal-- it makes placement and alignment easy, but I was concerned about the all the clear film connecting the letters. Also, the decals have a very flat sheen to them- which reminded me of old matchbox decals and such awful sheets. But my experience with the decals in other recent Airfix kits has been terrific, so I hoped and expected these would work out too.
| CONSTRUCTION |
The first thing you
need to do is decide which version you're doing-- day or night fighter?
(There are different bits for each version.)
Right after that, you need to decide how to build the model-- wheels up
or down? Canopy and turret fairings
raised for streamlined cruising or down to clear the firing arc for the turret?
Are you going to use the figures?
I was torn-- the only decision I was sure of before I started
was that this would be an OOB build of the Day Fighter version.
I decided to delay the other configuration decisions until I had to make
them....
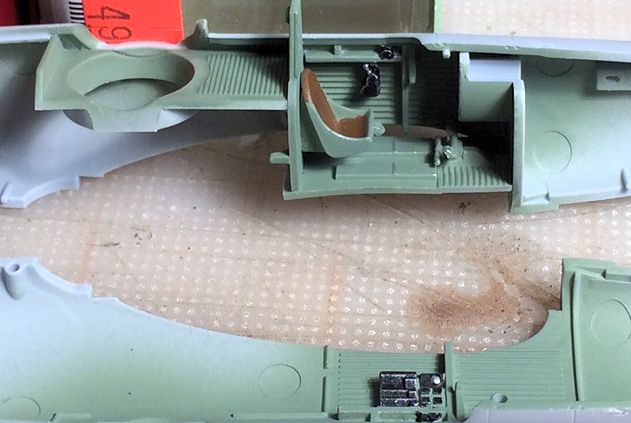 Construction starts
with the cockpit. You can't get far
before you need to decide about the figures-- if you're going to use them, you
need to paint and install at least the pilot before you close up the fuselage.
At this point I noticed that my pilot figure had a big molding defect-- a
huge sink mark in the middle of his chest.
While I could fill the cavity with some filler, I'd lose all the nice
uniform and harness detail. So. In
the end, I decided not to use the figures.
Also, I noticed that the gunner figure isn't wearing the “Rhoino Suit”--
he is sculpted just like a standard pilot.
So he would make a nice addition in another model, so I saved him for
later. (The pilot figure could
still be used in a bomber or other aircraft with limited visibility into the
interior.)
Construction starts
with the cockpit. You can't get far
before you need to decide about the figures-- if you're going to use them, you
need to paint and install at least the pilot before you close up the fuselage.
At this point I noticed that my pilot figure had a big molding defect-- a
huge sink mark in the middle of his chest.
While I could fill the cavity with some filler, I'd lose all the nice
uniform and harness detail. So. In
the end, I decided not to use the figures.
Also, I noticed that the gunner figure isn't wearing the “Rhoino Suit”--
he is sculpted just like a standard pilot.
So he would make a nice addition in another model, so I saved him for
later. (The pilot figure could
still be used in a bomber or other aircraft with limited visibility into the
interior.)
The cockpit has a
decent amount of detail, with molded on the inside of the fuselage, a seat,
control stick, and an instrument panel with some raised detail that worked well
with the included IP decal. I think
the detail is fine, especially in this scale, given that the cockpit opening is
so small. The one thing the
cockpit could benefit from would be the addition of some seatbelts-- especially
if you're going to build it with an open canopy.
Most of the basic airframe went together quite well, and fit of the parts was mostly quite good. The only place I needed filler was a small amount on the fuselage joint on the top of the engine cowl. I did encounter one part that didn't fit at all-- the rear fuselage insert for the lowered fairing didn't fit at all-- it just fell into the fuselage. I was left wondering if I had done something wrong and made the opening too wide. But then I tried the other part-- the fairing in the raised position and found that it fit fine. So there was another decision made for me-- build the model with the fairings raised. (It didn't occur to me until much later that I could probably have just sanded down the raised fairing piece to use as a replacement for the “lowered” piece. )
| COLORS & MARKINGS |
 The model was
painted with Tamiya acrylics. The underside was easy-- XF-21 Sky went
everywhere. I painted both sets of
landing gear doors, as I still hadn't decided whether I'd built it wheels up or
down. After it had cured for a
couple of days, I masked it off, and then applied XF-52 Flat Earth (brown) to
the entire airframe. I let that
cure for a couple of days, and then used Silly Putty to mask for the XF-81
Dark Green. After that
dried, I removed all the masks, and set it aside to cure for a few days.
(They long cure cycles are because of my schedule-- I didn't have a lot
of modeling time-- and not because
I think the Tamiya paints needed it!)
The model was
painted with Tamiya acrylics. The underside was easy-- XF-21 Sky went
everywhere. I painted both sets of
landing gear doors, as I still hadn't decided whether I'd built it wheels up or
down. After it had cured for a
couple of days, I masked it off, and then applied XF-52 Flat Earth (brown) to
the entire airframe. I let that
cure for a couple of days, and then used Silly Putty to mask for the XF-81
Dark Green. After that
dried, I removed all the masks, and set it aside to cure for a few days.
(They long cure cycles are because of my schedule-- I didn't have a lot
of modeling time-- and not because
I think the Tamiya paints needed it!)
While the paint was
drying, I used my limited modeling time to work on other parts. I found it was
easier to mask and paint the clear turret before attaching it to the rest of the
turret parts. I masked the turret
framework with a mix of Tamiya tape and clear masking fluid. I them filled the
turret with some Silly Putty to keep any overspray from coming through the gun
slots and getting on the inside surfaces.
I then airbrushed the turret with MM cockpit black.
(It looks “black”, but isn't quite as jarring as pure flat black.)
A few words about
turret color: The Airfix
instructions and box art made it look like the turret of the day fighter was
painted black- but that seemed odd
to me. I did a little researched,
and posted some questions on a couple of forums frequented by people that know a
lot about RAF aircraft. I found
that most planes did indeed have the entire turret black, while a few had the
framing around the glazing black, but the lower part of the turret ring was the
same green as the adjacent fuselage.
I didn't find a picture of “PS*U”, so I decided that Airfix was probably
correct. (Plus, it was easier to go
with all one color!)
 To prepare for
decalling, I airbrushed a couple of light coats of Future clear acrylic on the
entire model. I let that cure for a
day or so, and then was ready for decalling.
I started decaling my model with the stencils on the underside.
(They are the only markings on the underside of the plane.)
The decals went down well, and nestled down into the recessed detail with
a little bit of decal solvent.
To prepare for
decalling, I airbrushed a couple of light coats of Future clear acrylic on the
entire model. I let that cure for a
day or so, and then was ready for decalling.
I started decaling my model with the stencils on the underside.
(They are the only markings on the underside of the plane.)
The decals went down well, and nestled down into the recessed detail with
a little bit of decal solvent.
I then moved to the
top side, and started applying the stencils there.
That's when I ran into a problem-- even though the model had a nice gloss
coat, I couldn't get the tiny little topside stencils to go down without
silvering. They were also hard to see on the dark paint, so after trying a
couple of different techniques to
fix them, with no success, I gave up on them and decided not to use them.
When it came time
to put the large fuselage decals on the model, I was really concerned-- I
expected more trouble. But they
actually worked out well-- even though they looked bad when they went down.
The clear areas in the decals stood out like a sore thumb.
But I decided to go with them because this was an OOB build, and I didn't
have any aftermarket decals on hand!
In the end, the
reason things looked bad was because the decals have a very flat sheen to them-
so the clear portions of the decal stood out on top of the gloss-coated model.
The final flat clear made the paint match the decals, and the carrier
film (finally) disappeared.
| FINAL CONSTRUCTION |
I now had to make a
decision- was I building the model wheels up or wheels down?
The club meeting was now only 2 days away, so I went with the expedient
choice-- wheels up!
I know that several other reviewers (including one in a recent issue of
Airfix Model World) had built the model wheels down, and there had been no
complaints about the fit. So I
figured I'm covering part of the kit that no one else has reported on!
 I found that the
closed landing gear doors were a little long-- if you install them as supplied,
they will bow out a little in the middle, and won't settle down flush with the
wing surface. I had to sand the
tabs on the inboard ends, making them shorter, and thinner, so the doors would
fit properly. Once I did that, the
doors fit so well I didn't need to glue them!
(So I could install the landing gear later, if I want to.)
I found that the
closed landing gear doors were a little long-- if you install them as supplied,
they will bow out a little in the middle, and won't settle down flush with the
wing surface. I had to sand the
tabs on the inboard ends, making them shorter, and thinner, so the doors would
fit properly. Once I did that, the
doors fit so well I didn't need to glue them!
(So I could install the landing gear later, if I want to.)
Once the model was
flat coated, the final details were put into place.
Because I built the model wheels-up, this was pretty easy.
I drilled a tiny hole in the radiator cover to hold the metal rod I'd be
using to mount the model. I
attached the tail wheel, exhausts, and prop.
Getting the turret in place was a tight fit-- I ended up sanding a little
off the forward edge to make it drop into place without needing a lot of force.
(You can't see the spot I sanded, so I didn't bother to repaint it.
The Defiant had a
couple of radio antenna masts that are missing from the pictures.
There is a fixed mast that extends downwards from the center section of
the wing, and another retractable one that extended from under the fuselage near
the tail wheel. I knew there
was no way they'd survive the trip to/from my club meeting for the photo
session, so I left them off until after the model was home for good.
One more omission: After I got the model home from the photo session, I realized I never painted the tip of the spinner white. I had intended to use a circle template to mask the spinner and airbrush the white on the tip. But now that the model is complete, I'll probably just leave it be-- I'd be afraid I'd do more harm than good trying to paint it now!
| CONCLUSIONS |
Highly recommended.
This is another
winner from Airfix. It is a great little kit, and even more impressive because
it only cost about $12. The detail
level is good, and fit is pretty good throughout. The kit isn’t perfect- but it
is nicely done, at a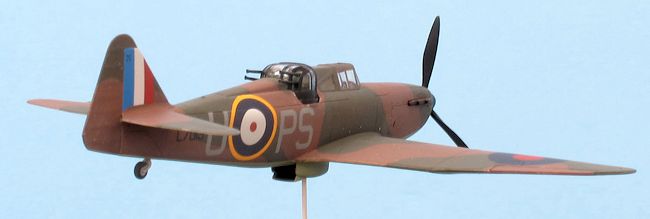 very reasonable price, too!
Also, it is so much nicer than any of the old kits available in this
scale—I think it makes the others essentially obsolete.
very reasonable price, too!
Also, it is so much nicer than any of the old kits available in this
scale—I think it makes the others essentially obsolete.
Review kit courtesy
of my wallet. When the kit first hit the market, it wasn't available here in the
USA. I ended up getting mine thanks to a friend who was traveling to the UK—he
was able to pick one up for about 8 pounds.
Since then, I understand it
has pretty much sold out, but do
not despair. The kit will
eventually appear in the US, either by itself, or as part of a Dogfight Double
with the new Do-17z, which might be an even nicer kit than the Defiant!
Special thanks to
Pip Moss of the IPMS Patriot Chapter in Bedford, Massachusetts for taking all
the great pictures.
| REFERENCES |
Kit Instructions,
Wikipedia, assorted modeling forums.
If you would like your product reviewed fairly and fairly quickly, please contact the editor or see other details in the Note to Contributors.