Hasegawa 1/48 Typhoon IB
|
KIT # |
JT 183 |
|
PRICE: |
$23.98 |
|
DECALS: |
Two versions: 609 & 266 Sq RAF |
|
REVIEW BY: |
|
|
NOTES: |
'Early Version' |
|
HISTORY |
 Following
on the heels of the successful Hawker Hurricane, Chief Designer Sir Sydney Camm
started development of the most heavily armed and most powerful British fighter
to date. Compared to the diminutive Hurricane, the Typhoon was a large aircraft
with a huge engine, better than twice the horsepower of the Hurricane. In
addition, it packed quite a wallop with its four 20-MM cannon, especially when
compared to the initial Hurricanes small 30-caliber armament. Unfortunately, two
major flaws, the engine and the rear fuselage/tailplane, caused delays in the
initial fielding of the aircraft and established a not too favorable reputation
amongst its pilots. However, the aircraft was rushed into combat service to
counter the threat of the "Jabo" low-level fighter-bomber attacks
accomplished by the FW-190. The Typhoon was very successful in this role, as it
was the only British fighter with the speed necessary to catch the swift FW-190
at ground level. Eventually the flaws were corrected and the Typhoon also went
on to serve as a highly successful ground-attack aircraft with great successes
against airfields, shipping, and railway rolling stock.
Following
on the heels of the successful Hawker Hurricane, Chief Designer Sir Sydney Camm
started development of the most heavily armed and most powerful British fighter
to date. Compared to the diminutive Hurricane, the Typhoon was a large aircraft
with a huge engine, better than twice the horsepower of the Hurricane. In
addition, it packed quite a wallop with its four 20-MM cannon, especially when
compared to the initial Hurricanes small 30-caliber armament. Unfortunately, two
major flaws, the engine and the rear fuselage/tailplane, caused delays in the
initial fielding of the aircraft and established a not too favorable reputation
amongst its pilots. However, the aircraft was rushed into combat service to
counter the threat of the "Jabo" low-level fighter-bomber attacks
accomplished by the FW-190. The Typhoon was very successful in this role, as it
was the only British fighter with the speed necessary to catch the swift FW-190
at ground level. Eventually the flaws were corrected and the Typhoon also went
on to serve as a highly successful ground-attack aircraft with great successes
against airfields, shipping, and railway rolling stock.
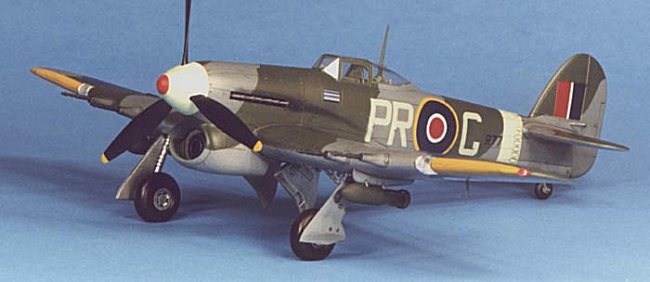
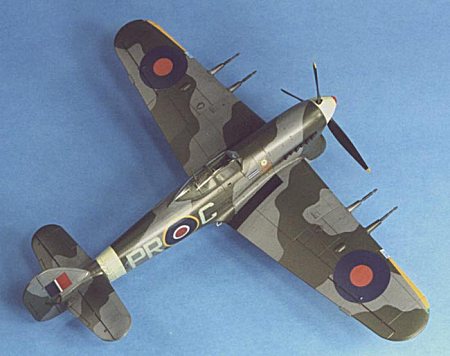
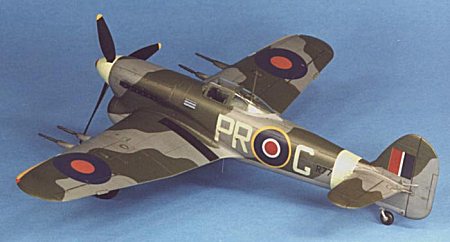
The aircraft modeled is that flown by S/LDR R. P. Beaumont of 609 Squadron who was one of the most successful Typhoon drivers around.
|
THE KIT |
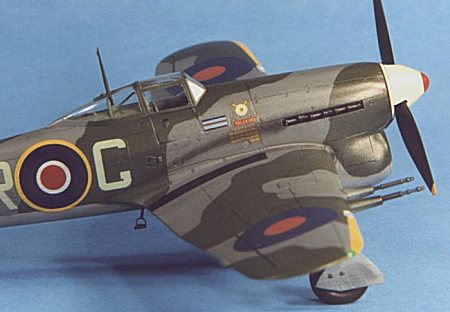
The kit is typical Hasegawa; a high quality injected molded plastic with detailed engraving. The kit consists of 85 injected molded plastic parts that are the envy of the business in quality. The instruction sheet is typical Hasegawa, an eight-page foldout with color references for Gunze-Sangyo paints.
|
CONSTRUCTION |
 After
washing the parts in mild dishwater soap and letting them dry, I then
pre-painted all the parts as indicated in the instructions. Starting with the
interior, I built up the kit as per the instructions. The interior builds up
very nicely with no significant problems but detail is a little on the sparse
side (as is typical with most Hasegawa kits). After-market detail sets would add
some nice touches to the look of the model, especially if you choose to leave
the "Car Door" and canopy in the open position. However, the detail in
the cockpit is more than acceptable, especially if you choose to close up the
canopy like I did.
After
washing the parts in mild dishwater soap and letting them dry, I then
pre-painted all the parts as indicated in the instructions. Starting with the
interior, I built up the kit as per the instructions. The interior builds up
very nicely with no significant problems but detail is a little on the sparse
side (as is typical with most Hasegawa kits). After-market detail sets would add
some nice touches to the look of the model, especially if you choose to leave
the "Car Door" and canopy in the open position. However, the detail in
the cockpit is more than acceptable, especially if you choose to close up the
canopy like I did.
The only major construction hurdle of the entire kit was the fitting of the fuselage inserts (J1, 2, & 4) that permit Hasegawa to offer both the early and later variants of the Typhoon with the same basic mold. As is usually the case, the inserts do not fit all that well and some puttying was needed. I chose to install the inserts so they would line up with the panel lines and the basic curvature of the fuselage. This left a small gap along the spine join that required filling. In addition, since the rear portion of the inserts do not fall along panel lines, putty was required there also. This was the only bad mark that I gave the kit. Unfortunately, it changes the build from an incredibly easy one capable by anyone to a slightly more complex build best left to modelers with some experience at lining up parts and gap filling.
Main wing assembly and installation was flawless, without the all too typical Hasegawa wing root gap. Filing off the mold lines and dry fitting the horizontal stabilizers will also permit a flawless, putty free installation. After a quick sanding down of all the joins (no putty needed) the model visited the paint shop where it was painted, decaled, and weathered before final assembly took place.
For final assembly I installed all the landing gear components, bombs, fuselage pieces, and cockpit details. All pieces went together easily.
|
PAINT & DECALS |
 The model
was painted with Floquil Military Colors (enamel) in British Ocean Grey, Medium
Sea Grey, UK Dark Green, and British Sky. I used paper masks to do the topside
camo pattern. I enlarged on my scanner the painting pattern provided on the
instruction sheet to the correct size and then used Tombo Mono Multi Liquid Glue
to coat the backside of the cutout masks. This is really a great product for
paper masks. The adhesive (when dry) will not pull up paint but is fairly tacky
so you can use paper masks around curves. I then carefully lifted the edges with
a toothpick to provide a slight amount of overspray. This was followed by a
light topcoat of Future to prepare the flat surface for decaling.
The model
was painted with Floquil Military Colors (enamel) in British Ocean Grey, Medium
Sea Grey, UK Dark Green, and British Sky. I used paper masks to do the topside
camo pattern. I enlarged on my scanner the painting pattern provided on the
instruction sheet to the correct size and then used Tombo Mono Multi Liquid Glue
to coat the backside of the cutout masks. This is really a great product for
paper masks. The adhesive (when dry) will not pull up paint but is fairly tacky
so you can use paper masks around curves. I then carefully lifted the edges with
a toothpick to provide a slight amount of overspray. This was followed by a
light topcoat of Future to prepare the flat surface for decaling.
The kit decals are adequate, but slightly out of register and a bit on the thick side. I had to replace the topside roundels with some from the spares box and they are a bit too large. I would recommend after-market decals for this kit. I applied MicroSol setting solution and the decals responded very well to the setting solution with no permanent wrinkling. After drying overnight, I wiped the decals off with a Polly S Plastic Prep to remove any residue and after drying I shot a very light coat of Future thinned with rubbing alcohol (50:50 mix) over the decals to seal them.
For weathering, I chose to accentuate the engraved panel lines and surface detail with a burnt umber oil wash. After spraying a mix of equal parts Future, rubbing alcohol, and Tamiya Flat Base (X-21), I then randomly applied some ground up black and burnt umber pastels with a soft brush to simulate staining and exhaust.
|
CONCLUSIONS |
This is an excellent model of an important WW II aircraft. It would be an extremely easy build suitable for first time modelers if not for the fuselage insert fit problems. A little careful work with that portion of the kit and you will be rewarded with an excellent model.
|
REFERENCES |
Bickers, Hawker Typhoon, $30.95
Copyright ModelingMadness.com. All rights reserved. No reproduction in any form without express permission from the editor.
If you would like your product reviewed fairly and fairly quickly, please contact the editor or see other details in the Note to Contributors.
Back to Reviews Page 2017