Airfix 1/48 Spitfire Vb
| KIT #: | 05110 |
| PRICE: | CDN$16.40 |
| DECALS: | Four options |
| REVIEWER: | Olivier Lacombe |
| NOTES: | IPMS Canada sheet used |
| HISTORY |
The Spitfire. Along with the Hurricane, it was responsible of the defence of Malta, during those dark years of 1941-1942. Rising up everyday to counter the German and Italian aircrafts, they managed to hold them at bay until the Allied position in the Mediterranean theater was secured. Malta was strategically placed to severly hinder the Axis' efforts to resupply its North African troops.
Of all the Malta defenders, one pilot stands out from the crowd. George Beurling, born in Verdun, achieved the highest score of any Canadian pilot during the Second World War.
| THE KIT |
![]()
 There's nothing like
an oldie given a new breath of life. It's exactly what happened with the
re-issue of the venerable Airfix Spit. Not contempt with having the most
accurate 1/48 Spit Vb on the market, Airfix tooled up a 'c' wing and boxed it
along with the Vb. The new edition also features parts to do a Seafire. Upon
opening the box, you're almost attacked by the sheer amount of plastic found in
it. You get a full
Spit Vb kit (yes, the
'b' wing is there) plus the
'c' wing. While the old
parts feature raised panel line and shiny styrene, the newly tooled wing has
crisp recessed lines and the surface is slightly pebbelish. It should look all
right under a few coat of paints though. As you dig through the various sprues,
you begin to realize that this box is a little gem. Airfix included the three
types of wingtips :
standard,
extended and
clipped. There's a
different air filter in addition to the tropical unit, a second set of exhausts
for the Seafire, but which can also be used to create a late Spit V. The Seafire
conversion is served by an insert that fits in the old fuselage, but not before
some surgery on your part. The flaps are offered as separate parts, so you can
elect to glue them opened or closed. Finally, there's a 4-bladed prop for the
Seafire and some new wheels.
There's nothing like
an oldie given a new breath of life. It's exactly what happened with the
re-issue of the venerable Airfix Spit. Not contempt with having the most
accurate 1/48 Spit Vb on the market, Airfix tooled up a 'c' wing and boxed it
along with the Vb. The new edition also features parts to do a Seafire. Upon
opening the box, you're almost attacked by the sheer amount of plastic found in
it. You get a full
Spit Vb kit (yes, the
'b' wing is there) plus the
'c' wing. While the old
parts feature raised panel line and shiny styrene, the newly tooled wing has
crisp recessed lines and the surface is slightly pebbelish. It should look all
right under a few coat of paints though. As you dig through the various sprues,
you begin to realize that this box is a little gem. Airfix included the three
types of wingtips :
standard,
extended and
clipped. There's a
different air filter in addition to the tropical unit, a second set of exhausts
for the Seafire, but which can also be used to create a late Spit V. The Seafire
conversion is served by an insert that fits in the old fuselage, but not before
some surgery on your part. The flaps are offered as separate parts, so you can
elect to glue them opened or closed. Finally, there's a 4-bladed prop for the
Seafire and some new wheels.
 The clear parts are
all right, both type of windscreen armour being provided (internal and external).
You may be able to achieve better results using a vac-formed canopy, but those
things can be hard to locate.
The clear parts are
all right, both type of windscreen armour being provided (internal and external).
You may be able to achieve better results using a vac-formed canopy, but those
things can be hard to locate.
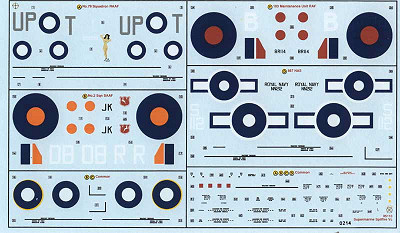
The lowdown of the kit is the decals. Although they offer a very nice selection of markings, the sheet is badly printed and most of the colours are somewhat off-register. Aftermarket is a must here.
I learned that Beurling's other Spit was in fact a Vb, so I'll be using the old bits from the kit.
| CONSTRUCTION |
 As usual, it starts
with the cockpit. The fuselage sides and the seat structure were painted Model
Master RAF Interior Green, as well as the lower instrument panel. The stick and
the pedals received the same treatment. I painted the seat with a mixture of
Gunze RAF Dark Earth and Gunze Red, it gave something close to phenolite. The
instrument panel (upper part) was painted Flat Black, while the seat and stick
were detailed with the same colour. The crow bar on the pilot's access door was
painted red, and the interior was put together before the fuselage halves were
closed.
As usual, it starts
with the cockpit. The fuselage sides and the seat structure were painted Model
Master RAF Interior Green, as well as the lower instrument panel. The stick and
the pedals received the same treatment. I painted the seat with a mixture of
Gunze RAF Dark Earth and Gunze Red, it gave something close to phenolite. The
instrument panel (upper part) was painted Flat Black, while the seat and stick
were detailed with the same colour. The crow bar on the pilot's access door was
painted red, and the interior was put together before the fuselage halves were
closed.
The Airfix kit is relatively easy to build, but you do have to get your elbow working in order to remove the seams. The main problem areas are the wing roots and the radiators. The first thing I did on the kit, was to separate the elevators from the stabilizers. I thought it would take me quite a bit of work, but in fact it was suprisingly easy. It's an easy way to make your Spitfire models look more like the real deal. In the past, I used Ultracast resin elevators to replace the kit's part, but with careful cutting, you can avoid this expense.
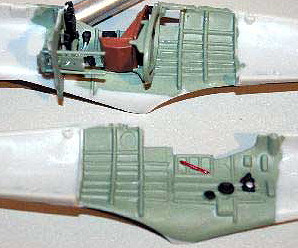
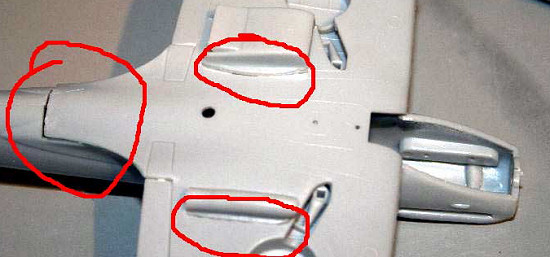 The wing roots are
not really hard to dispatch, but the radiators are another animal altogether. I
believe that if you sand down the mating surfaces before gluing them, you can
avoid the ugly ridge that can only be smoothed out with loads of sanding and
putty. In the picture to the left, you can see the big hole left by the lower
cowl. As you have the option of either using the tropical filter or the standard
one, Airfix engineered the kit that way. The tropical filter is very easy to
fit, a wee bit of glue along the edges is all you need to make things tidy.
Please note the circled area, as they show a big gap on the underside of the
fuselage, which I fixed by gluing a piece of styrene rod, and the not so nice
radiator edges.
The wing roots are
not really hard to dispatch, but the radiators are another animal altogether. I
believe that if you sand down the mating surfaces before gluing them, you can
avoid the ugly ridge that can only be smoothed out with loads of sanding and
putty. In the picture to the left, you can see the big hole left by the lower
cowl. As you have the option of either using the tropical filter or the standard
one, Airfix engineered the kit that way. The tropical filter is very easy to
fit, a wee bit of glue along the edges is all you need to make things tidy.
Please note the circled area, as they show a big gap on the underside of the
fuselage, which I fixed by gluing a piece of styrene rod, and the not so nice
radiator edges.
All the seams were puttied over with Tamiya putty and repeatedly sanded until they were all smooth. I glued on the gun fairings to the wings, and made sure they were straight. It's rather hard to become an ace if your guns aren't properly installed! The transparencies were masked and glued on the airframe. I managed to break the lousy tail wheel off... It's the only major low point of the kit, that darn bit is sticking out for the duration of the construction process and as such is very easy to break. I'll have to improvice once the painting is done.
| COLORS & MARKINGS |
Painting
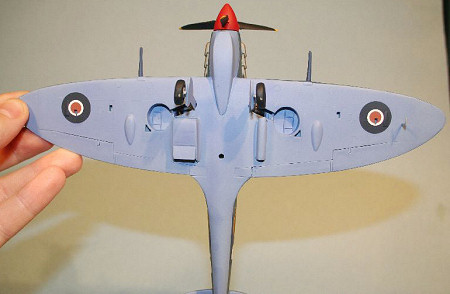 Once all the primed
seams were sanded over with 600-grit sandpaper, I applied the underside colour,
RAF Azure Blue, with Lifecolor paint : UA 098. Lifecolor paint is very easy to
use once you know how. You musn't under any circumstances thin it with alcohol.
If you do, be sorry all by yourself. The proper medium to use is ordinary water,
and you need to thin it to the consistency of milk. I didn't quite thin my batch
enough, so I had a little bit of troubles, but nothing major. The finish you get
with the paint is silky, and is very resilient to masking (as long as you don't
use duct tape that is).
Once all the primed
seams were sanded over with 600-grit sandpaper, I applied the underside colour,
RAF Azure Blue, with Lifecolor paint : UA 098. Lifecolor paint is very easy to
use once you know how. You musn't under any circumstances thin it with alcohol.
If you do, be sorry all by yourself. The proper medium to use is ordinary water,
and you need to thin it to the consistency of milk. I didn't quite thin my batch
enough, so I had a little bit of troubles, but nothing major. The finish you get
with the paint is silky, and is very resilient to masking (as long as you don't
use duct tape that is).
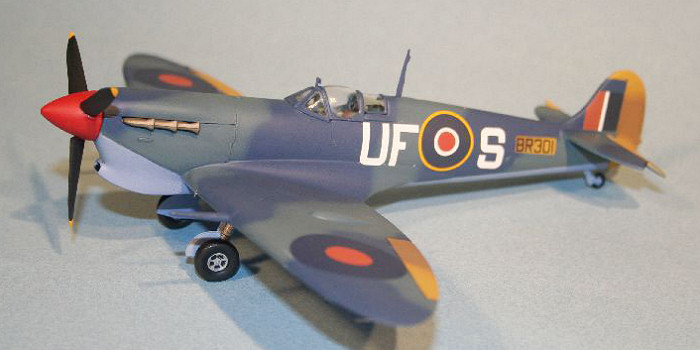
As I am modeling an
aircraft with a very controversial paint scheme, I decided to go full on and be
as controversial as I could be. Beurling's aircraft used to be in 601 Sqn., and
the top surfaces were repainted from the standard Middlestone/Dark Earth to Light
and Dark Mediterranean Blue (The blue colour could have been just one that faded
in certain area to give the impression of two different colours.) . It gets
better. A small patch on the fuselage was left in the original colours, as it
was where the serial number was applied, and the rudder was either a replacement
one still in the original colours or perhaps all the control surfaces where left
 in their original shades. So here's the plan : I'm painting all the control
surfaces with Middstone and Dark Earth, and I'm using the two different blues.
in their original shades. So here's the plan : I'm painting all the control
surfaces with Middstone and Dark Earth, and I'm using the two different blues.
I used Gunze shades for the Middlestone and Dark Earth colours, it took a mere 20 minutes to get the various areas done.
Once these areas were dry, they were masked with Tamiya masking tape and I painted the top camouflage. I used Tamiya XF-18 Medium Blue for the Light Mediterranean Blue and Gunze H328 Blue FS 15050 for the Dark Mediterranean Blue. I wasn't happy with the pattern showed in the IPMS Canada decal's instructions, so I drew a new one using various references that will come handy for future Spits. The only thing left was the spinner, and it was painted Gunze Red, having being primed with Tamiya Sky beforehand.
Construction continues
I painted the
propeller blades Gunze Flat Black with Model Masters Insignia Yellow tips. The
undercarriage was finished with Testors Aluminium for the metal parts and Gunze
Flat Black for the tyres. The radio mast was glued in place and brush painted in
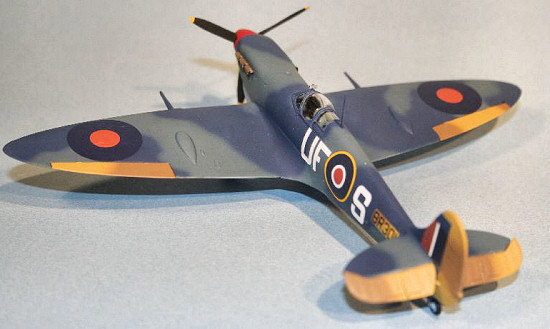 the appropriate colour, as was the pitot tube. The exhausts were painted Model
Master Jet Exhaust with Flat Black to simulate the ejectors' holes.
the appropriate colour, as was the pitot tube. The exhausts were painted Model
Master Jet Exhaust with Flat Black to simulate the ejectors' holes.
The propeller was glued on with a blade in the 6 o'clock position (gotta have variety between all the Spits!), but not before the various intakes were painted a mix of Flat Black, Aluminium and Azure Blue. I glued on the elevators in a drooped position and the model was coated with Future Floor wax. <
Decals
I scrounged up the roundels from various sources : the fuselage roundels and fin flash came from my Belcher Bits sheet on RCN aircraft, the top wing roundels from an Aeromaster sheet for early war Hurricanes and Spits, the bottom roundels from the Eagle Strike sheet found in the Grand Phoenix 1/48 Firefly I and the codes from the IPMS Canada "Aces" sheet. I had no troubles with any of those.
Once the decals were dry, I wiped them with a damp tissue paper and sealed them with Poly Scale Flat, thinned with a little bit of alcohol. The transparencies were unmasked and since there was a gap at the base in the windscreen, I plugged with with a little with of white glue. Finally, since I had lost my rear-view mirror, I made a new one from bits of plastics, and it was duly painted before affixed to the aircraft.
| CONCLUSIONS |
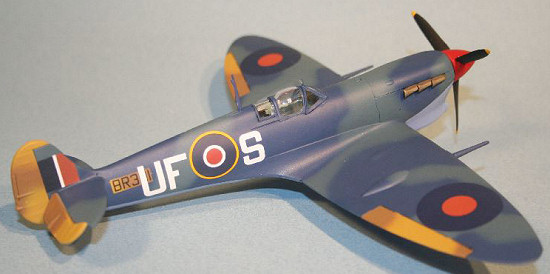
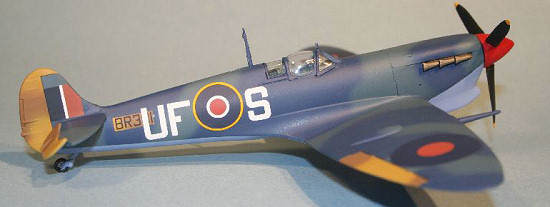 Ah, there's she is, a
lovely blue Spitfire. The desert scheme control surfaces may not be the most
accurate, but they sure give it a striking look. She's ready to soar above Malta
to engage the hordes of Axis warplanes incoming to harm the island.
Ah, there's she is, a
lovely blue Spitfire. The desert scheme control surfaces may not be the most
accurate, but they sure give it a striking look. She's ready to soar above Malta
to engage the hordes of Axis warplanes incoming to harm the island.
March 2006
Copyright ModelngMadness.com
If you would like your product reviewed fairly and fairly quickly, please contact the editor or see other details in the Note to Contributors.