PCM 1/32 Spitfire XVIe
|
KIT #: |
32009 |
|
PRICE: |
$89.95 SRP
|
|
DECALS: |
Six options |
|
REVIEWER: |
Lee Kolosna |
|
NOTES: |
Kit includes Cammett Ltd. resin conversion |
The Spitfire XVI (sixteen) was a
variant of the IX (nine) series that incorporated a US Packard-built Merlin
engine.
Most of these aircraft sported a cut-down rear
fuselage section with a bubble canopy, pointed broad-chord rudder, and the
“e” wing configuration containing a Browning .50 caliber machine gun inboard
of a Hispano 20 mm cannon.
Deployed to the European
 continent during the
winter of 1944/45 and assigned the task of close air support, most XVIs
sported clipped wings and bomb pylons underneath the wings.
Note that “most” is the operative word here
because the XVI was a rather confusing variant, first being referred to as a
LF IX in Air Ministry records and sporting a variety of fuselage and wing
configurations.
Finally acquiescing to appeals from the
operational units for a different designation in order to keep the spare
parts from becoming intermingled with regular Mark IX aircraft (the American
Merlin engine was sufficiently different that parts were not interchangeable
with the Rolls Royce built Merlins used in regular IXs) the Air Ministry
bestowed the mark number XVI on these Spitfires in August 1944.
continent during the
winter of 1944/45 and assigned the task of close air support, most XVIs
sported clipped wings and bomb pylons underneath the wings.
Note that “most” is the operative word here
because the XVI was a rather confusing variant, first being referred to as a
LF IX in Air Ministry records and sporting a variety of fuselage and wing
configurations.
Finally acquiescing to appeals from the
operational units for a different designation in order to keep the spare
parts from becoming intermingled with regular Mark IX aircraft (the American
Merlin engine was sufficiently different that parts were not interchangeable
with the Rolls Royce built Merlins used in regular IXs) the Air Ministry
bestowed the mark number XVI on these Spitfires in August 1944.
RAF squadrons with the 2nd
Tactical Air Force were kept segregated to keep all the XVIs together in
order to simplify the supply lines.
The Spitfire XVI became the primary
air-to-ground instrument of the 2nd TAF until the end of the war,
with Griffon engine powered Spitfire XIV (fourteen) taking the role of
medium and high altitude air superiority.
After the war, the XVI was phased out of the
RAF mainline inventory in favor of later marks of Spitfire (21, 22, and 24),
and were sold or given to the resurrected Greek, Belgian, and South African
air forces, where they continued to operate until the early 1950s before
being retired.
Pacific Coast Models worked with Sword in the Czech Republic to produce a
set of 1/32 scale kits of the Spitfire IX. PCM issued “c” and “e” wing
versions of the IX, which Tom Cleaver has previously reviewed here on
Modeling Madness.
They followed the first two kits up with this ambitious XVIe
offering which matches the IXe kit with a Cammet Ltd. resin conversion set
that modifies the standard fuselage into a low-back variant with bubble
canopy. Of
course, Tamiya crashed the party about a year later by
 releasing a
magnificent injection-molded XVI, so using the PCM kit to get a Spitfire XVI
in this scale is now mostly an exercise in doing things the hard way.
releasing a
magnificent injection-molded XVI, so using the PCM kit to get a Spitfire XVI
in this scale is now mostly an exercise in doing things the hard way.
In the box, you get a complete PCM IXe kit (including instructions,
profiles, and decals) along with the Cammett Ltd. conversion set thrown in
along with another set of color profiles and a large sheet of XVIe decals.
Despite Tamiya’s alternative, the PCM kit still has a lot going
for it. It is a
limited run production model with a low number of parts and it includes a
nicely detailed resin cockpit, two kinds of resin exhausts, resin wheel
wells, two sets of wheels, and beautiful color photo-etch for the
instruments, radiator screens, and pilot harness.
The Cammet Ltd. conversion set provides a hefty solid resin rear
fuselage section, two more sets of wheels, a clear resin bubble canopy, and
small pieces for the headrest brackets.
Here are a few of points for the modeler’s attention:
-
Decals.
The Cartograph- printed decals are of excellent quality, but the artwork in
the profiles and the decals themselves have a number of errors.
The maddening inconsistency of profile artist Richard Caruana
strikes again.
I’ll review them one-by-one:
-
Aircraft SL721 (AU-J) is a modern warbird, and
not the aircraft of No. 421
Squadron RCAF in the written description.
The vintage Canadian AU-J is well photographed and is actually
aircraft number TB886, with clipped wings and “Dorothy II” nose art on
the port side of the cowling.
The warbird SL721 has the extended elliptical wing tips,
matching what is seen in the top and side color profiles.
There is a red Indian head painted on the port side of the
fuselage, but the decal artwork is much larger.
Also, the roundels provided for the top of the wings are
oversized, measuring out to a scale 60 inches instead of the proper 56
inches. If
you put these oversized roundels on this or the No. 127 Squadron
airplane, the yellow surround will overlap the yellow identification
wing leading edge in the front as well as overlap the aileron at the
rear, which is clearly not correct.
-
Aircraft SL721 again (JM-R) was the actual origin of the warbird
above. In
service, it was a very handsome all-blue personal aircraft of Air Vice
Marshall Sir James M. Robb and had the extended elliptical wing tips.
You can get away with making this aircraft as the oversized
wing top insignia do not have a yellow identification wing leading edge
band to extend over, even though it will be technically four scale
inches too large.
-
 Aircraft TB900 (9N-F) of Number 127 Squadron, RAF looks pretty good,
other than the trouble with the oversized roundels.
It is a clipped wing aircraft, which contradicts what the side
and top color profiles show.
The top profile shows the port side call letters to read
(9N-F), from left to right, instead of the expected F-9N, with the
fuselage roundel offset from that of the starboard side.
A number of RAF squadrons did in fact have the squadron call
letters on the left side of the roundel so this may be true, but I have
my doubts about roundel being moved forward.
At any rate, I don’t have enough references to corroborate
whether the unusual configuration is correct or not.
Aircraft TB900 (9N-F) of Number 127 Squadron, RAF looks pretty good,
other than the trouble with the oversized roundels.
It is a clipped wing aircraft, which contradicts what the side
and top color profiles show.
The top profile shows the port side call letters to read
(9N-F), from left to right, instead of the expected F-9N, with the
fuselage roundel offset from that of the starboard side.
A number of RAF squadrons did in fact have the squadron call
letters on the left side of the roundel so this may be true, but I have
my doubts about roundel being moved forward.
At any rate, I don’t have enough references to corroborate
whether the unusual configuration is correct or not.
-
Aircraft TD321 (MN-J) of No. 350 Squadron, Belgian Air Force, has
clipped wings, again unlike that shown on the profiles.
The side profile shows the fin flash backwards, with the red
section in front instead of being in the rear.
I wish I had known that when I had picked this aircraft to do,
because it was too late to correct it when I discovered the error.
Also, the top profile shows no yellow wing leading edge band,
but the side profile does.
I looked at all the black and white pictures I could find of
Belgian Spitfires and I couldn’t tell – some had them, some didn’t.
I made the call of it having no yellow leading edge, but I
could certainly be wrong.
Since the top and side profiles incorrectly depict an extended
elliptical wing tip, the position of the insignia on the top and bottom
of the wings is incorrect.
Use the standard RAF aircraft positioning instead, which is
much more inboard.
Finally, the top profile shows the right side aircraft
markings to read MN-J from left to right, instead of the expected J-MN.
I wasn’t able to verify if this was correct in the photos of
other 350 Squadron aircraft, but a DACO decal sheet in 1/48 scale
indicates that J-MN is correct.
-
Aircraft 5621 of the South African Air Force had clipped wings, which
makes the profiles wrong and therefore the wing insignia placement is
incorrect in the top profile.
Move the national insignia inboard.
-
Aircraft TE284 of the Hellenic Air Force suffers the same as the
others, being a clipped wing aircraft and incorrect indicated placement
of the wing roundels.
Again, move the national insignia inboard.
-
-
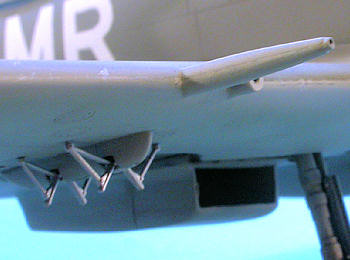
Pylons.
As stated above, almost all XVIs had bomb pylons mounted underneath their
wings and corresponding clipped wing tips.
The kit does not provide any pylons at all.
Fortunately all three of Tamiya’s Spitfire kits do include the
pylons and brackets, so you can utilize those like I did with my model.
-
-
Landing gear.
The kit does not provide the properly bulged landing gear doors
introduced with the Mark IX.
Once again, a Tamiya kit can come to the rescue because you will
find an extra set of bulged doors graciously provided because of their sprue
layout design.
These will fit just fine on the PCM kit.
The photo-etch torque link just doesn’t work at all, being much
too long and too wide.
I tried cutting mine down a bit, but finally just gave up and left
them off. They
are pretty hard to notice anyway being wedged between the wheel and the gear
door. I would
recommend fashioning a properly sized set of links
 from sheet plastic.
Post-war XVIs got a new set of landing gear designed for use on
concrete runways as opposed to grass strips, so a small bulge in the wing
top over the wheel well was introduced to allow for clearance of the wheels
when they retracted.
The kit does not provide this bulge.
The exact time of the introduction of this modification is not
clear, so it could be possible that one or more of the aircraft depicted in
the profiles did or didn’t have the wing top bulges.
from sheet plastic.
Post-war XVIs got a new set of landing gear designed for use on
concrete runways as opposed to grass strips, so a small bulge in the wing
top over the wheel well was introduced to allow for clearance of the wheels
when they retracted.
The kit does not provide this bulge.
The exact time of the introduction of this modification is not
clear, so it could be possible that one or more of the aircraft depicted in
the profiles did or didn’t have the wing top bulges.
-
Wheels.
The wheels (an option for either three spoke or four spoke) have
smooth tires but are a little too large in diameter, measuring about 2mm
greater than the corresponding Tamiya part.
BarracudaCast has resin replacements if you are so inclined.
-
Gun sight.
Most XVIs had a gyroscopic gun sight with an oblong sighting
glass. The kit
only provides the square glass Mark IX sight.
-
Seat.
The resin pilot’s seat looks like a clone of the Hasegawa Mark V
seat, which is slightly too wide.
I didn’t find this to be much to worry about, but BarracudaCast
has a resin replacement as well.
-
Elevators.
Spitfires at rest almost always have their elevators deflected
downwards. The
kit’s control surfaces are not separate pieces, so the modeler will have to
cut out and reposition the elevator pieces.
-
Fuel filler cap.
There isn’t one.
The modeler can scribe a circular area on top of the fuselage in
front of the windscreen, or get more elaborate by drilling out a hole and
adding a scratch-built filler cap.
-
Windscreen.
The engineering of the windscreen has the clear part separate from
the fluted frame extensions which are molded on the fuselage.
These extensions are slightly too wide and hard to integrate
nicely into the windscreen.
I sanded the extensions off the fuselage and made new ones from
very thin plastic card.
-
Overall shape.
Spitfire boffins point out that there are slight shape issues with
the fuselage cross section profile, but honestly I find it hard to see and
it certainly doesn’t detract from the overall look of the model.
The spinner and prop blades look good.
The “e” wing requires the modeler to install inserts for the
cannon breech covers and to open up the holes underneath the wings for the
ejection chutes.
The two outer ejection chute holes for the “c” wing are flashed over, but
I found it necessary to add a bit of filler to make them completely
invisible.
Being a limited-production model kit means no alignment pins, relatively
thick sprue gates, some flash to clean up, and so-so fit.
The wing root is particularly problematic, so expect to spend time
there filling a large gap.
The horizontal stabilizers attach with a butt joint and are
slightly thicker than the attachment points on the fuselage.
The pointed rudder is also thicker than the rear tail fin.
Due to the Tamiya offering, this PCM kit will probably disappear into the
bowels of the stashes for the few hundred modelers who originally purchased
it, like I did.
It’s currently out of production and I don’t expect it will ever be
released again.
That said, it still is a worthwhile project: it is about 40 bucks cheaper
than Tamiya’s kit, has less parts to mess with (no engine), and builds up to
a nice replica of a lesser-known variant of the Spitfire.
The first order of business is to hack away at the
Mark IX fuselage pieces according to the instructions in the Cammett Ltd.
conversion set.
These cuts are on existing panel lines and are
pretty easy to do with a razor saw.
Having built the PCM IXc kit a couple of years
ago, I knew that getting the cockpit together and properly wedged inside was
a little tricky, so I used a different sequence:
first I painted all the parts Polly Scale
British Interior Green and did the necessary drybrushing and wash
application to insure the details stood out.
The resin seat was painted Polly Scale Panzer
Red Brown with a black leather padding.
I then
 glued the rear bulkhead, head armor, and
seat to the large resin rear fuselage piece and added the photo etch
harness.
I glued the resin side consoles to each front fuselage
half.
The instrument faces were sanded off the plastic
instrument panel and the color photo-etch panels were added.
The bottom of the instrument panel bulkhead was
notched slightly so that the rudder pedal actuators would sit down flush
with the bottom of the bulkhead.
I stuck the instrument panel/rudder pedal
actuator assembly loosely up into the cockpit and then clamped the two
forward fuselage halves together and ran some plastic cement along the
seams.
After this was dry, I used CA glue to attach the
plastic front fuselage section to the resin rear fuselage piece, paying very
close attention to overall alignment.
This left gaps at the joint, which were filled
with CA glue and sanded smooth.
glued the rear bulkhead, head armor, and
seat to the large resin rear fuselage piece and added the photo etch
harness.
I glued the resin side consoles to each front fuselage
half.
The instrument faces were sanded off the plastic
instrument panel and the color photo-etch panels were added.
The bottom of the instrument panel bulkhead was
notched slightly so that the rudder pedal actuators would sit down flush
with the bottom of the bulkhead.
I stuck the instrument panel/rudder pedal
actuator assembly loosely up into the cockpit and then clamped the two
forward fuselage halves together and ran some plastic cement along the
seams.
After this was dry, I used CA glue to attach the
plastic front fuselage section to the resin rear fuselage piece, paying very
close attention to overall alignment.
This left gaps at the joint, which were filled
with CA glue and sanded smooth.
I glued in the resin wheel wells in the wing bottom
and then glued the top halves on.
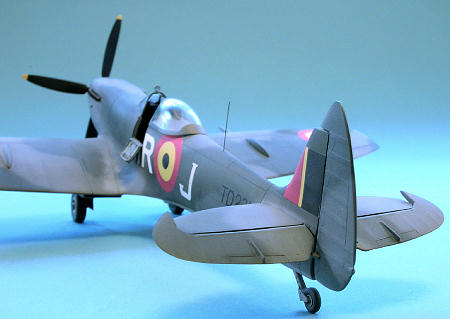
The clipped wing tips were added and noted that
these fit much better than the elliptical wing tips that I used on the
earlier IXc build. I notched out the navigation lights and replaced them
with clear
 red and clear green resin pieces that were sanded to match the
wing profile and polished back to clarity.
The radiators don’t fit well at all.
I cut down the plastic inserts as well as the
photo-etch screens in order to fit the actual space.
This still left significant gaps around the
outside of the radiator that had to be addressed by filling and sanding.
red and clear green resin pieces that were sanded to match the
wing profile and polished back to clarity.
The radiators don’t fit well at all.
I cut down the plastic inserts as well as the
photo-etch screens in order to fit the actual space.
This still left significant gaps around the
outside of the radiator that had to be addressed by filling and sanding.
I knew from my prior experience that the wing
attachment was going to be a challenge and this kit was no exception.
I filed the wing root mating points enough to
get the wing on with the proper dihedral angle and filled the gaps with
thick CA glue.
The biggest gap of about 2 mm was on the forward
portion of the port wing.
The gull wing insert was glued on and it too
had gaps that had to be filled.
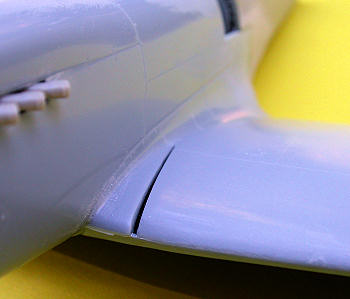
The gun blast tubes were added and blended in
with Mr. Surfacer and the barrels drilled out.
The stubby machine gun blast tube face was
filed down flat.
I swiped the bomb pylons from a Tamiya Spitfire
VIII kit and attached them to the underside of the wing.
The elevators were cut out of the horizontal
stabilizer pieces so that I could pose them with the necessary downward
deflection.
This required a strip of sheet styrene to be added to
the front of the elevator, which I sanded to a half round shape.
I used a round file to fashion a notch in the
rear of the stabilizer so it would mate with the
 round profile of the
elevator.
As stated above, the horizontal stabilizers are
thicker than their attachment points and are a relatively weak butt join.
I added a pin to help strengthen the joint and
I beefed up the filet on the fuselage to make it match the stabilizer.
round profile of the
elevator.
As stated above, the horizontal stabilizers are
thicker than their attachment points and are a relatively weak butt join.
I added a pin to help strengthen the joint and
I beefed up the filet on the fuselage to make it match the stabilizer.
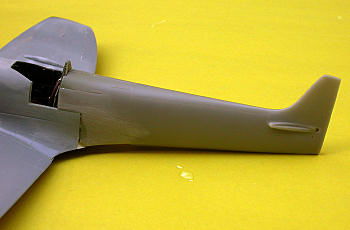
On my kit, the resin tail fin was short shot, so I
grafted a piece of the discarded plastic tail onto it.
The pointed rudder pieces were sanded down to
make them less thick but I didn’t go far enough, so I attached it with a
slight deflection angle to hide that mismatch.
Like the elevators, I added sheet styrene to
the front of the rudder and sanded it to a half found shape to mate with a
notch filed into the back of the fin.
The windscreen was glued on and carefully faired into
the surrounding fuselage.
The fluted extensions to the framing were
fashioned from very thin plastic card and added after sanding off the clunky
kit depictions.
I re-scribed the engraved panel lines lost in
the sanding process and washed off all the dust in preparation for paint.
Because of the oversized roundels for the wing tops,
the Canadian and RAF options were out.
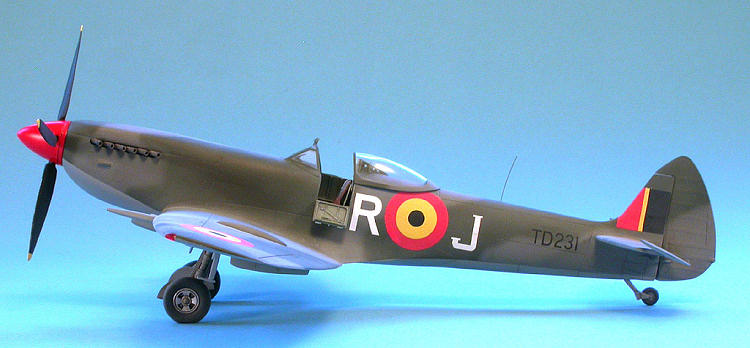
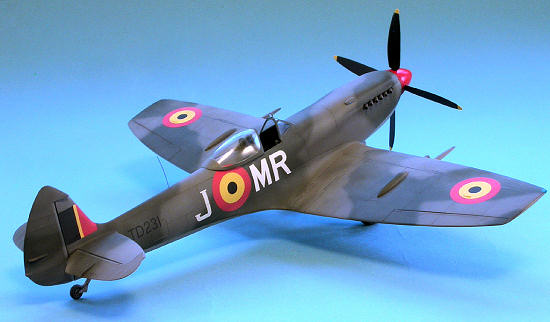
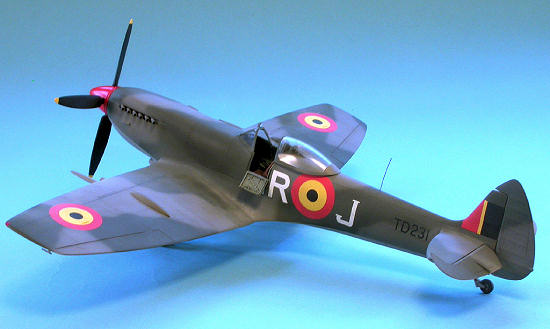
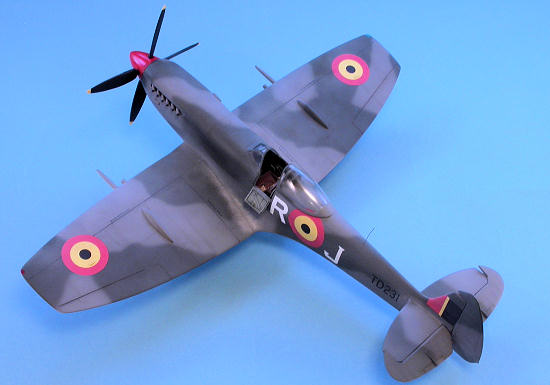
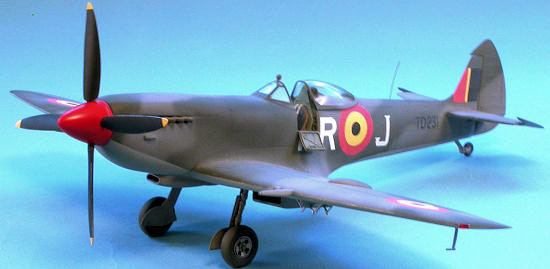
I decided to do aircraft TD321 (MN-J) from No.
350 Squadron of the Belgian Air Force as seen in Bassburg, Germany in 1946.
It sported a standard day fighter scheme of
Dark Green and Ocean Grey over Medium Sea Grey.
I used Testors Acryl Neutral Gray FS36270 as a
reasonable match
 for the undersides, with Polly Scale RAF Dark Green and
Ocean Grey for the top colors.
The topside camouflage pattern was sprayed
freehand using my airbrush without any masks.
The spinner was painted with Polly Scale Signal
Red.
A coat of Polly Scale clear gloss prepared the model
for the decals which went on reasonably well; although as usual I had a
number of markings that silvered and had to be dealt with.
Repeated stabbings with a sharp X-acto knife
tip followed by a flood of Micro Sol eliminated most of the offending
silvering, but I did have to use Solvaset for the more stubborn decals.
for the undersides, with Polly Scale RAF Dark Green and
Ocean Grey for the top colors.
The topside camouflage pattern was sprayed
freehand using my airbrush without any masks.
The spinner was painted with Polly Scale Signal
Red.
A coat of Polly Scale clear gloss prepared the model
for the decals which went on reasonably well; although as usual I had a
number of markings that silvered and had to be dealt with.
Repeated stabbings with a sharp X-acto knife
tip followed by a flood of Micro Sol eliminated most of the offending
silvering, but I did have to use Solvaset for the more stubborn decals.
Weathering was achieved first by applying a wash of
Paynes Gray and Burnt Umber artist oils thinned with Turpenoid in all the
panel lines.
The camouflage paint was diffused by randomly spraying
a highly thinned and lightened solution of the base color.
Chalk pastels were used to portray the
accumulated dirt on the wing roots, and the substantial paint wear seen on
Belgian Spitfires was achieved by pecking away with a silver artist’s pencil
followed by a light dry-brushing of Floquil Old Silver.
The same artist’s oil wash was used to simulate
the oily belly of the airplane.
The engine exhaust stains were done by spraying
a very thin red-brown and black mix, followed by a dusting of dark gray
chalk pastels.
More paint chipping was done on the leading edges of
the prop blades and the wings.
Note that Spitfire propeller blades were wooden
with just a thin metal strip on the leading edge, so don’t go crazy with the
simulated wear.
The prop was assembled, making sure everything was
aligned properly.
There is no real axle provided for the spinner,
so it was glued onto the front of fuselage in a fixed position.
I used the bulged landing gear doors from the
Tamiya Spitfire VIII kit and attached them to the spindly struts.
As mentioned earlier, I gave up on trying to
make the oversized photo-etched torque links fit.
The wheels went on with lots of fussing to get
the proper slightly tipped in (positive camber) alignment.
Because of the solid resin rear fuselage, this
is quite a heavy model.
The attachment point between the resin wheel
well and the plastic strut really isn’t robust enough to stand any kind of
repeated handing of the model.
I ended up adding a pin between the two pieces
for strength.
The rest of the fiddly bits (pitot tube, bomb
brackets, signal lamp, tail wheel, cockpit door, gun sight, control stick)
went on with the routine drama of dropped tiny parts resulting in long
searches on my hands and knees underneath the work table, stray glue marks,
and more than a few swear words.
The whip antenna was made with fishing line.
The rear view mirror was punched from a piece
of shiny Mylar.
A final coat of Polly Scale clear flat brought
the model together u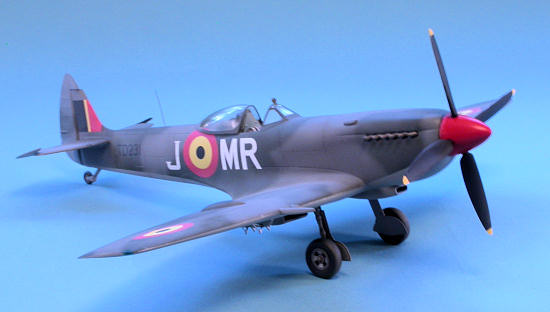 nder a unified finish.
The canopy was tacked on in the open position
with white glue and the model was done.
nder a unified finish.
The canopy was tacked on in the open position
with white glue and the model was done.
That is, until it fell it off my work table and
crashed to the floor.
It was just a few hours old when the most unfortunate
accident occurred and I found myself facing a model broken in two with the
entire resin rear fuselage separated from the styrene front.
The seat and bracket went flying off, as did
the starboard horizontal stabilizer.
The spinner, propeller, canopy, rear view
mirror, and one landing gear assembly were also victims of the violent
event.
Awww, fudge!
Except I didn’t say “fudge”.
After I calmed down, I made an assessment of the
damage and figured that I could get it mostly back together, but the
markings were going to be a problem since the break point went right through
the MN aircraft codes on both sides of the fuselage.
After weighing my options, I elected to keep it
as a Belgian Air Force aircraft rather than strip off all the markings and
probably most of the paint if I picked another scheme.
It took a bit of creative work, but I managed to glue
everything back together in more or less alignment, filled the seams around
the break, repainted, and put new markings on.
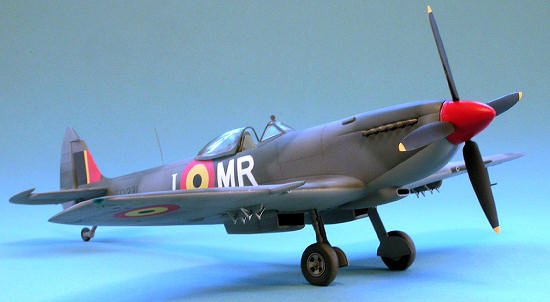
I decided to make a fictitious airplane with
codes MR-J (taken from the JM-R scheme of SL721) and be done with it.
The fin flash is still backwards. (Darn you,
Richard Caruana!)
 I expended 46 hours over six weeks to initially complete
this model, with another six hours required to repair the damage from the
accident. I
like the PCM Spitfires very much and will most likely get the newly released
XIV kit. What I
like most about them is their overall simplicity, low parts count (I really
have no interest in aircraft engines, which Tamiya includes in their much
more expensive kit), nicely detailed resin cockpits, and high quality
decals. I wish
they would spend more time proofing their color markings profiles and decal
artwork to avoid the sloppy mistakes that prevented me from doing an
accurate aircraft.
I expended 46 hours over six weeks to initially complete
this model, with another six hours required to repair the damage from the
accident. I
like the PCM Spitfires very much and will most likely get the newly released
XIV kit. What I
like most about them is their overall simplicity, low parts count (I really
have no interest in aircraft engines, which Tamiya includes in their much
more expensive kit), nicely detailed resin cockpits, and high quality
decals. I wish
they would spend more time proofing their color markings profiles and decal
artwork to avoid the sloppy mistakes that prevented me from doing an
accurate aircraft.
As I
have stated earlier, this model will most likely be relegated to an
interesting footnote in 1/32 scale Spitfire kit history.
It still makes for a very handsome model of a beautiful airplane
and I enjoyed my time building it.
Humphreys, Robert: The Supermarine
Spitfire, A Comprehensive Guide for the Modeller, Part 1: Merlin Powered,
Modeller’s Datafile No. 4
Lee Kolosna
January 2012
If you would like your product reviewed fairly and fairly quickly, please contact the editor or see other details in the Note to
Contributors.
Back to the Main Page
Back to the Review
Index Page