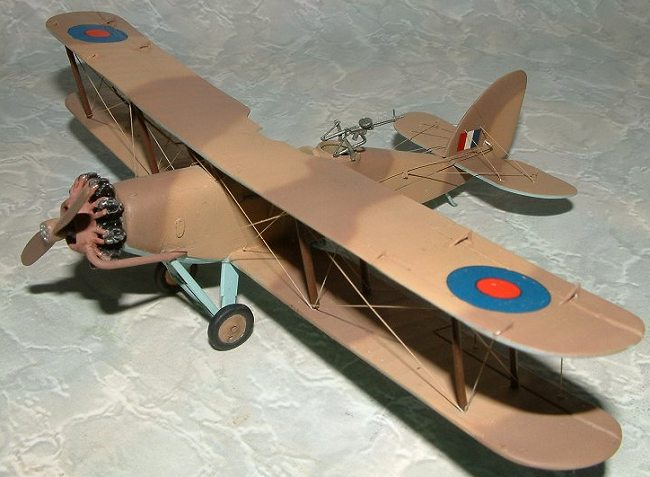
Merlin 1/72 Westland Wapiti
|
KIT # |
? |
|
PRICE: |
$ |
|
DECALS: |
two options |
|
REVIEWER: |
Mark Fordham |
|
NOTES: |
My winner for worst kit of the century award |
|
HISTORY |
In 1926 the Air Ministry invited designs for a replacement for the long serving D.H 9A to fill the role of general-perpose aircraft for the RAF, Westland, who had been producing the D.H 9A on a sub-contract basis decided to offer a plane using parts of the D.H 9 although the fuselage was an entirely new design, the wings and interplane struts were from the old 9A. This design named the Wapiti met with immediate approval, not only by the Air Ministry but more importantly by those who flew the Wapiti. Ultimately nearly a thousand wapiti’s were built and saw wide spread service. It is interesting to note that on the North West frontier they were used for the same role that was served by Russian Hind Helecopers some fifty years later, namely trying to subdue the local Tribesman.
At the outbreak of WWII several machine were still serving in the Middle East and indeed saw limited active service there.
|
THE KIT |
Well,
my first exposure to a Merlin Kit, and boy what a doozy, when opening the
box and shaking the contents of the box out onto the desk my first
reaction was the plane that it came over from England on must have caught
fire or they 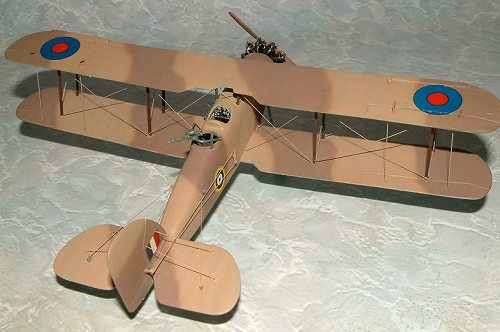 have
started strapping cargo to the wings to reduce costs as the misshapen
lumps of plastic the confronted me could in no way be called a model kit.
Two piece of plastic shaped like a banana for the fuselage, wavy flat
slabs of white plastic that I finally figured out were wings, two wheels
and a piece of plastic that I discovered was supposed to be the propeller
and some nice contrail strut material and a nice looking decal sheet
rounded of the content of the box. The instructions were the standard
Merlin A4 sheet with building tips and a short history on one side and a
nice set of 1/72 scale plans on the other side.
have
started strapping cargo to the wings to reduce costs as the misshapen
lumps of plastic the confronted me could in no way be called a model kit.
Two piece of plastic shaped like a banana for the fuselage, wavy flat
slabs of white plastic that I finally figured out were wings, two wheels
and a piece of plastic that I discovered was supposed to be the propeller
and some nice contrail strut material and a nice looking decal sheet
rounded of the content of the box. The instructions were the standard
Merlin A4 sheet with building tips and a short history on one side and a
nice set of 1/72 scale plans on the other side.
Laying the wings and fuselage against the plan showed them to be pretty accurate for dimensions but the parts were so crude by the time you have finished cleaning up the flash, moulding pips, sink marks and mould mis-alignments the wings are considerably smaller! To make matter worse the fuselage plastic had not been melted properly when cast and consisted of layers of “flakes” that peeled off every time you tried to sand or cut the plastic making it impossible to get a smooth finish on the fuselage. The only options was to either scratchbuild a new one or cover the entire fuselage with Tamiya putty in a hope that I could get a surface that I could work with.
|
CONSTRUCTION |
 Get
your scratchbuilding tools out for this one, your going to need them,
Merlin supply a couple of blobs of white metal that represent seats, well
they look a little like seats after an hour of careful paring and filing.
A scratch build floor was added to the fuselage along with control
sticks, instruments and side wall detail, all scratch build with bits
from the spares box or plastic off-cuts.
Get
your scratchbuilding tools out for this one, your going to need them,
Merlin supply a couple of blobs of white metal that represent seats, well
they look a little like seats after an hour of careful paring and filing.
A scratch build floor was added to the fuselage along with control
sticks, instruments and side wall detail, all scratch build with bits
from the spares box or plastic off-cuts.
With the fuselage together I smeared a thin coat of putty over the fuselage and once dry carefully sanded it smooth, it took five attempts to get an even smooth finish over the fuselage but once done it improved the finish dramatically. The panel lines around the engine and areas covered by aluminium were scribed in using a No 11 Blade referencing to photos and plans.
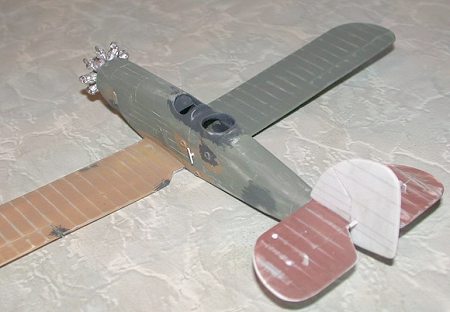
With the basic fuselage together it was time to move onto the ummmm errr wings, well that’s what I think they were anyway, the leading edge of the bottom wings was about 1 mm thick and the trailing edge around 4 mm! giving the wing the profile of a cheddar cheese slice. The wing tips were considerably thicker than the wing roots to top matters off. About all I could do to rectify this was to fill were necessary and sand the wings to a consistent thickness of around 2mm. This little job took almost a weeks worth of evenings to produce four useable main wings.
 The
Merlin supplied tailplanes and rudder were ditched and new ones
scratchbuilt out of 20 thou plastic card. With the lower wings, tailplane
and rudder now attached the Wapiti was finally starting to look like a
plane, the next step was to scratchbuild the undercarriage struts using
various thicknesses of plastic card and using photos as a guide for the
correct stance, the original Merlin wheels were used after cleaning them
up and making them round.
The
Merlin supplied tailplanes and rudder were ditched and new ones
scratchbuilt out of 20 thou plastic card. With the lower wings, tailplane
and rudder now attached the Wapiti was finally starting to look like a
plane, the next step was to scratchbuild the undercarriage struts using
various thicknesses of plastic card and using photos as a guide for the
correct stance, the original Merlin wheels were used after cleaning them
up and making them round.
 A
white metal engine and exhaust collector ring is supplied by Merlin that
after a good clean up with needle files looks very realistic with some
careful drybrushing. A couple of the collector rings had broken off over
the years and these were relaced with short lengths of plastic sprue. The
only down side is the white metal engine is very heavy and puts a lot of
strain on the thin undercarriage.
A
white metal engine and exhaust collector ring is supplied by Merlin that
after a good clean up with needle files looks very realistic with some
careful drybrushing. A couple of the collector rings had broken off over
the years and these were relaced with short lengths of plastic sprue. The
only down side is the white metal engine is very heavy and puts a lot of
strain on the thin undercarriage.
The Merlin supplied strut material was then cut to length and super glued onto the lower wing using cardboard jigs to set the correct alignment.
At
this point in construction the now completed main assemblies were given a
couple of very thick coats of primer to try and hide some of the more
glaring blemishes. The top wind was left off at this point to make it
easier to paint. With the primer down and dry it was time to decide on a
colour scheme for the Wapiti, now my finishing work was just way too
rough for a NMF (well painted aluminium) so thanks once again to the
generosity of Tel McGrady who not only sent me the Wapiti but also sent
the Profile series book on th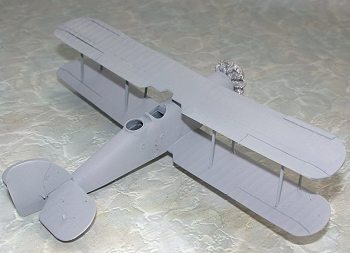 e Wapiti that featured one of the
camouflaged Wapitis serving in India in 1942. These Aircraft were
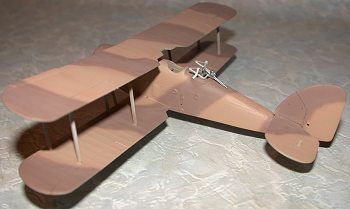
painted Sand/Dark earth/Azure Blue. Humbrol Sand was sprayed and left to
dry, the Dark earth was then freehand sprayed using the profile as a
guide and left for a week to harden up. The top was then masked off and
the blue applied using a home brewed Blue as the local hobby shop had
nothing that was even close to Adzure blue in stock.
e Wapiti that featured one of the
camouflaged Wapitis serving in India in 1942. These Aircraft were
painted Sand/Dark earth/Azure Blue. Humbrol Sand was sprayed and left to
dry, the Dark earth was then freehand sprayed using the profile as a
guide and left for a week to harden up. The top was then masked off and
the blue applied using a home brewed Blue as the local hobby shop had
nothing that was even close to Adzure blue in stock.
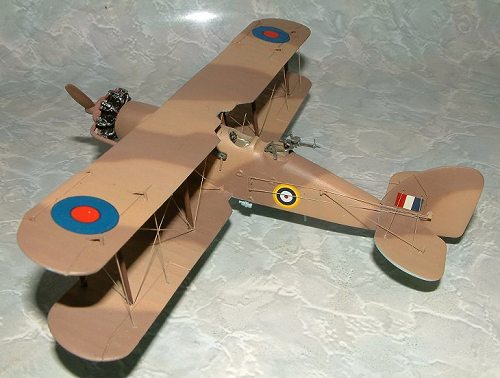
With the major painting now out of the way it was time to scratchbuild all the tiny little detail bits like the aileron hinges and gun mounts, most of these were made out of plastic card or stretched sprue and once added to the airframe they were touched up with a OO brush with the appropriate colour.
Rigging
was added from Stretched sprue with the top wing left off, this made it a
lot easier to add the rigging as the Wapiti is
 covered in the dam stuff!
Talk about flying telegraph pole! Don’t worry if the rigging sags a
little bit if you are doing it this was because once it was all finished
the top wing was superglued on and a incense stick was carefully waved
under the rigging, the smoke “snapped” the rigging tight and got rid of
most of the sags. (Actually, it is the heat from the burning incense
that does the job. Smoke has little added temperature in and of itself.
Some of us use the still hot end of a recently blown out match to do the
same thing. Ed)
covered in the dam stuff!
Talk about flying telegraph pole! Don’t worry if the rigging sags a
little bit if you are doing it this was because once it was all finished
the top wing was superglued on and a incense stick was carefully waved
under the rigging, the smoke “snapped” the rigging tight and got rid of
most of the sags. (Actually, it is the heat from the burning incense
that does the job. Smoke has little added temperature in and of itself.
Some of us use the still hot end of a recently blown out match to do the
same thing. Ed)
The painted wheels were glued on and the tailskid added from a ground down sewing needle. The propeller that was supplied by Merlin was little more than a lump of plastic that had a couple of dimples for bolts in the centre hub. Much carving and sanding was needed to get a shape that resembled a propeller and in retrospect I would have been better off replacing it with a white metal one or scrounging one from another kit as the roper still looks like a piece of plastic carved to look like a propeller.
|
CAMOUFLAGE & MARKINGS |
Due to
the painting being done during construction all that was left to do was
prep the aircraft with Future and add the decals, these came from the
spares box as none of the Merlin supplied ones were of any use as they
depicted the earlier style RAF Roundels. The Profile showed no serial
numbers  of aircraft
codes so decaling was over and done with, with the addition of the
national markings.
of aircraft
codes so decaling was over and done with, with the addition of the
national markings.
The final fiddly bits were added at this stage, the bits that will get wiped off the first time someone looks at the model, The guns came from the spares box with the scarf ring being made out of wire and stretched sprue. The whole thing is vary delicate and I’ve managed to wipe it off a couple of time already!
|
CONCLUSIONS |
Possibly the hardest model I have ever done, I was told by a number of people that this kit was “unbuildable”. Well I managed to wade my way though it, okay it’s never going to be a contest winner, but then even my best models aren’t that anyway, it will always be a pretty rough rendition of a Wapiti, but I can at least say I’ve finished a Merlin kit, have you? And Wapiti’s aren’t aircraft that you see in model form every day. Many thanks to Tel McGrady for the kit, information, and encouragement though this rather difficult build. With the Merlin Wapiti off the bench and onto the display shelves I decided to reward myself by building the Merlin A12 Shrike while waiting for the Starfix Bf 109E and a half kit to arrive. Stay tuned!
|
REFERENCES |
Profile Series Westland Wapiti
Google “Search for Wapiti”
Aircraft of World War II
December 2003
Copyright ModelingMadness.com
If you would like your product reviewed fairly and fairly quickly, please contact the editor or see other details in the Note to Contributors.