Eastern Express 1/72 Gloster E.28/39
|
KIT # |
? |
|
PRICE: |
? |
|
DECALS: |
2 options |
|
REVIEWER: |
|
|
NOTES: |
Old Frog/Novo kit |
|
HISTORY |
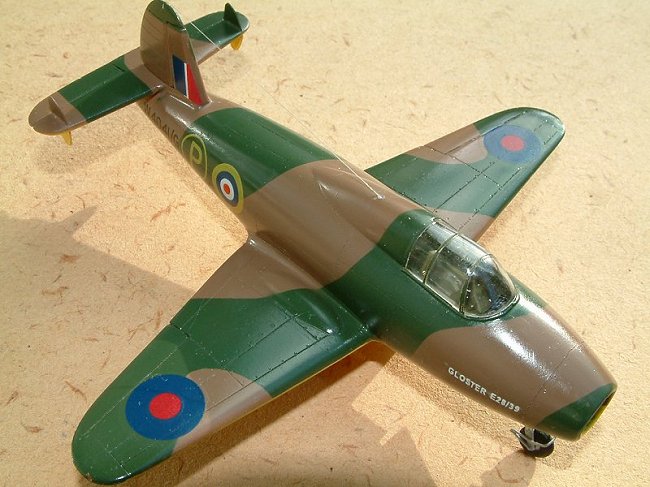
 The first Allied jet
aircraft, the Gloster-Whittle E.28/39 first flew briefly on 8 May 1941
while on taxiing trials, although the first official flight took place on
15 May. The airframe of the E.28/39 was built by the Gloster aircraft
company and proved the turbojet concept which had been under development
by Frank Whittle and his company since 1936.
The first Allied jet
aircraft, the Gloster-Whittle E.28/39 first flew briefly on 8 May 1941
while on taxiing trials, although the first official flight took place on
15 May. The airframe of the E.28/39 was built by the Gloster aircraft
company and proved the turbojet concept which had been under development
by Frank Whittle and his company since 1936. |
THE KIT |
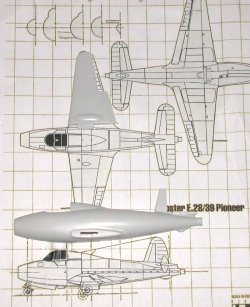 The
Eastern Express E28 is the re-boxed Frog one dating from when Adam was a
boy. No attempt has been made to update the mould or fix the major
inaccuracies that the Frog kit suffered from, The most noticeable of
these is the over scale fuselage as can be seen in the plans, the wings
are about right apart from being a little too rounded at the tips but the
fuselage as you can see is around 25 mm too long, way too fat and the
nose is well, just wrong. After much measuring, head scratching and
discussions with online experts I concluded that it just wasn’t worth
modifying the E28 to be accurate as it entailed basically scratch
building a new fuselage and I couldn’t be bothered doing that.
The
Eastern Express E28 is the re-boxed Frog one dating from when Adam was a
boy. No attempt has been made to update the mould or fix the major
inaccuracies that the Frog kit suffered from, The most noticeable of
these is the over scale fuselage as can be seen in the plans, the wings
are about right apart from being a little too rounded at the tips but the
fuselage as you can see is around 25 mm too long, way too fat and the
nose is well, just wrong. After much measuring, head scratching and
discussions with online experts I concluded that it just wasn’t worth
modifying the E28 to be accurate as it entailed basically scratch
building a new fuselage and I couldn’t be bothered doing that.
The box is typical Eastern Express in the fact that it barely can hold itself together let alone protect the contents of the kit. The instructions are printed on cheap A5 sheet of newsprint paper smelling faintly of tomcat. A small but nicely printed decal sheet with marking for two prototypes are included along with a very thick and cloudy canopy that doesn’t “do” future terribly well.
|
CONSTRUCTION |
 Construction started with scratch building the nose vanes around the
cockpit tub so there was a little more detail in there than a shapeless
blob of plastic, the vanes were cut from 5 thou plastic card and trimmed
to the curve of the inner fuselage. A couple of scraps of lead were then
superglued to the underside of the tub so the E28 wouldn’t be a tail
sitter.
Construction started with scratch building the nose vanes around the
cockpit tub so there was a little more detail in there than a shapeless
blob of plastic, the vanes were cut from 5 thou plastic card and trimmed
to the curve of the inner fuselage. A couple of scraps of lead were then
superglued to the underside of the tub so the E28 wouldn’t be a tail
sitter.
The tub details consist of a very basic seat and little else, so a control panel was cut out from my laser printed stock and glued to a piece of 5 thou card, seatbelts added from masking tape and a couple of my home cast side panels completed the detailing in the cockpit. The fit of the tub is a little sloppy so make sure you have got it lined up for “best fit” around the lip and fill the gaps with superglue as the last thing you want is it breaking free after the fuselage is glued together.
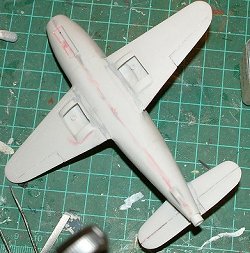
As you can see in the photo the basic fit is still pretty good even after all these years and what? At least three owners. Most of the joins just needed a light sanding and a dab of filler on the wing joins, in case your wondering what the red is in the photo, I use a MEK based plumbers PVC piping etching fluid for modelling glue, have done for years and in fact the 500 ml bottle I bought 5 years ago is still over half full. To combat the smell of MEK I decanter a little off into an empty Tamiya paint bottle and leave the lid off for 10 minutes, that gets rid of the powerful fumes and gives me a couple of months worth of glue on my desk.
 With
so many errors with the kit I half-heartily made an effort to fix the
curve of the wing tips, not that it was worth doing as I decided to
tackle this one as a purely “fun” build, I did however add the little
tail fins that the instructions give you details on how to scratchbuild.
I rescribed the panel details and added rivet details using a star wheel
from my wife’s sewing kit. The rear jet pipe supplied by EE was pitifully
undersize given the overly porky nature of the fuselage so I replaced it
with a section of plastic pipe that came from one of the kids balloon
stands.
With
so many errors with the kit I half-heartily made an effort to fix the
curve of the wing tips, not that it was worth doing as I decided to
tackle this one as a purely “fun” build, I did however add the little
tail fins that the instructions give you details on how to scratchbuild.
I rescribed the panel details and added rivet details using a star wheel
from my wife’s sewing kit. The rear jet pipe supplied by EE was pitifully
undersize given the overly porky nature of the fuselage so I replaced it
with a section of plastic pipe that came from one of the kids balloon
stands.
The undercarriage as supplied is very basic so stretched sprue was used to build up the front wheel guard and oleo struts. The main wheel well doors were thinned down as they would be about a scale foot thick and the front ones replaced by 5 tho plastic card.
|
CAMOUFLAGE & MARKINGS |
With the major assemblies done it was off to the paint shop with the Eastern express paint guide in hand. All single side view of it. With that wealth of information I laid down a couple of coats of white on the undersides as a base coat for the prototype yellow. Once dry 5 or 6 thin coats of Tamiya yellow was sprayed on to give the underside a nice bright yellow without too many patches.
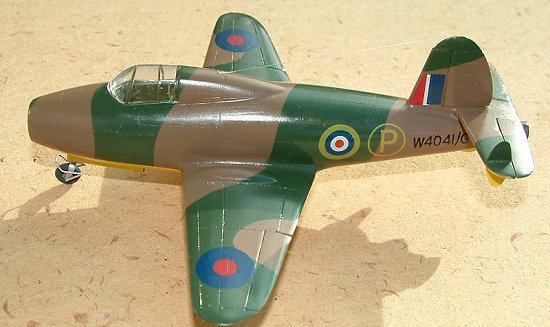 After
the underside was masked off the Dark earth was applied and left to dry,
the camo pattern was masked off with masking tape as it was hard edged on
the Prototype. The green was then gunned on and that concluded the major
paint work. Once the masking tape came off and the paint rubbed over with
a soft nylon pot scrubber to remove the orange peel and smooth down the
matt paint.
After
the underside was masked off the Dark earth was applied and left to dry,
the camo pattern was masked off with masking tape as it was hard edged on
the Prototype. The green was then gunned on and that concluded the major
paint work. Once the masking tape came off and the paint rubbed over with
a soft nylon pot scrubber to remove the orange peel and smooth down the
matt paint.
I differed from the norm on this model with the gloss coat for the decals as I’m always happy to try a new technique, so instead of the normal coat of Future I sprayed a couple of thin coats of ModelMaster Gloss acrylic that I picked up in a trade, god know how old the bottle was because I haven’t seen MM paints up this way in years, but it sprayed nicely and left a high gloss surface ready for the decals.
Eastern Express decals are very thin and prone to tearing at the slightest provocation but snuggled down nicely without any slivering. The roundels on the fuselage were a little thin and the green camo bled through the yellow but as they are the same diameter as the P symbols I didn’t replace them with ones out of the spares box.
|
CONCLUSIONS |
Old?,
yes….Inaccurate?, yes….. Not worth doing?, No. For most of us who have
grown up on a steady diet of Airfix and frog Kits this is like coming
home to your favourite old slippers, old, misshapen, smelly, well maybe
not smelly but as soon as you slip into this kit the troubles of the
modern world disappear and you are transported back in time to when it
didn’t matter 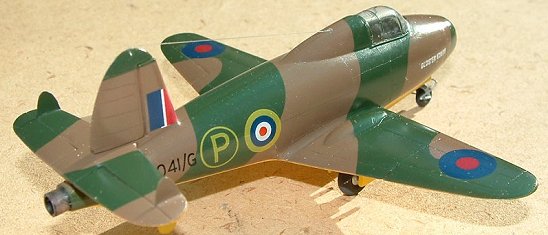 about total accuracies, your sitting in you room on a rainy
Saturday afternoon slapping together the latest pocket money purchase so
you can play dogfights with your best mate.
about total accuracies, your sitting in you room on a rainy
Saturday afternoon slapping together the latest pocket money purchase so
you can play dogfights with your best mate.
Grab one of these old beasties, forget about it’s accuracies, don’t look through tons of research tell the experts to go to h*ll, just crack the kit and build it, thinking all the time BACK to the days when you would have built this kit in total happy oblivion to it’s errors. Go on I dare you.
My thanks to MM/FBN for the chance to revisit my childhood. One of these days I’m going to build a model again in one afternoon, brush paint it, add the decal while the paints still tacky and then spend the rest of the afternoon battling my kids in mock dogfights just for the fun of it!
|
REFERENCES |
In the spirit of my conclusion no references were harmed in the making of this kit.
October, 2003
Copyright ModelingMadness.com. All rights reserved. No reproduction in part or in whole without express permission.
If you would like your product reviewed fairly and fairly quickly, please contact the editor or see other details in the Note to Contributors.
Back to the Reviews Index Page 2015