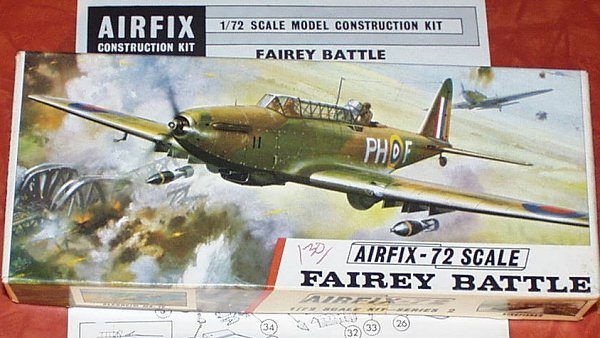
Airfix 1/72 Fairey Battle
|
KIT # |
259 |
|
PRICE: |
$ |
|
DECALS: |
Two Aircraft |
|
REVIEW : |
Mark Fordham |
|
NOTES: |
Long out of production` |
|
HISTORY |
NOTE: Copied from original instruction sheet, ah those were the days !
The Fairey Battle day bomber was designed to replace the Hawker Hart Biplane and when the first prototype flew in March 1936 the new monoplane, fitted with the equally new Rolls-Royce Merlin represented an enormous advance over the types then in service.
Battles went into squadron service in 1937 and by this time it was becoming obvious that the Battle was already obsolescent with the introduction of high speed heavily armed monoplane fighters. The Advanced Air Striking force of the R.A.F went to France in September 1939. In the same month Battles were used in action and suffered the first of the disastrous losses that were to plague its brief operational career. With only one defensive machine gun and inadequate armour it was vulnerable to both ground opposition and fighters especially when used at low level.. The most famous raid made by battles was against the Maastricht bridges in Mat 1940 when five Battles of N0 12 Squadron, flown by volunteers were all shot down.
The Fairey Battle was powered by a Rolls Royce Merlin engine giving a maximum speed of approximately 240 mph Armament consisted of one fixed and one flexible 0.303 machine gun and 1000 lb of bombs.
|
THE KIT |
 Now, hands up all those
of you that remember the first release of this kit? One – two – three, okay this
goes to show that Airfix has touched all modellers at some stage of their life.
I’m not going to lie to you, I’m a young buck of 37 when it comes to models.
Sheesh, I wasn’t even born when this kit was first released so I’m going to
go out on a limb here. I love these old Airfix kits, this is modelling at the
core level. You get the basic airframe with those wacky raised rivets and raised
details and wonderful working parts like revolving props and moving ailerons.
Now, hands up all those
of you that remember the first release of this kit? One – two – three, okay this
goes to show that Airfix has touched all modellers at some stage of their life.
I’m not going to lie to you, I’m a young buck of 37 when it comes to models.
Sheesh, I wasn’t even born when this kit was first released so I’m going to
go out on a limb here. I love these old Airfix kits, this is modelling at the
core level. You get the basic airframe with those wacky raised rivets and raised
details and wonderful working parts like revolving props and moving ailerons.
Oh did I forget to mention that there’s is almost no other kits in 1/72nd scale of the Fairey Battle so choices are rather limited.
Comparing the Airfix Battle to S.A.Ms’ 1/72nd scale drawing show up a few inaccuracies in the nose, tail and wings. Scott Van Aken here at MM informed me that Airfix originally used a set of prototype drawings to design the Battle moulds way back when. Making the nose about 4mm too short, the Rudder the wrong shape and the wings too narrow. Now I had two choices at this point, build it with all its inaccuracies and say "Hey it’s a Battle in 1/72nd scale" or tackle the major problems head on to make a more accurate Battle.
|
CONSTRUCTION |
Well normally I would have built this piece of classic Airfix straight out of the box unfortunately I have a scratch built 1/72nd scale Battle to compare it with sitting on the selves already and the Airfix Battle would have looked wrong without the modifications.
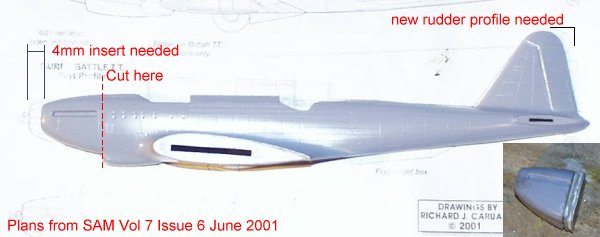 First step was to cut
the nose off each side of the fuselage just behind the exhaust slots (see photo
insert) At the same time I scored around the rudder halves and removed them,
cleaning up and reshaping the rudder profile as per plans.
First step was to cut
the nose off each side of the fuselage just behind the exhaust slots (see photo
insert) At the same time I scored around the rudder halves and removed them,
cleaning up and reshaping the rudder profile as per plans.
The nose of the battle needed to be lengthened by 4 mm, as luck would have it my lovely wife had just finished a Linburg Dinosaur and had not used the base that came with it, the base consisted of a 2mm thick slab of plastic. So after cutting out a template from cardboard used it to cut two 2mm packing pieces for the nose. These were glued on to the nose and left for a few days to really harden up then carefully filed to the correct shape.
At this time the fuselage was assembled as per kit instructions with extra details scratch built for the interior of the cockpit because Airfix supplies a floor and a seat and that’s it. I didn’t get too carried away with the cockpit as the transparencies had suffered the ravages of time and were not particularly clear and in the case of the centre section badly crazy-cracked. Some side detailing and a set of seatbelts completed the interior.
The next step was to assemble the wings and after sanding off all the diner-plate rivets and re-scribing the panel lines I reshaped the tips of the wings to match the scale plans, now the Airfix wings are too narrow at the tips by about 2mm but to fix that would require major surgery or scratch building complete new wings ..No thank you! Shape the tips and ignore the rest. While you’re at it you might as well make use of the separate ailerons and drop them to add a bit of interest to the plane.
 After gluing the wings
to the fuselage and cleaning up and adding the tailplanes its time to offer up
the lengthened nose to the fuselage. A small amount of filler was used to float
across the join and left to harden.
After gluing the wings
to the fuselage and cleaning up and adding the tailplanes its time to offer up
the lengthened nose to the fuselage. A small amount of filler was used to float
across the join and left to harden.
With the major airframe now complete it was time to replace the rudder with one of the correct profile. This was cut out of a piece of the dinosaur base and sanded to the correct shape. Then the battle was given the once over with 600 grit wet-n-dry to smooth in the new nose and remove the last of the raised details.
Exhausts were carefully drilled out and shortened by about 1mm in depth. On reflection I should have taken at least another 1 mm off them as they still stick out too far. Undercarriage was cleaned up and added to the underside then off to the paint shop.
Last job was to replace the bomb bay doors with some thin plastic salvaged from some long gone toy packaging and to cut out the Bomb aimer’s window as per SAM scale plans.
|
CAMO & MARKINGS |
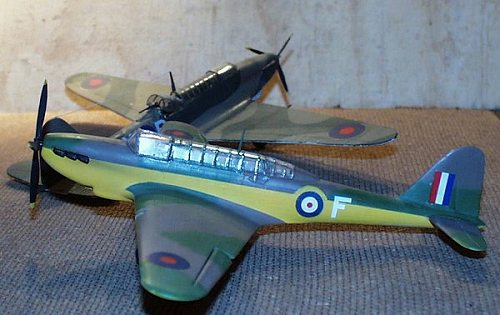
Airfix gives you the options for two Battles, one RAF PH*F and one Belgian version both with Green/Dark Earth uppers and black (RAF) or Grey (Belgian) undersides.
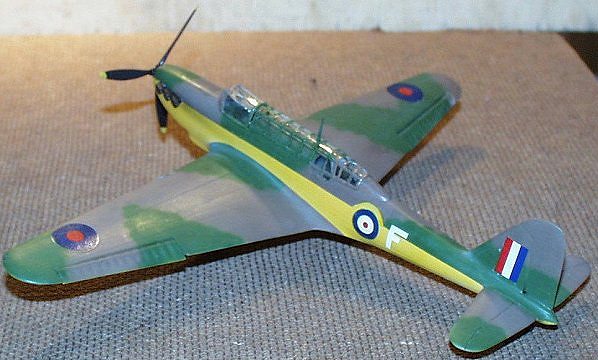
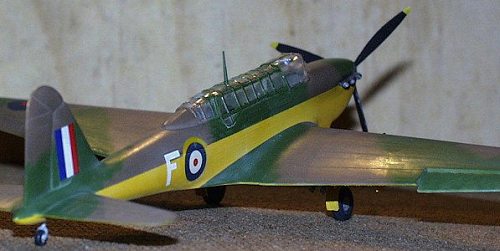
I had decided from the outset to do one of the more colourful Battles serving as a trainer with Green/Dark Earth upper camouflage and trainer yellow undersides.
 First step was to
spray an undercoat of matt white to check the regrafted nose and general joints.
After fixing the odd rough spot misted Tamiya XF-3 Flat Yellow with two drops of
orange added to help coverage over the underside of the plane. About ten coats
over a period of two nights were needed to get good coverage, The plane was then
left to dry for another day before masking up the fuselage and spraying the
Tamiya XF-52 Flat Earth over the upper surfaces.
First step was to
spray an undercoat of matt white to check the regrafted nose and general joints.
After fixing the odd rough spot misted Tamiya XF-3 Flat Yellow with two drops of
orange added to help coverage over the underside of the plane. About ten coats
over a period of two nights were needed to get good coverage, The plane was then
left to dry for another day before masking up the fuselage and spraying the
Tamiya XF-52 Flat Earth over the upper surfaces.
Then I sprayed the Humbrol 105 dark green freehand while trying to get the hang of my new badger airbrush. After a monumental cock up I shifted the paint back to my Aztek to finish off and hide the runs and sags. Moral to this story. Don’t use review aircraft to try out new airbrushes!
In despair I drowned the Battle in future and tossed the lot in the hot water cupboard to dry.
A few days later I removed the Battle and looked at it once again hmmmm the major run was about were the starboard wing roundel will be, I wonder. If I snick it slightly closer to the edge of the wing the whole mess will be covered Yay! Problem solved.
I used the original Airfix Roundels on the wings after coating them a few times with future to stop them cracking. The rest of the decals came from my non-existent spares box. Rear fuselage codes need to be confirmed so I left them off for now.
|
CONCLUSIONS |
When asked by my friends "what is your favourite aircraft?" the immediate and definitive answer is a Fairey Battle! I have come to love the graceful lines of the Battle and have waited with baited breath for one of the "Big Three" to kit the Battle in my scale (1/72nd) of choice, now after 25 years I have come a full circle back to this classic old Airfix kit.
Highly recommended for someone who wants to take a nostalgic trip back to the glory days of modelling.
My thanks to Don Brimmer for sending me this Battle.
|
REFERENCES |
Scale Aviation Modeller International Vol 7 Issue 6 June 2001
Copyright ModelingMadness.com
If you would like your product reviewed fairly and fairly quickly, please contact the editor or see other details in the Note to Contributors.
Back to Reviews Page 2020