| KIT #: | 5303 |
| PRICE: | $ |
| DECALS: | Three options |
| REVIEWER: | Nicolai Plesberg |
| NOTES: | True Details etched set. |
| HISTORY |
The Hawker Typhoon came about as a successor to the highly successful Hurricane, but with a much more powerful engine and armament; the latter consisting of four 20mm Hispano cannon. The powerplant, however, was a challenge, because it needed to be able to carry that kind of weaponry at high speed in the air. Such an engine did not exist at the time (1937), when the design on the Hurricane’s successor commenced. Two new engine designs, which were in the making, the Roll-Royce Vulture and the Napier Sabre did promise an unprecedented power output of more than 2000 hp. This meant, that four prototypes were ordered; two were to be powered by Vultures and two by Sabres; as a note here, the Vulture was later abandoned as it simply didn’t succeeded for Roll-Royce to solve the design difficulties with this engine. The armament in the prototypes was also changed to twelve .303 Browning machine guns, as the 20mm cannon in question had not yet been used in a single-engine fighter and there was an uncertainty on, how they would affect the flight properties of the plane when fired (recoil effects and stuff like that).
The initial
problems also consisted of airframe failures; especially the tail section had a
tendency, due to insufficient structural strength, to break off in mid-air
flight, and it cost a number of pilots their lives because they had almost no
chance of bailing out when thes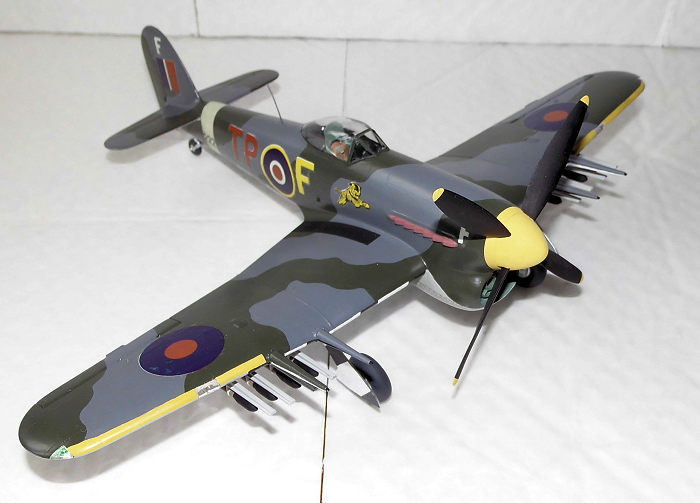 e problems occurred. Also, the original goal of
creating a high altitude interceptor had to be abandoned, because the engine
simply couldn’t perform adequately at altitude, just like the non two-stage
Merlin powered Spitfires. It seemed like the Typhoon was going to be a failure,
but rescue came from the course of the war. The appearance of the Focke-Wulf Fw
190A and its subsequent superiority over the Spitfire V and Hurricane II made it
a real threat to the RAF, not only to the bomber force, but also to Fighter
Command, as their inability to stop Luftwaffe’s Butcher Bird’s (Fw190 nickname)
hit and run raids over southern England cost the RAF dearly in both aircraft as
well as pilots. The Typhoon turned out to be fast enough to catch the Fw190 at
low altitude, and after a couple of lessons the Luftwaffe learned about the new
enemy fighter!
e problems occurred. Also, the original goal of
creating a high altitude interceptor had to be abandoned, because the engine
simply couldn’t perform adequately at altitude, just like the non two-stage
Merlin powered Spitfires. It seemed like the Typhoon was going to be a failure,
but rescue came from the course of the war. The appearance of the Focke-Wulf Fw
190A and its subsequent superiority over the Spitfire V and Hurricane II made it
a real threat to the RAF, not only to the bomber force, but also to Fighter
Command, as their inability to stop Luftwaffe’s Butcher Bird’s (Fw190 nickname)
hit and run raids over southern England cost the RAF dearly in both aircraft as
well as pilots. The Typhoon turned out to be fast enough to catch the Fw190 at
low altitude, and after a couple of lessons the Luftwaffe learned about the new
enemy fighter!
After series production got well underway during 1942 it was decided to evaluate the Typhoon in the role as close support / ground attack aircraft and different under wing stores were tested. As other aircraft, such as the De Havilland Mosquito, the Bristol Beaufighter and the Hawker Hurricane already had tremendous success in using unguided rocket projectiles against all sorts of targets, it was decided to equip Typhoons with rockets as well. It turned out to be an excellent choice, because rocket armed “Tiffies” (nickname for Typhoons) caused havoc among the embattled German forces during 1943-45, and especially after D-Day trains, tanks, trucks, troop concentrations and more were all hit hard by the Typhoon Squadrons, making the Typhoon one of the real air-to-ground workhorses in defeating the Nazi war machine. By VE-Day the Typhoon had earned the reputation as an indispensable tool for air-ground work as well as catching fast flying enemy aircraft at the deck. In all the Typhoon was build in 3330 examples; most (3315) were in fact build by Gloster Aircraft Co Ltd., the last being delivered in November 1945. Its service period in peace time didn’t last long, as it was replaced by its derivative, the Hawker Tempest, already from 1946.
| THE KIT |
 Monogram’s kit
has been around for quite a while; this boxing is one of the many re-releases,
in this case from 1977, according to the instructions and the box. It sports
fine raised details with engraved control surfaces (nearly the case anyway), and
with an almost perfect fit; I know it’s not Tamiya standard so filler is needed,
but don’t worry it’s not in big amounts, and simple yet effective instructions
showing, in a clear manner, how to put the kit together. I might also add that
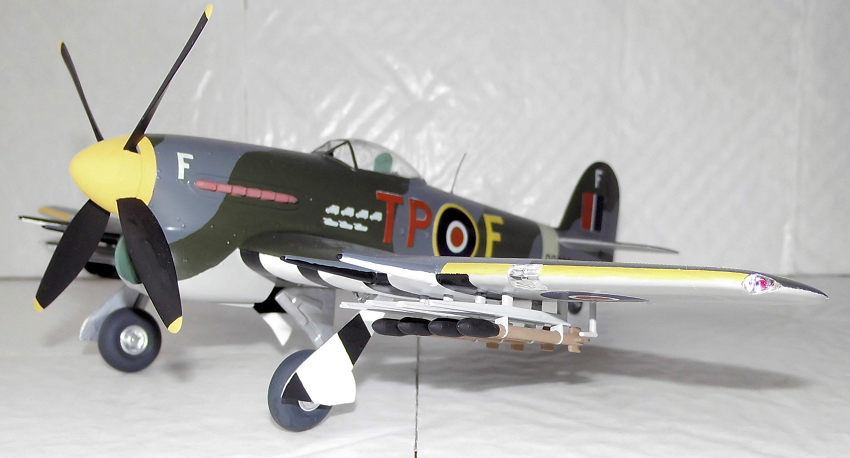
Monogram has depicted a late production Mk. IB with bubble canopy and a four
bladed propeller – side jump: speaking of the propeller; the blades are indeed
big because when I look over the 1/48 scale WWII fighter planes that I’ve built
over the past couple of years, the Typhoon’s prop blades get the first place
regarding their size! Only my 1/48 F8F Bearcat can challenge the Typhoon on that
issue!
Monogram’s kit
has been around for quite a while; this boxing is one of the many re-releases,
in this case from 1977, according to the instructions and the box. It sports
fine raised details with engraved control surfaces (nearly the case anyway), and
with an almost perfect fit; I know it’s not Tamiya standard so filler is needed,
but don’t worry it’s not in big amounts, and simple yet effective instructions
showing, in a clear manner, how to put the kit together. I might also add that
Monogram has depicted a late production Mk. IB with bubble canopy and a four
bladed propeller – side jump: speaking of the propeller; the blades are indeed
big because when I look over the 1/48 scale WWII fighter planes that I’ve built
over the past couple of years, the Typhoon’s prop blades get the first place
regarding their size! Only my 1/48 F8F Bearcat can challenge the Typhoon on that
issue!
The painting guide is also splendid, especially for the smaller details. My only gripe with the painting guide for the main scheme, is, the main colors to be used, are being described as dark grey / light grey / dark green when we all know, at least WWII RAF modelers, that the dark grey color used should be RAF Ocean Grey, the light grey color RAF Medium Sea Grey and the dark green color RAF Dark Green (that from WWII and not the modern tone). The decal sheet offers markings for three different planes and is printed in a gloss tone. The printing appears to be in register, but time will show how they’ll work. Anyway enough fussing on to construction.
| CONSTRUCTION |
I began
construction by detaching the larger parts (fuselage and wings) plus the cockpit
parts from the sprues and cleaning them up, and then started with the interior.
I had bought the cockpit set from True Details to Monogram’s Typhoon kit to
dress the office up a bit; the instructions to it are really splendid as are the
painting instructions – this is not always the case with such aftermarket sets!
First I attached the left cockpit sidewall details, then the right sidewall
details. Painting was next using the suggested colors, just remember: the
general color in British WWII aircraft cockpits is British Interior Grey Green –
not US Interior Green!! Actually in the case of the Typhoon it might not be
entirely correct as most Typhoons were actually built by Gloster Aircraft Co
Ltd, and Gloster built aircraft were us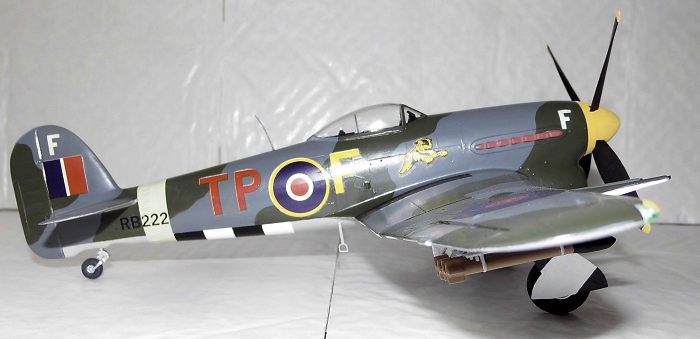 ually painted black in the cockpit – this
came to my attention after I finished the model! Folding the seat (this being
superior to the kit seat) and gluing to the headrest bulkhead plus adding the
seat belts was really easy, too, (and painting it in between of course) plus
gluing it to the right fuselage half. The last to be dressed up is the floor
itself with the kick panels plus the rudder pedals as well as the stick.
ually painted black in the cockpit – this
came to my attention after I finished the model! Folding the seat (this being
superior to the kit seat) and gluing to the headrest bulkhead plus adding the
seat belts was really easy, too, (and painting it in between of course) plus
gluing it to the right fuselage half. The last to be dressed up is the floor
itself with the kick panels plus the rudder pedals as well as the stick.
Before the fuselage halves were joined, the air intake insert (part 6) was glued in the right fuselage half then painted interior grey green. The instrument panel was also painted and glued in the right fuselage half as well, but it went flat black and not green! “Hey, wait a minute Nicolai, didn’t you forget something – doesn’t True Details provide an instrument panel in their etched set?” Well, yeah they do, but I chose not to use it – because I felt it didn’t really added extra detail. In other words the plastic part provides sufficient detail, I figured! It may seem hilarious, but the etched panel parts are not better than the kit panel in my humble opinion! Had it been a modern colored etched panel from, say, Eduard then it had been a totally different matter!!
While all the cockpit / interior things dried, I glued the wing parts together. Gear parts were also cut from the sprues and cleaned up and painted. As soon as the tail gear was finished and glued in place the fuselage halves were joined, including the floor piece. The main gears were also finished, including with the doors glued to the legs.
The next task
consisted of dealing with the seams, but that is mandatory anyway, so there is
really nothing new about that. Note one: the seams on the cannon barrel fairings
were surprisingly out of alignment so lots of filling and sanding is required
here. The wings themselves were pretty easy to deal with; easie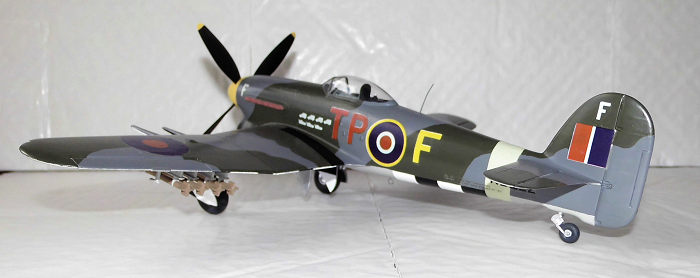 r than the cannon
barrel fairings, simply because they were better aligned! Note two: I also
corrected the fin leading edge, as its shape was not nailed exactly by Monogram,
by gluing a shim of styrene cut to shape and faired in with the usual filler /
sanding routine.
r than the cannon
barrel fairings, simply because they were better aligned! Note two: I also
corrected the fin leading edge, as its shape was not nailed exactly by Monogram,
by gluing a shim of styrene cut to shape and faired in with the usual filler /
sanding routine.
When all those subassemblies were to my satisfaction, I glued both wings and tail planes to the fuselage insuring that the fit was good before committing the glue. And of course faired in with the usual filler / sanding sessions when the glue has set. The next task was to finish up the cockpit area by painting / touching up the last issues, then cleaning the windscreen plus canopy and joining them with gloss varnish, then gluing the finished canopy onto the fuselage again using gloss varnish to avoid marring it with plastic glue. Unavoidable gaps were filled with gloss varnish; when set, sanded with a light hand. Usually I prefer to mount the gear before painting, but I chose to go a different route this time – by using wooden toothpicks cut to fit exactly in the mounting slots for the gear legs although moistening them would insure a tight fit. After cleaning the entire surface the model went to the paint shop.
| COLORS & MARKINGS |
First I masked off and painted the white invasion stripes – two coats were needed before the masking tape was removed and then the black invasion stripes were painted – one coat seemed enough; flat back seems to cover far better than flat white, doesn’t it?! As the flat black was in use anyway, I also painted the canopy / windscreen frames plus the propeller with one coat (side note here: before gluing the doors to the gear legs, I had attached them over the gear bays in order to make faint scratches in the surface of the doors to facilitate easier painting of the invasion stripes later). Then the sky colored tail band was masked off and painted using Humbrol Authentic Sky Type S (HB.5), and one coat was apparently enough. Even though the sky fuselage band existed on the decal sheet my experience told me, it would be far better to paint that on, as the decal can be extremely difficult to place correctly and get to conform to the surface on the model.
The under
surface color was next; first masking off then using Humbrol Authentic Medium
Sea Grey (HB.6) in two coats, then removing the tape after the second coat had
been applied. The upper su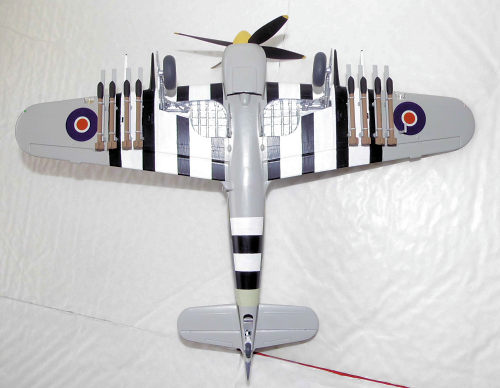 rface grey color was next, but first a new set of
masking was applied along the demarcation lines on fuselage and wings, to reduce
the amount of touch up later, then using Humbrol Authentic Ocean Grey (HB.3) in
two coats on all side- and upper surfaces. The next main color to be applied was
the camouflage pattern of RAF Dark Green using Humbrol Authentic Dark Green
(HB.1) in one coat and without any masking; I trusted my camouflage skills to
paint it freehand.
rface grey color was next, but first a new set of
masking was applied along the demarcation lines on fuselage and wings, to reduce
the amount of touch up later, then using Humbrol Authentic Ocean Grey (HB.3) in
two coats on all side- and upper surfaces. The next main color to be applied was
the camouflage pattern of RAF Dark Green using Humbrol Authentic Dark Green
(HB.1) in one coat and without any masking; I trusted my camouflage skills to
paint it freehand.
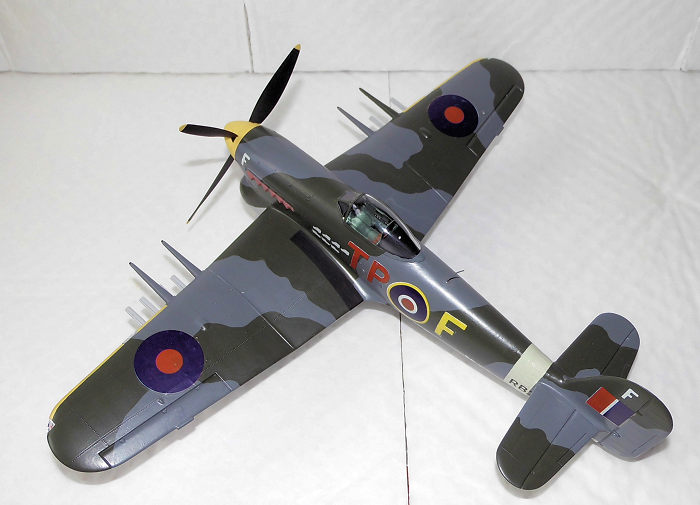
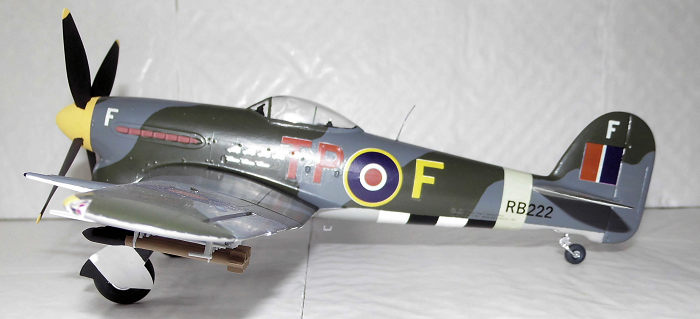
The last “main” color to use was the yellow for the outer wing leading edges; some more masking was applied to ensure some degree of control on where the yellow paint went! As you may have guessed by now, the next step was a thorough touch up session, but it really went surprisingly with no real trouble, and the model sat to the next day so the paint could set hard before I glossed the whole surface in preparation for the decals.
The decals were a mixed bag; the large ones worked okay, but some of the smaller ones like the small texts put on the radiator and rear fuselage broke into several pieces, but not any worse than it could be fixed. Also one of the serial numbers gave me trouble, but I succeeded in getting things in place. The carrier film may have been of an inconsistent quality or something like that. After cleaning the surface over and around the dried decals they were given a coat of gloss varnish in order to reduce the little silvering here and there, plus some small touch ups I had been forced to do. When that had set, the whole model got a coat of Humbrol Matt Cote to give the surface a more realistic sheen.
| FINAL CONSTRUCTION |
 The last leg of
this build consisted of first to glue the gear and remaining doors in place.
Then came the cleaning up of the remaining parts, such as the rockets plus their
racks, which were painted as specified in the instructions. Also the last detail
painting, such as the exhausts, navigation and landing lights were done. When
mounting the racks into the wing, I discovered that they were in fact a press
fit so no glue were used to fix them but CA glue was employed in attaching the
rockets to the racks. The final etched part, the boarding step, was added and
painted, as was a stretched sprue bit as whip aerial and the spinner base was
put on the shaft which was then flared over. The remaining spinner / propeller
assembly was carefully glued to the base, but the inevitable seam (it would have
been nice with an invisible seam here, Monogram!) was a bit too visible, so I
used more yellow paint in order to try and smooth it out as much as possible.
With that the model was finished.
The last leg of
this build consisted of first to glue the gear and remaining doors in place.
Then came the cleaning up of the remaining parts, such as the rockets plus their
racks, which were painted as specified in the instructions. Also the last detail
painting, such as the exhausts, navigation and landing lights were done. When
mounting the racks into the wing, I discovered that they were in fact a press
fit so no glue were used to fix them but CA glue was employed in attaching the
rockets to the racks. The final etched part, the boarding step, was added and
painted, as was a stretched sprue bit as whip aerial and the spinner base was
put on the shaft which was then flared over. The remaining spinner / propeller
assembly was carefully glued to the base, but the inevitable seam (it would have
been nice with an invisible seam here, Monogram!) was a bit too visible, so I
used more yellow paint in order to try and smooth it out as much as possible.
With that the model was finished.
| CONCLUSIONS |
Despite its heritage the Monogram Typhoon kit
is definitely one of their better efforts and can be recommended to anyone who
whish to expand their collection of RAF subjects with a relatively easy build.
If the kit decals are not to your taste then I am sure the aftermarket can
provide you with better alternatives.
The newer Hasegawa kits are
superior in a number of ways (surface detailing
and stock cockpit fittings, for instance),
but the Monogram kit is still
properly shaped and easier to build.
| REFERENCES |
Profile Publications no 81: The Hawker Typhoon by Francis K. Mason, 1966
18 December 2017
Copyright ModelingMadness.com
If you would like your product reviewed fairly and
fairly quickly, please
contact
the editor or see other details in the
Note to
Contributors. Back to the Main Page
Back to the Review
Index Page
Back to the Previews Index Page