| KIT #: | 5239 |
| PRICE: | $11.99 MSRP |
| DECALS: | Two options |
| REVIEWER: | Greg Ewald |
| NOTES: | Fun and simple build |
| HISTORY |
First off, let me tell you that
this is a “what-if”, but is based on quite a lot of sound speculation from an
argument at a pub last fall, that is, would some of the English pilots have been
welcomed into the American Volunteer Group in WW2 China, and if so, what
 would
they have flown? The Photo Recon versions of the Spitfires were some of the
sharpest looking spits flown, in my opinion, and the pilots possibly the
bravest. Sacrificing weapons and even the radio, they went hell-bent for speed
over enemy lines in customized front line airframes, snapping pictures through a
variety of different lenses, even hand held…then zipped back to friendly
airspace pursued by the wolves of Germany.
would
they have flown? The Photo Recon versions of the Spitfires were some of the
sharpest looking spits flown, in my opinion, and the pilots possibly the
bravest. Sacrificing weapons and even the radio, they went hell-bent for speed
over enemy lines in customized front line airframes, snapping pictures through a
variety of different lenses, even hand held…then zipped back to friendly
airspace pursued by the wolves of Germany.
These photos were used to plan nighttime and daytime bombing raids, provide information of armor and troop movements, and which ports were being used on the French coastline, very important information to the Allied staff.
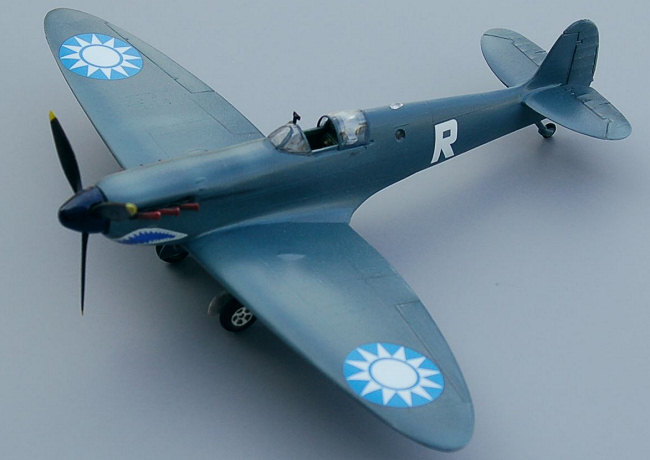
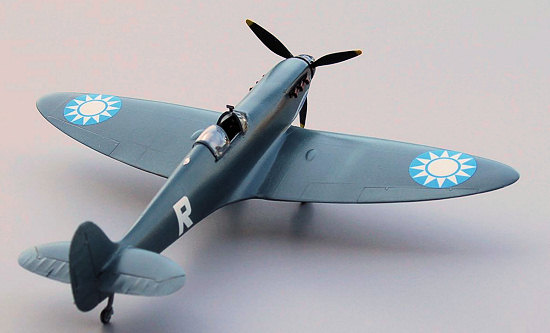
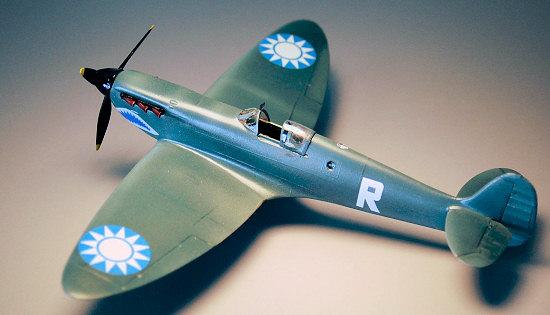
The AVG was disbanded on 4 July, 1942, after a brief period of success in combat against the Japanese empire, becoming the 23rd Fighter Group. British garrisons were being overrun as the red sun waved over more and more strong-points in Asia and IndoChina …so, what if some of the English pilots and planes were TAD’d (temporary additional duty, or traveling around drunk, whichever you prefer) over to the AVG for a brief period? Hence this build.
| THE KIT |
 Whooboy. This one takes you back to
the builds of your early years, doesn’t it? A whopping 30+ pieces molded in gray
come in a simple box, with a one piece fold out instructional pamphlet. The
sprues are flash free, for the most part, and I didn’t find a single sink hole
on my moldings, though I have heard from other modelers that they had several,
guess I am just lucky. The clear parts are chunky as you can believe, now, I
know that many ww2 planes had armored canopies, but this stuff would scale out
to be around 6” thick !
Whooboy. This one takes you back to
the builds of your early years, doesn’t it? A whopping 30+ pieces molded in gray
come in a simple box, with a one piece fold out instructional pamphlet. The
sprues are flash free, for the most part, and I didn’t find a single sink hole
on my moldings, though I have heard from other modelers that they had several,
guess I am just lucky. The clear parts are chunky as you can believe, now, I
know that many ww2 planes had armored canopies, but this stuff would scale out
to be around 6” thick !
The decals are surprisingly nice, it was almost too bad that I wasn’t going to use them on this build. With the minimal amount of parts, you can guess at the level of detail. None, really.
| CONSTRUCTION |
 Scrubbing off the mold release was
the first thing to do…when you open up the plastic bag, and the styrene looks
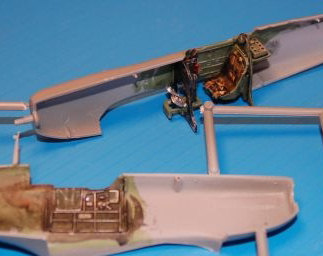
that shiny, it’s time to hit the sink! The cockpit went together easily, and
the addition of some wine bottle foil seatbelts helped add a little zing to the
otherwise plain ‘pit.
Scrubbing off the mold release was
the first thing to do…when you open up the plastic bag, and the styrene looks
that shiny, it’s time to hit the sink! The cockpit went together easily, and
the addition of some wine bottle foil seatbelts helped add a little zing to the
otherwise plain ‘pit.
The fuselage halves mated together well, and the raised seam was easily removed with some 200 grit sanding sticks and some heavy action with a gray 3M pad (these are available at your local hardware store, for use in paint stripping). I normally glue the fuselage onto the bottom deck of the wings before adding on the top halves, this keeps you from ending up with a massive fault line where the wings meet the hull, but in this case, follow the directions, and glue the upper wing pieces into place before attaching the fuselage, the fit is quite tight.
The rear control surfaces are
dodgy (at best), and you are going to have to be careful about keeping them
aligned while the glue dries, whether you make a jig, or do what I do, which is
to stand the plane on it’s wing in an old container, keep a weather eye on the
angles ! If you are building an early PRU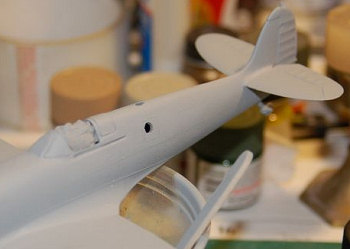 , you will want to remove the radio
mast at this time, prior to puttying.
, you will want to remove the radio
mast at this time, prior to puttying.
I skipped over the next steps 11-13, and adhered the canopy front and back glass portions using Kristal Kleer. A fair amount of filler was needed to get those canopy pieces to lie flush with the airframe itself, so I broke out the Bondo glazing putty and went to town…now, I had a gray plane with pink lines. Once the canopy area was dry, I took some damp tissue paper and gently wadded it into the exposed cockpit until it met flush with the outside of the clear parts…if you let that dry overnight, you will have a semi-rigid mask that will keep the paint out of your pilot’s seat. (just like teepee-ing your teacher’s house, remember?)
Now is a good time to drill out the port camera hole, too, using a high speed cutting bit, the hole will be filled with KristalKleer after the painting is finished.
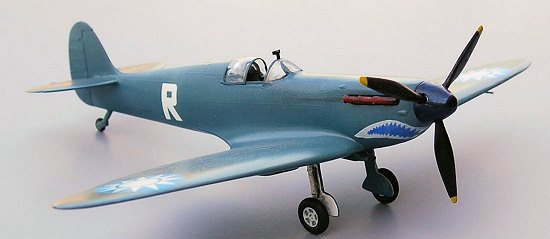
| COLORS & MARKINGS |
I used Krylon auto primer (grey) to
get the base down, then sprayed on a coat of Tamiya light blue. Once this was
dry, I switched over to my double action airbrush, and lightly applied some
paneling marks and stress lines using Tamiya Sky. A light coat of
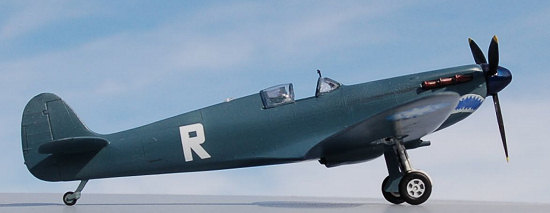 clear acrylic
satin in between each colour coat really helps to make the differences in hue
really stand out, especially with a monotone aircraft.
clear acrylic
satin in between each colour coat really helps to make the differences in hue
really stand out, especially with a monotone aircraft.
After I was happy with the effect, a coat of satin was applied to the whole spitfire, then a misting of Future prior to the application of decals.
The decals were from a Revell P-40 kit, with the exception of a custom made low-vis shark’s mouth, done easily by scanning in some original red and white decals, and then changing the colour using Irfanview ( a free online photo editor), then simply printing out onto some decal paper. I did have to use a fair amount of MicroSet to get the huge decals to lay down on the curvy airframe, though.
After letting everything dry for a day, a light coat of semi-gloss was applied, as recon planes were normally of a high gloss finish (note: gloss in scale is much closer to semi-gloss or satin, not pure gloss), until the plane’s surfaces looked nice and even.
| FINAL CONSTRUCTION |
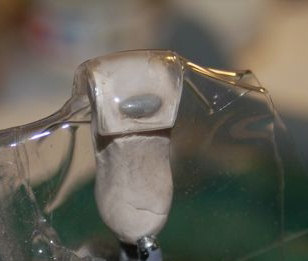 Many of the PRU Spitfire’s had custom
canopy glass installed, with bulges on either side to make the taking of
photographs easier for the pilot, so it was time to make a new center canopy!
Easily done with some clear plastic from a blister package, and a little bit of
heat: Take your kit canopy part, and modify it as necessary, I just added two
little bumps of styrene to mine, then smooshed in some Sculpey modeling clay,
which was then removed and baked to be hard. The canopy now rests on this, being
held in place by the alligator clip jaws of a X-acto stand. Cut out a section
of blister plastic, and heat gently over an open candle flame or with a heat
gun, then, when it begins to get droopy, pull it straight down over the old
canopy, wait a second, and remove. Hey, you have a new canopy! Make at least 4
this way…some will be sacrificed to the carpet gods, and some the errors of
cutting.
Many of the PRU Spitfire’s had custom
canopy glass installed, with bulges on either side to make the taking of
photographs easier for the pilot, so it was time to make a new center canopy!
Easily done with some clear plastic from a blister package, and a little bit of
heat: Take your kit canopy part, and modify it as necessary, I just added two
little bumps of styrene to mine, then smooshed in some Sculpey modeling clay,
which was then removed and baked to be hard. The canopy now rests on this, being
held in place by the alligator clip jaws of a X-acto stand. Cut out a section
of blister plastic, and heat gently over an open candle flame or with a heat
gun, then, when it begins to get droopy, pull it straight down over the old
canopy, wait a second, and remove. Hey, you have a new canopy! Make at least 4
this way…some will be sacrificed to the carpet gods, and some the errors of
cutting.
The wheel struts are flimsy, and are fairly difficult to keep straight during the attachment period, the x-acto stand comes in handy here, also, for holding them in place while the glue dries.
Now that you can put the plane on it’s legs, go ahead and attach the pitot and the mirror, but make a mental note that they are now on…or you will be spending a lot of time searching your floor for these two little pieces.
| CONCLUSIONS |
For a fun, fast build…this is perfect. Less pieces than most 72nd scale kits, but it does come out to look like the bird, and certainly is a stress reliever after a long build. This one would be great for a first time build, or something to do on a rainy weekend…
| REFERENCES |
 http://www.bbc.co.uk/ww2peopleswar/stories/65/a3607265.shtml
http://ipmsstockholm.org/magazine/2006/05/stuff_eng_profile_pr_spitfires.htm
http://www.aeroflight.co.uk/types/uk/supermarine/spitfireI-III/Spitfire1.htm
Photoeditor: http://www.irfanview.com/index.htm
December 2006
If you would like your product reviewed fairly and fairly quickly, please contact the editor or see other details in the Note to Contributors.