Novo/Frog 1/72 Percival Proctor IV
| KIT #: | F 341 |
| PRICE: | $? |
| DECALS: | none in this kit |
| REVIEWER: | Kim Elliot |
| NOTES: |
| HISTORY |
The Proctor was a communication/training aircraft used by the British forces during the '39 -'45 War. Seating 2, 3, or 4 persons, it was developed from a civil version, the Vega Gull, in 1940. RAF and RN use predominated, with a few being used by USAAF and RCAF units in the UK, plus some in New Zealand. Civil use was widespread after the war. A few are still in airworthy condition, and several may be found in museums.
| THE KIT |
Frog released a 1/72 Mk.IV in 1963. Since then, Novo has re-issued it, and it may have been re-issued and distributed by other Eastern European concerns. The plastic I started with came in a bag with a Novo header, no decals. For a preview, please visit this page.
 In common with Frog products of that era,
the kit is accurate in outline, but lacking in detail, and a bit clunky. It
features separate control surfaces, raised surface detail, and next to
useless clear parts. It was the availability of Falcon replacements for the
latter that prompted me to start this project.
In common with Frog products of that era,
the kit is accurate in outline, but lacking in detail, and a bit clunky. It
features separate control surfaces, raised surface detail, and next to
useless clear parts. It was the availability of Falcon replacements for the
latter that prompted me to start this project.
Finding dependable references is a large part of my approach to modelling. I like to be reasonably sure of the accuracy of the form and dimensions of my subject, with detail dependent on scale chosen. In 1/72, super-detail on a small aircraft such as the Proctor is usually lost, so the emphasis will be on the finish. There is an abundance of photographic detail on contemporary civil versions on the Internet. Drawings giving general arrangement details are a bit rare, but I was able to find some that seemed to correspond to photos, and explained the differing fuselage lengths and detail. Of course, once committed to an interpretation, more showed up and there is a bit of ambiguity in some of the detailing.
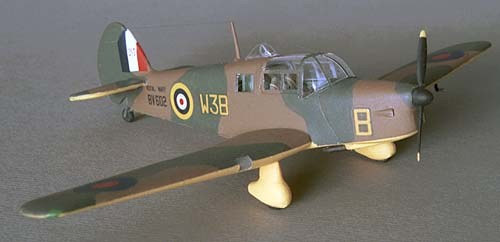
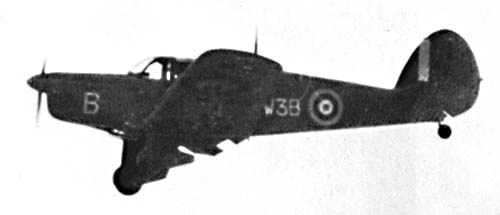
The actual subject I decided to model was a Mk. IIa illustrated in 'The Squadrons of the Fleet Air Arm', R. Sturtivant. A rather poor photo showed it in landing configuration, with the early war roundel and tail flash, and unit markings. It is not possible to discern the actual serial number, but reference was made to 752 Squadron, at Piarco, Trinidad. This at least narrowed it down to early 1941, and cross referencing Fleet Air Arm records from other Sturtivant publications allowed me to hazard an informed guess as to the possible serial number assigned to this airframe.
Modelling would be a lot easier (and faster) if questions of accuracy did not interfere. The Mk. IIa differed from the Mk. IV kitted in fuselage length, cockpit interior, possibly canopy detail and engine cooling air intake. The primary photographic reference I started with was not detailed in any of these areas, so some extrapolation and presumptions, based on other photos of Proctors in military service, had to be made.
| CONSTRUCTION |
Separation of parts from the sprues and cleaning up the abundant flash started the build. There was some short-shot moulding of the wheel pants apparent, but generally, most of the parts were adequate. The clear parts were discarded; Falcon vac-formed items substituting. These separated from their surround without problem. Four clear parts are supplied, two being landing light covers, the others the main windshield/canopy, and the D/F loop fairing. The side windows, being flat items, can be cut from the clear surround otherwise discarded.
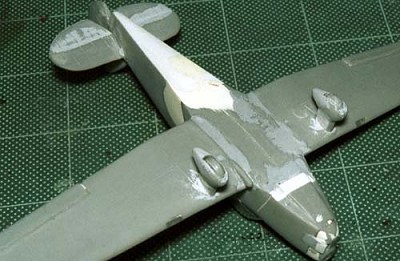
 Following the drawings, a cut was made
directly behind the fuselage windows and angled to the wing root fairing.
Another parallel cut removed a little less than 1/4" from the rear fuselage
halves. About 1/8" was removed from the front of the fuselage. The altered
fuselage sections were then rejoined, using small reinforcements inside the
pieces, and keeping the top line of the fuselage as datum. The step
resulting from removed material would be dealt with later.
Following the drawings, a cut was made
directly behind the fuselage windows and angled to the wing root fairing.
Another parallel cut removed a little less than 1/4" from the rear fuselage
halves. About 1/8" was removed from the front of the fuselage. The altered
fuselage sections were then rejoined, using small reinforcements inside the
pieces, and keeping the top line of the fuselage as datum. The step
resulting from removed material would be dealt with later.
Cockpit detailing came next. An instrument panel was fabricated and glued to one half of the fuselage. Later, a coaming would be added. The floor was glued in place, and the three seats cleaned up and attached. (There may not have been a rear seat in this version - the space may have been occupied by radio equipment). A control stick was added to the pilot's position. Some bits of rod and strip were added to give the impression of cockpit paraphernalia. The floor and walls were painted RAF Interior Green, the seats in a brownish leather shade, seat belts made from masking tape added, and a generic instrument decal added to the panel. Black dry-brushing accentuated the detailing.
 Wing halves and ailerons were then
assembled. Some work with a file was needed to correct poor mould alignment
of the parts, but was otherwise uneventful. The wheels were trapped between
the pant halves and then glued. This is the worst part of the kit parts:
lots of filler to restore bad moulding and sanding to capture the delicate
shape. Horizontal stabilizers, elevators, rudder were cleaned up prior to
assembly.
Wing halves and ailerons were then
assembled. Some work with a file was needed to correct poor mould alignment
of the parts, but was otherwise uneventful. The wheels were trapped between
the pant halves and then glued. This is the worst part of the kit parts:
lots of filler to restore bad moulding and sanding to capture the delicate
shape. Horizontal stabilizers, elevators, rudder were cleaned up prior to
assembly.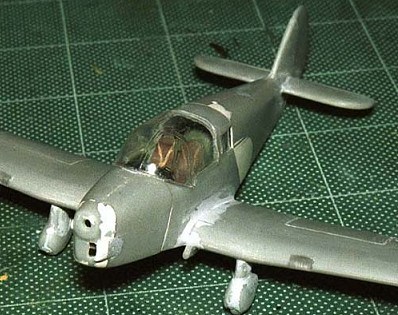
With the cockpit detailed and painted, the fuselage halves were joined. Once the glue had dried, a piece of sheet scrap was cut to fit the bottom of the fuselage and glued in place. The nose of the fuselage had a blanking piece inserted behind the intake, and glued on. Intake detail lost on both sides was restored with small scrap. Copious amounts of filler started the tedious process of refining the abused contours of the fuselage with file and sandpaper. Modification was made to the engine area to make it correspond to photographic reference.
 The wings were attached to the fuselage,
and the undercarriage then added to the wings. The stabilizers, elevators
and rudder were added, and the entire assembly left alone until the glue
had set. Everything seeming to be in alignment, putty was applied to all
joints to cover poor fit. A few applications, and general rub-down of the
surface finished major assembly.
The wings were attached to the fuselage,
and the undercarriage then added to the wings. The stabilizers, elevators
and rudder were added, and the entire assembly left alone until the glue
had set. Everything seeming to be in alignment, putty was applied to all
joints to cover poor fit. A few applications, and general rub-down of the
surface finished major assembly.
The clear parts were next. Small rectangles were measured and cut, then inserted from the inside into the fuselage windows. The wing landing light recesses were detailed, and clear sprue sections glued into the holes. Filed, sanded and polished, this was my preferred solution to using the Falcon bits that were a bit fiddly. The main canopy was fit to the cockpit with very little adjustment except for some puttying on the back. Spot gluing with cyano and gap filling with white glue sealed the cockpit. Masking of the clear areas followed, using Tamiya tape. Finally, the small protrusion under the port wing root (any guesses what it could be?) was attached.
| COLORS & MARKINGS |
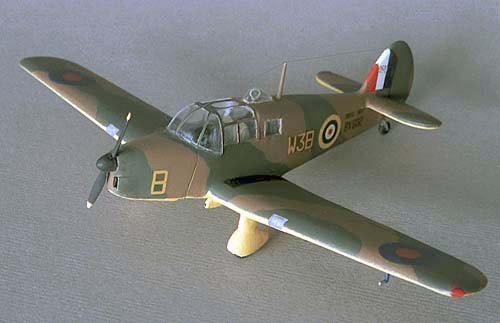
The cockpit framing was given an undercoat of Interior Green. An acrylic white primer was then sprayed lightly, highlighting a few surface blemishes. Mr. Surfacer 500 and a light sanding dealt with these. Using Model Master enamels, the first upper coat of Dark Earth was sprayed, using a Paasche airbrush. Once dry, the disruptive pattern was outlined in pencil, and RAF Dark Green applied with a brush. I prefer to brush paint small models, as the masking required for spraying is tedious. After a few days drying, the upper surfaces were masked, and Trainer Yellow sprayed on the undersides. The white primer allowed coverage in one coat. Enamels do take time to dry, so, after the upper surface masking was removed, everything was allowed to sit for a week. The antennae mast was glued in place, an exhaust pipe from rod stock added under the cowling, and painted with MM Exhaust. The propeller got a coat of flat black with yellow tips, and the main wheels and tail wheel flat black. The entire model was then given several coats of gloss acrylic (Future) and left to dry for a few more days.
 Serial numbers, both under wing and on the
fuselage were drawn in Photoshop on the computer and printed, using a laser
printer, onto clear decal film, then coated with MicroScale liquid decal
film. The yellow unit markings were prepared in a similar manner, but
printed onto white decal film, on an ink-jet printer. This requires the
background colour to be printed as well, and some fine-tuning of colour
settings is required. Calibration of printer output is essential if the
result is to be acceptable. The ink-jet material requires sealing after
printing to prevent ink smears; I use a Krylon acrylic gloss in a spray
can. The white film is noticeably thicker than the clear, and not a
completely satisfactory solution to home-made decals. I have acquired an
Alps printer, but it was not serviceable at the time of this project.
Serial numbers, both under wing and on the
fuselage were drawn in Photoshop on the computer and printed, using a laser
printer, onto clear decal film, then coated with MicroScale liquid decal
film. The yellow unit markings were prepared in a similar manner, but
printed onto white decal film, on an ink-jet printer. This requires the
background colour to be printed as well, and some fine-tuning of colour
settings is required. Calibration of printer output is essential if the
result is to be acceptable. The ink-jet material requires sealing after
printing to prevent ink smears; I use a Krylon acrylic gloss in a spray
can. The white film is noticeably thicker than the clear, and not a
completely satisfactory solution to home-made decals. I have acquired an
Alps printer, but it was not serviceable at the time of this project.
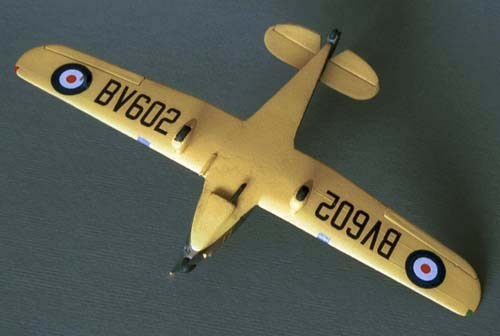 Under wing serials went on without a
hitch. The clear film is almost invisible, and the black completely opaque.
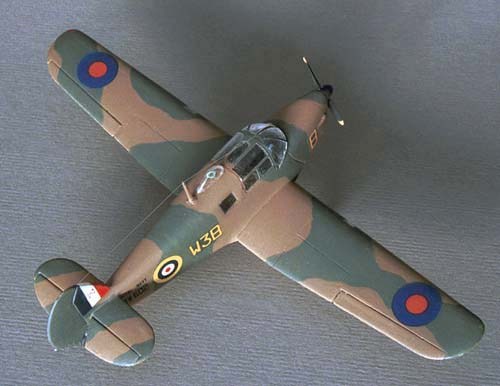
The upper wing 'B' roundels were the most difficult to find due to their
small size. 40 year old HisAirDec sheets supplied multi-part "A' and 'A1'
roundels and the fin flash. Despite their age, they went down without a
problem, using Solvaset. The fuselage yellow markings were applied last,
and left a few days to dry out. The cut edges of the decal are white, and
need to be trimmed with a fine brush with the background colour. The pitot
tube was applied under-wing and painted, the propeller and tailwheel
attached, and several coats of MM Dull Coat sprayed on. The canopy and wing
light masking removed, navigation wing-tip lights painted on, I could see
the end of this project.
Under wing serials went on without a
hitch. The clear film is almost invisible, and the black completely opaque.
The upper wing 'B' roundels were the most difficult to find due to their
small size. 40 year old HisAirDec sheets supplied multi-part "A' and 'A1'
roundels and the fin flash. Despite their age, they went down without a
problem, using Solvaset. The fuselage yellow markings were applied last,
and left a few days to dry out. The cut edges of the decal are white, and
need to be trimmed with a fine brush with the background colour. The pitot
tube was applied under-wing and painted, the propeller and tailwheel
attached, and several coats of MM Dull Coat sprayed on. The canopy and wing
light masking removed, navigation wing-tip lights painted on, I could see
the end of this project.
Gremlins struck close to the end. Doing some touch-up on the underside, with the model on it's back, I applied a bit too much pressure, and the aerial mast and a prop blade snapped off. It was a small matter to re-attach them, but the glue joints are there. The final part to attach was the D/F loop, just behind the cockpit. This was covered with the Falcon clear fairing, attached with white glue. Antennae wire was added using invisible mending thread, glued with cyano.
| CONCLUSIONS |
The resulting model is quite small, with a disproportionate wing-span. The Frog kit provides the only way of getting a Proctor without scratch building. Now that this has been finished, a Czech limited run edition is probably in the works. The Falcon replacement canopies made the model a possibility - I challenge anyone to use the injection-moulded one. Chopping the fuselage was not too difficult, given that a fair amount of putty and finishing is required if done box-stock. The kit is not bad in basic outline, merely limited in detail, and representative of an era in modelling when expectations were not as high as today.
| REFERENCES |
RAF Aircraft since 1912, Putnam
The Squadrons of the Fleet Air Arm, Sturtivant
Aviation News Plans
Numerous web sources for photographic images (Google Percival Proctor, and disregard the academic references)
http://www.jaapteeuwen.com/ww2aircraft/html%20pages/PERCIVAL%20PROCTOR.htm
| CREDITS |
I would like to thank Ed Foerter of Air Support Books in Kitchener for finding the kit for me originally, and Terry Higgins of Skygrid who listened with good humour to my rants about building it far too many times. Scott Van Aken of Modeling Madness provided the Falcon clear bits and the incentive to finish the project. (Scott would in turn like to thank Falcon for supplying the canopy set. There are no better vacuform canopies made anywhere. Sound like a plug? It is. Ed)
Kim Elliott (bricoleur2000@hotmail.com )
January 2005
Copyright ModelingMadness.com. All rights reserved. No reproduction in part or on whole without express permission from the editor.
If you would like your product reviewed fairly and quickly, please contact the editor or see other details in the Note to Contributors.
Back to the Review Index Page 2024