Magna 1/48 Miles Master
| KIT #: | 0548 |
| PRICE: | $54.00 |
| DECALS: | Several options |
| REVIEWER: | Pat Earing |
| NOTES: |
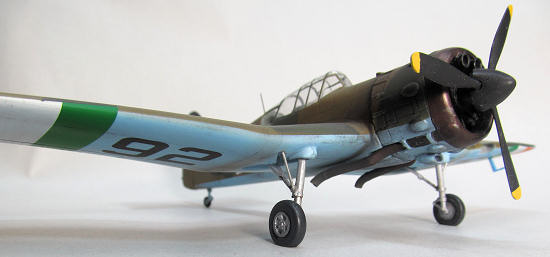
Resin and white metal kit with vacuformed canopy. |
| HISTORY |
 The Miles
Master was a two seat advanced trainer used by the Royal Air Force and Fleet Air
Arm during World War II.
The Master
was employed to meet the need of training pilots for the then new Hawker
Hurricane and Supermarine Spitfire fighters.
The Miles
Master was a two seat advanced trainer used by the Royal Air Force and Fleet Air
Arm during World War II.
The Master
was employed to meet the need of training pilots for the then new Hawker
Hurricane and Supermarine Spitfire fighters.| THE KIT |
I
have owned numerous Magna Model kits over the years, yet I have never undertaken
to build one.
One of the reasons is that upon opening the box I have been
consistently struck by the sheer number of pin holes visible in the resin
castings.
However, overcoming my initial misgivings I dove into the Miles
Master for my continuing build of IAC aircraft.
| CONSTRUCTION |
Beginning with the inevitable wash to remove release agents construction started
with the cockpit.
Magna provides adequate resin seats with seat belts
represented and the cast details are excellent when they are not destroyed by
pin holes.
I could have spent hours fixing items in the cockpit, but really,
most of the flaws will not be seen and a coat of paint makes it look okay.
Use caution when installing the instrument panels that
they are aligned with the axis of the cockpit.
I used Model master RAF interior green with Floquil
Engine Black and Grimy Black for details.
 Once happy
with the cockpit I lightly block sanded the two fuselage halves and joined them
with CA glue.
Overall, the fit was excellent.
Next I cleaned up the large wing castings and attached
them to the fuselage.
These fit very tightly with a positive locking system
that is ‘new’ for Magna kits.
With very little in the way of clean up an excellent
alignment and gluing surface is achieved.
Finally, I attached the tail planes and rudder.
Once happy
with the cockpit I lightly block sanded the two fuselage halves and joined them
with CA glue.
Overall, the fit was excellent.
Next I cleaned up the large wing castings and attached
them to the fuselage.
These fit very tightly with a positive locking system
that is ‘new’ for Magna kits.
With very little in the way of clean up an excellent
alignment and gluing surface is achieved.
Finally, I attached the tail planes and rudder.
Now for the real work… dealing with pin holes.
Magna’s resin is ‘different’ than others that I have
worked with; being almost soft and compliant like plastic.
Unfortunately, whatever system they use to pour it
creates lots of pin holes in the exterior surface.
This is relatively easy to fix on the big open areas,
but is a bearcat in tight detail ridden areas such as around the landing gear
openings and the cowling.
I lightly sanded the whole thing with 400 grit sand
paper and primed heavily with automotive lacquer primer.
I then sanded the whole thing with 400 grit paper, and
re-primed where necessary.
In some spots due to the size of the holes I filled them
with CA glue and re-primed.
Happy with the body work I then attacked the vacuformed parts.
Before cutting a vacuformed canopy free I use a fine
point sharpie and outline the canopy; and in this case the landing light cover
as well, so I can see the exact extent of the cutting necessary.
I begin cutting with small, sharp scissors, leaving
about 1 mm of extra material so I can trim for best fit.
In this case, the canopy was excellent and fit exactly
to the framing as cast.
As such I trimmed until my pen lines were gone and it
fit the opening perfectly.
For this final fit trimming I use a new #11 blade
freehand without a holder to get everything fitted just so.
 Unfortunately,
the wing light cover did not fit so well, and I had to fill some sizable gaps.
Using the packing tape cover method I recently learned
about on a modeling website might have resulted in a better looking outcome.
In any case, I then dipped both clear parts in a liberal
coat of Future floor wax, and when dry attached carefully with CA glue making
sure that that any gaps are filled and the canopy is firmly attached.
Unfortunately,
the wing light cover did not fit so well, and I had to fill some sizable gaps.
Using the packing tape cover method I recently learned
about on a modeling website might have resulted in a better looking outcome.
In any case, I then dipped both clear parts in a liberal
coat of Future floor wax, and when dry attached carefully with CA glue making
sure that that any gaps are filled and the canopy is firmly attached.
At this point I masked to the lower canopy rail with thick masking tape and
primed the glue edge.
When dry, I carefully sand until the canopy has no
visible gaps or holes at the glue edge-in this case it took only two
applications of primer and sanding to get an acceptable finish.
For the landing lights I used two 2mm MV lenses and
glued on the cover.
Unfortunately, because of the poor fit it took four
applications of primer, and I still ended up with some visible swelling at the
edges on top as well as dust inside.
Wing tip formation light were also cut out at this time
and shaped from a clear toothbrush handle with appropriately drilled and colored
light bulbs.
The final exterior assembly before paint was to prepare and install the large
resin cowling.
Magna casts a reasonable representation of the
| COLORS & MARKINGS |
Now for the paint shop.
I masked the canopy with Tamiya Kabuki tape, using a
sharp #11 blade to carefully cut away the canopy lines.
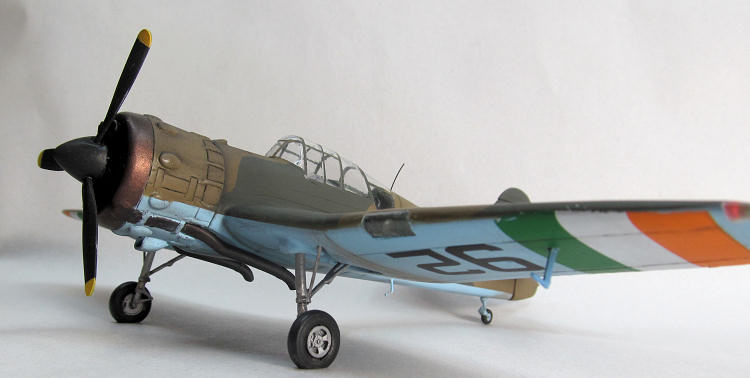
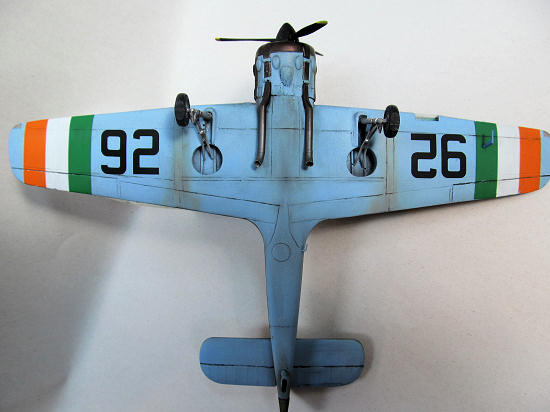
When the IAC acquired their Masters from the RAF they
repainted the bottom in a light blue color, for which none of my r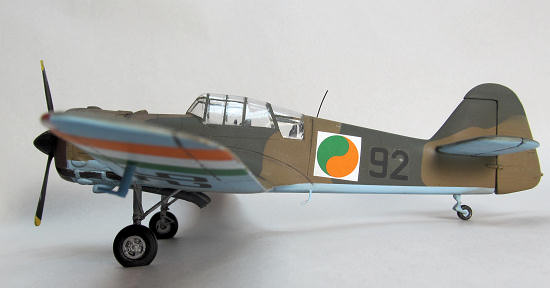 eferences
offered anything in the way of an FS number; other than to make mention that the
color appeared to be a light blue color-very helpful.
I mixed a best guess starting with MM Bright Blue and
cutting it 8:1 with flat white.
Satisfied with the tint, I sprayed the bottom with my
trusty Iwata TR-1 and let it dry overnight.
eferences
offered anything in the way of an FS number; other than to make mention that the
color appeared to be a light blue color-very helpful.
I mixed a best guess starting with MM Bright Blue and
cutting it 8:1 with flat white.
Satisfied with the tint, I sprayed the bottom with my
trusty Iwata TR-1 and let it dry overnight.
Once I had the bottom masked up, I sprayed MM RAF Interior Green over the canopy
(for the visible interior color when viewed though the canopy) and then top
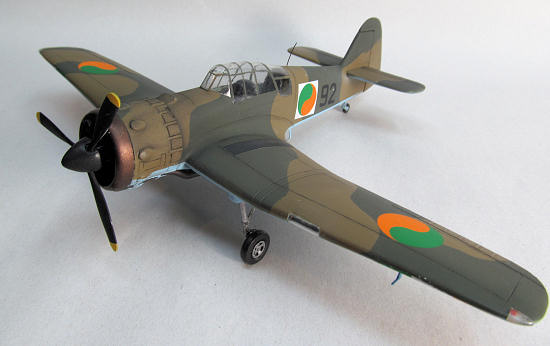
coated the upper surfaces with MM Dark Earth.
Using frisket paper I cut masks for an A camouflage
pattern and when satisfied that all was covered adequately I top coated with MM
Dark Green.
Removing all but the canopy masking I gave the entire model a
gloss coat of MM rattle can Glosscoat lacquer clear.
I
sourced decals from spares from Max Decals.
The call number is fictious as it was the only option I
had in the correct font, size and color (and I have been thoroughly chastised as
these numbers were worn by a Fairy Battle-Oops.)
These decals are easy to use, although they tend to
stick where initially placed so it is important to use liberal amounts of water
or setting solution as you apply them.
Alter everything had set and dried, I wiped the model
down to remove excess Micro Sol stains and top coated with MM Dullcoat.
I
applied a light wash with artist acrylic black and burnt umber as well as some
further highlighting using pastels.
Final assembly was commenced by looking through the
spares box for new wheels as the ones provided in the kit had extensive pin-hole
 damage.
New propeller blades due to the extensive white metal
flash, and exhaust pipes.
I installed the landing gear legs after judicious clean
up and replaced most of the smaller rods with round plastruct as trying to clean
up the metal parts was proving to be overly tedious.
These assemblies were brush painted with floquil bright
silver.
I chose not to paint the wheel wells interior green as the blue looked
good and worn-maybe not accurate, but possible during a wartime repaint?
The exhaust pipes were cast slightly out of round, and
rather than try and sand them back and drill the white metal out I used Albion
brass tubing and made new ones.
In order to bend the tubing without distorting it, I
inserted the next size down tubing and made my bends over an appropriate sized
round object.
Once cut apart at the center of the bend, I used a vice and
pliers to remove the now trapped inner tube.
The funky bends to the cowling I kept by cutting the
forward part of the white metal parts off and gluing to the newly formed back
halves.
These were then given a coat of MM Metalizer titanium and weather as per
the cowl ring.
damage.
New propeller blades due to the extensive white metal
flash, and exhaust pipes.
I installed the landing gear legs after judicious clean
up and replaced most of the smaller rods with round plastruct as trying to clean
up the metal parts was proving to be overly tedious.
These assemblies were brush painted with floquil bright
silver.
I chose not to paint the wheel wells interior green as the blue looked
good and worn-maybe not accurate, but possible during a wartime repaint?
The exhaust pipes were cast slightly out of round, and
rather than try and sand them back and drill the white metal out I used Albion
brass tubing and made new ones.
In order to bend the tubing without distorting it, I
inserted the next size down tubing and made my bends over an appropriate sized
round object.
Once cut apart at the center of the bend, I used a vice and
pliers to remove the now trapped inner tube.
The funky bends to the cowling I kept by cutting the
forward part of the white metal parts off and gluing to the newly formed back
halves.
These were then given a coat of MM Metalizer titanium and weather as per
the cowl ring.
| CONCLUSIONS |
| REFERENCES |
Maxwell, Joe and Patrick J. Cummins The Irish Air Corps: An Illustrated Guide. W &G Baird, Ireland. 2009
Pat Earing
May 2012 If you would like your product reviewed fairly and fairly quickly , please
contact
me or see other details in the
Note to
Contributors.